|
| |
| Sun Java(TM) System Directory Server 5.2 2005Q1 Administration Guide | |
Chapter 1
Directory Server Administration OverviewThe Directory Server product includes a Directory Server, an Administration Server to manage multiple directories, and a Server Console to manage both servers through a graphical interface. This chapter provides overview information about Directory Server, and the most basic tasks you need to start administering a directory service.
Verifying plug-in signatures is an additional security feature that allows the server to detect or prevent unauthorized plug-ins from being loaded. Directory Server Markup Language (DSML) is a new XML-based format for sending requests to a directory server.
This chapter includes the following sections:
Overview of Directory Server ManagementDirectory Server is a robust, scalable server designed to manage an enterprise-wide directory of users and resources. It is based on an open-systems server protocol called the Lightweight Directory Access Protocol (LDAP). Directory Server runs as the ns-slapd process or service on your machine. The server manages the directory contents and responds to client requests.
You perform most Directory Server administrative tasks through the Administration Server, a second server that Sun Java System provides to help you manage Directory Server (and several other Sun Java System servers). Server Console is the graphical interface to the Administration Server. Directory Server Console is a part of Server Console designed specifically for use with Directory Server.
You can perform most Directory Server administrative tasks from Directory Server Console. You can also perform administrative tasks manually by editing the configuration files or by using command-line utilities. For more information about Server Console see the Administration Server Administration Guide.
Starting and Stopping Directory ServerIf you are not using Secure Sockets Layer (SSL), you can start and stop Directory Server using the methods listed here. If you are using SSL, see Starting the Server with SSL Enabled.
Starting and Stopping the Server From the Command Line
To start or stop the server from the command line. Run the following commands:
or
The useversion option is required only if Directory Server 5.2 is not the default version. For the complete syntax of the directoryserver command, refer to the Directory Server Man Page Reference.
These commands must be run as root if you specified root as the UID for Directory Server.
Otherwise, both commands must run either as root, or with the same UID and GID as Directory Server. For example, if Directory Server runs as nobody, you must run the start and stop utilities as nobody.
For users of previous versions of Directory Server, note that starting the server in referral mode is no longer available.You can set global referrals using Directory Server Console. This procedure is explained in Setting the Default Referrals.
Starting and Stopping the Server From the Console
When Directory Server Console is running, you can start, stop, and restart Directory Server through its graphical interface. For instructions on running the console, see Starting Directory Server Console.
When you successfully start or stop Directory Server from Directory Server Console, the console displays a message dialog stating that the server has been either started or shut down. In case of an error, the console will show all messages pertaining to the error.
Starting the Server with SSL Enabled
Before enabling SSL, you must install and configure certificates on your server. For instructions on managing certificates and enabling SSL, see Chapter 11, "Managing Authentication and Encryption." For information on certificates, certificate databases, and obtaining a server certificate, see the Administration Server Administration Guide.
To start the server with SSL enabled, you must start the server from the command line and provide the password which protects the server's certificates.
Alternatively, you can create a password file to store your certificate password. By placing your certificate database password in a file, you can start your server from the server console, and also allow the server to restart automatically when running unattended.
The password file must be placed in the following location:
ServerRoot/alias/slapd-serverID-pin.txt
where serverID is the identifier you specified for the server when you installed it.
Include the name of the security token and its password in the file as follows:
tokenName:password
The device name for the internal certificate database is shown in this example (capitalization and spacing must be exactly as shown):
Internal (Software) Token:password
If you store certificates in an alternate device, use the name of the device that appears in the drop-down menu at the top of the Manage Certificates Dialog. To create certificate databases, you must use the administration server and the Certificate Setup Wizard.
If you want to start the server with SSL enabled but prevent the server listening on the non-SSL port, you can set nssldap-listenhosts to the loopback address 127.0.0.1. Alternatively, you can set the nsslapd-port attribute to 0, although doing this could break certain administrative scripts, such as monitor, db2bak.pl and ldif2db.pl.
For information on using SSL with Directory Server, see Chapter 11, "Managing Authentication and Encryption."
Starting the Server as a Non-Root User on Ports less than 1024
Normally you must be root to start Directory Server if the port is less than 1024. The following procedure enables you to use a specified non-root user instead.
- Install Directory Server and Administration Server. When configuring the servers, ensure that the user for both servers is root.
Use the installation instructions in Java Enterprise System Installation Guide.
- Stop the Directory Server. See Starting and Stopping Directory Server.
- From the ServerRoot directory, run the following commands to change directory and file ownership to the required userID.
chown -R userID:groupID slapd-hostname
chown -R userID:groupID alias/slapd-hostname-*.db
- Edit the file dse.ldif to change the nsslapd-localuser value from root to the required userID.
- Restart the Directory Server. See Starting and Stopping Directory Server.
Using Directory Server ConsoleDirectory Server Console is an interface that you access as a separate window of Server Console. You start Directory Server Console from Server Console, as described in the following procedure.
Starting Directory Server Console
- Check that the Directory Server daemon, slapd-serverID is running. If it is not, as root or administrative user, enter the following command to start it:
- Check that the administration server daemon, ns-httpd, is running. If it is not, as root or administrative user, enter the following command to start it:
- Start Server Console by entering the following command:
If you are running Server Console on a machine other than the one on which Administration Server is installed, you may need to configure the connection restrictions on the Administration Server, as described in the Administration Server Administration Guide.
The Console login window is displayed. Or, if your configuration directory (the directory that contains the o=NetscapeRoot suffix) is stored in a separate instance of Directory Server, a window is displayed requesting the administrator user DN, password, and the URL of the Administration Server for that directory server.
- Log in using the bind DN and password of a user with sufficient access permissions for the operations you want to perform.
Server Console is displayed.
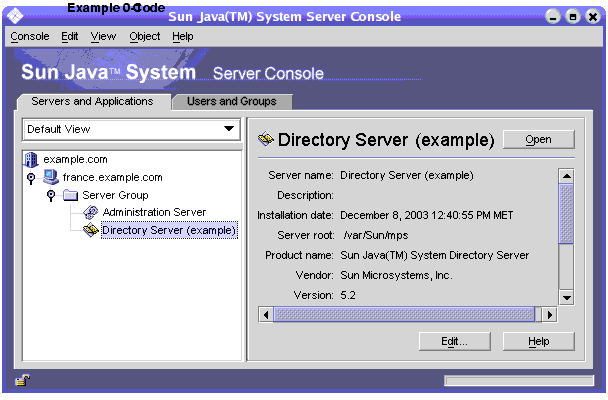
- Navigate through the tree in the left-hand panel to find the machine hosting your Directory Server and click on its name or icon to display its general properties.
Figure 1-1 Sun Java System Server Console
To edit the name and description of your Directory Server, click the Edit button. Enter the new name and description in the text boxes. Click OK to set the new name and description. The name will appear in the tree on the left, as shown in the previous figure.
- Double-click the name of your Directory Server in the tree or click the Open button to display the Directory Server Console for managing this directory server.
Navigating Directory Server Console
Directory Server Console provides the interface for browsing and performing administration operations on your Directory Server instance. It always displays four tabs from which you can access all Directory Server functionality:
- Tasks Tab - Contains buttons for administrative tasks such as restarting the server.
- Configuration Tab - Provides access to all parameters for managing the server.
- Directory Tab - Displays and edits the data entries contained in the directory.
- Status Tab - Displays the statistics, logs and replication status of the server.
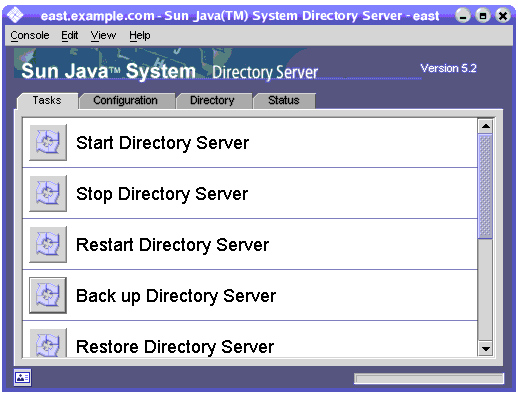
Tasks Tab
The Tasks tab is the first interface visible when opening Directory Server Console. It contains buttons for all of the major administrative tasks such as starting or stopping Directory Server as shown in the following figure. To view all of the tasks and their buttons, you may need to scroll through the list.
Figure 1-2 Tasks Tab of Directory Server Console
You must be logged in as a user with administrator rights in order to perform these tasks. The task buttons will not be visible to users with insufficient rights.
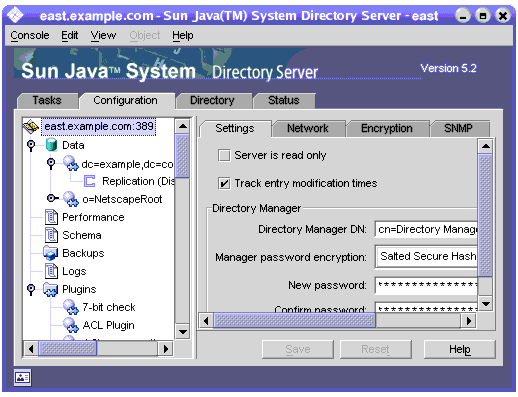
Configuration Tab
The Configuration tab of Directory Server Console provides interfaces and dialogs to view and modify all directory settings such as those for suffixes, replication, schema, logs, and plug-ins. These dialogs are only available or will only take effect if you are logged in as a user with administrator rights.
The left side of this tab contains a tree of all configuration functions and the right-hand side displays the interface specific to managing each function. These interfaces often contain other tabs, dialogs or pop-up windows. For example, the following figure shows the general settings for the entire directory.
Figure 1-3 Configuration Tab of Directory Server Console
When you select a configurable item in the left-hand tree, the current settings for that item will appear in one or more tabs in the right-hand panel. For the explanation and behavior of these settings, please refer to the chapter in this guide that describes each functionality. Depending on the setting, some changes will take effect immediately when saved, and others not until the server is restarted. The console will display a dialog informing you when the server needs to be restarted.
Unsaved changes in a tab are signalled by a red mark next to the tab name. Unsaved changes will remain on the tab even if you configure another item or view one of the other major tabs. The Save and Reset buttons apply to all tabs of a given configurable item, but do not affect the unsaved settings of other items.
Most text fields will only allow you to enter values that have the correct syntax for the setting. By default, the label of the setting and the value that you type will be highlighted in red until its syntax is correct. The Save button will be disabled until all settings have valid syntax. You may choose italic font for highlighting incorrect values, as described in Visual Configuration Preferences.
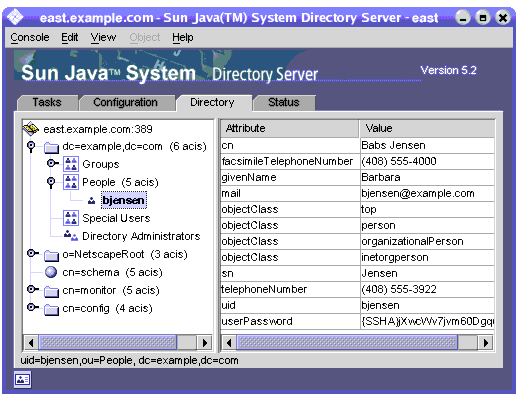
Directory Tab
The Directory Tab of the console displays the directory entries as a tree for easy navigation. In this tab, all entries and the attributes they contain can be browsed, displayed and edited.
Note
If you plan to browse lists of thousands of entries, create browsing indexes for faster access. Refer to Browsing Indexes for the Console for instructions.
Figure 1-4 Directory Tab of the Directory Server Console
If the bind DN given during the login has sufficient access rights, the configuration entries are viewed as normal entries and may be modified directly. However, you should always use the dialogs available through the Configuration Tab to change configuration settings safely.
Several options are available through the View menu to change the layout and contents of the Directory Tab. New layout options include viewing all entries in a single tree, including leaf entries, and also displaying attributes in the right-hand pane. The default is to view leaf entries on the right and not in the left-hand tree.
The View>Display options enable ACI counts, role counts, and inactivation state icons for all entries in the directory tree. In Figure 1-4, ACI counts and leaf entries are displayed in the left-hand tree, and attribute values for the selected entry are displayed in the right-hand pane. For more information, see Directory Tree View Options.
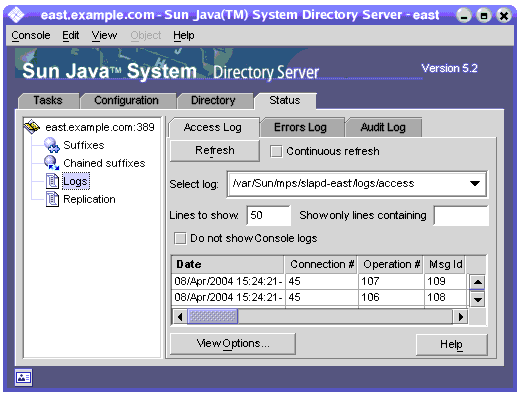
Status Tab
The status tab displays server statistics and log messages. The tree on the left lists all status items, and when selected, the contents of each are displayed in the right-hand pane. For example, the following figure shows a table of log entries.
Figure 1-5 Status Tab of Directory Server Console
Viewing the Current Bind DN From the Console
You can view the bind DN you used to log in to Directory Server Console by clicking the login icon in the lower-left corner of the display. The current bind DN then appears next to the login icon as shown here:
Changing Your Login Identity
When you create or manage entries from Directory Server Console, and when you first access Server Console, you are given the option to log in by providing a bind DN and a password. This identifies who is accessing the directory tree and determines the access permissions granted to perform operations.
You can log in with the Directory Manager DN when you first start Server Console. At any time, you can choose to log in as a different user, without having to stop and restart the Console.
To change your login in Server Console:
- On Directory Server Console, select the Tasks tab and click the button next to the label "Log on to the Directory Server as a New User." Or, when in another console tab, select the Console>Log in as New User menu item.
A login dialog box appears.
- Enter the new DN and password and click OK.
Enter the full distinguished name of the entry with which you want to bind to the server. For example, if you want to bind as the Directory Manager, then enter the following DN in the Distinguished Name text box:
cn=Directory Manager
Using the Online Help
The online help provides context-sensitive information for most tabs and dialogs of Directory Server Console. The Help button is usually located in the bottom right-hand corner of these interfaces. The keyboard shortcut for invoking the context-sensitive help on any screen is always Alt-P.
Invoking the online help will display an HTML-based page in the Console's built-in browser. From there, you may click the Launch in Browser button to open the same page in an external browser such as Mozilla. Within the online help, links to further information will also open an external browser window.
Each online help page gives an explanation of the fields and buttons contained in the corresponding tab or dialog. Use this information to guide you when interpreting, entering or modifying values through the console.
The help system for Directory Server is dependent on Administration Server. If you are running Directory Server Console on a machine remote to your Administration Server, you will need to verify the following:
- You may need to configure the connection restrictions enforced on the Administration Server to allow access from your machine, as described in the Administration Server Administration Guide.
- If you wish to use an external browser to view the online help pages, and your browser is configured to use proxies, you must do one of the following:
The Console Clipboard
Directory Server Console uses your system clipboard to copy, cut, and paste text. To reduce typing, you can copy the DN or URL of an entry into the clipboard when navigating within the Directory tab.
Before opening a dialog or another tab where you need to paste the DN or URL in a text field:
Console Settings
Directory Server Console provides many settings for customizing how information is displayed in the Configuration and Directory tabs.
Visual Configuration Preferences
When you modify configuration parameters and enter values in fields on the top-level configuration tab, Directory Server Console uses colored text to indicate valid input. For example, if you enable a feature that requires you to enter further configuration values, the labels of the required fields will appear red and then turn blue once you enter valid value.
By default the console uses red and blue colors, but you can modify this behavior as follows:
- On any tab of Directory Server Console, select the Edit>Preferences menu item. In the Console Preferences dialog, select the Misc. tab.
- Choose the radio button for the visual configuration indicator that you prefer. You may choose colored fonts or font appearances or both.
- For a description of the settings on the other tabs of the Console Preferences dialog, see the Administration Server Administration Guide.
Then click OK to save your changes.
- Exit all windows of Server Console and restart it.
Directory Tree View Options
On the top-level Directory tab of Directory Server Console, the items of the View menu allow you to display additional information in the directory tree and select what appears in the right-hand panel.
The following View options affect the contents of the Directory tab:
- Follow Referrals - When this checkbox is selected, the directory tree will show the entries and all children of the target of the referral, as if they were in the directory. When the checkbox is empty, referrals are shown as referral entries. For more information, see Creating Smart Referrals.
- Sort Objects - When this checkbox is empty, entries are displayed in the order in which they are returned by the server. When this checkbox is selected, entries at the same level in the directory tree are sorted according their display attribute describe below. For information on how to sort large subtrees without impacting server performance, see Browsing Indexes for the Console.
- Display>ACI Count - If an entry contains one or more access control instructions (ACIs) in the aci attribute, the directory tree will show how many beside the entry. For more information, see Chapter 6, "Managing Access Control."
- Display>Role Count - If an entry is a member of one or more roles, the directory tree will show how many beside the entry. For more information, see Assigning Roles.
- Display>Inactivation State - If a user or group entry has been deactivated to prevent binding to the server, the directory tree will show a red box and line through the entry's icon. For more information, see Inactivating and Activating Users and Roles.
- Layout>View Children - When you choose this layout option, the tree in the left-hand panel does not show leaf entries of the directory, and selecting a parent node in the left-hand panel displays all of its children, including leaf entries, in the right-hand panel. You may select entries in either panel.
- Layout>View Only Tree - With this layout option, the Directory tab has only one panel that displays a tree containing all entries in the directory.
- Layout>View Attributes - In this layout, the left-hand panel displays a tree containing all entries in the directory, and the right-hand panel displays the attributes and values stored in the entry selected in the tree.
- Display Attribute - Click this menu item to see the Display Attribute dialog and choose the label for entries displayed in the Directory tab. By default, the label is the value of the entry's first RDN attribute, for example People. For base entries that do not have an RDN, the label is entire DN, for example dc=example,dc=com.
To use a different attribute to display entries in the directory tree, choose the other radio button and select an attribute. Entries without the chosen attribute will still use the entry's first RDN attribute. By default, only the attribute value is used in the label. If you select the "Show attribute name" checkbox, the label will look like ou=People.
Configuring LDAP ParametersThe LDAP parameters are the basic settings in your directory server, such as the distinguished name (DN) of the Directory Manager, the global read-only setting, the port configuration, and the ability to track all directory modification times.
Configuring the Directory Manager
The Directory Manager is the privileged server administrator, comparable to the root user in UNIX. Access control does not apply to the entry you define as Directory Manager. You initially defined this entry during installation. The default is cn=Directory Manager.
The DN of the directory manager is stored in the nsslapd-rootDN attribute and the password in the nsslapd-rootpw attribute of the cn=config branch.
Use Directory Server Console to change the Directory Manager DN, its password, and the storage scheme used for this password:
- Log in to the Console as Directory Manager.
If you are already logged in to the Console, see Changing Your Login Identity for instructions on how to log in as a different user.
- On the top-level Configuration tab, select the server node at the root of the navigation tree, and select the Settings tab in the right-hand panel.
- Enter the new distinguished name in the Directory Manager DN field. The default value is the one defined during installation.
- From the Manager Password Encryption pull-down menu, select the storage scheme you want the server to use to store the password for Directory Manager.
- Enter the new password and confirm it using the text fields provided.
- Click Save.
Changing Directory Server Port Numbers
You can modify the port or secure port number of your user directory server using Directory Server Console or by changing the value of the nsslapd-port or nssldap-secureport attributes under the cn=config entry.
If you want to modify the port or secure port for a Directory Server that contains the Sun Java System configuration information (o=NetscapeRoot subtree), you can do so through Directory Server Console.
If you change the configuration directory or user directory port or secure port numbers, you should be aware of the following repercussions:
- You need to change the configuration or user directory port or secure port number configured for the Administration Server. See the Administration Server Administration Guide.
- If you have other Sun Java System Servers installed that point to the configuration or user directory, you need to update those servers to point to the new port number.
- If the Directory Server is referenced in replication agreements defined on other servers, the replication agreements must be updated to use the new port or secure port number.
- If you set a non-privileged port number, and Directory Server is installed on a machine to which other users have access, you may expose the port to a hijack risk by another application. In other words, another application can bind to the same address/port pair. This rogue application may then be able to process requests intended for Directory Server, and could be used to capture passwords used in the authentication process, to alter client requests or server responses, or to produce a denial of service attack. To avoid this security risk, use the nsslapd-listenhost attribute to specify the interface (address) on which Directory Server listens. For more information on this attribute, see the Directory Server Administration Reference.
- Changing the port number via the console does not make the necessary changes to the some scripts. The following scripts remain hard-coded to the original port number and must be modified manually: bak2db.pl, schema_push.pl, db2bak.pl, check-slapd, db2index.pl, db2ldif.pl, monitor, ldif2db.pl, ns-accountstatus.pl, ldif2ldap, ns-activate.pl, ns-inactivate.pl.
Note that the script names given here are the standalone tool names and that the check-slapd command is not documented as it is not part of the publicly exposed API. For more information, see the Directory Server Administration Reference.
To Modify the Port or Secure Port on Which Directory Server Listens for Incoming LDAP Requests
To modify the ports for DSML requests, see Configuring DSML.
- On the top-level Configuration tab of Directory Server Console, select the root node with the server name, and select the Network tab in the right-hand panel.
The tab displays the server's current port settings for the LDAP protocol.
- Enter the port number you want the server to use for non-SSL communications in the Port field. The default value is 389.
- If you have activated SSL on this server as described in Chapter 11, "Managing Authentication and Encryption," you may allow connections on a secure port:
- Select the option to use both secure and non secure ports.
- Enter the port number you want the server to use for SSL communications in the Secure Port field. The default value is 636.
The encrypted port number that you specify must not be the same port number as you are using for normal LDAP communications.
- Click Save and then restart the server.
See Starting and Stopping Directory Server for information.
Setting Global Read-Only Mode
Each suffix in your directory may be placed in read-only mode independently and may return a specific referral if one is defined. Directory Server also provides a global read-only mode that will apply to all suffixes and may return a global referral when one is defined.
The global read-only mode is designed to allow administrators to prevent modifications to the directory contents while performing tasks such as reindexing the suffixes. For this reason, global read-only mode does not apply to the following configuration branches:
These branches should be protected at all times by Access Control Instructions (ACIs) against modifications by non-administrative users, regardless of the read-only setting (see Chapter 6, "Managing Access Control.") Global read-only mode will prevent update operations on all other suffixes in the directory, including update operations initiated by the Directory Manager.
Read-only mode will also interrupt replication on a suffix if it is enabled. A master replica will no longer have any changes to replicate, although it will continue to replicate any changes that were made before read-only mode was enabled. A consumer replica will not receive updates until read-only mode is disabled. A master in a multi-master replication scenario will neither have any changes to replicate nor be able to receive updates from the other masters.
To enable or disable the global read-only mode:
For information on placing an individual suffix in read-only mode, refer to Setting Suffix Read-Only Mode.
Tracking Modifications to Directory Entries
You can configure the server to maintain special attributes for newly created or modified entries:
- creatorsName—The distinguished name of the person who initially created the entry.
- createTimestamp—The timestamp for when the entry was created in GMT (Greenwich Mean Time) format.
- modifiersName—The distinguished name of the person who last modified the entry.
- modifyTimestamp—The timestamp for when the entry was last modified in GMT format.
Note
When a client application creates or modifies entries in a chained suffix, the creatorsName and modifiersName attributes do not reflect the real creator or modifier of the entries. These attributes contain the name of the chaining proxy needed to bind to the remote server. For information on proxy authorization, refer to Creating a Proxy Identity.
When tracking modification times of replicated suffixes, the name and timestamp attributes are replicated as normal attributes. As a result, these attributes reflect the time of the original modification to the entry on the master server, not the time that the entry was replicated to a consumer.
To enable the Directory Server to track this information:
- On the top-level Configuration tab of Directory Server Console, select the root node in the configuration tree, then select the Settings tab in the right-hand panel.
- Select the "Track entry modification times" checkbox.
The server will add the creatorsName, createTimestamp, modifiersName, and modifyTimestamp attributes to every newly created or modified entry. Existing entries will not contain the creation attributes.
- Click Save and then restart the server.
See Starting and Stopping Directory Server for more information.
Verifying Plug-In SignaturesThe verification of plug-in signatures is a new feature of Directory Server 5.2. Plug-ins provided with Directory Server each have a digital signature which may be verified by the server at startup. By default, the server will verify plug-in signatures, but it will load every plug-in regardless of the presence or validity of a signature.
Verifying signatures has the following advantages:
- A signature on a plug-in provided with Directory Server indicates that it has been rigorously tested and is officially supported.
- Using a checksum of the plug-in binary itself, the signature verification can detect whether the plug-in has been tampered with. Therefore the signature protects sensitive code that runs in the server itself.
- You may configure your server to load only the signed plug-ins, which may help detect problems with unsigned and unsupported plug-ins.
Configuring the Verification of Plug-In Signatures
- On the top-level Configuration tab of Directory Server Console, select the Plugins node in the configuration tree. The current signature verification policy is displayed in the right-hand panel.
- Select one of the following options:
- Do not verify plug-in signatures - All plug-ins defined in the server configuration will be loaded regardless of their signature. No warnings or errors will be shown because of a plug-in signature.
- Flag plug-ins with invalid signatures - All plug-ins defined in the server configuration will be loaded, but the server will verify the signature of each one. If a plug-in binary is altered in any way, the signature will no longer be valid, and the server will display a warning message on startup and in the error log. Plug-ins without signatures will also be flagged.
- Reject plug-ins with invalid signatures - The server will verify the signature of all plug-ins defined in the configuration and will only load plug-ins with valid signatures. The server will display a warning message on startup and in the error log that indicates which plug-ins have an invalid signature or no signature.
- Click Save, and then restart Directory Server as described in Starting and Stopping Directory Server.
Viewing the Status of a Plug-In
- On the top-level Configuration tab of Directory Server Console, expand the Plugins node in the configuration tree, and select the plug-in you wish to verify. The current configuration of the plug-in is displayed in the right-hand panel.
- The "Signature state" field shows the signature verification status of the plug-in with one of the following values:
- Unknown - This signature state occurs in all plug-ins when the server is configured not to verify plug-in signatures. The following states are visible only if you verify plug-in signatures.
- Valid signature - The plug-in configuration provides a signature that matches the checksum of the plug-in binary. This plug-in is officially supported. The following states are visible only if you flag but do not reject invalid signatures.
- Invalid signature - The plug-in configuration contains a signature which does not match the checksum of the plug-in binary. This state indicates that the plug-in may have been tampered with.
- No signature - The plug-in configuration did not provide a signature for the server to verify.
Configuring DSMLIn addition to processing requests in the Lightweight Directory Access Protocol (LDAP), Directory Server also responds to requests sent in the Directory Service Markup Language version 2 (DSMLv2). DSML is another way for a client to encode directory operations, but the server processes DSML as any other request, with all of the same access control and security features. In fact, DSML processing allows many other types of clients to access your directory contents.
Directory Server supports the use of DSMLv2 over the Hypertext Transfer Protocol (HTTP/1.1) and uses the Simple Object Access Protocol (SOAP) version 1.1 as a programming protocol to transport the DSML content. For more information about these protocols and examples of DSML requests, see Accessing the Directory Using DSMLv2.
Enabling DSML Requests
Because LDAP is the standard protocol for accessing a directory, DSML requests are not enabled by default after installing Directory Server. If you want your server to respond to DSML requests sent over HTTP/SOAP, you must explicitly enable this feature.
To enable DSML requests on your server through the console:
- On the top-level Configuration tab of Directory Server Console, select the root node in the configuration tree, and select the Network tab in the right-hand panel.
- Select the Enable DSML checkbox and choose one of the following security options. The secure port options are only available if you have activated SSL, as described in Chapter 11, "Managing Authentication and Encryption."
- Then edit any of the following fields:
- Port - The HTTP port for receiving DSML requests.
- Encrypted Port - The HTTPS port using SSL to received encrypted DSML requests.
- Relative URL - A relative URL that, when appended to the host and port, determines the full URL that clients must use to send DSML requests.
By default, the server will process requests sent to the following URL:
http://host:80/dsml
- Click Save and you will be reminded that you must restart the server to begin responding to DSML requests.
To enable DSML requests through the command line:
- Perform the following ldapmodify command to enable the DSML front-end plug-in and modify its settings. Modifying the ds-hdsml-port, ds-hdsml-secureport, and ds-hdsml-rooturl attributes is optional:
% ldapmodify -h host -p LDAPport -D "cn=Directory Manager" -w passwd
dn:cn=DSMLv2-SOAP-HTTP,cn=frontends,cn=plugins,cn=config
changetype: modify
replace: nsslapd-pluginEnabled
nsslapd-pluginEnabled: on
-
replace: ds-hdsml-port
ds-hdsml-port: DSMLport
-
add: ds-hdsml-secureport
ds-hdsml-port: secureDSMLport
-
replace: ds-hdsml-rooturl
ds-hdsml-root: relativeURL
-
^DConfiguring DSML Security
In addition to the secure port setting described in the previous section, you may configure the level of security that is required to accept DSML requests. The ds-hdsml-clientauthmethod attribute of the DSML front-end plug-in determines what authentication methods are required of the client. This attribute may have the following values:
- httpBasicOnly - The server uses the contents of the HTTP Authorization header to find a user name that can be mapped to an entry in the directory. This process and its configuration are described in DSML Identity Mapping. With this setting, DSML requests to a secure HTTPS port are encrypted through SSL but do not use client certification.
- clientCertOnly - The server uses credentials from the client certificate to identify the client. With this value, all DSML clients must use the secure HTTPS port to send DSML requests and provide a certificate. The server checks that the client certificate matches an entry in the directory. See Chapter 11, "Managing Authentication and Encryption," for more information.
- clientCertFirst - The server will attempt to authenticate clients first with a client certificate if one is provided. Otherwise, the server will authenticate clients using the contents of the Authorization header.
If no certificate and no Authorization header is provided in the HTTP request, the server will perform that DSML request with anonymous binding. Anonymous binding is also used in the following cases:
Regardless of the ds-hdsml-clientauthmethod attribute value, if a certificate is provided but it cannot be matched to an entry, or if the HTTP Authorization header is specified but cannot be mapped to a user entry, the DSML request will be rejected with error message 403: "Forbidden."
To set the DSML security requirements through the console:
- On the top-level Configuration tab of the Directory Server console, select the root node in the configuration tree, and select the Encryption tab in the right-hand panel.
You must have already configured and enabled SSL as described in Chapter 11, "Managing Authentication and Encryption."
- Select one of the choices for the drop-down menu in the DSML Client Authentication field.
- Click Save and then restart the server to enforce this new security setting.
To set the DSML security requirements through the command line:
- Run the following ldapmodify command to edit the attribute of the DSML front-end plug-in:
% ldapmodify -h host -p LDAPport -D "cn=Directory Manager" -w passwd
dn:cn=DSMLv2-SOAP-HTTP,cn=frontends,cn=plugins,cn=config
changetype: modify
replace: ds-hdsml-clientauthmethod
ds-hdsml-clientauthmethod: httpBasicOnly or
clientCertOnly or clientCertFirst
^D- When the DSML front-end plug-in has been modified, you will need to restart the server to enforce this new security setting.
DSML Identity Mapping
When performing basic authentication without a certificate, Directory Server uses a mechanism called identity mapping to determine the bind DN to use when accepting DSML requests. This mechanism extracts information from the Authorization header of the HTTP request to determine the identity to use for binding. See Identity Mapping for a complete description of this mechanism.
The default identity mapping for DSML-over-HTTP is given by the following entry in your server configuration:
dn:cn=default,cn=HTTP-BASIC, cn=identity mapping, cn=config
objectclass: top
objectclass: nsContainer
objectclass: dsIdentityMapping
cn: default
dssearchbasedn: ou=People,userRoot
dssearchfilter: (uid=${Authorization})This mapping searches the ou=People,userRoot subtree for an entry whose uid attribute matches the user name given in the Authorization header. The userRoot is the suffix you defined when installing the directory, for example dc=example,dc=com.
Within the mapping entry attributes, you may use place-holders of the format ${header} where header is the name of an HTTP header. The most common headers used in DSML mappings are:
- ${Authorization} - This string is replaced with the user name contained in an HTTP Authorization header. An authorization header contains both a username and its password, but only the user name is substituted in this place-holder.
- ${From} - This string is replaced with the email address that may be contained in an HTTP From header.
- ${host} - This string is replaced with the hostname and port number in the URL of the DSML request, which are those of the server itself.
To have DSML requests perform a different identity mapping, define a new identity mapping for HTTP headers:
- Edit the default DSML-over-HTTP identity mapping or create custom mappings for this protocol. See Identity Mapping for the definition of the attributes in an identity mapping entry. These mapping entries must be located below the following entry:
cn=HTTP-BASIC, cn=identity mapping, cn=config.You may create a new mapping entry in one of two ways:
- Use the top-level Directory tab of the Directory Server console to create a new entry with the appropriate object classes, as described in Managing Entries Using the Console.
- Use the ldapmodify tool to add this entry from the command line, as described in Adding Entries Using ldapmodify.
- Restart Directory Server for your new mappings to take effect.
Custom mappings are evaluated first, and if no custom mapping is successful, then the default mapping is evaluated. If all mappings fail to determine the bind DN for the DSML request, the DSML request will be forbidden and rejected (error 403).