Chapter 37 The Duke’s Bank Application
This chapter describes the Duke’s Bank application, an online banking application. It covers the following topics:
Overview of the Duke’s Bank Application
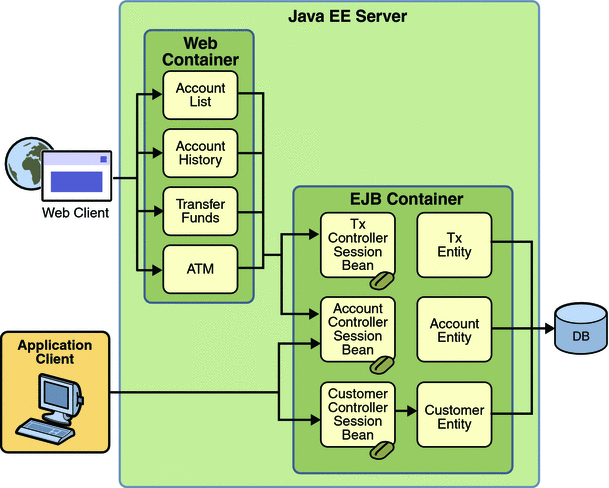
Duke’s Bank has two clients: an application client used by administrators to manage customers and accounts, and a web client used by customers to access account histories and perform transactions. The web client is built using JavaServer Faces technology (see Chapter 10, JavaServer Faces Technology). The clients access the customer, account, and transaction information maintained in a database through enterprise beans. The Duke’s Bank application demonstrates the way that many of the component technologies presented in this tutorial (enterprise beans, application clients, and web components) are applied to provide a simple but functional application.
Figure 37–1 gives a high-level view of how the components of the Duke's Bank application interact.
Figure 37–1 Duke's Bank Application
Enterprise Beans
Let’s take a closer look at the access paths between the clients, enterprise beans, and database tables. The end-user clients (web and application clients) access only the session beans. Within the enterprise bean tier, the session beans use Java Persistence entities. On the back end of the application, the entities access the database tables that store the entity states.
Note –
The source code for these enterprise beans is in the tut-install/javaeetutorial5/examples/dukesbank/src/com/sun/ebank/ejb/ directory.
Session Beans
The Duke’s Bank application has three session beans: AccountControllerBean, CustomerControllerBean, and TxControllerBean. (Tx stands for a business transaction, such as transferring funds.) These session beans provide a client’s view of the application’s business logic. Hidden from the clients are the server-side routines that implement the business logic, access databases, manage relationships, and perform error checking.
The AccountControllerBean Session Bean
The business methods of the AccountControllerBean session bean perform tasks that fall into the following categories: creating and removing entities, managing the account-customer relationship, and getting the account information.
The following methods create and remove entities:
-
createAccount
-
removeAccount
These methods of the AccountControllerBean session bean call the create and remove methods of the Account entity. The createAccount and removeAccount methods throw application exceptions to indicate invalid method arguments. The createAccount method throws an IllegalAccountTypeException if the type argument is neither Checking, Savings, Credit, nor Money Market. The createAccount method also looks up the specified customer exists by invoking the EntityManager.find method. If the result of this verification is null, the createAccount method throws a CustomerNotFoundException.
The following methods manage the account-customer relationship:
-
addCustomerToAccount
-
removeCustomerFromAccount
The Account and Customer entities have a many-to-many relationship. A bank account can be jointly held by more than one customer, and a customer can have multiple accounts.
In the Duke’s Bank application, the addCustomerToAccount and removeCustomerFromAccount methods of the AccountControllerBean session bean manage the account-customer relationship. The addCustomerToAccount method, for example, starts by verifying that the customer exists. To create the relationship, the addCustomerToAccount method first looks up the Customer and Account entities using the EntityManager.find method, then it calls the Account.addCustomer method to associate the customer with the account.
The following methods get the account information:
-
getAccountsOfCustomer
-
getDetails
The AccountControllerBean session bean has two get methods. The getAccountsOfCustomer method returns all of the accounts of a given customer by invoking the getAccounts method of the Account entity. Instead of implementing a get method for every instance variable, the AccountControllerBean has a getDetails method that returns an object (AccountDetails) that encapsulates the entire state of an Account entity. Because it can invoke a single method to retrieve the entire state, the client avoids the overhead associated with multiple remote calls.
The CustomerControllerBean Session Bean
A client creates a Customer entity by invoking the createCustomer method of the CustomerControllerBean session bean. To remove a customer, the client calls the removeCustomer method, which invokes the EntityManager.remove method on the Customer instance.
The CustomerControllerBean session bean has two methods that return multiple customers: getCustomersOfAccount and getCustomersOfLastName. getCustomersOfAccount calls the getCustomers method of the Account entity. getCustomersOfLastName uses the Customer.FindByLastName named query to search the database for customers with a matching last name, which is a named parameter to the query.
The TxControllerBean Session Bean
The TxControllerBean session bean handles bank transactions. In addition to its get methods, getTxsOfAccount and getDetails, the TxControllerBean bean has several methods that change the balances of the bank accounts:
-
withdraw
-
deposit
-
makeCharge
-
makePayment
-
transferFunds
These methods access an Account entity to verify the account type and to set the new balance. The withdraw and deposit methods are for standard accounts, whereas the makeCharge and makePayment methods are for accounts that include a line of credit. If the type method argument does not match the account, these methods throw an IllegalAccountTypeException. If a withdrawal were to result in a negative balance, the withdraw method throws an InsufficientFundsException. If a credit charge attempts to exceed the account’s credit line, the makeCharge method throws an InsufficientCreditException.
The transferFunds method also checks the account type and new balance; if necessary, it throws the same exceptions as the withdraw and makeCharge methods. The transferFunds method subtracts from the balance of one Account instance and adds the same amount to another instance. Both of these steps must complete to ensure data integrity. If either step fails, the entire operation is rolled back and the balances remain unchanged. The transferFunds method, like all methods in session beans that use container-managed transaction demarcation, has an implicit Required transaction attribute. That is, you don’t need to explicitly decorate the method with a @TransactionAttribute annotation.
Java Persistence Entities
For each business entity represented in our simple bank, the Duke’s Bank application has a matching Java Persistence API entity:
-
Account
-
Customer
-
Tx
The purpose of these entities is to provide an object view of these database tables: bank_account, bank_customer, and bank_tx. For each column in a table, the corresponding entity has an instance variable. Because they use the Java Persistence API, the entities contain no SQL statements that access the tables. The enterprise bean container manages all data in the underlying data source, including adding, updating, and deleting data from the database tables.
Unlike the session beans, the entities do not validate method parameters. The session beans check the parameters and throw the application exceptions, such as CustomerNotInAccountException and IllegalAccountTypeException. Consequently, if some other application were to include these entities, its session beans would also have to validate the method parameters. Validation code was not added to the entity’s methods, in order to keep the business logic separate from the entity data.
Helper Classes
The EJB JAR files include several helper classes that are used by the enterprise beans. The source code for these classes is in the following directory:
tut-install/javaeetutorial5/examples/dukesbank/dukesbank-ejb/src/java/com/sun/tutorial/
javaee/dukesbank/util/
Table 37–1 briefly describes the helper classes.
Table 37–1 Helper Classes for the Application’s Enterprise Beans|
Class Name |
Description |
|---|---|
|
AccountDetails |
Encapsulates the state of an Account instance. Returned by the getDetails method of AccountControllerBean. |
|
CustomerDetails |
Encapsulates the state of a Customer instance. Returned by the getDetails method of CustomerControllerBean. |
|
Debug |
Has simple methods for printing a debugging message from an enterprise bean. These messages appear on the standard output of the Application Server when it’s run with the --verbose option and in the server log. |
|
DomainUtil |
Contains validation methods: getAccountTypes, checkAccountType, and isCreditAccount. |
|
TxDetails |
Encapsulates the state of a Tx instance. Returned by the getDetails method of TxControllerBean. |
Database Tables
A database table of the Duke’s Bank application can be categorized by its purpose: representing business entities.
Tables Representing Business Entities
Figure 37–2 shows the relationships between the database tables. The bank_customer and bank_account tables have a many-to-many relationship: A customer can have several bank accounts, and each account can be owned by more than one customer. This many-to-many relationship is implemented by the cross–reference table named bank_customer_account_xref. The tables named bank_account and bank_tx have a one-to-many relationship: A bank account can have many transactions, but each transaction refers to a single account.
Figure 37–2 Database Tables
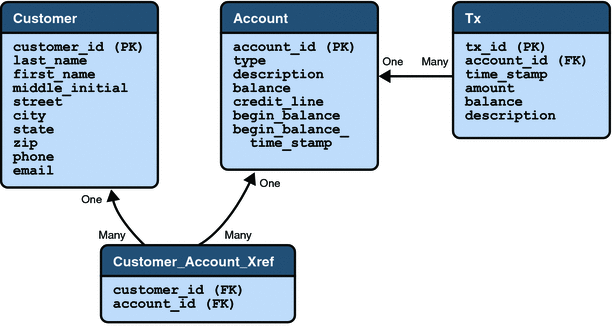
Figure 37–2 uses several abbreviations. PK stands for primary key, the value that uniquely identifies a row in a table. FK is an abbreviation for foreign key, which is the primary key of the related table. Tx is short for transaction, such as a deposit or withdrawal.
Protecting the Enterprise Beans
In the Java EE platform, you protect an enterprise bean by specifying the security roles that can access its methods. In the Duke’s Bank application, you define two roles, bankCustomer and bankAdmin, because two categories of operations are defined by the enterprise beans.
A user in the bankAdmin role will be allowed to perform administrative functions: creating or removing an account, adding a customer to or removing a customer from an account, setting a credit line, and setting an initial balance. A user in the bankCustomer role will be allowed to deposit, withdraw, and transfer funds, make charges and payments, and list the account’s transactions. Notice that there is no overlap in functions that users in either role can perform.
The system restricts access to these functions to the appropriate role by setting method permissions on selected methods of the CustomerControllerBean, AccountControllerBean, and TxControllerBean enterprise beans. For example, by allowing only users in the bankAdmin role to access the createAccount method in the AccountControllerBean enterprise bean, you deny users in the bankCustomer role (or any other role) permission to create bank accounts.
Application Client
Sometimes, enterprise applications use a stand-alone client application for handling tasks such as system or application administration. For example, the Duke’s Bank application uses an application client to administer customers and accounts. This capability is useful in the event that the site becomes inaccessible for any reason or if a customer prefers to communicate things such as changes to account information by phone.
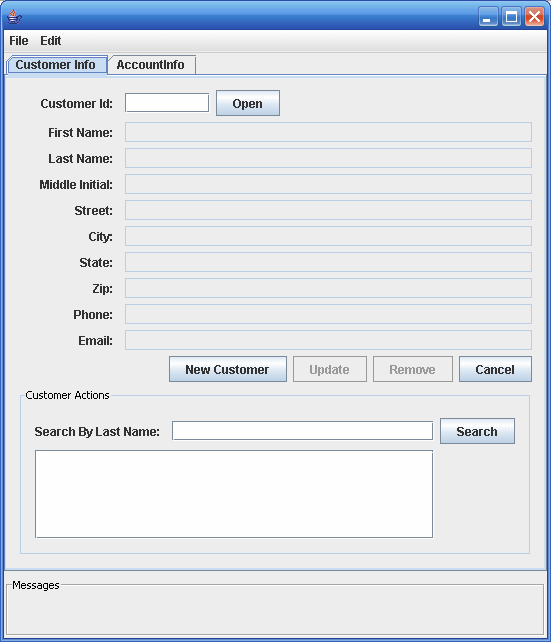
The application client shown in Figure 37–3 handles basic customer and account administration for the banking application through a Swing user interface. The bank administrator can perform any of the following functions on the respective tabs.
Figure 37–3 Application Client
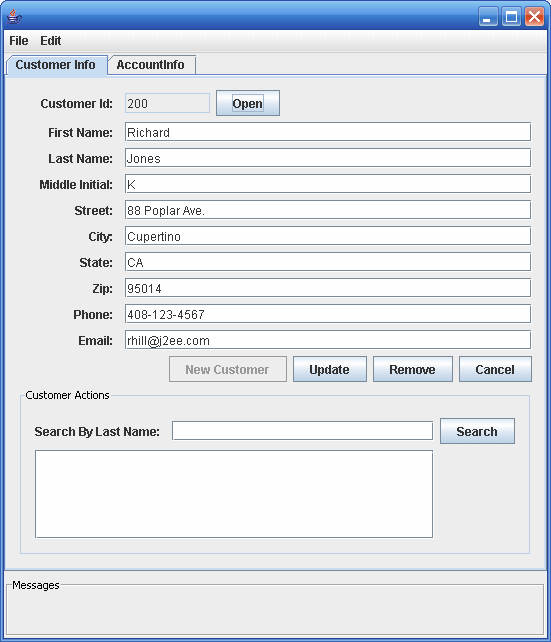
Customer Info tab:
-
View customer information
-
Add a new customer to the database
-
Update customer information
-
Remove a customer
-
Find a customer’s ID
Account administration:
-
Create a new account
-
Add a new customer to an existing account
-
Remove a customer from an existing account
-
View account information
-
Remove an account from the database
Error and informational messages appear in the bottom under Messages.
The Classes and Their Relationships
The source code for the application client is in the following directory:
tut-install/javaeetutorial5/examples/dukesbank/dukesbank-appclient/src/java/com/sun/tutorial/ javaee/dukesbank/client/ |
The application client is consists of a single class: BankAdmin.
BankAdmin Class
The BankAdmin class, which creates the user interface, is a Swing class that provides action methods that are called when certain events occur in the application, and methods that call the controller session beans. It was created using the NetBeans IDE Swing editor, Matisse.
Note –
Although BankAdmin was written using NetBeans IDE, you do not need to have NetBeans installed in order to run the application. If you want to alter the user interface, however, you do need to use NetBeans IDE.
The BankAdmin Constructor
The BankAdmin constructor creates the initial user interface, which consists of a menu bar, two tabs, and a message pane, by calling the initComponents method. The menu bar contains the standard File and Edit menus, the left tab is for viewing and updating customer information, the right tab is for viewing and updating account information, and the message pane contains a message area.
The initComponents method is automatically generated by NetBeans IDE. It creates all the user interface elements visible in BankAdmin.
Class Methods
The BankAdmin class provides methods that other objects call when they need to update the user interface. These methods are as follows:
-
setCustomerTextFields: When true enables the user to enter or change information in the customer tab. When false, the fields are disabled.
-
fillCustomerTextFields: Uses a CustomerDetails object to display customer information in the customer tab
-
clearCustomerTextFields: Clears the contents of the customer fields in the customer tab
-
setAccountTextFields: When true enables the user to enter or change information in the account tab. When false, the fields are disabled.
-
fillAccountTextFields: Uses an AccountDetails object to display account information in the account tab
-
clearAccountTextFields: Clears the contents of the account fields in the account tab
-
resetAll: Calls setCustomerTextFields and setAccountFields, setting all the fields to disabled
The following methods interact with the controller session beans to create and update customer and account information:
-
createAccount: uses an AccountDetails object to create a new account
-
updateAccount: uses an AccountDetails object to update an account information
-
createCustomer: uses a CustomerDetails object to create a new customer
-
updateCustomer: uses a CustomerDetails object to update a customer’s information
The UI-elementMouseReleased methods are linked to the GUI controls in BankAdmin. They call the previous methods to enable/disable the GUI fields, and create/update accounts and customers.
Web Client
In the Duke’s Bank application, the web client is used by customers to access account information and perform operations on accounts. Table 37–2 lists the functions the client supports, the JSP pages the customer uses to perform the functions, and the backing beans ad other JavaBeans components that implement the functions.
Note –
The source code for the web client is in the tut-install/javaeetutorial5/examples/dukesbank/dukesbank-war/ directory.
Table 37–2 Web Client
|
Function |
JSP Pages |
JavaBeans Components |
|---|---|---|
|
Home page |
main.jsp |
CustomerBean |
|
Log on to or off of the application |
logon.jsp logonError.jsp logoff.jsp |
CustomerBean |
|
List accounts |
accountList.jsp |
CustomerBean, AccountHistoryBean |
|
List the history of an account |
accountHist.jsp |
CustomerBean, AccountHistoryBean |
|
Transfer funds between accounts |
transferFunds.jsp transferAck.jsp |
CustomerBean, TransferBean |
|
Withdraw and deposit funds |
atm.jsp atmAck.jsp |
CustomerBean, ATMBean |
|
Error handling |
error.jsp |
none |
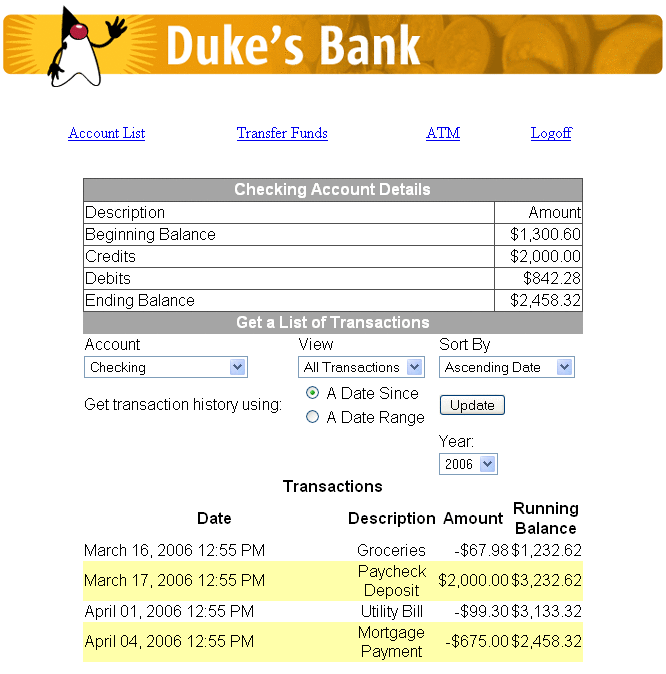
Figure 37–4 shows an account history screen.
Figure 37–4 Account History
Design Strategies
The main job of the JSP pages in the Duke’s Bank application is presentation. They use JavaServer Faces tags to represent UI components on the page, to bind the components to server-side data stored in backing beans, and wire the components to event-handling code. To maintain the separation of presentation and application behavior, most dynamic processing tasks are delegated to enterprise beans, custom tags, and JavaBeans components, including backing beans (see Backing Beans).
In the Duke’s Bank application, the JSP pages rely on backing beans and other JavaBeans components for interactions with the enterprise beans. In the Duke’s Bookstore application, discussed in Chapters Chapter 3, Getting Started with Web Applications to Including the Classes, Pages, and Other Resources, the BookDB JavaBeans component acts as a front end to a database.
In the Duke’s Bank application, CustomerBean acts as a facade to the enterprise beans. Through it, the backing beans can invoke methods on the enterprise beans. For example, TransferFundsBean can indirectly invoke the transferFunds method of the TxControllerBean enterprise bean by first calling getTxController on CustomerBean then calling transferFunds on the TxController interface.
The other backing beans have much richer functionality. ATMBean sets acknowledgment strings according to customer input, and AccountHistoryBean massages the data returned from the enterprise beans in order to present the view of the data required by the customer.
The web client uses a template mechanism implemented by custom tags (discussed in A Template Tag Library) to maintain a common look across all the JSP pages. The template mechanism consists of three components:
-
template.jsp determines the structure of each screen. It uses the insert tag to compose a screen from subcomponents.
-
screendefinitions.jspf defines the subcomponents used by each screen. All screens have the same banner, but different title and body content (specified in the JSP Pages column in Table 37–2).
Finally, the web client uses logic tags from the JSTL core tag library to perform flow control and tags from the JSTL fmt tag library to localize messages and format currency.
Client Components
All the JavaBeans components used in the web client are instantiated by the managed bean facility (see Configuring a Bean) when they are encountered in the page, such as when an EL expression references the component. The managed bean facility is configured in the faces-config.xml file. The following managed-bean elements from the faces-config.xml file specify how AccountHistoryBean and CustomerBean are to be instantiated and stored in scope:
<managed-bean>
    <managed-bean-name>accountHistoryBean</managed-bean-name>
    <managed-bean-class>
        com.sun.tutorial.javaee.dukesbank.web.AccountHistoryBean
    </managed-bean-class>
    <managed-bean-scope>request</managed-bean-scope>
    ...
    <managed-property>
        <property-name>accountId</property-name>
        <value>#{param.accountId}</value>
    </managed-property>
    <managed-property>
    ...
</managed-bean>
<managed-bean>
    <managed-bean-name>customerBean</managed-bean-name>
    <managed-bean-class>
        com.sun.tutorial.javaee.dukesbank.web.CustomerBean
    </managed-bean-class>
    <managed-bean-scope>session</managed-bean-scope>
</managed-bean>
As shown by the preceding configurations, an AccountHistoryBean instance is saved into request scope under the name accountHistoryBean, and a CustomerBean instance is saved into session scope under the name customerBean. EL expressions use these names to reference the beans from a page. The managed bean configurations can also initialize bean properties with values. As shown in the preceding configuration, the accountId property of AccountHistoryBean is set to the expression #{param.accountId} when an instance of AccountHistoryBean is created. This expression references the accountId variable in the request parameter map. This is so that other pages in the application can pass the account ID to AccountHistoryBean and therefore make it available to the accountHist.jsp page.
Responsibility for managing the enterprise beans used by the web client rests with CustomerBean. It creates account and transaction controller enterprise beans and provides methods for retrieving the beans.
When instantiated, the CustomerBean component uses @EJB annotations to inject references to the enterprise beans. Because these enterprise beans apply to a particular customer or session, CustomerBean is stored in session.
public class CustomerBean {

        @EJB
        private AccountController accountController;

        @EJB
        private TxController txController;
        ...
}
CustomerBean also does the following:
-
Maintains the customer ID
-
Retrieves the list of accounts from the database
-
Gets detailed information about a particular account
-
Invalidates a session to allow a customer to log out.
Because CustomerBean is in session, it is a convenient place to keep account information so that the backing beans and their associated pages can pass this information between themselves.
The page fragment template/links.jsp generates the list of bank function links at the top of every page. Notice that the customer is retrieved from the userPrincipal object, which is set when the customer logs in (see Protecting the Web Client Resources). After the customer is set, the page can retrieve the collection of accounts from CustomerBean.
As shown by the following code from links.jsp, the ID of the first account in the collection of accounts is set into request scope. The setPropertyActionListener tag is nested inside the commandLink tag, which represents the hyperlink that launches the atm.jsp page. This setPropertyActionListener tag causes the account ID to be set in request scope when the hyperlink is clicked.
...
    <c:set var="accountId" scope="request"
             value="${customerBean.accounts[0].accountId}"/>
    <h:commandLink value="#{bundle.ATM}" action="atm">
        <f:setPropertyActionListener
                 target="#{requestScope.accountId}"
                 value="#{customerBean.accounts[0].accountId}"/>
    </h:commandLink>
...
Request Processing
When a user clicks on a button or a hyperlink, the application navigates to a new page or reloads the current page. Navigation to all pages listed in Table 37–2 is configured in the web/WEB-INF/faces-config.xml file using a set of navigation rules.
As described in Configuring Navigation Rules, the JavaServer Faces navigation mechanism matches a logical outcome String or an action method to one of the navigation rules to determine which page to open next. The button or hyperlink that the user clicks specifies the logical outcome String or action method with its action attribute.
Although it’s not necessary to do so, the web client of Duke’s Bank uses an Java SE Enum class to encapsulate all the possible logical outcomes for the application:
public enum Navigation  {
    main,
     accountHist,
     accountList,
     atm,
     atmAck,
     transferFunds,
     transferAck,
     error,
     logout;

    public Object action() {
        return this;
    }
}
If you are not familiar with enums, see http://java.sun.com/javase/6/docs/technotes/guides/language/enums.html.
A managed bean is needed to expose the enum to the expression language so that a page can access its logical outcomes. In this case, the Navigation enum class is accessed through the NavigationEnumBean:
public class NavigationEnumBean extends EnumManagedBean {
    public NavigationEnumBean() {
        super(Util.Navigation.class);
    }
}
NavigationEnumBean extends a special bean class that includes a method to return an enum constant, which represents a logical outcome:
public Enum getEnum(String enumName) {
    return Enum.valueOf(e, enumName);
}
The application also includes a custom EL resolver, EnumResolver, which resolves expressions that reference an instance of this bean class. You create a resolver if you want expressions to particular kinds of objects resolved in a special way that is not already supported by the EL mechanism. See Resolving Expressions for more information on EL resolvers.
The resolver calls the bean’s getEnum method from its getValue method to return the enum constant:
public Object getValue(ELContext elContext, Object base, Object property) {
    if ((base != null && property != null)
        && base instanceof EnumManagedBean) {
            elContext.setPropertyResolved(true);
            return
                 ((EnumManagedBean)base)
                    .getEnum(property.toString());
    }
    return null;
}
A tag’s action attribute references a particular constant of the enum to specify a logical outcome. The following commandLink tag appears on the links.jsp page:
<h:commandLink value="#{bundle.Logoff}"
    action="#{navigation.logout.action}"/>
The action attribute has the expression #{navigation.logout.action} to invoke the action method of the Navigation enum. This returns the enum constant, representing the logical outcome, logout.
The following piece of a navigation rule configuration in the faces-config.xml file corresponds to the action attribute expression of the preceding commandLink tag. It causes the logoff.jsp page to open if the logout logical outcome is returned.
<navigation-rule>
    ...
    <navigation-case>
        <description>
            Any action that returns "logout" should go to the
            logoff page and invalidate the session.
        </description>
        <from-action>logout</from-action>
        <to-view-id>/logoff.jsp</to-view-id>
</navigation-rule>
When a page in the application is rendered, it is constructed with the aid of a template mechanism. Every page includes the template.jsp page, which in turn includes certain subcomponents, such as banner.jsp, into the page depending on which page is being rendered. The screendefinitions.jspf page, included in template.jsp, determines which page to render based on the current view ID, which identifies the UI component tree that represents the page to be rendered. The screendefinitions.jspf page accesses the view ID with this expression from its definition tag:
<tt:definition name="bank"
         screen="${facesContext.viewRoot.viewId}">
Based on the view ID, the templating mechanism will include specific components into the page.
Protecting the Web Client Resources
In the JavaEE platform, you protect a web resource from anonymous access by specifying which security roles can access the resource. The web container guarantees that only certain users acting in those roles can access the resource. For the web container to enforce the security constraint, the application must specify a means for users to identify themselves, and the web container must support mapping a role to a user.
In the Duke’s Bank web client, you restrict all the URLs listed in Table 37–2 to the security role bankCustomer. The application requires users to identify themselves by means of the form-based login mechanism. When a customer tries to access a web client URL and has not been authenticated, the web container displays the JSP page logon.jsp. This page contains an HTML form that requires a customer to enter an identifier and password. This form is rendered by a JavaServer Faces custom component. A custom tag represents the component on the page. In the following piece of logon.jsp, the <db:formBasedLogin> tag represents the custom component:
<f:view>
...
<h:outputText value="#{bundle.Logon}"/>
 <h:outputText value="#{bundle.Submit}"/>.</h3>
<br><br>
<db:formBasedLogin  />
</f:view>
Note that there is no h:form tag. This is because the custom component renders the form tag along with the complete HTML form that customers use to log in:
<form action="j_security_check" method=post>
<table>
<tr>
    <td align="center" >
    <table border="0">
    <tr>
    <td><b><fmt:message key="CustomerId"/></b></td>
    <td>
        <input type="text" size="15" name="j_username">
     </td>
    </tr>
    <tr>
    <td><b><fmt:message key="Password"/></b></td>
    <td>
         <input type="password" size="15" name="j_password">
    </td>
    ...
</form>
-
Add the customer’s group, ID, and password to the default realm of the container using the Admin Console.
-
Map the bankCustomer role to the customer or the customer’s group in the deployment descriptor.
Note that the action invoked by the form, j_security_check, is specified by the Java Servlet specification, as are the request parameters j_username and j_password. The web container retrieves this information, maps it to a security role, and verifies that the role matches that specified in the security constraint. In order for the web container to check the validity of the authentication information and perform the mapping, you must perform these two steps when you deploy the application:
After the customer has been authenticated, the identifier provided by the customer is used as a key to identify the customer’s accounts. The identifier is retrieved from the FacesContext object by the CustomerBean constructor, which saves it into the customerId property:
customerId = Long.parseLong(FacesContext.getCurrentInstance()
    .getExternalContext().getUserPrincipal().getName());
Building, Packaging, Deploying, and Running the Duke's Bank Application
To build the Duke’s Bank application, you must have installed the tutorial bundle as described in . When you install the bundle, the Duke’s Bank application files are located in the tut-install/javaeetutorial5/examples/dukesbank/ directory. This directory contains the configuration files for creating the EAR, dukesbank.ear. The EAR consists of the following three modules:
-
dukesbank-appclient: The application client
-
dukesbank-ejb: The enterprise beans and persistence entities
-
dukesbank-war: The web client
After you build the source code, all the sub-modules will be built into their respective module packages, and the resulting EAR file will reside in the tut-install/javaeetutorial5/examples/dukesbank/dist/ directory.
Setting Up the Servers
Before you can package, deploy, and run the example, you must first set up the Java DB database server with customer and account data, and you must add some resources to the Application Server.
Starting the Application Server
Before you can start this tutorial, the Application Server must be running. For information on starting the Application Server, see Starting and Stopping the Application Server.
Creating the Bank Database in NetBeans IDE
To create the database tables used in Duke’s Bank, follow the instructions in Creating the Database Tables in NetBeans IDE.
Creating the Bank Database Using Ant
-
In a terminal window or command prompt, go to the tut-install/javaeetutorial5/examples/dukesbank/ directory.
-
Execute the following command:
ant create-tables
In Duke’s Bank, the database tables will be created and populated before deploying the application. This happens automatically when you run the deploy task. You can manually reset the database to its original state by following these steps:
This task executes the SQL commands contained in tut-install/javaeetutorial5/examples/common/sql/javadb/tutorial.sql. The SQL commands delete any existing tables, create new tables, and insert the initial data in the tables.
Adding Users and Groups to the File Realm
To enable the Application Server to determine which users can access enterprise bean methods and resources in the web client, add users and groups to the server’s file security realm using the Admin Console following the procedures described in Managing Users and Groups on the Application Server. Add the users and groups listed in Table 37–3.
Table 37–3 Duke’s Bank Users and Groups|
User |
Password |
Group |
|---|---|---|
|
200 |
javaee |
bankCustomer |
|
bankadmin |
javaee |
bankAdmin |
Building, Packaging, and Deploying Duke’s Bank Using NetBeans IDE
-
In NetBeans IDE, select File->Open Project.
-
In the Open Project dialog, navigate to tut-install/javaeetutorial5/examples/.
-
Select the dukesbank folder.
-
Select the Open as Main Project and Open Required Projects check boxes.
-
Click Open Project.
-
In the Projects tab, right-click the dukesbank project and select Undeploy and Deploy.
You will see the output in the Output tab.
Follow these instructions to build, package, deploy, and run the Duke’s Bank example application to your Application Server instance using NetBeans IDE.
Building, Packaging, and Deploying Duke’s Bank Using Ant
To compile and package the enterprise beans, application client, and web client into dukesbank.ear, go to the tut-install/javaeetutorial5/examples/dukesbank/ directory of the tutorial distribution and execute the command:
ant |
Run the following command to deploy dukesbank.ear:
ant deploy |
This task calls the create-tables task to initialize the database tables.
Running the Duke's Bank Application Client Using NetBeans IDE
-
In NetBeans IDE, select the dukesbank project in the Projects pane.
-
Right-click dukesbank and select Run.
-
At the login prompts, type bankadmin for the user name and javaee for the password. You should see the application client, as shown in Figure 37–5.
You can now create customers and accounts using the application client.
To run the application client in NetBeans IDE, follow these steps:
Running the Duke's Bank Application Client Using Ant
-
In a terminal window, go to tut-install/javaeetutorial5/examples/dukesbank/.
-
Enter the following command:
ant run
-
At the login prompts, type bankadmin for the user name and javaee for the password. You should see the application client, as shown in Figure 37–5.
You can now create customers and accounts using the application client.
To run the application client, follow these steps:
Figure 37–5 BankAdmin Application Client
Running the Duke's Bank Web Client
-
Open the bank URL, http://localhost:8080/bank/main.faces, in a web browser.
-
The application displays the login page. Enter 200 for the customer ID and javaee for the password. Click Submit.
-
Select an application function: Account List, Transfer Funds, ATM, or Logoff. When you have a list of accounts, you can get an account history by selecting an account link.
Note –The first time you select a new page, particularly a complicated page such as an account history, it takes some time to display because the Application Server must translate the page into a servlet class and compile and load the class.
To run the web client, follow these steps:
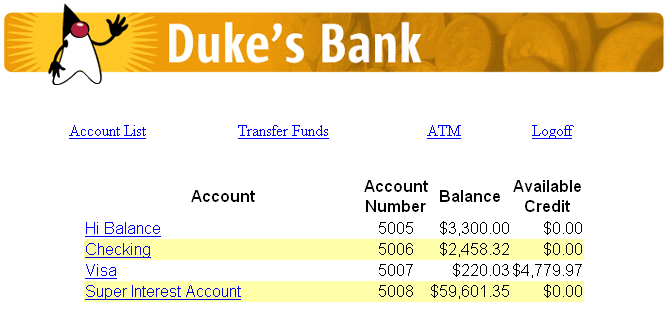
If you select Account List, you will see the screen shown in Figure 37–6.
Figure 37–6 Account List
- © 2010, Oracle Corporation and/or its affiliates
