Configuring Identity Manager End-User Self-Registration
You can configure OpenSSO Enterprise so that end-users can create their own accounts when accessing Identity Manager for the first time. This is called self-registration or anonymous enrollment. The user provides the minimum required account details, and the user account is created on Identity Manager. This user account is automatically provisioned into OpenSSO Enterprise. A user account created in this manner is the most basic account with the minimum privileges available.
In the Identity Manager WAR, /idm is the base context of the deployment. An OpenSSO Enterprise policy agent must be present and protecting Identity Manager.
To configure OpenSSO, complete the following steps:
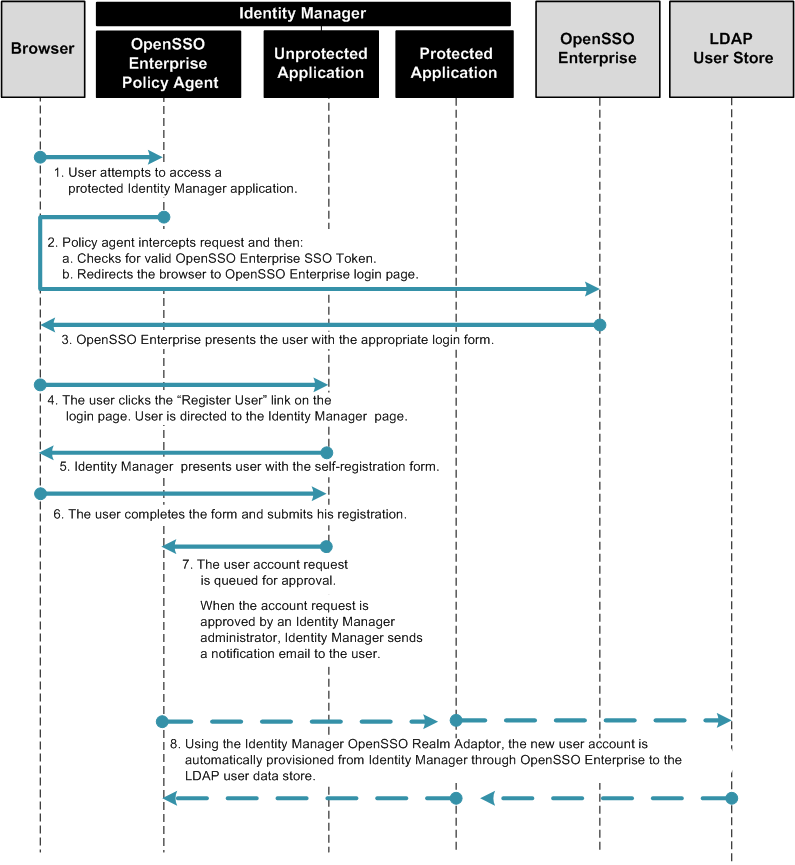
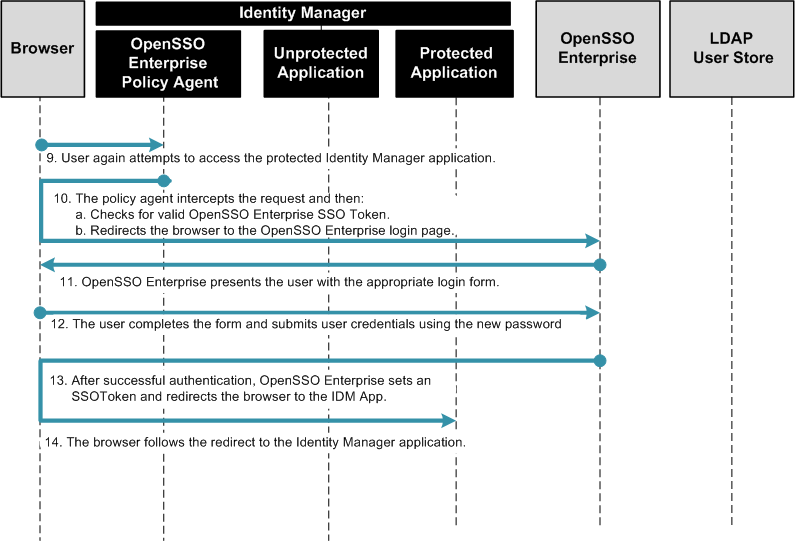
The following figures illustrate the process flow for end-user self-registration.
Figure 1–13 Process Flow for End-User Self-Registration

Figure 1–14 Process Flow for End-User Self-Registration (continued)

Configuring OpenSSO Enterprise for End-User Self-Registration
Complete the following steps:
 To Define Identity Manager URLs as Not Enforced
-
Log in to the OpenSSO Enterprise console as an administrator.
-
Click the Access Control tab.
-
Click the appropriate realm name and navigate to the Policy Agent Profile for the policy agent that protects Identity Manager.
-
Under the Policy Agent Profile, click the Application tab.
-
Add the following URIs to the “Not Enforced URIs” property.
-
/idm/authutil/
-
/idm/authutil/*
-
/idm/authutil/*?*
-
-
Click Save.
-
Log out of OpenSSO Enterprise.
Modifying the OpenSSO Enterprise Login Page
Modify the opensso/config/auth/default/Login.jsp page to include a Register User button. You can manually change the deployed Login.jsp file, or you can use the sample Login.jsp included with the opensso.zip download. Choose only one of the following procedures:
 To Manually Modify a Deployed Login.jsp
-
Use a text editor to open the file /web-container-deploy-base/opensso/config/auth/default/Login.jsp .
-
Add the sections of code displayed in bold in the following example:
... <% String ServiceURI = (String) viewBean.getDisplayFieldValue(viewBean.SERVICE_URI); String encoded = "false"; String gotoURL = (String) viewBean.getValidatedInputURL( request.getParameter("goto"), request.getParameter("encoded"), request); String encodedQueryParams = (String) viewBean.getEncodedQueryParams(request); if ((gotoURL != null) && (gotoURL.length() != 0)) { encoded = "true"; } String replaygotoURL = ""; String goToURL = request.getParameter("goto"); if(gotoURL != null && !gotoURL.equals("null") && (gotoURL.length() > 0)){ replaygotoURL = "&goto=" + goToURL; } System.out.println("replaygotoURL: " + replaygotoURL); %> <link rel="stylesheet" href="<%= ServiceURI %>/css/styles.css" type="text/css" /> <script language="JavaScript" src="<%= ServiceURI %>/js/browserVersion.js"></script> <script language="JavaScript" src="<%= ServiceURI %>/js/auth.js"></script> ... function LoginSubmit(value) { aggSubmit(); var hiddenFrm = document.forms['Login']; if (hiddenFrm != null) { hiddenFrm.elements['IDButton'].value = value; if (this.submitted) { alert("The request is currently being processed"); } else { this.submitted = true; hiddenFrm.submit(); } } } function RegisterUser() { window.location = "http://HostName.DomainNamecom:6480/idm/authutil/ anonEnrollment.jsp?id=endUserAnonymousEnrollment<%=replaygotoURL%>"; } ... <jato:content name="hasNoButton"> <tr> <td><img src="<%= ServiceURI %>/images/dot.gif" width="1" height="15" alt="" /></td> <td> <table border=0 cellpadding=0 cellspacing=0> <script language="javascript"> markupButton( '<jato:text name="lblSubmit" />', "javascript:LoginSubmit('<jato:text name="lblSubmit" />')"); </script> <script language="javascript"> markupButton( 'Register User', "javascript:RegisterUser()"); </script> </table> </td> </tr> <!-- end of hasNoButton --> </jato:content> ... <input type="hidden" name="goto" value="<%= gotoURL %>"> <input type="hidden" name="SunQueryParamsString" value="<%= encodedQueryParams %>"> <input type="hidden" name="encoded" value="<%= encoded %>"> <input type="hidden" name="plaingoto" value="<%= request.getParameter("goto") %>"> </auth:form> </jato:content> ... -
Remove the web container's temporary, compiled JSP to ensure that the changes made are picked up.
For example, if using GlassFish, the temporary, compiled classes is under glassfish-home/domains/your-domain/generated/.
-
Restart the OpenSSO Enterprise web container after making the changes.
 To Use the Sample Login.jsp
-
Locate the file opensso/integrations/idm/jsps/Login.jsp in the opensso.zip distribution.
-
Replace the deployed /web-container-deploy-base/opensso/config/auth/default/Login.jsp with the modified Login.jsp.
Choose one of the following options:
You can you replace your existing Login.jsp with the sample Login.jsp. If you choose this option, the following will occur:
-
You will lose any custom changes made to the existing Login.jsp.
-
You will inherit changes that might have been previously made to the sample Login.jsp to incorporate requirements for other use cases related to the OpenSSO integration with Identity Manager.
-
You must change the Identity Manager URL embedded in the Login.jsp to reflect your Identity Manager system URL. Search for the string /idm in the sample Login.jsp file to locate these URLs.
Alternatively, you can manually make the changes to the file. If you choose this option, run the diffcommand to view the differences between the two files.
-
-
Remove the web container's temporary, compiled JSP to ensure that the changes made are picked up.
For example, if using GlassFish, the temporary, compiled classes are under glassfish-home/domains/your-domain/generated/.
-
Restart the OpenSSO Enterprise web container after making the changes.
Modifying the Identity Manager Registration Work Flow
You can use the Identity Manager plug-in for NetBeans IDE or, you can use the Identity Manager Debug Pages. Choose only one of the following procedures:
 To Change the Registration Work Flow Using
NetBeans IDE
Before You Begin
-
NetBeans IDE must be already downloaded and installed.
See downloaded and installed NetBeans IDE for more information.
-
The Identity Manager Plug-In for NetBeans must be already downloaded and installed.
See downloaded and installed the Identity Manager Plug-in for NetBeans for more information.
-
Create (or open) an Identity Manager Project in NetBeans.
You can use this procedure with either integrated or remote NetBeans projects. Use the online help available in NetBeans to create the Identity Manager project if necessary. See the Identity Manager IDE website for more information.
-
From the NetBeans Project Window, right-click on the Custom Identity Manager Objects Node and select IDM > Open Object.
-
In the Open Object dialog box, enter the object name “End User Anonymous Enrollment,” and click OK.
-
Right-click on the file in the Project Window, and choose IDM > Clone Object(s) to clone the object for safe keeping.
-
Name the new object End User Anonymous Enrollment Orig.
-
Click on the tab in the Editor window containing the file “End User Anonymous Enrollment” work flow.
This will put the file in focus.
-
Expand the tree in the Navigator Window to locate the Activity Assimilate User View.
-
Add the OpenSSO Enterprise resource to the map of options for the "assimilate" invocation.
The changes are displayed in bold in the following example:
<Activity id='2' name='Assimilate User View'>
<Action id='0' hidden='true'>

<expression>
<invoke name='assimilate'>
<ref>view</ref>
<map>

<s>waveset.accountId</s>
<ref>accountId</ref>

<s>to</s>
<ref>accountId</ref>

<s>global.firstname</s>
<ref>firstname</ref>

<s>global.lastname</s>
<ref>lastname</ref>

<s>global.fullname</s>

<concat>
<ref>firstname</ref>
<s> </s>
<ref>lastname</ref>
</concat>

<s>fullname</s>

<concat>
<ref>firstname</ref>

<s> </s>
<ref>lastname</ref>
</concat>

<s>accounts[Lighthouse].fullname</s>

<concat>
<ref>firstname</ref>
<s> </s>
<ref>lastname</ref>
</concat>

<s>global.email</s>
<ref>email</ref>

<s>global.idmManager</s>
<ref>idmManager</ref>

<s>accounts[Lighthouse].idmManager</s>
<ref>idmManager</ref>

<s>waveset.password</s>
<ref>userPassword</ref>

<s>waveset.organization</s>
<ref>organization</ref>

<s>waveset.resources</s>

<list>
<s>OpenSSO</s>
</list>

</map>

</invoke>

</expression>

<Variable name='view'>
<ref>user</ref>
</Variable>

<Return from='view' to='user'/>
<Return from='WF_ACTION_ERROR' to='error'/>
</Action>

<Transition to='Create Process View'/>
</Activity>
The name of the OpenSSO resource (OpenSSO in self_registration_idm_anon_enroll.html) is the name assigned when the resource was created. To verify the name, navigate to the "Resources | List Resources" tab in the Identity Manager administration console and expand the "Sun Access Manager Realm" branch.
-
Save the changes.
-
Right-click on the file and select IDM > Upload Object(s) to upload the file.
 To Use the Identity Manager Debug Pages
-
Log in to the Identity Manager console as an administrator.
-
Go to the debug URL at protocol://IDM-host-machine:port/idm/debug.
-
Select the object Task Definition in the list next to the List Objects button.
-
Click the List Objects button.
-
Search for the object "End User Anonymous Enrollment.
Export the existing definition to back it up. Then click Edit.
-
Add the OpenSSO Enterprise resource to the Activity "Assimilate User View.”
In the following example, the changes are displayed in bold:
<Activity id='2' name='Assimilate User View'>
<Action id='0' hidden='true'>

<expression>
<invoke name='assimilate'>
<ref>view</ref>
<map>

<s>waveset.accountId</s>
<ref>accountId</ref>

<s>to</s>
<ref>accountId</ref>

<s>global.firstname</s>
<ref>firstname</ref>

<s>global.lastname</s>
<ref>lastname</ref>

<s>global.fullname</s>

<concat>
<ref>firstname</ref>
<s> </s>
<ref>lastname</ref>
</concat>

<s>fullname</s>

<concat>
<ref>firstname</ref>

<s> </s>
<ref>lastname</ref>
</concat>

<s>accounts[Lighthouse].fullname</s>

<concat>
<ref>firstname</ref>
<s> </s>
<ref>lastname</ref>
</concat>

<s>global.email</s>
<ref>email</ref>

<s>global.idmManager</s>
<ref>idmManager</ref>

<s>accounts[Lighthouse].idmManager</s>
<ref>idmManager</ref>

<s>waveset.password</s>
<ref>userPassword</ref>

<s>waveset.organization</s>
<ref>organization</ref>

<s>waveset.resources</s>
<list>
<s>OpenSSO</s>
</list>

</map>

</invoke>

</expression>

<Variable name='view'>
<ref>user</ref>
</Variable>

<Return from='view' to='user'/>
<Return from='WF_ACTION_ERROR' to='error'/>
</Action>

<Transition to='Create Process View'/>
</Activity>
The name of the OpenSSO Enterprise resource (OpenSSO in self_registration_idm_anon_enroll.html) is the name assigned when the resource was created. To verify the name, navigate to the "Resources | List Resources" tab in the Identity Manager administration console and expand the "Sun Access Manager Realm" branch.
-
Log out of the console.
Testing Configurations for End-User Self-Registration
Complete the following tests in this exact order:
 To Test End-User Self-Registration
-
Go to the OpenSSO Enterprise login URL at protocol://OpenSSO-HostName:port/opensso/UI/Login.
-
Click the Register User button to register a test user.
-
Go through the registration process, and click Register to save changes.
A message is displayed indicating the registration request is being processed.
 To Test Approval of New User Account
-
Log in to the Identity Manager console as an administrator.
The Create User task is displayed as pending task.
-
Navigate to the Work Items > Approvals tab.
-
Choose the provisioning task for the new user-id and click the Approve button.
-
Confirm the approval.
-
Log out of the Identity Manager console.
 Verify Provisioning Of New User Account
-
Log in to the OpenSSO Enterprise console as an administrator.
-
Navigate to the Access Control > Realm > Subjects tab.
The approved user is displayed indicating that the profile was successfully registered and provisioned.
 Verify Activation Of New User Account
- © 2010, Oracle Corporation and/or its affiliates
