Installing Updates from the Update Tool
Web Space Server updates and add-ons can be downloaded using the Sun GlassFish Update Tool.
If the user is behind a proxy, and is upgrading from a early version of Web Space Server ( a version of Web Space Server which is earlier to Web Space Server 10.0 Update 5), the user need to use a workaround. For the instructions for using this workaround, see To Use updatetool in a Proxy That Requires Authentication.
First release of the product (Web Space Server 10.0) was bundled with Update Center 2.0 which was not supporting authenticated proxy setup. Sun GlassFish Web Space Server 10.0 Update 5 and later versions of Web Space Server are bundled with Update Center 2.2, with supports proxy authentication, and hence the workaround is not required.
Note –
The version of Update Tool included with some versions of GlassFish Enterprise Server is not compatible with the Web Space Server Add-On package repositories. You must use the version of Update Tool that comes with Web Space Server 10.0 software.
Update Tool also includes a command-line (CLI) Image Packaging System (IPS) utility, called pkg, which provides the same core functionality as its GUI-based counterpart. This IPS tool is started with the webspace_dir/bin/pkg command. See the Update Center wiki for complete information about Update Tool and the pkg command.
 To Download the Updates Using Update Tool
-
Start Update Tool by changing to the webspace-dir/bin directory and typing updatetool.
-
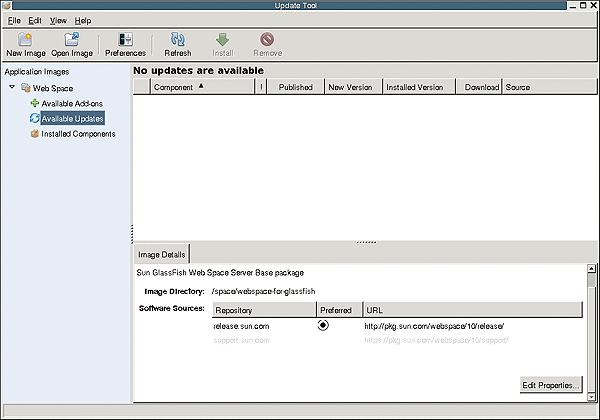
Expand Web Space under the Application Images pane, and click Available Updates.
Figure 2–1 Update Tool

-
Click the Edit Properties button.
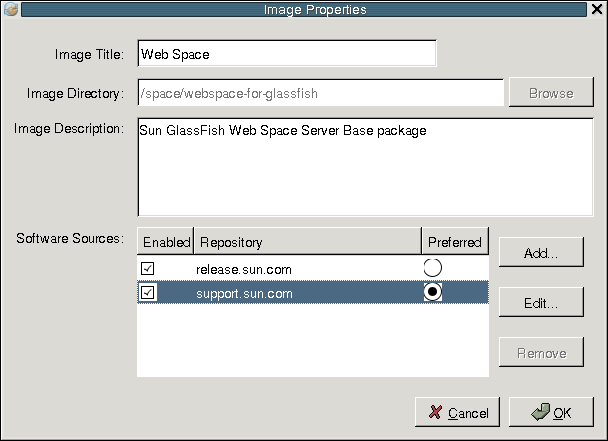
The Image Properties window is displayed.
-
Select the option support.sun.com repository, and choose Preferred.
The Repository Properties window appears.
-
Provide the appropriate repository URL provided by Sun support, and click OK.
The support.sun.com repository is highlighted.
Figure 2–2 Selecting the support.sun.com repository

-
Click OK again to enable the support.sun.com repository.
The Update Tool main window is displayed.
-
Expand Web Space under the Application Images pane, and select Available Add-ons.
-
Select the Web Space for GlassFish V2 component, and click install.
-
Restart the GlassFish server.
cd <glassfish_dir>/bin
./asadmin stop-domain
./asadmin start-domain
-
Change to the webspace_dir/webspace/application directory.
-
Run the ant install-gfv2.xml script to regenerate and redeploy the Web Space Server WAR files.
ant -f install-gfv2.xml
-
Restart the GlassFish server.
cd <glassfish_dir>/bin
./asadmin start-domain
 To Download the Updates Using the CLI-Based pkg Tool
-
Start Update Tool by changing to the webspace-dir/bin directory and typing updatetool.
-
Change to the webspace_dir/pkg/bin directory.
-
Type the following command to download updates:
pkg set-authority -P --enable -O http://pkg.sun.com/webspace/10/ repository-name
Ask your SunSolve service representative for the correct repository name to use.
-
Type the following commands to install the Update components.
pkg image-update
-
Restart the GlassFish server.
cd <glassfish_dir>/bin
./asadmin stop-domain
./asadmin start-domain
-
Change to the webspace_dir/webspace/application directory.
-
Run the ant install-gfv2.xml script to regenerate and redeploy the Web Space Server WAR files.
ant -f install-gfv2.xml
-
Restart the GlassFish server.
cd <glassfish_dir>/bin
./asadmin start-domain
 To Use updatetool in a Proxy That
Requires Authentication
This is a workaround to install Web Space Server from behind a proxy, when you are updating from a early version of Web Space Server. Sun GlassFish Web Space Server 10.0 Update 5 and later versions of Web Space Server are bundled with Update Center 2.2 which supports proxy authentication, and this workaround is not required.
-
Download Update Center 2.2 suitable for your platform from Update Center Wiki.
-
Unzip the Update Center 2.2 to a temporary directory (i.e. /tmp/uc2.2)
-
Copy the files pkg-bootstrap.jar and pkg-client.jar from /tmp/uc2.2/pkg-toolkit-sunos-i386/pkg/lib to <webspace_dir>/webspace-for-gfv2/pkg/lib.
-
Navigate to <webspace_dir>/webspace-for-gfv2/bin, and run updatetool.
You are prompted to type the proxy info and proxy port.
-
Type the proxy info and proxy port information.
The latest version of the updatetool and pkg files is downloaded.
-
Run updatetool again to download Web Space Server packages.
- © 2010, Oracle Corporation and/or its affiliates
