| C H A P T E R 4 |
|
Troubleshooting |
This chapter provides information to assist you in resolving problems with the Sun StorageTek Backup Manager. It contains the following sections:
If you suspect problems with any agent, follow the procedures in this section to isolate the problem.
If you need assistance with resolving the problem, contact Sun technical support http://www.sun.com/service/contacting.
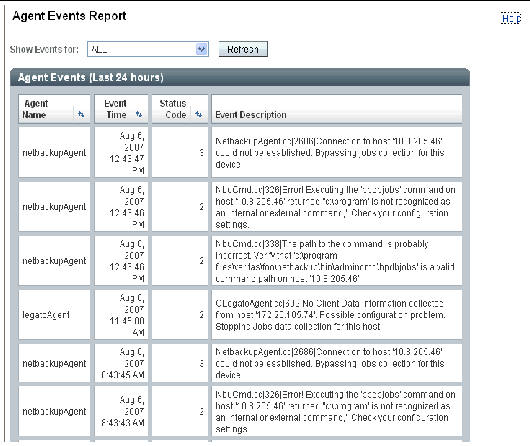
The Agent Events Report contains warning and critical level error messages for each agent configured in the Sun StorageTek Backup Manager environment. The report, by default, displays events for all agents generated during the last 24-hour period. You can also view events for a single agent by selecting the agent from the Show Events for: drop-down menu and clicking Refresh.

You can also check the Messages.log file for events that occurred prior to the last 24-hour period. Each agent's log file is located at:
/opt/sbm/agents/agent_name/log
where agent_name is the name of the agent.
In addition to your daily routine of monitoring the previous night's backups and current tape library status, you also need to verify the status of the data acquisition agents.
Each agent has two status values associated with it:
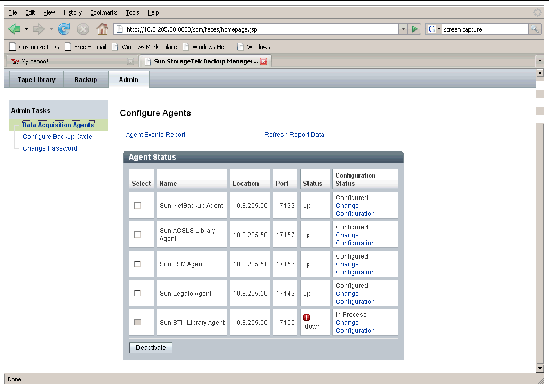
1. Go to Admin > Data Acquisition Agents and enter the Admin password.
The Agent Status is displayed as shown in the following example.

2. Verify the status of each data acquisition agent.
An agent status of up indicates the agent is running and no problems currently exist with the agent.
An agent status of down or unknown indicates the following:
|
Indicates a communication error between the specific device agent and the database. |
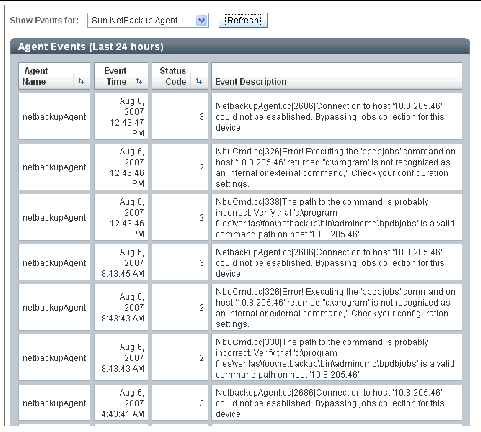
a. If an agent's status is Down or Unknown, open the Agent Event Report to determine the cause of the error.
The events collected during the last 24-hour period for the selected agent are displayed, as shown in the following example.

b. Determine the source of the problem from the event description, and take the necessary action.
If you cannot determine the source of the problem from this report, gather the information specified in Gathering Data and contact Sun technical support for assistance.
3. Verify the configuration status of each agent.
If an agent's configuration status is any value other than Configured, take the following action depending on its configuration status:
|
Indicates the agent is not configured. Configure the agent as described in Configuring an Agent. |
|
|
Indicates a communication error between the device agent and the database. Gather the information specified in Gathering Data and contact Sun support. |
Before you contact Sun technical support, gather the following information for the agent in question:
If a problem suggests a communications problem between the SBM agent and the backup master server and libraries, check to be sure you have configured connectivity properly. See Appendix B of the Sun StorageTek Backup Manager Installation Guide for detailed procedures.
The Sun StorageTek Backup Manager has built-in debugging messages to assist Sun support personnel when troubleshooting agent problems. If you experience problems with any of the agents that you cannot resolve, contact Sun technical support for assistance.
By default, Sun StorageTek Backup Manager installs and runs the agents using the SBM user account. You can also run the agent as root if necessary.
Prerequisite: You have already installed the agents as described in the Sun StorageTek Backup Manager Installation Guide.
1. Log in as root user to the SBM server.
2. Change directory to ~/.ssh.
3. Open another session and log in to backup master server as root.
4. Change to the directory: ~/.ssh.
If the directory does not exist, create it.
5. Copy the public key from the SBM server to the backup master server:
scp -p id_dsa.pub backup_masterserver_hostname:~/.ssh/id_dsa.pub.sbm
6. On the backup master server, create the file: authorized_keys2:
cat id_dsa.pub.sbm >> authorized_keys2
7. From the SBM server, check the connectivity:
ssh backup_server_fully_qualified_domain_name
8. When prompted to add each host to the known hosts file, type y.
Result: This will allow the root user to log in from the SBM server to the backup master server without prompting for a password.
1. Open the file ~/.rhosts on the backup master server.
2. Edit the ~/.rhosts file to add an entry for the SBM server:
3. From the SBM server, check the connectivity:
rsh backup_server_hostname set
1. Download SFU 3.5 located at:
http://www.microsoft.com/windowsserversystem/sfu/downloads/default.mspx
2. Set up RSH as described in the following instructions:
http://www.microsoft.com/technet/interopmigration/unix/sfu/sfu35rsh.mspx
3. Create a root account on the Windows master server to enable RSH as root from the SBM server.
Follow the steps in the section Installing and Setting Up RSH for Windows of the Sun StorageTek Backup Manager Installation Guide. However, when you edit the .rhosts file (as described in step 5.c.) add an entry for the SBM server using the root user as follows:
1. Check the status of the agent:
online 10:31:25 svc:/application/sbm/agents/netbackupAgent:default
2. If the agent is online, stop the process:
3. Verify that the agent is down.
disabled 10:26:36 svc:/application/sbm/agents/netbackupAgent:default
root 18865 18637 0 10:31:13 pts/3 0:00 grep netbackupAgent
4. Go to the directory where the agent is installed.
| Note - By default the agents are installed in the /opt/sbm directory. |
5. Open the script file for the agent you want to modify:
/opt/sbm/agents/agent name/etc/agent name
vi /opt/sbm/agents/netbackupAgent/etc/netbackupAgent
6. Go to this line in the script file:
DMN_OPTS="-w ${DAEMON_WD} -msgdir ${DAEMON_LOG} -ini ${DAEMON_INI}/bb.bco -user ${SBM_USER} -group ${SBM_GRP}"
7. Remove the options for sbm user and group. The line will look like this:
DMN_OPTS="-w ${DAEMON_WD} -msgdir ${DAEMON_LOG} -ini ${DAEMON_INI}/bb.bco"
10. Check the agent process to verify that it is running as root.
root 19121 18637 0 10:55:46 pts/3 0:00 grep netbackupAgent
root 18952 1 0 10:32:58 ? 0:03 /opt/sbm/agents/netbackupAgent/bin/netbackupAgent -w /opt/sbm/agents/netbackupAgent
You can manually stop and restart the application server if necessary. The situations in which you might have to restart the server include:
1. Log in as root to the SBM server.
3. Change to the following directory:
cd /opt/sbm/sbmapp/glassfish/bin
4. To start the application server enter the following command:
./asadmin start-domain domain1
Result: A message informs you that the application server has started. If the application server fails to start, contact Sun technical support.
1. Log in as root to the SBM server.
3. Change to the following directory:
cd /opt/sbm/sbmapp/glassfish/bin
4. To stop the application server, enter the following command:
Result: A message informs you that the application server has stopped.
You can configure the GlassFish server to run on a port other than the default port. The following procedure assumes the Web server is running on the default port 4848.
1. Log in to the admin console of the web server.
http://SBM management server:4848
| Note - The default login provided by GlassFish are user name: admin and password: adminadmin. |
2. Click Application Server from the left menu tree.
3. Click Stop Instance to stop the GlassFish server.
4. Log in as sbmapp user to the SBM server.
5. Go to the GlassFish server installation root directory located at:
6. Edit the configuration file.
a. Open the file domain.xml, located in the GlassFish server installation root directory:
glassfish_ install_root_directory/domains/domain1/domains/domain1/config/
d. Review all port settings to make sure that all port values contain non-conflicting numbers.
e. Save and close the domain.xml file.
7. Restart the GlassFish server by entering the following command:
glassfish_ install_root_directory/bin/asadmin start-domain
8. To verify the SBM application is running on the new port, log into the web server using the new HTTP listening port:
http://SBM_management_server:new_listening_port
For more information about the GlassFish server, see Chapter 1 (page 25) of the following document:
https://glassfish.dev.java.net/nonav/javaee5/docs/SJSASEEIG.pdf
Prerequisite: Stop the GlassFish server as described in Step 1 through Step 3 in Changing the GlassFish Server Port.
1. Log in as root to the SBM server.
2. Run the userdel command for each SBM user account.
3. Run the groupdel command for each SBM user account.
svcadm enable agent_name |
|
svcadm disable agent_name |
|
svcs agent_name |
|
svcs -l agent_name |
Copyright © 2007, Sun Microsystems, Inc. All Rights Reserved.