|
| |
| Sun Java System Access Manager 6 2005Q1 Deployment Planning Guide | |
Chapter 5
Deployment ScenariosThis chapter describes various deployment scenarios for Sun Java™ System Access Manager 6 2005Q1, including:
Multiple Servers ScenarioA typical deployment scenario might have two servers, with both Access Manager and Directory Server installed on each one. The Directory Server instances are set up in a multiple master configuration.
The Access Manager installed on the first server points to either instance of Directory Server. During installation using the Java Enterprise System installer, you can choose an existing Directory Server with or without an existing DIT, depending on your setup.
You install the second instance of Access Manager on the second server by running the Access Manager installation scripts, with the instance pointing to an Directory Server with an existing DIT. Access Manager does not write any information to Directory Server that it recognizes as already existing, so there is no danger of overwriting existing data.
Multiple instances of Access Manager can be installed against Directory Server for enhanced performance, directory replication support, or agent failover. To install multiple instances of Access Manager on different servers against the same Directory Server, see Installing Multiple Access Manager Instances.
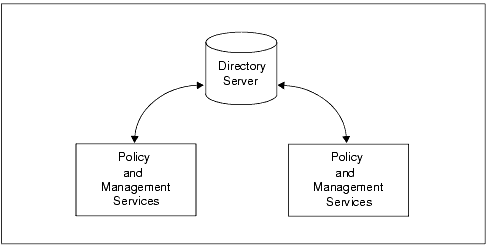
Figure 5-1 shows two Access Manager instances with one Directory Server.
Figure 5-1 Multiple Access Manager Instances With One Directory Server
Installing Multiple Access Manager Instances
To install multiple instances of Access Manager, follow these steps:
- Install the first instance of Access Manager by running the Java Enterprise System installer. For information about the installer, refer to the Sun Java Enterprise System 2005Q1 Installation Guide.
- Create and start a new web container instance for each Access Manager instance you plan to create, using the administration tools for the web container.
For Web Server documentation, see:
http://docs.sun.com/coll/WebServer_05q1For Application Server documentation, see:
http://docs.sun.com/coll/ApplicationServer8_ee_04q4- Copy the AccessManager-base/SUNWam/bin/amsamplesilent file to a writable directory and make that directory your current directory. On Linux systems, this file is in the AccessManager-base/identity/bin directory. For example, you might create a directory named /newinstances.
- Rename the copy of the amsamplesilent file to describe the new instance you want to deploy. For example, if you plan to create a new Access Manager instance for Web Server 6.1, rename the file to amnewws6instance.
In case you might need to uninstall this instance later, save the new amnewws6instance file.
- Set the following variables in the amnewws6instance file:
DEPLOY_LEVEL=1
NEW_INSTANCE=true
WEB_CONTAINER=WS6Set other variables in the amnewws6instance file as required for the new instance you want to create. For a description of these variables, refer to the Access Manager 2005Q1 Administration Guide.
Important All Access Manager instances must use the same value for the password encryption key. To set the AM_ENC_PWD variable for a new instance, copy the value from the am.encryption.pwd attribute in the AMConfig.properties file for the first instance. If you have deployed a new instance with a different key value, see Changing the Password Encryption Key for an Installation.
- Run the amconfig script, specifying the new amnewws6instance file as input. For example, on Solaris systems:
cd AccessManager-base/SUNWam/bin/
./amconfig -s /newinstances/amnewws6instance
The -s option runs the script in silent mode.
The script reads the variables in the amnewws6instance file and then runs in silent mode to configure the new web container.
For more information about creating new Access Manager instances, see the Access Manager 2005Q1 Administration Guide.
Changing the Password Encryption Key for an Installation
The password encryption key is a string that Access Manager uses to encrypt user passwords. All Access Manager subcomponents must use the same password encryption key value that the Identity Management and Policy Services Core uses. If you plan to deploy multiple instances of Access Manager on different servers and install the Administration Console or Common Domain Services for Federation Management, you must use the same password encryption key for all instances.
When you install the first Access Manager instance, the Java Enterprise System installer generates a default password encryption key. You can either accept this default value or specify another value produced by a J2EE random number generator. The installer stores the password encryption key value in the am.encryption.pwd attribute in the AMConfig.properties file.
For more information, see Appendix A, “AMConfig.properties File” in the Access Manager Developer's Guide.
To deploy multiple instances of Access Manager, save the password encryption key value from the am.encryption.pwd attribute after you install the first instance. Then, use this key to set the AM_ENC_PWD variable in the silent install file (amsamplesilent) when you run the amconfig script to deploy each additional instance.
Why change the password encryption key?
The following scenarios explain why you might need to retrieve and change the password encryption key, as described in To change the password encryption key:
- If you are doing a multi-server installation of Access Manager with each instance pointing to the same Directory Server and you did not save the password encryption key used during the first Access Manager install, you must retrieve the key to use when you deploy additional instances.
- If you have created an additional Access Manager instance pointing to the same Directory Server as that of the first Access Manager instance but the additional instance has a different password encryption key, you must modify that encryption key value to match the first instance.
What else needs to be changed if you change the password encryption key?
Passwords and the password encryption key must be consistent throughout a deployment. If you change a password in one place or instance, you must also update the password in all other places and instances.
The serverconfig.xml file contains the encrypted user passwords, which are identified by the <DirPassword> element. For example:
<DirPassword>
Adfhfghghfhdghdfhdfghrteutru
</DirPassword>The puser and dsameuser passwords in serverconfig.xml are encrypted using the password encryption key defined in am.encryption.pwd in the AMConfig.properties file. If you change the password encryption key, you must also re-encrypt these passwords in the serverconfig.xml file using the ampassword utility.
For information about the ampassword utility, see the Access Manager Administration Guide.
To change the password encryption key
- Log in as or become superuser (root) on the server where the first Access Manager instance is installed.
- In the AMConfig.properties file for the first Access Manager instance, get and save the values of the following attributes:
Password encryption key: am.encryption.pwd
Shared secret: com.iplanet.am.service.secretThe AMConfig.properties file is installed in the following directory:
Solaris systems: /etc/opt/SUNWam/config
Linux systems: /etc/opt/sun/identity/config- Log in as or become superuser (root) on the server where the second Access Manager instance is deployed.
- As a precaution, back up the AMConfig.properties and serverconfig.xml files in the /config directory.
- Stop the web container of the second Access Manager instance. For example, if Web Server is the web container:
cd AccessManager-base/SUNWwbsvr/https-host2-name
./stop- Edit the AMConfig.properties file and replace the values for am.encryption.pwd and com.iplanet.am.service.secret with the values that you saved from the first instance in Step 2.
- Since the encryption key defined in am.encryption.pwd is changed, you must run the ampassword utility to re-encrypt and replace the passwords in serverconfig.xml, The passwords in serverconfig.xml are identified by the <DirPassword> element. Consider the following cases:
Passwords are the same. If the password for puser and dsameuser is the same as the amadmin password in serverconfig.xml, run ampassword to re-encrypt the amadmin password. For example on Solaris systems:
cd AccessManager-base/SUNWam/bin/
./ampassword --encrypt passwordwhere password is the password you used for amadmin when you installed the first instance. Use the ampassword output (new encrypted password) to replace the two passwords in serverconfig.xml of the second instance.
Passwords are different. If the passwords for puser and dsameuser are different from the amadmin password in serverconfig.xml, run ampassword to re-encrypt each password (type="proxy" and type="adminv).
Use the ampassword output (new encrypted passwords) to replace the puser and dsameuser passwords in serverconfig.xml of the second instance.
- Restart the web container for Access Manager for the second instance. For example, if Web Server is the web container:
cd AccessManager-base/SUNWwbsvr/https-host2-name
./start
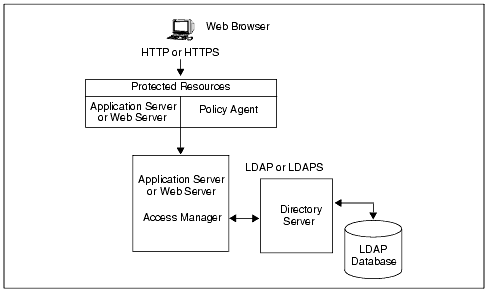
Web DeploymentThe most common use of an Access Manager deployment is when a web browser accesses an application or resource deployed on a web server. The application/resource is protected by Access Manager and communicates with it using a policy agent installed on the web server. Additionally, the web server might have the Access Manager SDK deployed. This architecture does not impose restrictions with regards to the number of web servers within a machine, or the instances of Access Manager across multiple machines. For example, a machine might have multiple web servers, each deploying Access Manager. Similarly, there might be multiple web servers running on different machines, each deploying Access Manager. Figure 5-2 illustrates this simple deployment scenario.
Figure 5-2 Simple Web Deployment Scenario
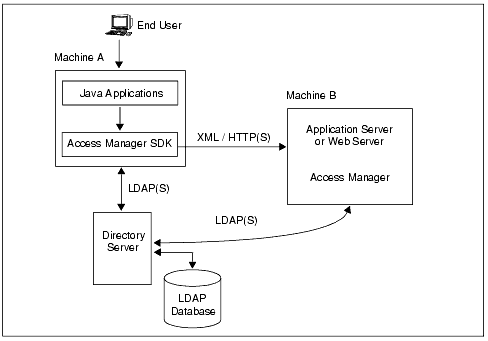
Java Application DeploymentAnother common scenario for Access Manager is one in which Java™ applications access an Access Manager SDK installed directly on the machine where they are deployed. In this scenario, there must be an additional machine with an instance of Sun Java System Web Server or Sun Java System Application Server running, at least, one instance of Access Manager; this machine maintains the state information to provide single sign-on. Figure 5-3 illustrates this Java application deployment scenario.
Figure 5-3 Java Application Deployment
Multiple JVM EnvironmentAccess Manager services are supported in multiple Java Virtual Machine (JVM) environments. That is, an instance of Sun Java System Application Server can be configured to have multiple JVMs with Access Manager services running in all of them. The Access Manager architecture imposes no restrictions on the deployment with regards to the number of Application Server instances within a machine, the number of Access Manager services across multiple machines, or the number of JVMs that a single Application Server can have. See the Java System Application Server documentation for more information on the multiple JVM environment.
Replication ConsiderationsLoad balancing across replicated Directory Servers and locating replicated servers closer to users are two ways to improve Access Manager performance and response time. Directory Server can be set up in single-supplier or multi-supplier configurations. Load-balancing applications such as Sun Java System Directory Proxy Server can also be used. Directory Proxy Server dynamically performs proportional load balancing of LDAP operations across a set of configured Directory Servers. If one or more Directory Server(s) become unavailable, the load is proportionally redistributed among the remaining servers. When the server comes back on line, the load is proportionally and dynamically reallocated.
When Access Manager is installed for replication purposes, each instance of Directory Server and each instance of Access Manager, must be configured with the same values for the following:
Configuring For Replication
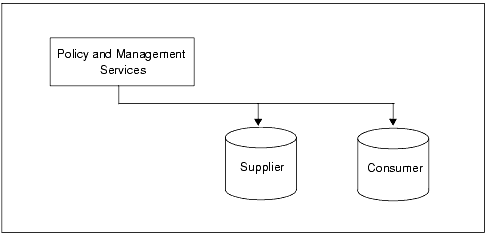
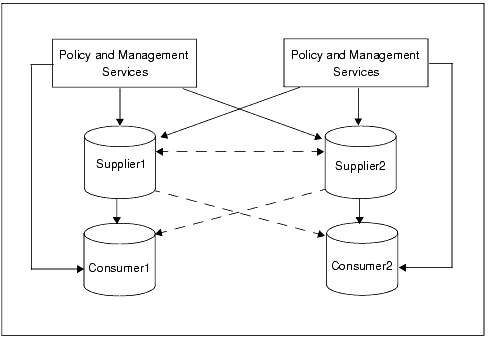
Access Manager can be configured to work with single-supplier or multi-supplier replication. Figure 5-4 illustrates a single-supplier configuration where the consumer is a read-only database. Requests for write operations are referred to the supplier database. This configuration provides some measure of enhanced server performance by distributing the workload to more than one directory.
Figure 5-4 Single Supplier Replication
Figure 5-5 illustrates a multi-supplier configuration using multiple instances of Access Manager. This configuration provides failover protection as well as high availability, resulting in further enhanced server performance.
Figure 5-5 Multi-Supplier Configuration (also known as Multi-Master Replication)
The following steps can be used to configure replication at the root or top level of the Access Manager directory tree when Access Manager has not yet been installed. They can also be used to configure replication at the default organization level.
- Install supplier and consumer Directory Servers.
See the Sun Java Enterprise System 2005Q1 Installation Guide for detailed instructions.
- Set up replication agreements between the supplier and consumer, and verify that the directory referrals and updates are working properly.
See the Directory Server Administration Guide for detailed instructions.
Note
It might be necessary to migrate existing Directory Server data to work with this version of Access Manager. For instructions on how to do this see the Access Manager Migration Guide.
- If deploying Access Manager and Directory Server for the first time, or there is no plan to use existing user data, run the Sun Java Enterprise System 2005Q1 installation program to install Access Manager.
During installation, answer yes when asked if there is an existing Directory Server, and specify the host name and port number for a supplier Directory Server you installed in Step 1.
- In the server where Access Manager Management and Policy services are installed, modify the AMConfig.properties file in the following directory, depending on your platform:
- Solaris systems: /etc/opt/SUNWam/config
- Linux systems: /etc/opt/sun/identity/config
- Modify the following properties to reflect the host and port number of a consumer Directory Server installed in Step 1.
- Modify the following properties to reflect the number of times Access Manager should continue to make the same request when the requested entry is not found.
com.iplanet.am.replica.retries
- Modify the following properties to reflect the number of milliseconds Access Manager should allow to elapse between retries.
com.iplanet.am.replica.delay.between.retries
- In each Access Manager Authentication module enabled, specify the consumer directory installed in Step 1. In the following substeps, the LDAP Authentication module is used as an example:
- In the Access Manager console, choose Service Management.
- Locate the Access Manager service to be reconfigured by clicking the Properties arrow.
- In the right pane:
- In the first field named LDAP Server and Port, type the host name and port number for the primary (consumer) Directory Server. For example, consumer1.example.com:389.
- In the second field named LDAP Server and Port, type the host name and port number for the secondary (or supplier) Directory Server. For example, supplier1.example.com:389.
- Click Submit.
- In the following file: AccessManager-base/SUNWam/config/ums/serverconfig.xml, specify the host name and port number of the consumer directory installed in Step 1 as in Code Example 5-1.
- Restart Access Manager. For information, see the Sun Java System Access Manager Administration Guide (http://docs.sun.com/doc/817-7647).
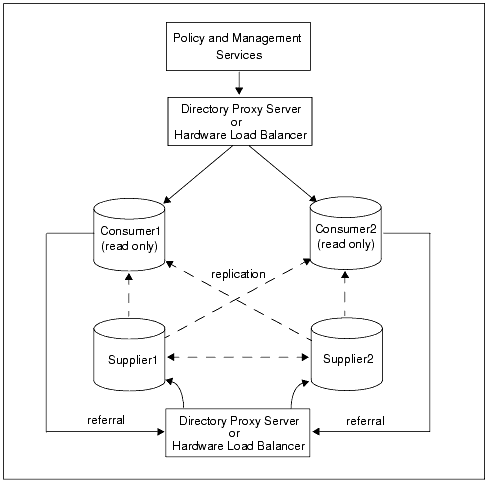
Configuring With a Load Balancer
Figure 5-6 illustrates a multi-supplier configuration that includes Directory Proxy Server. This configuration takes full advantage of Access Manager support for failover, high availability, and managed load-balancing.
Figure 5-6 Multi-supplier Replication With Load Balancer
Using LDAP load balancers adds a layer of high availability and directory failover protection beyond the basic level that comes with Access Manager. For example, Directory Proxy Server can specify what percentage of the load gets redistributed to each of server. And, when all back-end LDAP servers become unavailable, it continues to manage request traffic and begins rejecting client queries. If you choose to install a load-balancer, Access Manager must be configured to recognize the application.
- Before configuring:
- Set up the Directory Servers for replication. For comprehensive information about directory replication and for detailed setup instructions, see “Managing Replication” in the Directory Server Administration Guide.
- Install and configure the LDAP load balancer. Follow the instructions in the documentation that comes with the product.
- In the AMConfig.properties file, modify the following properties to reflect the load balancer host and port number of a consumer Directory Server installed in Step a.
com.iplanet.am.directory.host
com.iplanet.am.directory.portNote: The com.sun.am.event.connection.idle.timeout property specifies the timeout value in minutes after which persistent searches are restarted. Ideally, this value should be lower than the Load Balancer or Firewall TCP timeout value to make sure that persistent searches are restarted before the connections are dropped. The default value of zero (0) specifies that a search is not restarted when a connection is dropped.
- For each Access Manager Authentication module enabled, specify the consumer Directory Server installed in Step a. In the following substeps, the LDAP Authentication module is used as an example:
- In the AccessManager-base/SUNWam/config/ums/serverconfig.xml file (on Solaris systems), specify the host name and port number of the consumer directory installed in Step a as in Code Example 5-2.
- Restart Access Manager. For information, see the Sun Java System Access Manager Administration Guide (http://docs.sun.com/doc/817-7647).
Note
See Appendix E, "Load Balancer Configuration" for more specifics about configuring Access Manager with a load balancer.
Replication Caveats
There may be situations in which directory replication cannot be implemented in an Access Manager deployment. For comprehensive information on planning and implementing Directory Server replication, see the Sun Java System Directory Server Deployment Planning Guide.
Directory Server With a FirewallIf your deployment is configured with a firewall between Access Manager and Directory Server, Access Manager connections can time out if the firewall idle connection timeout value is less than the Directory Server idle connection timeout value (nsslapd-idletimeout attribute). This problem usually occurs during non-peak usage hours when the load on Access Manager is low.
When Directory Server connections are dropped by the firewall, Access Manager does not recognize that the connections have been dropped and then goes through the pool of LDAP connections until all connections are exhausted. Access Manager must be restarted to create a fresh pool of LDAP connections.
To prevent this problem, consider the following solutions:
Setting the Global Timeout Attribute
You might be able to set the Directory Server global nsslapd-idletimeout attribute to a value less than the firewall idle connection timeout value. However, this solution might not be acceptable because nsslapd-idletimeout is a global configuration attribute that affects applications other than Access Manager.
Setting the Timeout for Individual Client Connections
Directory Server allows you to set specific attributes for individual client connections. The nsIdleTimeout attribute specifies the idle connection timeout value for individual clients. This value takes precedence over the nsslapd-idletimeout value set for the global Directory Server configuration.
Set the nsIdleTimeout attribute for the Access Manager user that binds to the LDAP directory, which by default is amldapuser.
To add the nsIdleTimeout attribute for amldapuser, use either the Directory Server console or the ldapmodify tool. For example, to use ldapmodify:
ldapmodify -h host-name -p port -D "cn=Directory Manager" -w password
dn: cn=amldapuser,ou=DSAME Users, dc=example,dc=com
changetype: modify
add: nsIdleTimeout
nsIdleTimeout: timeout-valueFor timeout-value, specify a value less than the connection idle timeout value set for the firewall. Thus Directory Server will close the Access Manager connections for amldapuser before they are closed by the firewall.
For information about the Directory Server attributes and the ldapmodify tool, see the Directory Server Administration Guide on the following Web site:
http://docs.sun.com/coll/DirectoryServer_05q1
Access Manager and Portal Server DeploymentFor the Java Enterprise System 2005Q1 release, you can deploy Access Manager with Portal Server either on the same physical server or on multiple servers.
Installation on a Single Server
In this scenario, Access Manager and Portal Server are installed on the same physical server. You must also install or have access to an installed version of Directory Server, which can be either on the same server or a remote server.
To install these components, run the Java Enterprise System installer in a single session and make these selections:
- On the Component Selection panel, select these products and subcomponents:
- Under Communication & Collaboration Services, select Portal Server 6 2005Q1.
- Under Directory & Identity Services, select Access Manager 6 2005Q1 and its subcomponents:
- Identity Management and Policy Services Core
- Access Manager Administration Console
- Common Domain Services for Federation Management
- Access Manager SDK
Important By default, when you select Portal Server 6 2005Q1, the installer installs only the Access Manager SDK, so you must specifically check the other subcomponents.
- Install and configure one of the following web containers:
Installation on Multiple Servers
In this scenario, Portal Server will access Access Manager on a local server from a remote server. You must also install or have access to an installed version of Directory Server, which can be either on a local or remote server.
- On the local server, install Access Manager and a web container. You must install and configure the components on this server before you install and configure the components on the remote server.
- On the remote server, install Portal Server and the Access Manager SDK. You do not need to select the other Access Manager subcomponents on the remote server.
For more information, refer to these documents:
- Running the installer: Sun Java Enterprise System 2005Q1 Installation Guide (http://docs.sun.com/doc/819-0056).
- Deploying Portal Server: Sun Java System Portal Server Deployment Planning Guide (http://docs.sun.com/doc/817-7697).
- Configuring Access Manager: Sun Java System Access Manager Administration Guide (http://docs.sun.com/doc/817-7647).
Session FailoverSun Java™ System Access Manager 6 2005Q1 provides a Web container independent session failover implementation using Sun Java System Message Queue (Message Queue) as the communications broker and the Berkeley DB by Sleepycat Software, Inc. as the session store database.
Access Manager session failover retains a user’s authenticated session state in the event of a single hardware or software failure, which allows the user’s session to fail over to a secondary Access Manager instance without losing any session information or requiring the user to login again.
Topics include:
Overview of Access Manager Session Failover
Access Manager 6 2005Q1 session failover includes these components:
- Two or more instances of Access Manager 6 2005Q1, with each instance running on a supported web container on a different host server.
- Message Queue broker cluster that manages the session messages between the Access Manager instances and the session store database.
- Berkeley DB by Sleepycat Software, Inc. (http://www.sleepycat.com/) as the session store database. The Berkeley DB client daemon is amsessiondb.
By default, Access Manager uses Message Queue and the Berkeley DB as the default communications/repository solution. If you prefer, you can use another JDBC 2.0 compliant repository (database) as the back-end session store with the corresponding implementation of the pluggable session repository interface in place. If you use another non-default session repository, however, extra configuration (not covered in this guide) is required.
Access Manager session failover follows the Message Queue publish/subscribe (topic destinations) delivery model:
- When a user initiates, updates, or ends a session, Access Manager publishes a session creation, update, or deletion message to the Message Queue broker cluster.
- The Berkeley DB client (amsessiondb) subscribes to the Message Queue broker cluster, reads the session messages, and stores the session operations in the database.
If an Access Manager instance fails due to a single hardware or software problem, a user’s session associated with that instance fails over to a secondary Access Manager instance, as follows:
- The secondary Access Manager instance publishes a query request to the Message Queue broker cluster for the user's session information.
- The Berkeley DB clients (amsessiondb) subscribing to the same session request topic on the Message Queue broker cluster receive the query request retrieve the corresponding entry from the session database, and then publish the user's session information to the Message Queue broker cluster with the session response topic.
- The secondary Access Manager instance subscribing to the session response topic receives the response with the user's session and continues without losing any session information or the user having to login again.
If a Message Queue broker fails, Access Manager continues to operate in non-session failover mode. When the Message Queue broker is later restarted, Access Manager returns to session failover mode.
For more information about the Message Queue components and the publish/subscribe delivery model, see the Sun Java System Message Queue Technical Overview: http://docs.sun.com/doc/819-0069.
Hardware and Software Requirements
Access Manager session failover is supported on the following platforms:
Required components for Access Manager session failover include:
- Sun Java System Access Manager 6 2005Q1 (6.3). In a multi-server deployment, all Access Manager instances must access the same Directory Server.
- Web container to run Access Manager: Web Server 6.1 2005Q1 SP4, Application Server Enterprise Edition 8.1 2005Q1, IBM WebSphere Application Server, or BEA WebLogic.
- Sun Java System Message Queue 3 2005Q1 (3.6)
- Berkeley DB version 4.2.52
- JDK 1.4.x and later
For the latest information about the supported versions of these platforms and components, refer to the Access Manager Release Notes (http://docs.sun.com/doc/817-7642).
Deployment Scenarios
The section describes several scenarios for deploying the Access Manager session failover components.
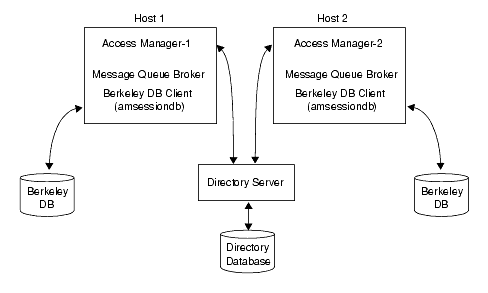
Figure 5-7 shows a scenario with two host servers, each running an Access Manager instance on a supported web container, the Message Queue broker cluster, and the Berkeley DB client (amsessiondb). Both Access Manager instances access the same Directory Server.
Figure 5-7 Access Manager Session Failover Deployment Scenario 1
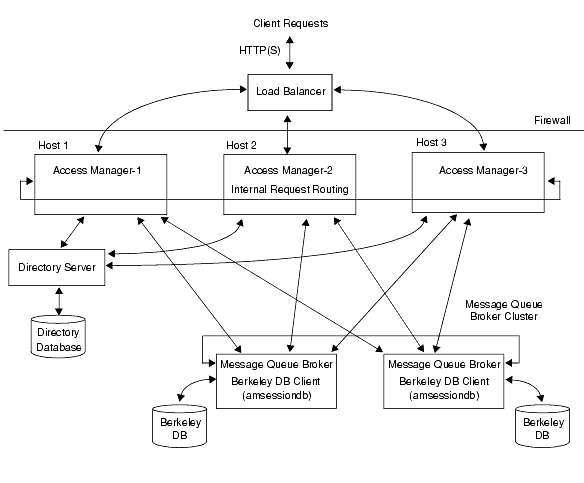
Figure 5-8 shows a deployment scenario using Access Manager session failover that includes:
- Three Access Manager instances, running on different host servers on supported web containers.
- Message Queue brokers, running in cluster mode on different servers.
- Berkeley DB client (amsessiondb), running on the same servers as the Message Queue brokers.
- Directory Server, accessed by all Access Manager instances.
- Load balancer to improve performance and security.
- Client requests can originate from a Web browser, C or Java application using the Access Manager SDK, or J2EE/Web agent.
Figure 5-8 Access Manager Session Failover Scenario 2
As a variation of the deployment shown in Figure 5-8, you can deploy the Berkeley DB client (amsessiondb) on two different servers to improve performance.
You can add additional sites similar to the one shown in Figure 5-8, with each site accessing the same Directory Server. Session failover, however, occurs only for the Access Manager instances within a site; cross-site session failover is not supported in the current release.
Installation of Session Failover Components
Table 5-1 describes how to install the components required for Access Manager session failover.
Table 5-1 Installation of Access Manager Session Failover Components
Component
How to install ...
Access Manager 6 2005Q1
Install the first instance of Access Manager using the Java ES 2005Q1 Installer. The installer adds the packages required for session failover.
Reference: Sun Java Enterprise System 2005Q1 Installation Guide:
http://docs.sun.com/doc/819-0056Run the amconfig script to:
Reference: Sun Java System Access Manager Administration Guide:
http://docs.sun.com/doc/817-7647Refer to the deployment scenario shown in Figure 5-7.
Sun Java System Message Queue
Install Message Queue using the Java ES installer.
Reference: Sun Java Enterprise System 2005Q1 Installation Guide:
http://docs.sun.com/doc/819-0056Berkeley DB
The Java ES installer and amconfig script adds the Access Manager packages or RPMs required for session failover.
On servers that are not running an instance of Access Manager, add the following packages or RPMs, depending on your operating system.
For the Solaris OS, add the following packages using the pkgadd command:
Reference: Solaris documentation:
http://docs.sun.com/app/docs/prod/solarisFor the Linux OS, add the following RPMs using the rpm command:
Reference: Linux online man pages.
Refer to the deployment scenario shown in Figure 5-8.
Tip
In a multi-server deployment, all instances of Access Manager must use the same password encryption key value. When you install the first instance, save the password encryption key value (am.encryption.pwd property in the AMConfig.properties file). Then, when you run the amconfig script to deploy Access Manager instances on other servers, set the AM_ENC_PWD variable to this same value in the amconfig script input file.
Configuration of Session Failover
To configure Access Manager session failover, follow these steps:
Modify the AMConfig.properties Files
On each host server that is running an Access Manager instance, modify the following properties in the AMConfig.properties file to point to the load balancer. For example:
com.iplanet.am.server.protocol=http
com.iplanet.am.server.host=lbhost.example.com
com.iplanet.am.server.port=80
com.iplanet.am.console.protocol=http
com.iplanet.am.console.host=lbhost.example.com
com.iplanet.am.console.port=80
com.iplanet.am.profile.host=lbhost.example.com
com.iplanet.am.profile.port=80
com.iplanet.am.naming.url=http://lbhost.example.com:80/amserver/namingserv iceSet this parameter if your deployment has implemented the Liberty Alliance Project:
com.sun.identity.liberty.interaction.wspRedirectHandler=http://lbhost.exam ple.com:80/amserver/WSPRedirectHandler
Disable Cookie Encoding
On each host server that is running an Access Manager instance, disable cookie encoding:
The Access Manager client should also not do any cookie encoding or decoding. A remote SDK client must be in sync with the Access Manager server side settings, either in the AMConfig.properties file or the web container’s sun-web.xml file.
Edit the Web Container server.xml File
On each host server that is running an Access Manager instance, add the actual installed locations of imq.jar and jms.jar in the server.xml (or equivalent) configuration file for the Access Manager Web container. For example, on Solaris systems:
<JAVA javahome="/usr/jdk/entsys-j2se" serverclasspath="/usr/share/lib/imq.jar:/usr/share/lib/jms.jar:/opt/SUNWwb svr/bin/https/jar/webserv-rt.jar:${java.home}/lib/tools.jar:/opt/SUNWwbsvr /bin/https/jar/webserv-ext.jar:/opt/SUNWwbsvr/bin/https/jar/webserv-jstl.j ar:/usr/share/lib/ktsearch.jar"
Add a New User in the Message Queue Server
If you don't want to use the “guest” user as the Message Queue user name and password, add a new user and password to connect to the Message Queue broker on servers where Message Queue is installed. For example, on Solaris systems, to add a new user named amsvrusr:
# /usr/bin/imqusermgr add -u amsvrusr -p password
Then make the “guest” user inactive by issuing the following command:
# /usr/bin/imqusermgr update -u guest -a false
Create a Secondary Configuration Instance for the Load Balancer
In the Access Manager console, create a new secondary configuration instance for your load balancer:
- Login to the Access Manager console as amadmin.
- Click Service Configuration and then Session.
- Create a new Secondary Configuration Instance for the load balancer:
- Instance Name: Specify the load balancer URL.
For example: http://lbhost.example.com:80- Session Store User and Session Store Password: Use the name and password you added under Add a New User in the Message Queue Server.
- Session Cluster Server List: Specify the server IDs from the platform list that are participating in the same session failover cluster.Do not include the server ID of load balancer. For example: 02,03,04
- Database URL: Specify the Message Queue broker address list.
For example: mqsvr1.example.com:7777,mqsvr2.example.com:7777Note: The default Message Queue port is 7676. If you are using Application Server as the web container, however, consider using another port, since port 7676 might already be in use by Application Server. For the range of the valid port numbers, refer to the Message Queue documentation.
- Click OK to save your changes.
Edit the amsessiondb Script (if Needed)
Access Manager includes the amsessiondb script in the /bin directory:
The amsessiondb script connects to the Message Queue broker using the Message Queue user name and password described under Add a New User in the Message Queue Server. The script starts the Berkeley DB client (amsessiondb), creates the database, and allows you to set the database values shown in Table 5-2.
The amsessiondb script contains variables that specify the locations of the Access Manager session failover components:
JAVA_HOME=/usr/j2se
IMQ_JAR_PATH=/usr/share/lib
JMS_JAR_PATH=/usr/share/lib
BDB_JAR_PATH=/usr/share/db.jar
BDB_SO_PATH=/usr/lib
AM_HOME=/opt/SUNWam
If you any of these components are not installed in their default directories, edit the amsessiondb script and set the variables, as needed, to the correct paths.
Access Manager Session Failover Scripts
Access Manager provides the Berkeley DB client (amsessiondb) amsessiondb and amsfopasswd scripts in the /bin directory:
The default AccessManager-base installation directory is /opt on Solaris systems and /opt/sun on Linux systems.
amsessiondb
The amsessiondb script starts the Berkeley DB client (amsessiondb), creates the database, and allows you to set database values, as described in Table 5-2. You must run the amsessiondb script on all servers where you want to create the Berkeley DB.
Important Before you run the amsessiondb script, make sure you have the paths set correctly, as described under Edit the amsessiondb Script (if Needed).
When you run the amsessiondb script, you can enter the Message Queue broker password on the command lines as clear text (-w or --password option). However, if you prefer to use an encrypted password in a file (-f or --passwordfile option), run the scripts as follows:
- Run the amsfopasswd script to encrypt the Message Queue broker clear text password to a file.
- Run the amsessiondb script, using the file from Step 1 for the -f or --passwordfile option.
amsessiondb Usage
amsessiondb [ -u username | --username username ]
[ -w password | --password password | -f filename | --passwordfile filename ]
[ -c cachesize | --cachesize cachesize ]
[ -b dbdirectory | --dbdirectory dbdirectory ]
-a MQServerAddressList | --clusteraddress MQServerAddressList
[ -s numcleanexpiredsessions | --numcleansessions numcleanexpiredsessions ]
[ -v | --verbose ]
[ -i statsinterval | --statsInterval statsinterval ]
amsessiondb -h | --help
amsessiondb -n | --version
Table 5-2 amsessiondb Script Arguments
Argument
Description
-u username |
--username usernameUser name to connect to the Message Queue broker. Specify the user you specified under Add a New User in the Message Queue Server.
Default is “guest”.
-w password | --password password
Clear text password for the user name used to connect to the Message Queue broker. Specify the password you specified under Add a New User in the Message Queue Server.
Default is “guest”.
-f filename |
--passwordfile filenameFile that contains the encrypted password for accessing the Message Queue broker.
Note If you specify this option, do not specify the -w or --password option.
-c cachesize | --cachesize cachesize
Cache size in MB. Default is 8 MB.
-b dbdirectory |
--dbdirectory dbdirectoryBase directory where the Berkeley DB database (amsessions.db) is created.
Default is “sessiondb”, created in the directory where you are running the amsessiondb script.
Note To ensure that you have sufficient disk space where you are creating the database, allow 1 GB for each 100,000 sessions.
-a MQServerAddressList |
--clusteraddress MQServerAddressListMessage Queue broker address list, in the format:
host1:port[,host2:port,host3:port,...]
For example: mqsvr1:7777,mqsvr2:7777
-s numcleanexpiredsessions |
--numcleansessions numcleanexpiredsessionsNumber of expired sessions to be deleted for each cleanup interval.
Default is 1000.
-v | --verbose
Run in verbose mode. Results are sent to the standard output.
Default is non-verbose mode.
-i statsinterval |
--statsInterval statsintervalInterval in seconds to print the statistics for total requests, reads, writes, and deletes to the standard output.
Default is 60 seconds.
-h | --help
Display amsessiondb command usage and then exit.
-n | --version
Return the version of Access Manager currently installed and then exit.
amsessiondb Example
amsessiondb -u amsvrusr -f pwfile -c 128 -b sessiondb -a host1:7777,host2:7777
amsfopasswd
The amsfopasswd script accepts the Message Queue broker password in clear text and returns the encrypted password in a file. You can then use this file as input to the amsessiondb script.
amsfopasswd Usage
amsfopasswd -f filename | --passwordfile filename
-e password | --encrypt password
amsfopasswd -h | --help
Table 5-3 amsfopasswd Script Arguments
Argument
Description
-f filename | --passwordfile filename
Path to the destination file where amsfopasswd stores the encrypted password.
-e password | --encrypt password
Clear text password that amsfopasswd encrypts.
-h | --help
Display the amsfopasswd command usage and then exit.
amsfopasswd Example
amsfopasswd -f /tmp/pwfile -c mypassword
Startup of Session Failover Components
To start the Access Manager session failover components, follow this sequence:
Start the Message Queue Brokers
On each server where Message Queue is installed, use the imqbrokerd command to start the Message Queue broker. For example, on Solaris systems:
# /usr/bin/imqbrokerd -vmargs "-Xms256m -Xmx2096m" -port 7777 -cluster mqsvr1:7777,mqsvr2:7777
where mqsvr1 and mqsvr1 are the Message Queue server names and 7777 is the Message Queue broker port number you are using.
For more information about the imqbrokerd command, see the Sun Java System Message Queue Administration Guide (http://docs.sun.com/doc/819-0066).
Start the Berkeley DB Client (amsessiondb)
Before you start the Berkeley DB client (amsessiondb), make sure that the database directory exists:
- If you do not plan to specify the -b (or --dbdirectory) option, make sure that the default sessiondb directory exists under the directory where you plan to run the amsessiondb script. The sessiondb directory must also be empty.
- If you plan to specify the -b (or --dbdirectory) option, make sure that directory you specify exists and that it is empty.
To ensure that you have sufficient disk space where you plan to create the database, allow 1 GB for each 100,000 sessions.
Then, on each server where you want to create a database, run the amsessiondb script. For example, on a Solaris system:
# cd /opt/SUNWam/bin
# ./amsessiondb -u amsvrusr -w password -b /opt/AMSessionDBFiles -a mqsvr1:7777,mqsvr2:7777or
# cd /opt/SUNWam/bin
# ./amsessiondb -u amsvrusr -f pwfile -b /opt/AMSessionDBFiles -a mqsvr1:7777,mqsvr2:7777where:
amsvrusr is the user that you added under Add a New User in the Message Queue Server and password is the password entered on the command line.
/opt/AMSessionDBFiles is the existing database directory.
pwfile is a file generated by the amsfopasswd script that contains the encrypted Message Queue password.
mqsvr1:7777,mqsvr2:7777 is the Message Queue broker address list, with 7777 as the Message Queue broker port number.
For the amsessiondb script syntax and options, see the amsessiondb script.
Start Each Access Manager Instance
On each host server, start Access Manager. For information, see the Sun Java System Access Manager Administration Guide (http://docs.sun.com/doc/817-7647).
Federation ManagementThis section describes the configuration for a deployment using the Federation Management functionality of Access Manager. This scenario assumes that Domain A, Domain B and Domain C each contain two instances of Access Manager and one instance of Directory Server. Domain A and Domain B have Service Provider A and Service Provider B, respectively. Domain C has Identity Provider C.
In order to manage this federation scenario correctly there are two concepts to understand.
- A Hosted Provider defines a specific instance of Access Manager as one acting as a service provider.
- A Remote Provider contains data related to any type of provider hosted on machine different from the one on which the instance of Access Manager is currently being configured. This may or may not be an instance of Access Manager; it could be any compliant service provider or identity provider.
So, in the above defined scenario, Service Provider A will configure itself as a hosted provider and Service Provider B and Service Provider C as remote providers. Service Provider B will configure itself as a hosted provider and Service Provider A and Service Provider C as remote providers. Service Provider C will configure itself as a hosted provider and Service Provider A and Service Provider B as remote providers. Once these are configured, an Authentication Domain can be created in each of the domains.
For information about Federation Management, see the Access Manager Federation Management Guide.