 To Create and Configure a Calendar Server Instance
This procedures runs the Calendar Server configuration wizard to create and configure a Calendar Server instance. For a summary of the input values, see Calendar Server Configuration Wizard Details.
Steps
-
Change directory to the Calendar Server directory:
cd /opt/SUNWics5/cal/sbin
-
Run the command that starts the configuration wizard:
./csconfigurator.sh
The configuration wizard’s Welcome page is displayed.
-
Click Next to continue.
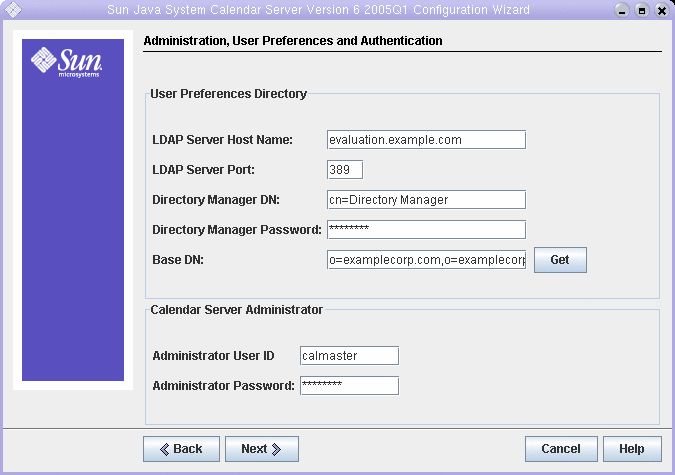
The Administration, User Preferences and Authentication page is displayed.
Figure 6–13 Administration, User Preferences and Authentication Page

-
Do the following:
-
In the LDAP Server Host Name text field, confirm that the default value is evaluation_host.
-
In the LDAP Server Port text field, confirm that the default value is 389.
-
In the Directory Manager DN text field, confirm that the default value is cn=Directory Manager. There must be a space between Directory and Manager.
-
In the Directory Manager Password text field, type password.
-
In the Base DN text field, type o=examplecorp.com,o=examplecorp.
Tip –Your Calendar Server Base DN specifies the LDAP organization (o=examplecorp.com,o=examplecorp) that you created with the Messaging Server configuration wizard.
-
In the Administrator User ID text field, confirm that the default value is calmaster.
-
In the Administrator Password text field, type password.
Click Next. The wizard verifies the connection to the default Directory Server instance. A Question dialog box is displayed.
-
-
Click Create It to create the calmaster user.
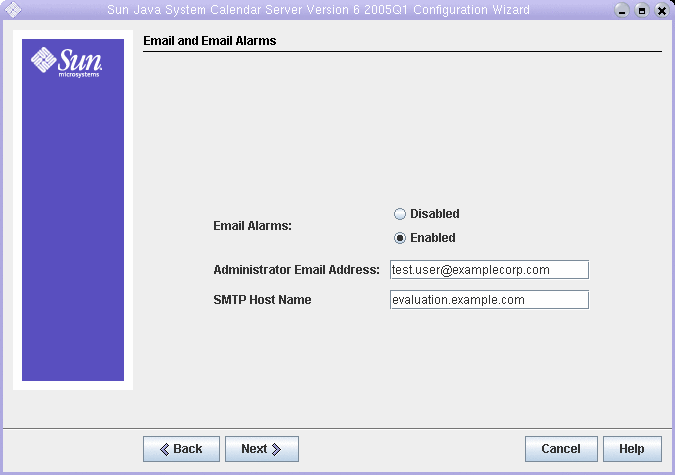
The Email and Email Alarms page is displayed.
Figure 6–14 Email and Email Alarms Page

-
Do the following:
-
In Email Alarms, confirm that the default selection is Enabled.
-
In the Administrator Email Address text field, type calmaster@examplecorp.com.
-
In the SMTP Host Name text field, confirm that the default value is evaluation_host.
Click Next. The Problem Connecting to SMTP Host dialog box might be displayed.
-
-
In the Problem Connecting to SMTP Host dialog box, click Accept.
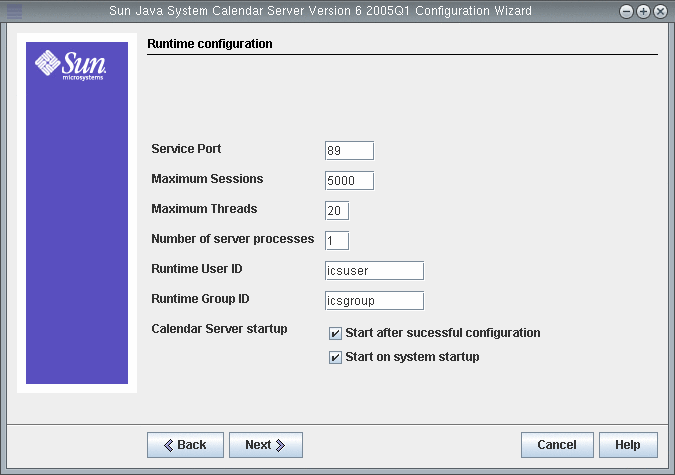
The Runtime Configuration page is displayed.
Figure 6–15 Runtime Configuration Page

-
Do the following:
-
In the Service Port text field, type 89.
-
In the Maximum Sessions text field, confirm that the default value is 5000.
-
In the Maximum Threads text field, confirm that the default value is 20.
-
In the Number of Server Processes text field, confirm that the default value is 1.
-
In the Runtime User ID text field, confirm that the default value is icsuser.
-
In the Runtime Group ID text field, confirm that the default value is icsgroup.
-
Confirm that Start After Successful Configuration is selected.
-
Confirm that Start on System Startup is selected.
Click Next. The Create New User ID dialog box is displayed.
-
-
Click Create User ID to create the icsuser account.
The Directories to Store Configuration and Data Files page is displayed.
-
Click Next to accept the default values.
The Create New Directory? dialog box is displayed.
Tip –If you previously installed and uninstalled Java Enterprise System, a different message will appear, stating that /var/opt/SUNWmsgsr is not empty. Click to overwrite the existing directory. Do this for each directory.
-
Click Create Directory. Do this for each new directory.
The Archive and Hot Backup Configuration page is displayed.
-
Click Next to accept the default values.
The Create New Directory? dialog box is displayed.
-
Click Create Directory. Do this for each new directory.
The Ready to Configure page is displayed.
-
Click Configure Now.
When configuration is complete, the Configuration Summary page is displayed.
-
Review the details and click Close.
Tip –In the Runtime Configuration page, you selected the Start after successful configuration option. Calendar Server now starts automatically.
- © 2010, Oracle Corporation and/or its affiliates
