| Sun StorEdge S1 Array Installation and Maintenance Manual |
| Sun StorEdge S1 Array Installation and Maintenance Manual |
| C H A P T E R 1 |
|
Sun StorEdge S1 Array Overview |
This chapter describes the components of the array, except for the disk drives. For information on the drives, refer to the disk drive documents that you received with the array. This chapter is organized as follows:
The Sun StorEdge S1 array is a Low Voltage Differential (LVD) Ultra3 SCSI unit that is 1 RU (1.73 inches) in height. The thinness of the unit enables you to stack many units in a single rack. The array has a single power supply (available in AC or DC versions) and up to three hot-swappable, LVD SCSI disk drives. Because the array supports LVD SCSI, you can connect up to four arrays to one LVD SCSI bus.

The array accepts up to three 1-inch high drives. For more information on the Sun StorEdge S1 array disk drives, see the following:
The Sun StorEdge S1 array has the following features:
Offers isolated ground option and dual input (for DC power model only)
The ship kit contains the following items:
The following table lists the supported cables you can order from your Sun supplier.
VHDCI connectors are narrower and thinner than SCSI-3 connectors, as shown in the following figure.

The Sun StorEdge S1 array does not ship with brackets needed for mounting the array in a four-post rack or cabinet. You need to order the 19 inch Rackmount Kit, part number X6920A, from your Sun supplier to obtain the needed mounting brackets. For mounting instructions, see To Mount the Array Into a Four-Post Rack or Cabinet.
The rackmount kit contains the parts for two adjustable mounting brackets, along with screws and nuts needed to assemble the brackets, to attach the brackets to the rack, and to secure the array in the rack. The kit also contains two cable mounting brackets and an accessory kit
The accessory kit contains additional parts whose use is described in To Mount the Array Into a Four-Post Rack or Cabinet. The Rackmount Accessory Kit envelope contains the components listed in the following table.
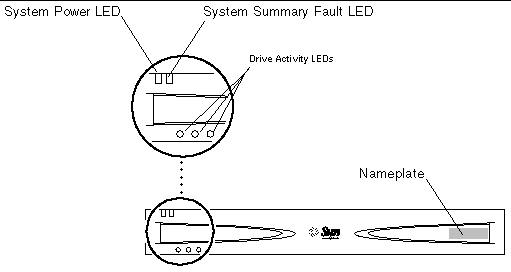
The front bezel of the array has five LEDs on the left and a blank nameplate on the right, as shown in the following figure.
 [ D ]
[ D ]
You can attach an identifying sticker or label to the nameplate. If you want to remove the nameplate so that you can attach it to another array, see To Remove the Nameplate From the Bezel.
For information about what the front panel LEDs indicate, see Checking Front Panel LEDs.
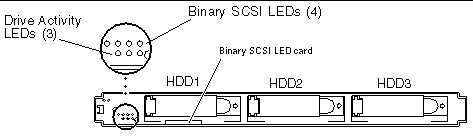
You can remove the front bezel to access hard drives and to view the SCSI ID LEDs. For how to remove the bezel, see To Remove the Bezel.
The SCSI LEDs are shown in the following figure. A pull-out card attached to the system summarizes the LED information. For more information about using these LEDs, see the following:
 [ D ]
[ D ]
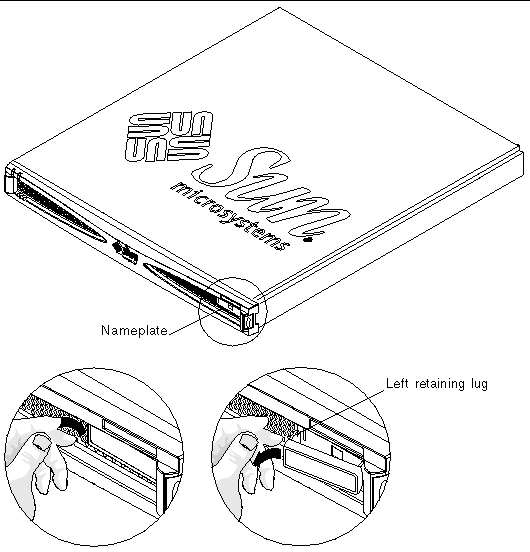
You can place a label onto the front of the nameplate. This nameplate is removable so you can easily transfer a label onto another system, by following the instructions below:
1. Press the left end of the nameplate towards the right (FIGURE 1-5).
Pressing the left of the nameplate towards the right releases the retaining lug on the left of the bezel and causes the nameplate to swing out from the bezel.
 [ D ]
[ D ]
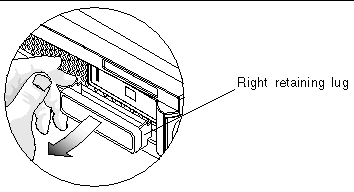
2. Pull the retaining lug on the right away from the bezel so that the nameplate comes free of the bezel (see FIGURE 1-6).
 Insert the nameplate's right retaining lug into its slot in the bezel, then gently push the left retaining lug into its slot until it clicks.
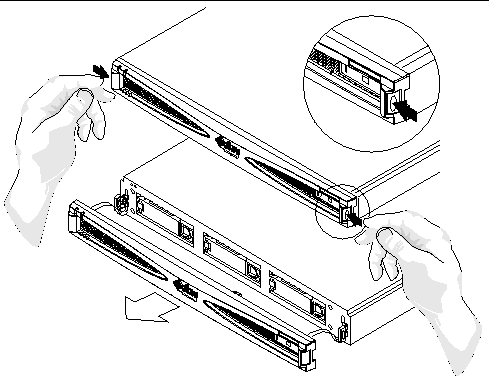
Before you can add or remove disk drives or do other maintenance procedures, you must remove the bezel from the front of the system.
Release the front bezel by pressing the latches on both ends and pulling the bezel away from the array (FIGURE 1-7).
The bezel is tethered to the system so that it hangs from the front of the chassis after removal.
For information about how to detach the tethers from the chassis, see To Clean the Front Bezel Screen.
 [ D ]
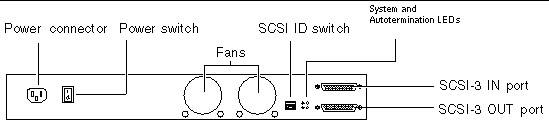
[ D ]The following figure shows the components at the back of an AC version of the Sun StorEdge S1 array.
|
Note - The AC and DC versions have the same power switch, fans, SCSI ID switch, System and Autotermination LEDs, and SCSI IN and OUT ports. See FIGURE 1-13 for the back of a DC version. |
 [ D ]
[ D ]The array has one rocker power switch to control the power supply, which is illustrated in the following figure.
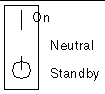
The following table describes each of the rocker switch's settings.
|
When the switch is released from the On position, the switch returns to the Neutral position, and the power supply remains on. |
|
|
Note - If you remove the power cable from the system with the power switch in the On position, full power returns to the system when you replace the cable. |
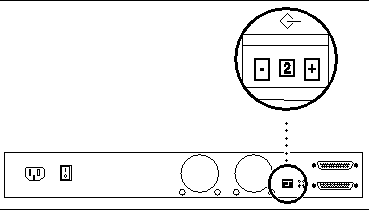
The SCSI ID switch illustrated in the following figure sets the base SCSI ID for the drives.
 [ D ]
[ D ]
See Setting the SCSI IDs for the Drives for how to use the switch to set the base SCSI ID for the disk drives.
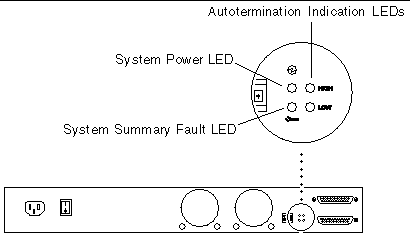
The following figure illustrates the back panel LEDs.
 [ D ]
[ D ]The System Power and System Summary Fault LEDs give the same diagnostic information as the System Power and System Summary Fault LEDs at the front of the array.
The Autotermination Indication LEDs indicate if the array is part of an UltraSCSI, wide SCSI, or narrow SCSI daisy chain. They also indicate the array's position in the daisy chain.
For more information on interpreting back panel LEDs, see the following:
The array has a single power supply that provides power to the internal components. The power supply in your system is either AC- or DC-powered.
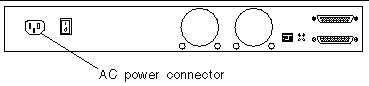
An AC power supply converts incoming AC voltage to outgoing DC voltages. The following figure shows an AC power connector on the back of an AC version of the Sun StorEdge S1 array.
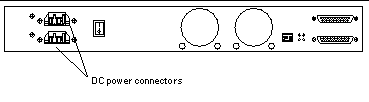
The DC power supply converts incoming -48 VDC voltage to outgoing DC voltage. The DC version has two DC connectors so you can connect a single array to two different -48 VDC power sources.
|
Note - Each DC power source should have a 10-amp circuit breaker. |
The following figure shows the two DC power connectors on the back of a DC version of the Sun StorEdge S1 array.
The cooling system ensures adequate airflow through the system. The internal fans can achieve a maximum airflow of approximately 20 cfm in free air.
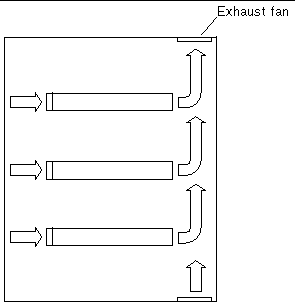
As illustrated in the following figure, the air is drawn through the front of the array and expelled from the back of the array.
Airflow requirements differ for an open-rack system and a closed-rack system. FIGURE 1-15 shows the air flowing from the back of the array straight out the open back of an open-rack system.

FIGURE 1-16 shows the air flowing from the back of the array and then up and out through the exhaust fan at the top back of a closed-rack (cabinet) system.

|
Caution - If the array is installed in a closed or multi-unit rack assembly, the operating ambient temperature of the rack environment might exceed the room's ambient temperature. Ensure that the rack environment ambient temperature does not exceed the system's environmental specifications. For more details, see Environmental Specifications. |
The disk drives in the Sun StorEdge S1 array are all hot-swappable. See the disk drive documentation that comes with the array for information about the drives installed in your system.
The SCSI IDs for the disk drives in the array are set using the SCSI ID switch at the back of the array, as described in, Setting the SCSI IDs for the Drives. You can refer to either the drive LEDs on the front of the array or the SCSI ID switch at the back of the array to determine which SCSI IDs are assigned to the drives. See the following for more information:
If you ordered a array with fewer than three disk drives, foam fillers occupy the empty disk drive slots. The foam fillers are air baffles that enable the to maintain maximum cooling. If any slot does not contain a disk drive, you must fill the slot with a foam filler to ensure proper cooling.

|
Caution - If the array is running and a drive slot does not contain a disk drive or foam filler, the array cannot cool properly and might overheat. |
The array can be used as additional disk storage for an existing host system. Storage management support is provided by the Sun StorEdge S1 Storage Subsystem Manager 2.0 software.
| Sun StorEdge S1 Array Installation and Maintenance Manual | 816-0080-12 |
Copyright © 2003, Sun Microsystems, Inc. All rights reserved.

