| SPARC Enterprise M3000/M4000/M5000/M8000/M9000 Servers Administration Guide |
| C H A P T E R 4 |
|
Domain Configuration |
This chapter describes how to set up and manage domains with XSCF firmware. On your server, by default from the factory, there is one domain with the Oracle Solaris OS installed, and its Domain Identification Number (DID) is 0 (zero).
This chapter contains these sections:
These sections provide details on domain configuration:
A domain is an independent system resource that runs its own copy of the Oracle Solaris OS. Domains divide a system’s total resources into separate units that are not affected by each other’s operations. Domains can be used for different types of processing; for example, one domain can be used to test new applications, while another domain can be used for production purposes.
The entry-level server supports only a single domain, one CPU, 8 dual inline memory modules (DIMMs), and I/O. Midrange and high-end servers support multiple domains and one to 16 physical system boards (PSBs). One PSB consists of 4 CPUs, 32 DIMMs, and I/O. The I/O varies by server, and can include PCIe slots, PCI-X slots, and built-in I/O.
Entry-level servers have a fixed system board configuration by default; you do not need to reconfigure the system board.
To use a PSB in your midrange or high-end server, the hardware resources on the board must be logically divided and reconfigured as eXtended System Boards (XSBs). There are two modes of XSBs:
The following figures show a PSB in Uni-XSB mode on entry-level, midrange, and high-end servers.
FIGURE 4-1 A Physical System Board in Uni-XSB Mode on an Entry-Level Server

FIGURE 4-2 A Physical System Board in Uni-XSB Mode on a Midrange Server

FIGURE 4-3 A Physical System Board in Uni-XSB Mode on a High-End Server

| Note - Although a CMU with two CPUs can be configured into Quad-XSB mode on a high-end server, the server generates a "configuration error" message for those XSBs that do not have a CPU and memory. |
FIGURE 4-4 shows a PSB in Quad-XSB mode on a midrange server, and FIGURE 4-5 shows a PSB in Quad-XSB mode on a high-end server.
The logical dividing between Uni-XSB and Quad-XSB is done using the setupfru command.
FIGURE 4-4 A Physical System Board in Quad-XSB Mode on a Midrange Server

FIGURE 4-5 A Physical System Board in Quad-XSB Mode on a High-End Server

A domain consists of one or more XSBs. Each domain runs its own copy of the Oracle Solaris OS. A domain must have, at a minimum, 1 CPU, 8 DIMMs, and I/O.
In FIGURE 4-4, one domain (for example, domain 0) must contain XSB 00-0, and the second domain (for example, domain 1) must contain XSB 00-1, because of the I/O requirement for a domain. The remaining XSB 00-2 and XSB 00-3 can be assigned to either domain, or to none.
The number of domains allowed depends on server model. The default is one domain (the maximum for entry-level servers) and the maximum number of domains is 24. Each domain is identified with a domain ID number, with the default domain as #0.
TABLE 4-1 shows the maximum number of system boards, the maximum number of domains, and the domain ID number range by server model.
Domains can be set up to include both Uni-XSBs and Quad-XSBs. FIGURE 4-6 shows two XSBs in Uni-XSB mode (left side of figure) and two XSBs in Quad-XSB mode (right side of figure) on a high-end server; the partition of these boards into three Oracle Solaris domains is shown by shading.
FIGURE 4-6 Example of XSBs and Oracle Solaris Domains on a High-End Server

The Oracle Solaris OS is installed on a per-domain basis. In the configuration shown in FIGURE 4-6, there would be three Oracle Solaris images, one for each domain.
In high-end servers, the internal disks are available only for the first (top) I/O device and the third (third from top) I/O device. The second and fourth I/O devices do not have the capability to have internal disk drives. In midrange servers, the internal disk drive is available only for the first (top) I/O device.
Midrange and high-end servers support system boards that contain SPARC64 VII+, SPARC64 VII, and SPARC64 VI processors, or a mix of these processor types. Entry-level servers support only SPARC64 VII+ and SPARC64 VII processors.
FIGURE 4-7 shows an example of a mixed configuration of SPARC64 VII and SPARC64 VI processors.
FIGURE 4-7 CPUs on CPU/Memory Board Unit (CMU) and Domain Configuration
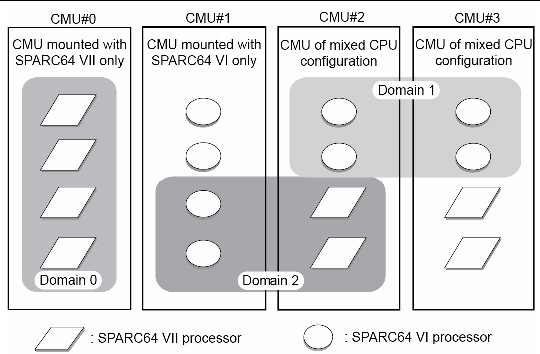
Different types of processors can be mounted on a single CMU, as shown in CMU#2 and CMU#3 in FIGURE 4-7. And a single domain can be configured with different types of processors, as shown in Domain 2 in FIGURE 4-7.
A domain runs in one of the following CPU operational modes:
To check the CPU operational mode, execute the prtdiag (1M) command on the Oracle Solaris OS. If the domain is in SPARC64 VII Enhanced Mode, the output will display SPARC64-VII on the System Processor Mode line. If the domain is in SPARC64 VI Compatible Mode, nothing is displayed on that line.
By default, the Oracle Solaris OS automatically sets a domain’s CPU operational mode each time the domain is booted based on the types of processors it contains. It does this when the cpumode variable - which can be viewed or changed by using the setdomainmode(8) command - is set to auto.
You can override the above process by using the setdomainmode(8) command to change the cpumode from auto to compatible, which forces the Oracle Solaris OS to set the CPU operational mode to SPARC64 VI Compatible Mode on reboot. To do so, power off the domain, execute the setdomainmode(8) command to change the cpumode setting from auto to compatible, then reboot the domain.
DR operations work normally on midrange and high-end server domains running in SPARC64 VI Compatible Mode. You can use DR to add, delete or move boards with any processor types, which are all treated as if they are SPARC64 VI processors. Entry-level servers do not support DR operations.
DR also operates normally on domains running in SPARC64 VII Enhanced Mode, with one exception: You cannot use DR to add or move into the domain a system board that contains any SPARC64 VI processors. To add a SPARC64 VI processor you must power off the domain, change it to SPARC64 VI Compatible Mode, then reboot the domain.
In an exception to the above rule, you can use the DR addboard(8) command with its -c reserve or -c assign option to reserve or register a board with one or more SPARC64 VI processors in a domain running in SPARC64 VII Enhanced Mode. The next time the domain is powered off then rebooted, it comes up running in SPARC64 VI Compatible Mode and can accept the reserved or registered board.
The SPARC Enterprise M4000/M5000/M8000/M9000 Servers XSCF User’s Guide contains the above information, as well as additional detailed instructions.
The assignment of CPU modules (CPUM), memory, and I/O to domains in Quad-XSB mode for midrange and high-end servers is shown in TABLE 4-2, TABLE 4-3 and TABLE 4-4.
In TABLE 4-4, the XSB board number xx is in the range of 00-15; the IOU board number xx is the IOU board number corresponding to the XSB board number. For example, XSB 00-0 has IOU#00-PCI#0.
The domain component list (DCL) identifies the potential resources for a domain. On midrange or high-end servers, a single XSB can potentially belong to multiple domains. However, a single XSB can be assigned only to one specific domain. Entry-level servers are configured with one XSB and one domain, and the XSB is already configured in the domain.
XSB numbers are not used in domain configuration, however. The software requires that each XSB number “map” to a logical system board (LSB) number. Processor numbers and I/O bridges are based on LSB numbers. Appendix A contains additional information on LSB and device path names. Note that on entry-level servers, which have only one XSB, the LSB number is 0 by default.
This section applies to domain configuration after installing a new board in the midrange or high-end server.
| Note - If you create a new domain, you have to install the Oracle Solaris OS on the domain. See the Oracle Solaris OS documentation collection for instructions. |
Domain configuration typically includes these steps:
1. Logging in to the XSCF console with appropriate privileges.
2. Specifying the XSB mode, either Uni-XSB or Quad-XSB, using the setupfru command.
3. Setting up information for a domain (the DCL), using the setdcl command. The DCL identifies the potential resources for a domain.
4. Assigning the hardware resources (XSBs) to the domain, using the addboard command. The DCL must be set up before assigning XSBs to a domain.
5. Powering on the domain, using the poweron command.
(Step 5 and Step 6 may be done in reverse order.)
6. Opening a console to the domain, using the console command.
7. Installing the Oracle Solaris OS at the OpenBoot PROM prompt, if this is a new domain. See the Oracle Solaris OS documentation collection for instructions.
8. Setting up any services you want to use on the domain, such as NTP. See Chapter 3 for information on services, including NTP.
This domain configuration example, applicable to midrange and high-end servers, assumes one PSB in Uni-XSB mode will be set up in Quad-XSB mode and configured into two domains. The domain configuration will be:
domain0 = XSB#00-0 + XSB#00-2
domain1 = XSB#00-1 + XSB#00-3
Domain communication includes:
The DSCP network establishes a link, using IP addresses, between the Service Processor and each domain. This link enables communication between the Service Processor and domains, and the secure transfer of information. Each domain must have its own IP address, and the Service Processor must have its own IP address.
DSCP is optimized to securely exchange control data such as error reports, fault events, and time synchronization, between each domain and the Service Processor.
You can log in to the Service Processor and use the console command to access a particular domain.
Once you have access to the domain console, you will get the standard Oracle Solaris OS console with associated prompts, based on the configured shell. You will be able to run all of the normal Oracle Solaris command-line interface commands. To run Oracle Solaris GUI-based commands, however, you must log in to the domain from a remote environment, not through the domain console.
If your server is networked, you can log into a domain directly using standard Oracle Solaris applications, such as telnet, rsh, and rlogin. To ensure a secure connection, use ssh.
On an entry-level server, the CD-RW/DVD-RW drive can be used with no special specifications. On a midrange server, the optional CD-RW/DVD-RW drive or tape drive can automatically be used by the domain on PSB/XSB 00-0.
On a high-end server, the CD-RW/DVD-RW drive or tape drive can be used by assigning them to a specific card port on an I/O unit. The devices are assigned to a specific port on an I/O unit using the cfgdevice command on the Service Processor, then connected using the cfgadm command on the Oracle Solaris OS. The CD-RW/DVD-RW drives are read-only.
See To Attach a CD-RW/DVD-RW Drive or Tape Drive While the Oracle Solaris OS Is Running on a High-End Server for instructions. Also, see the SPARC Enterprise M3000/M4000/M5000/M8000/M9000 Servers XSCF User’s Guide or to the cfgadm(1M) and cfgdevice(8) man pages for additional information.
| Note - Do not use the CD-RW/DVD-RW drive unit and the tape drive unit at the same time. |
For domain backup and restore operations, see your backup software documentation for instructions. The Oracle Solaris OS documentation collection also contains information on backup and restore operations.
Dynamic reconfiguration allows you to add PSBs to or remove them from midrange or high-end server domains without stopping the Oracle Solaris OS. DR is not supported on entry-level servers. You can use dynamic reconfiguration to redistribute your midrange or high-end server resources by adding or removing system boards as needed or to replace failed system boards with new ones. For more information, see the SPARC Enterprise M4000/M5000/M8000/M9000 Servers Dynamic Reconfiguration (DR) User’s Guide and the Service Manual for your server.
This section describes these tasks:
| Note - To change configuration of a domain, the target domain must be powered off. |
|
1. Log in to the XSCF console with platadm or domainadm privileges.
2. Execute the setdomainmode command:
where domain_id is the domain to which the CPU operational mode is to be specified, and mode is auto, to automatically determine the CPU operational mode at domain startup, or compatible, to set the CPU operational mode to the SPARC64 VI Compatible Mode.
3. Verify the operation with the showdomainmode command.
4. To check the CPU operational mode currently set to the domain, execute the prtdiag(1M) command on the Oracle Solaris OS.
|
1. Log in to the XSCF console with platadm or fieldeng privileges.
2. Execute the setupfru command:
where mode is either 1 to specify a Uni-XSB or 4 to specify a Quad-XSB; sb specifies the system board device, and location is the location of the device, a number from 0-15.
3. Verify the operation with the showfru command.
|
1. Log in to the XSCF console with platadm privileges.
where domain_id is the domain you are setting the DCL for; lsb is the LSB number; and xcb is the XSB number
3. Verify the operation with the showdcl command.
|
1. Log in to the XSCF console with platadm privileges or domainadm privileges for a specific domain.
where domain_id is the domain to which the XSB is to be assigned; xsb is the XSB number to be assigned to the domain. For example, to assign XSB00-0 in domain 0, enter:
Once an XSB has been assigned to a domain, that XSB belongs to that domain until the domain unassigns it.
3. Verify the operation with the showboards -a command.
|
1. Log in to the XSCF console with platadm or fieldeng privileges or domainadm or domainmgr privileges for a specific domain.
where domain_id is the domain you want to power on. Only a user with platadm or fieldeng privileges can use the -a option to turn on power to all domains.
3. Verify the domain is powered on by opening a console to it, with the console command.
See To Access a Domain From the XSCF Console.
|
1. Log in to the XSCF console with platadm, platop, or fieldeng privileges or domainadm, domainmgr, or domainop privileges for a specific domain.
2. Type the showboards command:
|
1. Log in to the XSCF console with platadm, platop, or useradm privileges or domainadm, domainmgr, or domainop privileges for a specific domain.
where domain_id is the domain you want to access. This command supports both interactive and read-only connections; the default is a read-write connection.
3. To return to the XSCF console, press the Enter key, then the escape character, then type “.”. By default, the escape character is “#”.
|
1. If the volume management daemon (vold) is running, stop the daemon:
2. Log in to the XSCF console with platadm privileges.
3. Type the cfgdevice command:
a. To check the status of current drives:
where port_no is the port number in the specified domain where the device is to be attached. port_no is specified in the format: IOU number-PCI slot number.
4. Mount the drive by typing the cfgadm command:
where Ap_Id is the attachment point of the controller, for example, c0.
5. Restart the volume management daemon (vold) if necessary:
|
1. If the volume management daemon (vold) is running, stop the daemon:
2. Detach the drive by typing the cfgadm command:
where Ap_Id is the attachment point of the controller. For example, if the drive is connected to controller c0, you would type:
3. Log in to the XSCF console with platadm privileges.
4. Type the cfgdevice command:
a. To check the status of current drives:
where port_no is the port number in the specified domain where the device is to be detached. port_no is specified in the format: IOU number-PCI slot number.
5. Restart the volume management daemon (vold) if necessary:
For additional information on this chapter’s topics, see:
| SPARC Enterprise M3000/M4000/M5000/M8000/M9000 Servers Administration Guide | E21618-01 |
Copyright © 2011, Oracle and/or its affiliates. All rights reserved.
 To Set CPU Operational Mode