Joining Multiple Disparate Data Sources
This configuration describes an organization, Example.com, whose specific directory service requirements are met by some of the features of a virtual directory.
Data Storage Scenario
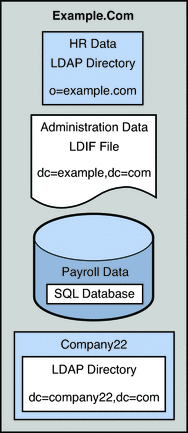
Example.com stores organizational data in multiple disparate data sources. For legacy reasons, user data is spread across an LDAP directory, a flat LDIF file, and an SQL database. The HR department stores user data in an LDAP directory, with a base DN of o=example.com. The Payroll department stores data in an SQL database. Administrative data such as departments and building numbers is stored by the administration department in an LDIF file, with a base DN of dc=example,dc=com.
In addition, Example.com has acquired a company named Company22. Company 22 also stores its user data in an LDAP directory, with a base DN of dc=company22,dc=com.
The following diagram provides a high level view of how Example.com's user data is stored.
Figure 22–2 Data Storage In Disparate Sources
Client Application Requirements
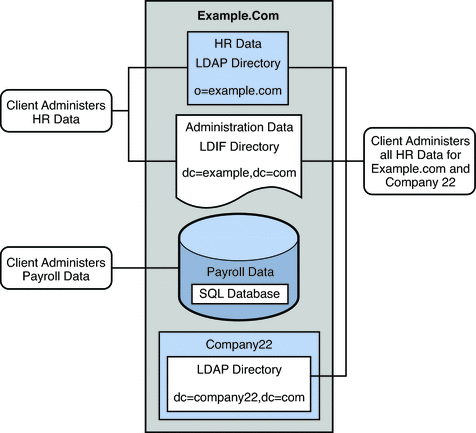
Example.com has several LDAP client applications that require access to the data stored in the disparate data sources. The requirements of the client applications are not all the same. Different views of the data are required. In some cases, the clients require the data to be aggregated. In addition, some client applications require access to Company22's user data so that these new employees of Example.com can be administered along with the old employees.
The following diagram provides a high level view of Example.com's client application requirements.
Figure 22–3 Client Application Requirements
The following sections walk you through sufficient configuration Directory Proxy Server data views to meet the client application requirements described in this sample scenario. For information about how data views work, see Chapter 17, Directory Proxy Server Distribution, in Sun Directory Server Enterprise Edition 7.0 Reference and Chapter 18, Directory Proxy Server Virtualization, in Sun Directory Server Enterprise Edition 7.0 Reference.
The configuration of the sample scenario is divided into the following sections:
-
Aggregate Data From the HR LDAP Directory and the Administration LDIF File
-
Add Data From Company 22 to Example.Com's DIT by Renaming the DN
-
Enable LDAP Clients to Access the Payroll Data in an SQL Database
Aggregate Data From the HR LDAP Directory and the Administration LDIF File
The HR department stores information such as employee names, job start data, and job level. The administration department stores additional data such as building codes and office numbers. The client application that handles the HR data requires access to the combined data from both sources. Both data sources have a common attribute, the employeeNumber that exists in each entry.
The following diagram illustrates the requirements of the client application.
Figure 22–4 Aggregation of Data From LDAP Directory and LDIF File
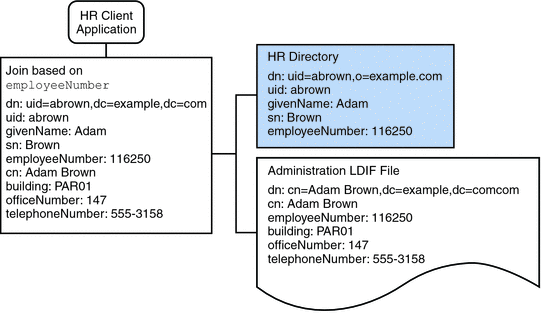
To fulfill this application requirement, a data view is created for the payroll directory and for the administration LDIF file. These two data views are then joined to provide access to the aggregated data. This common attribute enables Directory Proxy Server to aggregate the data for each user.
For simplicity, the commands used in this section assume the following information:
-
A Directory Proxy Server instance runs on the local host, with the default LDAP port (389).
-
The Directory Proxy Server instance is located at /local/myDPS.
-
The path to the file containing the Proxy Manager password has been set as a variable, LDAP_ADMIN_PWF.
-
The payroll LDAP directory runs on a host named payrollHost, on port 2389.
-
The LDIF file used to store the administration data is named example.ldif.
To obtain the complete syntax of each command, run the command without any options. For example:
$ dpconf create-ldap-data-view Operands are missing Usage: dpconf create-ldap-data-view VIEW_NAME POOL_NAME SUFFIX_DN |
 Create and Enable an LDAP Data View for the Payroll
Directory
-
Create an LDAP data source for the payroll directory.
$ dpconf create-ldap-data-source payroll-directory payrollHost:2389
-
Create an LDAP data source pool for the payroll directory.
$ dpconf create-ldap-data-source-pool payroll-pool
-
Attach the payroll data source to the data source pool.
$ dpconf attach-ldap-data-source payroll-pool payroll-directory
-
Configure the weights of the attached data source.
$ dpconf set-attached-ldap-data-source-prop -h payrollHost -p 2389 \
payroll-pool payroll-directory add-weight:2 \
bind-weight:2 compare-weight:2 delete-weight:2 \
modify-dn-weight:2 modify-weight:2 search-weight:2
-
Create an LDAP data view for the payroll directory.
$ dpconf create-ldap-data-view payroll-view payroll-pool o=example.com
-
Enable the LDAP data view so that client requests can be routed to this data view.
$ dpconf set-ldap-data-view-prop payroll-view is-enabled:true
-
Restart Directory Proxy Server for the changes to take effect.
$ dpadm restart /local/myDPS
 Create and Enable an LDIF Data View for the Administration
Data
-
Create an LDIF data view for the administration data.
$ dpconf create-ldif-data-view admin-view example.ldif dc=example,dc=com
-
Enable the LDIF data view for the administration data.
$ dpconf set-ldif-data-view-prop admin-view is-enabled:true
-
Specify that the administrator view contains entries that are used by more than one entry in the payroll view.
$ dpconf set-ldif-data-view-prop admin-view contains-shared-entries:true
When this property is set to TRUE, deleting an entry in the payroll data view will not result in the deletion of the shared entry in the administrator data view. Adding an entry to the payroll data view will only add the entry to the secondary data view if it does not already exist.
-
Restart Directory Proxy Server for the changes to take effect.
$ dpadm restart /local/myDPS
 Join the Payroll Data View and the Administrator Data
View
-
Create a filter join rule on the administrator data view that specifies how the data should be aggregated.
The following join rule specifies that data should be joined based on the employeeNumber attribute of the user entry.
$ dpconf set-ldif-data-view-prop admin-view \ filter-join-rule:employeeNumber=\${payroll-view.employeeNumber} -
Create a join data view that aggregates the two data views.
For the join data view, the organization uses the suffix DN dc=example,dc=com.
$ dpconf create-join-data-view example-join-view payroll-view admin-view \
dc=example,dc=com
Add Data From Company 22 to Example.Com's DIT by Renaming the DN
The user data for Company 22 is stored under the DN dc=company22,dc=com. While Example.com wants to keep this user data separate in most cases, one client application needs to administer Company 22 employees along with the rest of the Example.com employees. This client application requires Company 22's user data to look like Example.com data.
The following diagram illustrates the requirements of the client application.
Figure 22–5 DN Renaming

To fulfill this application requirement, a data view with a virtual DN of dc=example,dc=com is created for the Company 22's directory.
For simplicity, the commands used in this section assume the following information:
-
A Directory Proxy Server instance runs on the local host, with the default LDAP port (389).
-
The Directory Proxy Server instance is located at /local/myDPS.
-
The path to the file containing the Proxy Manager password has been set as a variable, LDAP_ADMIN_PWF.
-
The Company 22 LDAP directory runs on a host named company22Host, on port 2389.
 Create a Data View For Company 22's Directory With
a Virtual DN
-
Create an LDAP data source for Company 22's directory.
$ dpconf create-ldap-data-source company22-directory company22Host:2389
-
Create an LDAP data source pool for Company 22's directory.
$ dpconf create-ldap-data-source-pool company22-pool
-
Attach Company 22's data source to the data source pool.
$ dpconf attach-ldap-data-source company22-pool company22-directory
-
Configure the weights of the attached data source.
$ dpconf set-attached-ldap-data-source-prop -p 2389 \
company22-pool company22-directory add-weight:2 \
bind-weight:2 compare-weight:2 delete-weight:2 \
modify-dn-weight:2 modify-weight:2 search-weight:2
-
Create an LDAP data view for Company 22's directory with a virtual DN of dc=example,dc=com.
$ dpconf create-ldap-data-view company22-view company22-pool dc=example,dc=com
-
Instruct Directory Proxy Server to map this virtual DN to the real DN that is in Company 22's directory.
$ dpconf set-ldap-data-view-prop company22-view \
dn-mapping-source-base-dn:dc=company22,dc=com
-
Enable the LDAP data view for Company 22's directory so that client requests can be routed to this data view.
$ dpconf set-ldap-data-view-prop company22-view is-enabled:true
-
Restart Directory Proxy Server for the changes to take effect.
$ dpadm restart /local/myDPS
Add Company 22's Data to the HR Data
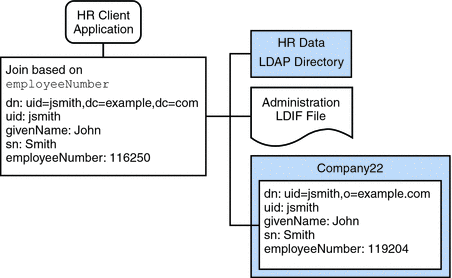
The HR department requires an aggregated view of the HR data for Example.com and the newly acquired Company 22. The following diagram illustrates the requirements of the global HR application.
Figure 22–6 Aggregation of Data From Join Data View and LDAP Data View
 Join the Example Join Data View and the Company 22
Data View
-
Create a filter join rule on the Company 22 data view that specifies how the data should be aggregated.
The following join rule specifies that data should be joined based on the employeeNumber attribute of the user entry.
$ dpconf set-ldif-data-view-prop company22-view \ filter-join-rule:employeeNumber=\${example-join-view.employeeNumber} -
Create a join data view that aggregates Company 22's data view and Example.com's join data view.
$ dpconf create-join-data-view global-join-view example-join-view \
company22-view dc=example,dc=com
Enable LDAP Clients to Access the Payroll Data in an SQL Database
Example.com's payroll department stores salary data in an SQL database. The database has two tables, and employee table and a salary table. Example.com has an LDAP client application that requires access to that data. The client application requires the SQL data to look like LDAP data.
The following diagram illustrates the requirements of the client application.
Figure 22–7 JDBC Dataview Providing Access to an SQL Database
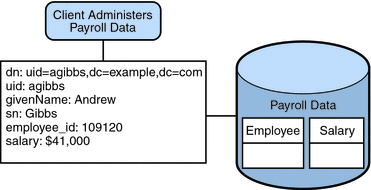
To fulfill this application requirement, a JDBC data view is created that maps columns in the SQL tables to LDAP attributes.
For simplicity, the commands used in this section assume the following information:
-
A Directory Proxy Server instance runs on the local host, with the default LDAP port (389).
-
The Directory Proxy Server instance is located at /local/myDPS.
-
The path to the file containing the Proxy Manager password has been set as a variable, LDAP_ADMIN_PWF.
-
The SQL database is up and running.
-
The JAVA_HOME variable has been set to the correct Java path.
-
The password to the SQL database is myPassword stored in the myPasswordFile file.
 Create a JDBC Data View For Example.com's Payroll
Database
-
Create a JDBC data source for the payroll database.
$ dpconf create-jdbc-data-source -b payrollsqldb \
  -B jdbc:payrollsqldb:payrollsql://localhost/ \
  -J file://payrollsqldb.jar \
  -S org.payrollsqldb.jdbcDriver payroll-src
-
Configure the JDBC data source with the properties of the SQL database.
$ dpconf set-jdbc-data-source-prop payroll-src \
  db-user:proxy db-pwd-file:password-file-location/myPasswordFile
-
Enable the JDBC data source.
$ dpconf set-jdbc-data-source-prop payroll-src is-enabled:true
-
Create a JDBC data source pool for the payroll database.
$ dpconf create-jdbc-data-source-pool payroll-pool
-
Attach the payroll data source to the data source pool.
$ dpconf attach-jdbc-data-source payroll-pool payroll-src
-
Create a JDBC data view for the payroll database, with a virtual DN of o=payroll.
$ dpconf create-jdbc-data-view payroll-view payroll-pool o=payroll
-
Create a JDBC table for each table in the SQL database.
$ dpconf create-jdbc-table jdbc-employee employee
$ dpconf create-jdbc-table jdbc-salary salary
-
Add a JDBC attribute for each column in the SQL tables.
$ dpconf add-jdbc-attr jdbc-employee eid employee_id
$ dpconf add-jdbc-attr jdbc-employee first firstname
$ dpconf add-jdbc-attr jdbc-employee last lastname
$ dpconf add-jdbc-attr jdbc-employee description description
$ dpconf add-jdbc-attr jdbc-employee spouse spousename
$ dpconf add-jdbc-attr jdbc-salary salary salary
$ dpconf add-jdbc-attr jdbc-salary social ssn
-
Specify which attributes can be viewed and which can be written, through the JDBC data view.
$ dpconf set-jdbc-data-view-prop payroll-view \
 viewable-attr:eid \
 viewable-attr:first \
 viewable-attr:last \
 viewable-attr:desc \
 viewable-attr:spouse \
 viewable-attr:salary \
 viewable-attr:social
 $ dpconf set-jdbc-data-view-prop payroll-view \
 writable-attr:eid \
 writable-attr:first \
 writable-attr:last \
 writable-attr:description \
 writable-attr:spouse \
 writable-attr:salary \
writable-attr:social
-
Create a JDBC object class that maps to an LDAP object class.
The following command creates an object class that maps to the LDAP person object class. The object class specifies that the employee table should be used as the primary table, and that the salary table should be used as the secondary table. The eid attribute should be used to construct the DN.
$ dpconf create-jdbc-object-class payroll-view \
 person jdbc-employee jdbc-salary eid
-
Create a filter join rule on the secondary table that specifies how data from the secondary table should be linked to data from the primary table.
The following join rule specifies that data should be joined based on the employee_id attribute.
$ dpconf set-jdbc-table-prop jdbc-salary \ filter-join-rule:employee_id=\${employee.employee_id} -
Create a super class on the JDBC object class.
$ dpconf set-jdbc-object-class-prop payroll-view person super-class:extensibleObject
Add Virtual Access Control
Access control on LDAP directories is handled by defining ACIs in the directories themselves. When data sources are accessed through virtual data views, ACIs must be defined that apply only to the data viewed through these data views.
Any access that goes through Directory Proxy Server is controlled by a connection handler. For information about connection handlers, see Chapter 25, Connections Between Clients and Directory Proxy Server .
 Add an ACI That Allows Anonymous Access
-
Add the ACI.
$ ldapadd -v -D "cn=proxy manager" -w password -p 389
dn: cn=ldifonly-acis,cn=virtual access controls
objectclass: top
objectclass: aciSource
cn: ldifonly-acis
dpsaci: (targetattr="*")(version 3.0; acl "anonymous_access"; allow(all) \
(userdn="ldap:///anyone");)
-
Point the connection handler to the virtual ACI.
$ dpconf set-connection-handler-prop anonymous aci-source:ldifonly-acis
-
Enable the connection handler.
$ dpconf set-connection-handler-prop anonymous is-enabled:true
- © 2010, Oracle Corporation and/or its affiliates
