| J2EE Policy Agents Guide |
Chapter 2
Installing the AgentThe previous chapter provided an overview of J2EE Policy Agents and listed the servers and platforms supported by these agents. This chapter describes in detail how to install the agents on the supported servers and platforms.
Topics in this chapter include:
Pre-Installation TasksYou must perform certain pre-installation tasks before you begin installing the J2EE policy agents. Some of these tasks are to be performed for all the agents and the rest are specific to the agent you are installing. From this list, read the section Common Tasks first to understand the generic tasks and then move on to the section relevant to your agent. If the agent-specific sections do not include any tasks pertaining to the agent you are installing, you may directly go to the section Launching the Installation Program.
Common Tasks
- Make sure that the agent you wish to install is supported on the desired platform and application server combination. Also make sure that the agent being installed is certified to work with the Identity Server version for which you intend to use this agent.The complete list of supported application servers on various platforms is available in the "Supported Servers".
- Make sure that you have the correct binaries for installing the agent. The agent is distributed as tar-gzip archive for all UNIX platforms. For Windows 2000 platform, these binaries are provided as a Zip archive. Make sure that you are using the correct binaries for the desired platform.
- Install the required application server if it is not already installed. Refer to the application server documentation for the details on how best to install the application server for your platform of choice.
Once you have performed the common pre-installation tasks mentioned above, you must perform the tasks relevant to the agent you are about to install. For detailed instructions specific to your agent, select the appropriate section from the following list:
Agent for Sun ONE Application Server 7.0
Before you begin the installation of the agent for Sun ONE Application Server 7.0, you must make sure that:
Agent for BEA WebLogic 6.1 SP2
Before you begin the installation of the agent for BEA WebLogic 6.1 SP2 Server, you must make sure that the BEA WebLogic Server has been shut down.
Agent for BEA WebLogic Server 7.0 SP2 or BEA WebLogic Server 8.1
Before you install the policy agent for BEA WebLogic Server 7.0 SP2 or BEA WebLogic Server 8.1, you must create a server domain as explained below.
Using the configuration or domain wizard appropriate for your server version and operating system, create a new stand-alone server domain. The configuration wizard launch script/program typically resides in the following directory.
Once these steps are done, you must shutdown the BEA WebLogic Server before launching the agent installation program.
Agent for IBM WebSphere 5.0/5.1
Before you begin the installation of agent for IBM WebSphere 5.0/5.1 Application Server, you must ensure that the application server instance that will be protected by this agent is running and the Administration application is deployed on this server.
Agent for PeopleSoft 8.3/8.4/8.8
If you are installing the policy agent for PeopleSoft 8.3/8.4/8.8, you must perform the following tasks for setting up PeopleSoft for SSO before you install the agent.
Creating DEFAULT_USER
- Invoke the PeopleSoft web application as explained in the following tables and log on as a privileged user.
- Select Add a New Value and create a user.
- In the User ID field, enter DEFAULT_USER.
- In the Password field, enter the password. You will need this password while installing the agent.
- Choose the default values or leave the non-mandatory fields blank.
- In the User Profiles page, open the ID tab and select the ID Type as None. DEFAULT_USER does the initial communication between the PeopleSoft web server servlets and the PeopleSoft Application Server.
- Click the Save button to save the changes.
- Log out of the PeopleSoft application.
Installing PeopleCode
- Invoke Application Designer on the Windows NT machine where PeopleSoft application is installed. To do this, go to Start menu > Programs > PeopleSoft Installation > Application Designer.
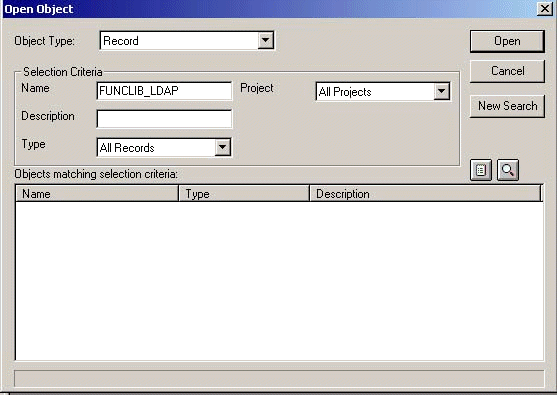
- Log on as a privileged user, who has write permissions to FUNCLIB_LDAP record. For example, PS(8.3) / VP1(8.4) / PSHC(8.8).
- Navigate to the FUNCLIB_LDAP record. To do this:
- Select the LDAP Auth row, right-click the mouse button and select View PeopleCode option.
- Append the contents of AmPeopleCode.txt to the end of the existing PeopleCode source. This file is provided with the agent binaries.
- Search for Function getWWWAuthConfig() in the PeopleCode:
Function getWWWAuthConfig()
&defaultUserId = "";
End-Function
- Modify the variable &defaultUserId to return the User ID created in previous step as follows:
Function getWWWAuthConfig()
&defaultUserId = "DEFAULT_USER";
End-Function;
- Click the Save button to save and exit from the Application Designer.
Registering PeopleCode for Authentication
- Invoke the PeopleSoft web application and log on as a privileged user.
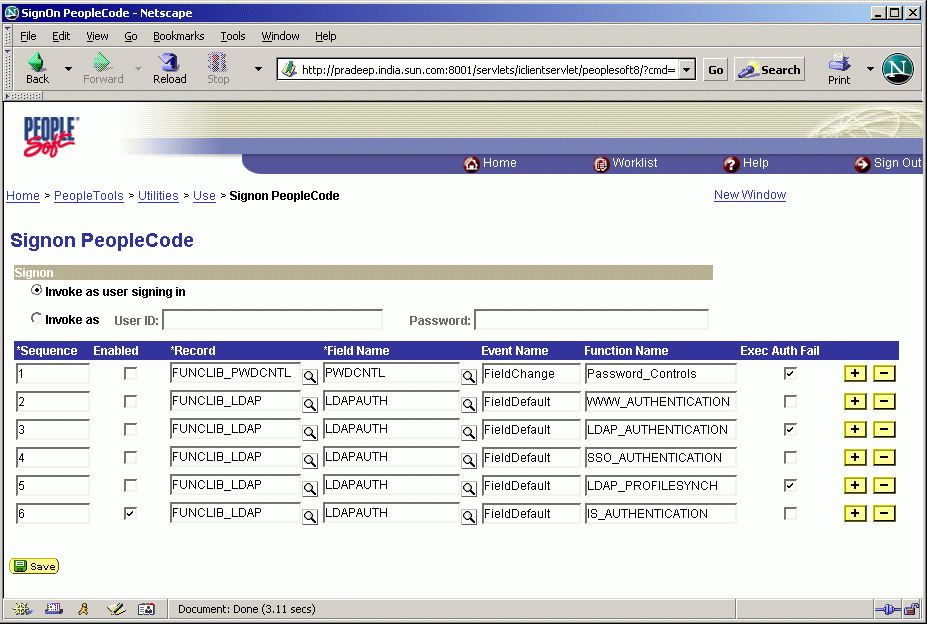
- Navigate to the SignOn PeopleCode window as explained here:
If you are using PeopleSoft 8.3, go to Home > PeopleTools > Utilities > Use > SignOn PeopleCode.
Figure 2-2 SignOn PeopleCode window in PeopleSoft 8.3
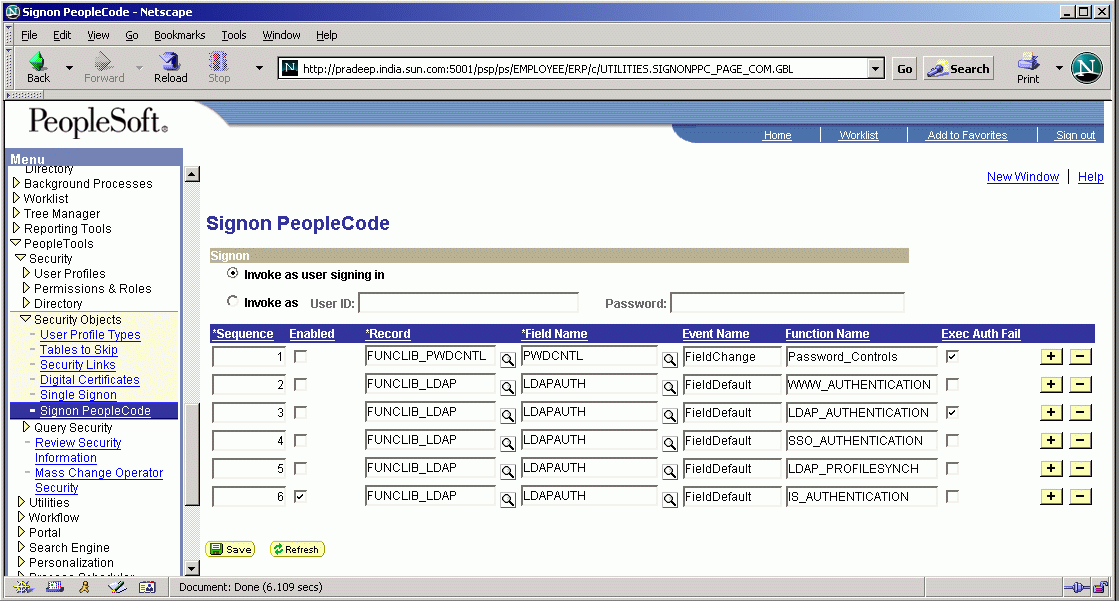
If you are using PeopleSoft 8.4/8.8, go to Home > PeopleTools > Security > Security Objects > SignOn PeopleCode
Figure 2-3 SignOn PeopleCode window in PeopleSoft 8.4/8.8
- Add a new row, which should look like the 6th row shown in Figure 2-2 and Figure 2-3. To add a new row, click + on the last row.
- Ensure that the Function Name column shows IS_AUTHENTICATION, the Exec Auth Fail column is not selected, and the Enabled column is selected.
- Click the Save button to save the changes.
- Log out of the PeopleSoft application.
Agent for Apache Tomcat Server 4.1.27
If you are installing the J2EE policy agent for Tomcat Server, you must perform the following tasks before you install the agent.
- Make sure the environment variable CATALINA_HOME points to the Tomcat Server directory that contains the Tomcat distribution.
- Make sure the environment variable CATALINA_BASE is not set, or if set points to the same Tomcat Server directory as CATALINA_HOME.
- Make sure the Tomcat Server is not running before you install the agent. If the server is running, you must stop it using the Tomcat server shutdown script. You can find these scripts at the following locations:
Agent for Oracle 9iAS R2 and Oracle 10g
Before you begin installing the policy agent for Oracle 9iAS R2 or Oracle 10g, you must stop all the processes related to Oracle 9iAS or Oracle 10g.
Before installing the agent for Oracle 10g, you must also make sure that the Apache web server is configured to have a fully qualified host name. To ensure this, the Oracle Universal installation program should be started with the following command-line parameter:
./runInstaller OUI_HOSTNAME=fully_qualified_host_name
If this is not done, the front-end Apache web server will be misconfigured to have a wrong host name in httpd.conf. This is a known issue in Oracle 10g Application Server. To get around this problem, you must change the variable ServerName in the file $ORACLE_HOME/Apache/Apache/conf/httpd.conf to show the fully qualified host name if you had installed the Oracle 10g Application Server without specifying OUI_HOSTNAME.
Note
An incorrect value to the ServerName variable in httpd.conf file will lead to the malfunctioning of the agent resulting in the application or portions thereof becoming inaccessible.
To learn more about stopping the processes, refer to the Application Servers’ Administration Guides at the following URLs:
- Oracle 9iAS R2
http://download-west.oracle.com/docs/cd/A97329_03/core.902/a92171/toc.htm
- Oracle Application Server 10g
http://download-west.oracle.com/docs/cd/B10464_03/core.904/b10376/toc.htm
Agent for SAP Enterprise Portal 6.0 SP2
If you wish to install the agent for SAP Enterprise Portal 6.0 SP2, you must perform the following tasks before starting the agent installation program:
Disabling SAP* User
When SAP Enterprise Portal 6.0 SP2 is installed, by default the super-administrator user, SAP*, is active in the system. While this user is active, no other users are allowed to log on to the system for security purposes. In order to make the Enterprise Portal installation usable by regular users, this user must be disabled. Follow the steps outlined in the SAP Enterprise Portal 6.0 SP2 administration guide to disable this user before installing the agent.
Planning User-Mapping Schemes
The agent for SAP Enterprise Portal integrates the user base as it exists in the SAP back end with the user base available in Sun ONE Identity Server. This integration is achieved through a mapping scheme that provides three different ways to map the users in these two separate user bases. These schemes are:
Mapping Based on User IDs When installed, the agent defaults to this mode of mapping the Identity Server users to the SAP user base. In this mode, the agent assumes that the user ID for logging a given user onto the Enterprise Portal is the same as that used for authenticating with Sun ONE Identity Server’s authentication service.
Mapping Based on an LDAP Attribute In this mode, the agent maps the Sun ONE Identity Server user to a user-id as specified in a named attribute in the profile of the user in Sun ONE Identity Server. The name of the attribute is configurable and can be changed to the applicable value as necessary. When a user accesses the Enterprise Portal, the agent redirects the user to first authenticate against Sun ONE Identity Server’s authentication service. When the user is authenticated successfully, the agent reads the value stored in the named attribute for this particular user and uses that value to sign on to the Enterprise Portal.
Mapping based on HTTP Header In this mode, the agent maps the Sun ONE Identity Server user to a user-id as specified in a named HTTP header available in the user’s request. When operating in this mode, the agent will treat requests that do not have the specified named header as invalid requests and would display an error message. If however, a value is available for the named header, then the agent uses this value to log the user onto Enterprise Portal and hosted applications.
Shutting Down the Enterprise Portal
Before you begin the installation of the agent for SAP Enterprise Portal, you must first shut down the Enterprise Portal completely. If the Enterprise Portal is not fully shut down before the agent installation, it may cause corruption of key system files and render a part of or the entire system unusable.
Agent for Macromedia JRun 4
If you are installing the J2EE policy agent for Macromedia JRun 4, make sure the Macromedia JRun 4 instance is not running during the installation of the agent. If the server is running, you must stop it using the JRun server script as follows:
# jrun_install_directory/bin/jrun stop jrun_instance_name
Agent for SAP Enterprise Portal 6.0 SP2 and Web Application Server 6.20 SP1
The Agent for SAP Enterprise Portal 6.0 SP2 and Web Application Server 6.20 SP1 can be installed for three different system configurations, as follows:
- On a system where only SAP Web Application Server 6.20 SP1 is installed and you intend to protect the hosted applications.
- On a system where SAP Enterprise Portal 6.20 SP2 is installed and you intend to protect the applications deployed on the underlying SAP Web Application Server as well as the Enterprise Portal.
- On a system where SAP Enterprise Portal 6.20 SP2 is installed and you intend to protect only the Enterprise Portal and not any applications that might be deployed on the underlying SAP Web Application Server.
The agent installation program does not distinguish between any of the above scenarios, but detects the configuration of the system and installs the necessary components based on the detection results. Note that if you intend to use only the third scenario—where the agent is being installed solely to protect the Enterprise Portal installation—then this agent is exactly equivalent to the agent for SAP Enterprise Portal 6.20 SP2.
Planning User-Mapping Schemes
The agent for SAP Enterprise Portal and Web Application Server integrates the user base as it exists in the SAP back end with the user base available in Sun ONE Identity Server. This integration is achieved through a mapping scheme that provides three different ways to map the users in these two separate user bases. These schemes are:
Mapping Based on User IDs When installed, the agent defaults to this mode of mapping the Identity Server users to the SAP user base. In this mode, the agent assumes that the user ID for logging a given user onto the Enterprise Portal or applications hosted on Web Application Server is the same as that used for authenticating with Sun ONE Identity Server’s authentication service.
Mapping Based on an LDAP Attribute In this mode, the agent maps the Sun ONE Identity Server user to a user ID as specified in a named attribute in the profile of the user in Sun ONE Identity Server. The name of the attribute is configurable and can be changed to the applicable value as necessary. When a user accesses the Enterprise Portal or the hosted applications, the agent redirects the user to first authenticate against Sun ONE Identity Server’s authentication service.When the user is authenticated successfully, the agent reads the value stored in the named attribute for this particular user and uses that value to sign on to the Enterprise Portal or hosted applications.
Mapping Based on HTTP Header In this mode, the agent maps the Sun ONE Identity Server user to a user ID as specified in a named HTTP header available in the user’s request. If a value is available for the named header, then the agent uses this value to log the user onto Enterprise Portal or hosted applications.
Shutting down the SAP Server
Before you begin the installation of the agent for SAP Enterprise Portal and Web Application Server, you must first shut down the Web Application Server completely. If the Server is not fully shut down before the agent installation, it may cause corruption of key system files and render a part of or the entire system unusable.
Disabling SAP* User
When SAP Enterprise Portal 6.0 SP2 is installed, by default the super-administrator user, SAP*, is active in the system. While this user is active, no other users are allowed to log on to the system for security purposes. In order to make the Enterprise Portal installation usable by regular users, this user must be disabled. Follow the steps outlined in the SAP Enterprise Portal 6.0 SP2 administration guide to disable this user before installing the agent.
Readying the Application for Agent Protection
Before installing the agent, any applications hosted on SAP Web Application Server that must be protected by this agent installation must be removed from the server completely. After the agent installation is complete, follow the post-installation tasks to configure these applications to be protected by the installed agent.
Agent for BEA WebLogic 8.1 SP2/SP3 Server/Portal
Before you install the policy agent for WebLogic 8.1 SP2/SP3 Server/Portal, ensure that the WebLogic 8.1 domain associated with the Server/Portal has been shut down. For more on how to create a portal application; please refer to WebLogic Server documentation available at the BEA Systems, Inc. web site: http://www.bea.com.
Agent for Sun Java System Application Server 8.1
Before you install the policy agent for Sun Java System Application Server 8.1, ensure that the following conditions apply.
Domain Administration Server (DAS) is an integral concept of Sun Java System Application Server 8.1. The following is a brief description of administrative domains and how they pertain to DAS.
Administrative domains provide a basic security structure whereby different administrators can administer specific groups (domains) of application server instances. By grouping the server instances into separate domains, different organizations and administrators can share a single Application Server installation.
Each domain has its own configuration, log files, and application deployment areas that are independent of other domains. If the configuration is changed for one domain, the configurations of other domains are not affected. Each domain has its own DAS, with a unique port number.
For more information on DAS and administrative domains, see the Sun Java System Application Server 8.1 Administration Guide.
Launching the Installation ProgramAfter completing the pre-installation tasks, you are now ready to launch the installation program that will install the policy agent on your system. This installation program is platform-specific and should be used as described in this section. Once the installation program has been launched successfully, you may go to the next section, which provides the necessary details on how to use this installation program.
Launching the Installation Program on Solaris, HP-UX, AIX, and Linux
The binaries for the policy agents for Solaris, HP-UX, AIX and Red Hat Advanced Server platforms are provided as tar-gzip archives. Copy the respective archive to the machine where the application server is installed and then perform the following steps to launch the installation program:
- Login as the root user.
- Unzip the binary archive using the following command:
# gzip -dc binaryname.tar.gz | tar xvf -
Please ensure that binaryname is substituted with the name of the appropriate agent binary.
- Set your JAVA_HOME environment variable to a JDK version 1.3.1 or higher. If your system does not have the required version of JDK, you may either download and install a compatible version of this software from the Java web site http://java.sun.com/ or use the JDK provided along with the application server.
The installation program provides two types of interfaces—a GUI or a graphical user interface, and an interactive command line interface. In most cases, the GUI installation program can be used for installing the agent. However, in cases such as when you are installing the agent over a telnet session on a remote server and do not have windowing capabilities, then it is recommended that you use the command-line installation program for installing the agent.
If you choose to use the GUI installation program interface, then it is required that you set your DISPLAY environment variable to ensure that the GUI installation program window appears on the correct console.
Once you have completed the above steps, you are now ready to execute the setup script that launches the agent installation program. This program can be launched in two different modes—a GUI mode which has a rich graphical interface, and an interactive terminal mode that does not require any windowing capability. The following steps may be used to launch the installation program in each of these two modes.
Launching the Installation Program in the GUI Mode
- To launch the installation program in the GUI mode, use the following command:
# ./setup
When launching the program in a GUI mode, it is required that you set your JAVA_HOME and DISPLAY environment variables correctly as pointed out in the previous steps. If however, you have not set these variables, the setup script will prompt you for their values accordingly.
If your JAVA_HOME environment variable is not set correctly, the setup script displays the following prompt:
Enter JAVA_HOME location (Enter "." to abort):
- At this prompt, you must type the full path to the JDK installation directory that should be used for launching the installation program. Otherwise, enter a period (.) to abort the installation.
If your DISPLAY environment variable is not set correctly, the setup script displays the following prompt:
Please enter the value of DISPLAY variable (Enter "." to abort):
- At this prompt, you may specify the hostname for the DISPLAY variable. Otherwise enter a period (.) to abort the installation.
Launching the Installation Program in the Command-Line Mode
- To launch the installation program in a non-GUI or command line mode, use the following command:
# ./setup -nodisplay
When launching the program in a command line mode, it is required that you set your JAVA_HOME environment variable correctly as pointed out in the previous steps. If however, you have not set this variable, the setup script will prompt you for its value as follows:
Enter JAVA_HOME location (Enter "." to abort):
- At this prompt, you must type the full path to the JDK installation directory that should be used for launching the installation program. Otherwise, enter a period (.) to abort the installation.
Depending upon the mode in which you have launched the installation program, you should see the appropriate interface appear at this stage.
Launching the Installation Program on Windows
The binaries for the policy agents on Windows platform are provided as a zip archive. Copy this archive to the machine where the application server is installed and follow these steps to launch the installation program:
- Log into your Windows system as a user with Administrative privileges. If you do not have administrative privileges, either log on as Administrator user or request such privileges to be granted to your account by the system administrator of the machine or domain as applicable.
- Unzip the agent binaries in a convenient location using any standard Zip utility. The binary contains two executable files setup.bat and install.exe, which may be used to launch the installation program. Each of these files provides different features for launching the installation program. You may choose either of these two files depending upon your installation requirements.
Using the setup.bat file to launch the installation program
In order to use the setup.bat file to launch the installation program, you must have a JDK version 1.3.1 or higher available in your system path.
- To verified the JDK version on your machine, type the following command in a command prompt window:
C:\> java -version
You will see the following display if your machine has JDK version 1.3.1 or higher.
java version 1.3.1_02
Java(TM) 2 Runtime Environment, Standard Edition (build 1.3.1_02-b02)
Java HotSpot(TM) Client VM (build 1.3.1_02-b02, mixed mode)
- To execute setup.bat, type the file name at the command prompt window in the directory where it is present, or double-click the file in Windows Explorer. For example:
C:\>setup.bat
The installation program provides two types of interfaces—a GUI and an interactive command line interface. You can launch the installation program in the GUI mode by invoking setup.bat file from a command prompt window as shown above or by double clicking it in Windows Explorer. The installation program may be launched in a command line mode by passing the argument -nodisplay to the setup.bat script as follows:
C:\>setup.bat -nodisplay
Using the install.exe file to launch the installation program
Using install.exe relieves you from the task of setting up your environment path to include a valid version of JDK. This program first checks your system for a compatible JDK version and uses the one that is found. However, if no compatible version is found, this program installs the necessary runtime environment and uses it to launch the installation program.
You can invoke install.exe either from the command prompt or by double clicking the file from Windows Explorer. One limitation with using install.exe is the fact that it does not recognize any command line arguments the way the setup.bat does. Consequently, it is not possible to use install.exe to launch the installation program in any mode other than the default GUI mode.
Depending upon the mode in which you have launched the installation program, you should see the appropriate interface appear at this stage.
Using the Installation ProgramAs mentioned in the last section, the agent installation program provides two types of interfaces - a GUI or graphical user interface, and a non-GUI or console-based interactive interface. Once the installation program is launched, you must provide all the necessary information requested by this program in order to successfully install the agent on your system. The following two sections describe in detail how to use this installation program in each interface to successfully install the agent on your system.
Once the installation program has been launched, the expected interaction will be the same on any platform for a given application server agent. Thus the steps outlined here for a certain application server agent installation will be applicable to the same agent installation for the same application server on a different platform.
Note
- The information regarding the use of the agent installation program as outlined in this section is applicable to all application server agents supported in this release. Any agent specific differences have been identified here separately.
- It is important that you perform all the pre-installation tasks relevant to the agent you are installing. These tasks are presented in the section Pre-Installation Tasks.
Using the GUI Installation Program
When the agent installation program is launched in the GUI mode, it presents the user with a series of screens that gather the necessary information and report the status of the installation progress and result at certain stages of the overall installation. These screens also contain some navigation buttons that help the user to go forward or backward as necessary and also allow the user to access help messages if needed. The agent installation program also provides active feedback, by means of pop-up windows that contain the necessary help or error messages, to help the user enter correct information in case the provided information is not valid.
Follow these steps to install the agent in the GUI mode:
- Launch the installation program in the GUI mode as explained in the earlier sections. The installation program begins with a welcome screen. Read the information provided on this screen.
- Click Next to open the License Agreement text. You must read and understand all the terms and conditions as detailed in this agreement. If you do not agree with any term or condition of this agreement, click the No button to terminate the installation of the agent. If you have read and agree to the terms and conditions, click the Yes (Accept License) button to continue.
- In the Select Installation Directory screen, select the directory in which the agent will be installed. You must specify the full path to the directory of your choice. If you select a directory that does not exist on your system, the installation program will prompt you to specify if the new directory should be created. You can either choose to create this new directory by clicking the Create Directory button or select a new directory by clicking the Choose another Directory button.
Figure 2-4 Select Installation Directory screen
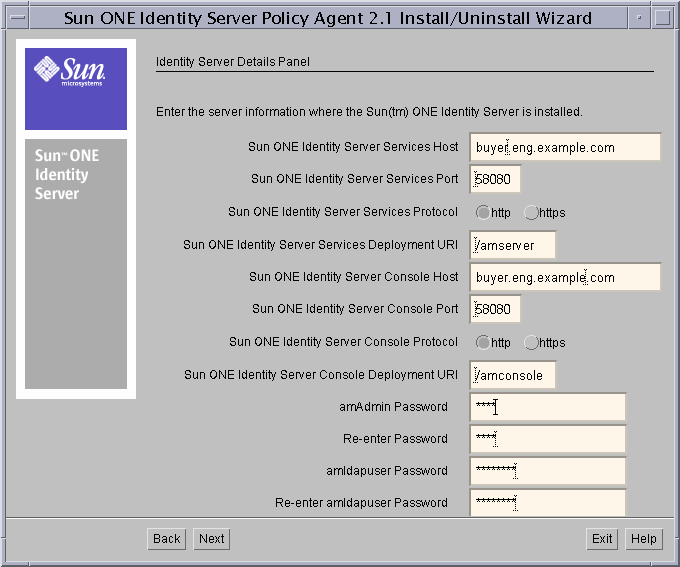
- In the Identity Server Details screen, enter the relevant information as requested by the installation program.
Figure 2-5 Identity Server Details screen
Sun ONE Identity Services Host: Enter the fully qualified host name of the system on which the Sun ONE Identity Server is installed.
Sun ONE Identity Server Services Port: Enter the port number for the web container used by Sun ONE Identity Server to provide its services.
Sun ONE Identity Server Services Protocol: Select the appropriate protocol that will be used by the agent when communicating with Sun ONE Identity Server services. This protocol value may either be HTTP or HTTPS.
Sun ONE Identity Server Services Deployment URI: Enter the URI that will be used by the agent to access various Sun ONE Identity Server services. The default URI is /amserver.
Sun ONE Identity Server Console Host: Enter the fully qualified hostname of the system on which the Sun ONE Identity Server console is installed.
Sun ONE Identity Server Console Port: Enter the port number of the web container that is used by Sun ONE Identity Server console.
Sun ONE Identity Server Console Protocol: Select the appropriate protocol that will be used by the agent when communicating with Sun ONE Identity Server console. This protocol value may either be HTTP or HTTPS.
Sun ONE Identity Server Console Deployment URI: Enter the URI that will be used by the agent to access the Sun ONE Identity Server console. The default URI is /amconsole.
amAdmin Password: Enter the password assigned to the amAdmin user as specified during Sun ONE Identity Server installation. The password entered here should be the amAdmin user password originally used during the installation of Sun ONE Identity Server. Even if after the installation of Sun ONE Identity Server, the password for the amAdmin user has been changed, you should still enter the original password and not the changed password.
Re-enter Password: Re-enter the amAdmin password in this field to ensure that the correct value is used by the agent.
amldapuser Password: Enter the password assigned to the Sun ONE Identity Server internal LDAP authentication user (amldapuser) as specified during Sun ONE Identity Server installation.
Re-enter amldapuser Password: Re-enter the amldapuser password in this field to ensure that the correct value is used by the agent.
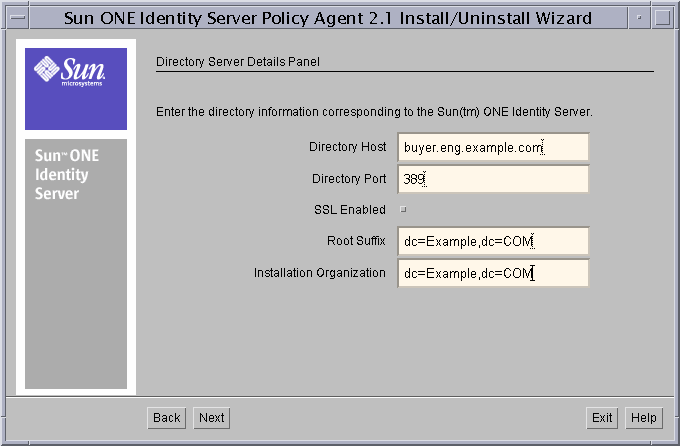
- In the Directory Server Details screen, enter the necessary information regarding the Directory Server used with Sun ONE Identity Server.
Figure 2-6 Directory Server Details screen
Directory Host: Enter the fully qualified hostname of the system where the Directory Server is installed.
Directory Port: Enter the port number used by this Directory Server.
SSL Enabled: Select this check box if the Directory Server uses SSL to communicate on the said port.
Root Suffix: Enter the root suffix to be used for accessing information stored in this Directory Server.
Installation Organization: Enter the complete DN of the default organization that was created when Sun ONE Identity Server was installed.
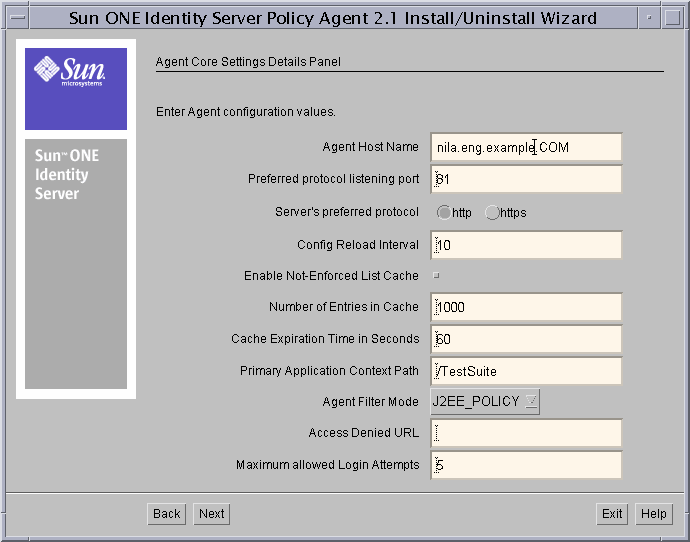
- In the Agent Core Settings Details screen, enter the key information necessary for the agent to function correctly.
Figure 2-7 Agent Core Settings Details screen
Agent Host Name: Enter the fully qualified hostname on which the application server protected by the agent is installed.
Preferred protocol listening port: Enter the preferred port number on which the application server provides its services.
Server’s preferred protocol: Select the protocol used by the application server to provide its services on the given port number as entered for the field Preferred protocol listening port.
Config Reload Interval: Enter the amount of time in seconds after which the agent will automatically reload any changes made to the its configuration. Specify the value 0 to disable this feature.
The agent supports hot-swap configuration, which allows changes to take effect without having to restart the application server. This feature can be very helpful in a controlled development and test environment where frequent changes to the configuration are needed to arrive at the correct configuration settings. It is recommended that this feature be disabled for production systems to ensure the optimal use of system resources and to avoid accidental changes to be picked up by the agent. Also note that although the majority of agent configuration is hot-swap enabled, there are some configuration settings that require a complete application server restart. Please refer to Chapter 3, "Agent Configuration" to learn more about this feature.
Enable Not-Enforced List Cache: Select this check-box if you wish to enable the caching of Not-Enforced List entries as evaluated by the agent against incoming user requests.
It is recommended that the Not-Enforced List caching be enabled in order to optimize system performance. However, the overall system performance can be affected if the corresponding values of Cache Size and Cache Expiration time are not suited for your deployment. It is therefore recommended that the values used for these configuration settings be carefully evaluated in a controlled testing environment before being used in production. It should also be noted that the agent maintains two caches in its memory—one for recording the URIs that were evaluated as enforced and the other for recording the URIs that were evaluated as not-enforced. The specified values of Number of Entries in Cache and Cache Expiration time are equally applicable to both of these caches. This factor must be considered when setting the values for the size and expiration time of the cache.
Number of Entries in Cache: Enter the size of cache used by the agent to store the evaluated results.
Cache Expiration Time in Seconds: Enter the amount of time in seconds after which the agent can purge an entry from its cache to free up the cache memory for newer entries.
Primary Application Context Path: Enter the context path for the primary application being protected by the agent. If this application is deployed at the root context of the application server, enter the value “/”.
When installing the agent for SAP Enterprise Portal 6.0 SP2, enter the context path as /irj.
When installing the agent for SAP Enterprise Portal 6.0 SP2 and Web Application Server 6.20 SP1, you should ensure that the primary application context path is set to the context path of the application that will be available throughout the life of the server. If your SAP installation does not include the Enterprise Portal, you must specify the value corresponding to one of the applications that will be protected by this agent. If, however, your SAP installation does include the Enterprise Portal, you may use the context path /irj as well
In a situation where there are multiple applications deployed on the application server, you must choose the context path of the application that is available for as long as the application server is alive. This value is used by the agent to receive notifications form the Sun ONE Identity Server and is also used to provide support for legacy browsers, etc. Providing an incorrect value for this configuration setting may lead to the malfunctioning of the agent and the application server.
Agent Filter Mode: Select the agent filter mode that you would like to run the agent in. For a complete description of the available agent filter modes, refer to the chapter Chapter 3, "Agent Configuration".
When installing the agent for SAP Enterprise Portal 6.0 SP2, the agent filter mode must be set to either SSO_ONLY or URL_POLICY. Other agent filter modes are not supported for this agent.
Access Denied URL: Enter the complete URI for the access denied page to be used by the agent. If this value is not specified, the agent will use HTTP error status code 403 (FORBIDDEN) to deny access to resources as needed.
Maximum Allowed Login Attempts: Enter the number of unsuccessful access attempts in succession after which the user will not be allowed to access the requested URL temporarily for security purposes. Specify the value 0 if you want to disable this feature.
The Login Attempt Limit feature can be used to guard the hosted application from Denial-Of-Service attacks where the end user can overload the application server by repeated authentication requests. By disabling this feature, the system remains vulnerable to such attacks. Therefore this feature should not be disabled unless there is a specific requirement that necessitates the disabling of this feature.
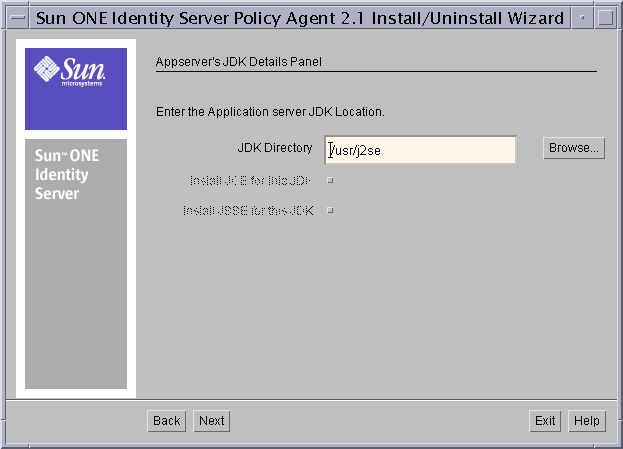
- Enter the information regarding the JDK being used by the application server in the Application Server’s JDK Details screen. If you are installing the agent for PeopleSoft, you will not get the JDK screen now but at a later stage in the installation process.
Figure 2-8 Application Server’s JDK Details screen
JDK Directory: Enter the complete path to the directory where the JDK being used by your application server is installed.
Install JCE for this JDK: Select this box if the JDK being used by your application server does not have JCE installed.
Install JSSE for this JDK: Select this box if the JDK being used by your application server does not have JSSE installed.
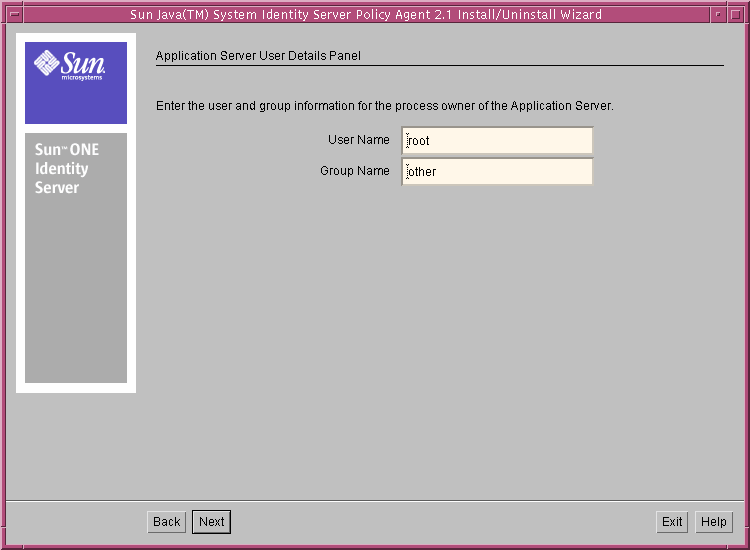
- Enter the user and group information for the process owner of the application server in the Application Server User Details screen. This screen appears only when the agent for Tomcat Server 4.1.27, Oracle 9iAS R2, Oracle 10g, SAP Enterprise Portal SP2 or Macromedia JRun 4 is being installed on a Unix platform.
Figure 2-9 Application Server User Details screen
User Name: The name of the user running the application server process.
Group Name: The name of the group to which the user running the application server process belongs.
The screens displayed thus far by the agent installation program are common to all the agents. However, the screens that follow are specific to the application server agent that is being installed.
For detailed instructions for each agent, from the following list, click the appropriate link depending on which application server agent you are installing. After you perform the steps in the respective section, proceed to "Summary Screen".
Agent for Sun ONE Application Server 7.0
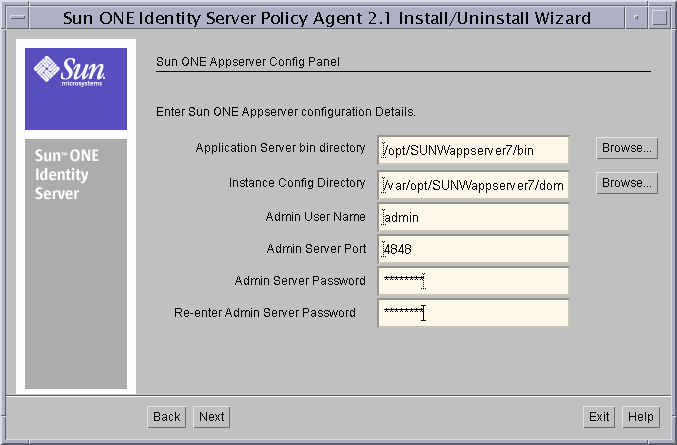
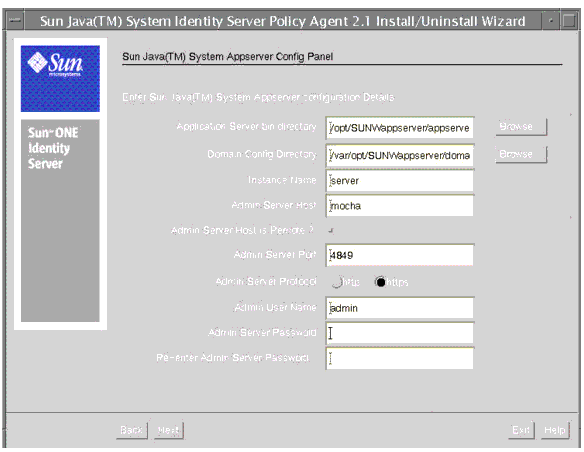
If you are installing the agent for Sun ONE Application Server 7.0, enter the configuration information on this screen as explained in this section.
Figure 2-10 Sun ONE Application Server Configuration screen
Application Server bin directory: Enter the complete path to the bin directory of the Sun ONE Application Server 7.0 installation.
Instance Config Directory: Enter the complete path to the config directory of the Sun ONE Application Server 7.0 instance, which will be protected by this agent.
Admin User Name: Enter the user name of the Administrator of this Sun ONE Application Server 7.0 instance.
Admin Server Port: Enter the port number on which the Administration Server for this Sun ONE Application Server 7.0 is available.
Admin Password: Enter the password for the Administrator of this Sun ONE Application Server 7.0 instance.
Re-enter Admin Server Password: Re-enter the password for the Administrator of this Sun ONE Application Server 7.0 instance.
Note
You must ensure that the Sun ONE Application Server 7.0 Administration Server is available at the time of installation of the agent.
Next, the installation program displays a summary of all the information that you have provided to install the agent. For details about this screen and to get started with the installation, proceed to the Summary Screen section.
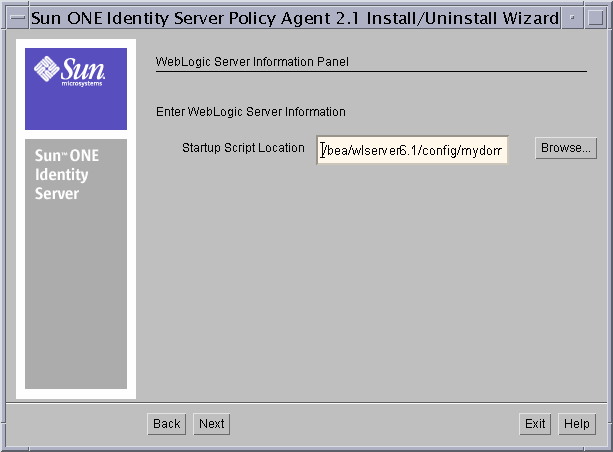
Agent for BEA WebLogic Server 6.1 SP2
If you are installing the agent for BEA WebLogic Server 6.1 SP2, enter the following configuration information on this screen.
Figure 2-11 WebLogic Server Information screen
Startup Script Location: Enter the full path to the startup script that is used to start your BEA WebLogic Server instance.
Next, the installation program displays a summary of all the information that you have provided to install the agent. For details about this screen and to get started with the installation, proceed to the Summary Screen section.
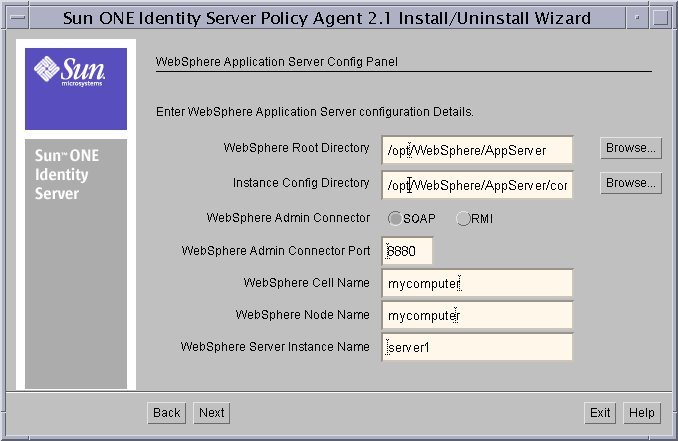
Agent for IBM WebSphere Application Server 5.0/5.1
If you are installing the IBM WebSphere Application Server instance, enter the following configuration information.
Figure 2-12 WebSphere Application Server Configuration screen
WebSphere Root Directory: Enter the complete path to the root directory for the IBM WebSphere Application Server.
Instance Config Directory: Enter the complete path to the config directory of the IBM WebSphere Application Server instance that will be protected by this agent.
WebSphere Admin Connector: Specify the protocol for connecting to WebSphere Administration Service. You can choose between SOAP and RMI.
WebSphere Admin Connector Port: Enter the Administration Service Port for specified Connector.
WebSphere Cell Name: Enter the cell name for the IBM WebSphere Application Server.
WebSphere Node Name: Enter the node name for the IBM WebSphere Application Server.
WebSphere Server Instance Name: Enter the instance name of the IBM WebSphere Application Server instance.
Next, the installation program displays a summary of all the information that you have provided to install the agent. For details about this screen and to get started with the installation, proceed to the Summary Screen section.
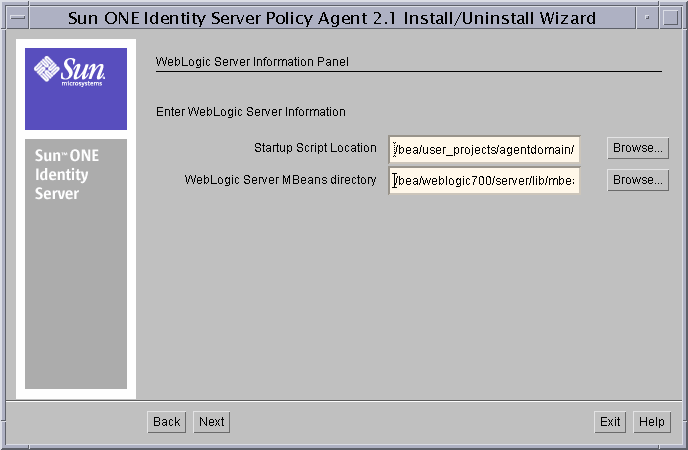
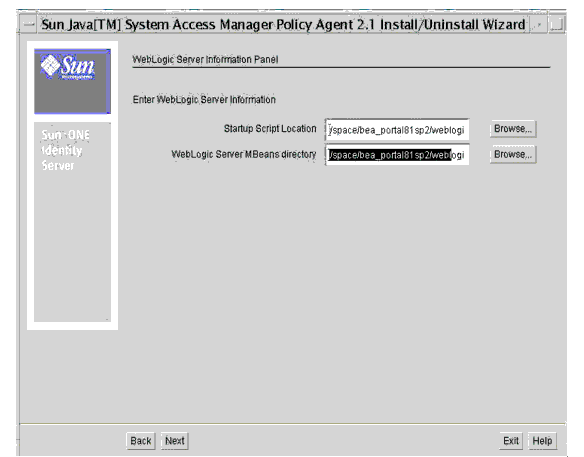
Agent for BEA WebLogic Server 7.0 SP2 or BEA WebLogic Server 8.1
If you are installing the agent for BEA WebLogic Server 7.0 SP2 or BEA WebLogic Server 8.1, enter the following configuration information on this screen.
Figure 2-13 WebLogic Server Information screen
Startup Script Location: Enter the full path to the startup script that is used to start your BEA WebLogic Server instance. This script is typically located under the following directory:
WebLogic_Install_Dir/bea/user_projects/server-domain-name
WebLogic Server MBeans Directory: Enter the full path to the mbeantypes directory:
WebLogic_Install_Dir/bea/weblogic/server/lib/mbeantypes
This directory stores MBeans required to deploy on WebLogic.
Next, the installation program displays a summary of all the information that you have provided to install the agent. For details about this screen and to get started with the installation, proceed to the Summary Screen section.
Agent for PeopleSoft 8.3/8.4/8.8
If you are installing the agent for PeopleSoft, perform the following steps:
- In the PeopleSoft Application Version screen, choose the PeopleSoft application version on which you are going to install the agent.
Figure 2-14 PeopleSoft Application Version/Deployment Options screen
- Choose one from the following agent deployment options:
Agent on WebLogic Server hosting PeopleSoft application: Select this option to install the agent on top of BEA WebLogic Server hosting the PeopleSoft application.
Proxy Solution - Agent on a Separate Proxying Web Server: Select this option if you want to configure Sun ONE Web Server (also referred as iPlanet Web Server) as a proxy for BEA WebLogic Server hosting PeopleSoft application.
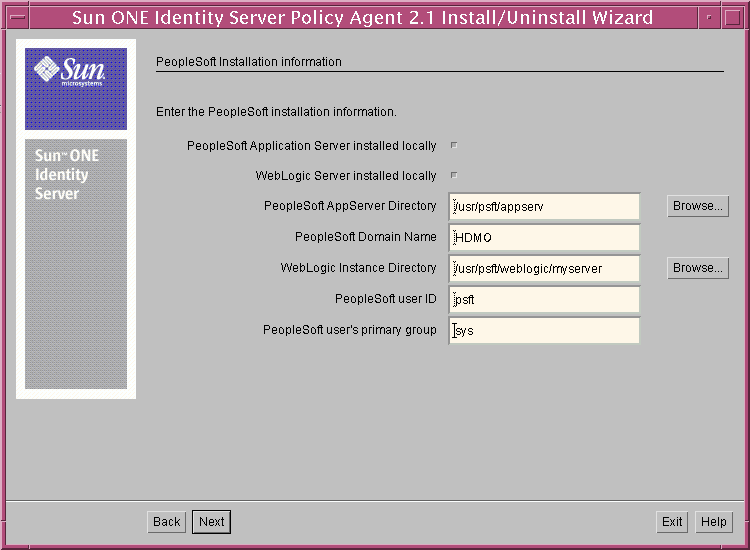
- Click Next and in the PeopleSoft Installation Information screen, provide the details about your PeopleSoft installation.
Figure 2-15 PeopleSoft Installation Information screen
PeopleSoft Application Server Installed locally: Click this check box if you have PeopleSoft Application Server installed locally.
WebLogic Server Installed locally: Click this check box if you have WebLogic Server installed locally.
Note
Select one or both of the above options according to your installation. You need to select at least one to proceed.
PeopleSoft AppServer Directory: Enter the full path to the directory where the PeopleSoft Application Server is installed. For example, PS_HOME/appserv
PeopleSoft Domain Name: Enter the PeopleSoft domain that this agent will protect. For example, HDMO.
WebLogic Instance Directory: Enter the full path to the WebLogic instance directory. For example, PS_HOME/weblogic/myserver or BEA_HOME/wlserver6.1/config/peoplesoft
PeopleSoft user ID: Enter the system user ID used to install PeopleSoft software. For example, psft
PeopleSoft user’s primary group: Enter the primary group of the PeopleSoft user. For example, sys
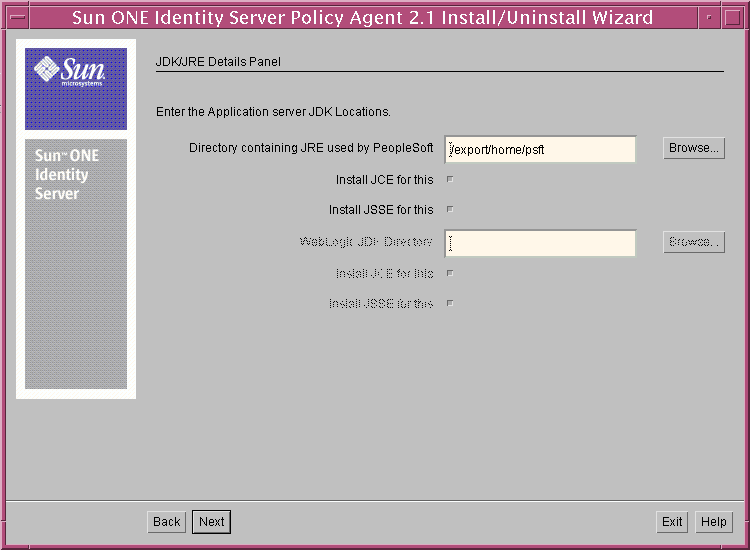
- Click Next and in the JDK/JRE Details screen, enter the locations of the application server’s JDK.
Figure 2-16 JDK/JRE Details screen
Directory containing JRE used by PeopleSoft: Enter the complete path to the directory containing the JRE used by the application server.
Install JCE for this: Choose this option if the Sun JCE provider needs to be installed on the JDK.
Install JSSE for this: Choose this if the Sun JSSE provider needs to be installed on the JDK.
WebLogic JDK Directory: Enter the complete path to the JDK used by WebLogic Server.
Install JCE for this: Choose this option if the Sun JCE provider needs to be installed on the JDK.
Install JSSE for this: Choose this option if the Sun JSSE provider needs to be installed on the JDK.
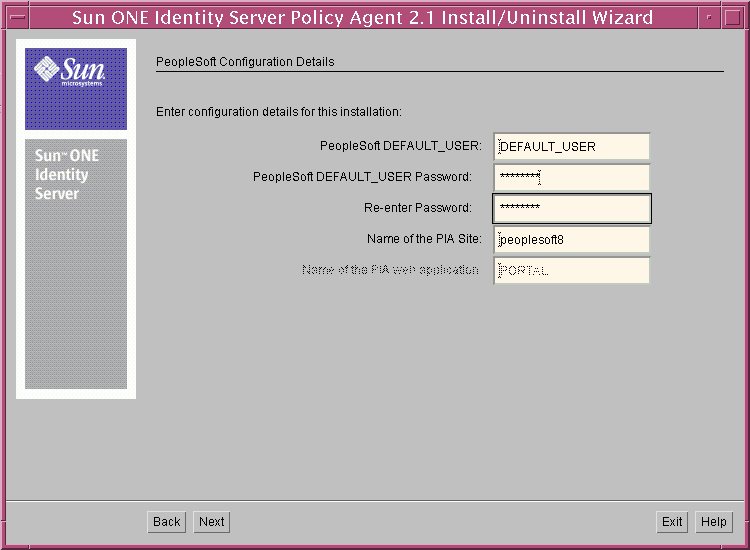
- Click Next and in the PeopleSoft Configuration Details screen, enter the configuration details for this installation.
Figure 2-17 PeopleSoft Configuration Details
PeopleSoft DEFAULT_USER: This field displays the generic PeopleSoft user ID that the web server uses to identify itself to the application server. For example, DEFAULT_USER. For more information on creating this user, see the section "Creating DEFAULT_USER."
PeopleSoft DEFAULT_USER Password: Enter the PeopleSoft DEFAULT_USER password assigned while creating the DEFAULT_USER.
Re-enter Password: Enter the password for DEFAULT_USER again for confirmation.
Name of the PIA Site: Enter the name of the PIA site, as given during PeopleSoft installation. For example, peoplesoft8
Name of the PIA web application: Enter the name of the PIA web application as given during PeopleSoft installation. For example, PORTAL.
Next, the installation program displays a summary of all the information that you have provided to install the agent. For details about this screen and to get started with the installation, proceed to the Summary Screen section.
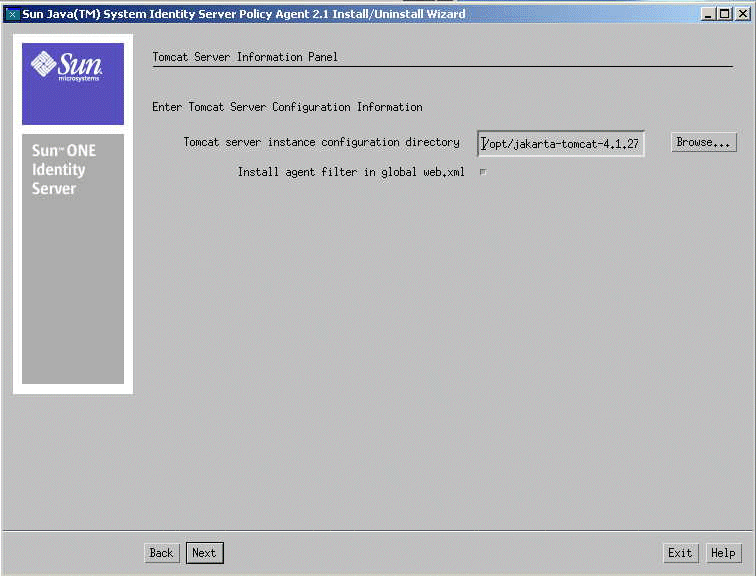
Agent for Apache Tomcat Server 4.1.27
If you are installing the agent for Apache Tomcat Server 4.1.27, enter the configuration information in the Tomcat Server Information screen as explained in this section.
Figure 2-18 Tomcat Server Information panel
Tomcat server instance configuration directory: Enter the complete path to the configuration directory of the Tomcat Server instance.
Install agent filter in global web.xml: Choose this option if you want to install the agent filter in the global deployment descriptor of Tomcat Server. This will enforce Sun ONE Identity Server policies on the entire instance including its index page, if any. Moreover, you will not be required to manually add filter definition for any individual web application deployed on this instance.
Note
There is more than one way to deploy the agent filter. To see details about both these options, see the section Agent for Apache Tomcat Server 4.1.27 under Post-Installation Tasks.
Next, the installation program displays a summary of all the information that you have provided to install the agent. For details about this screen and to get started with the installation, proceed to the Summary Screen section.
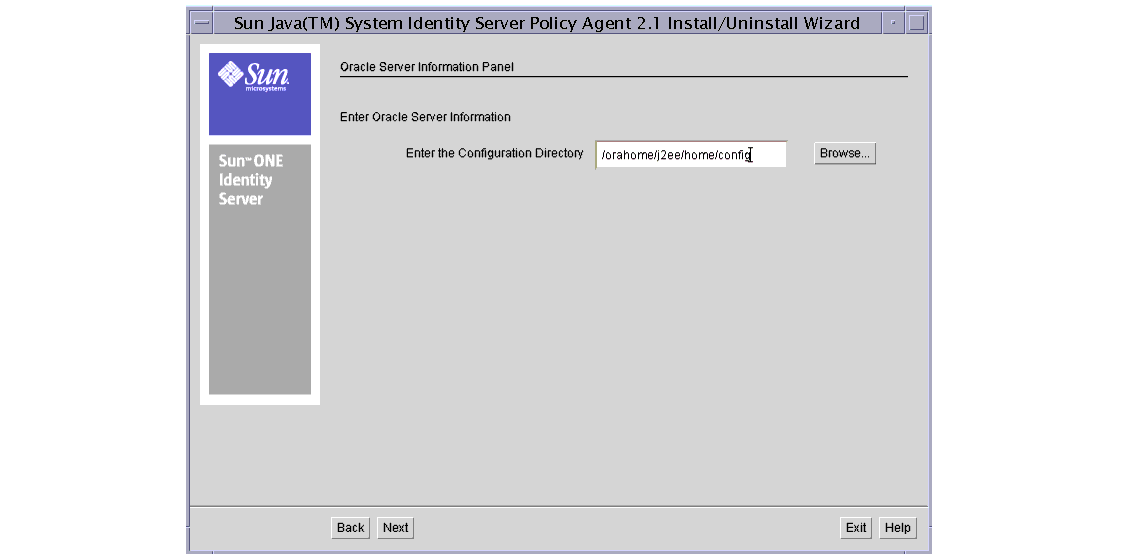
Agent for Oracle 9iAS R2 and Oracle 10g
When you are installing the agent for Oracle 9iAS R2 or Oracle 10g, the installation program displays the Oracle Server Information panel where you must enter the following information.
Figure 2-19 Oracle Server Information screen
Enter the configuration directory: Enter the full path to the configuration directory of the OC4J instance. This directory is typically located as follows:
Next, the installation program displays a summary of all the information that you have provided to install the agent. For details about this screen and to get started with the installation, proceed to the Summary Screen section.
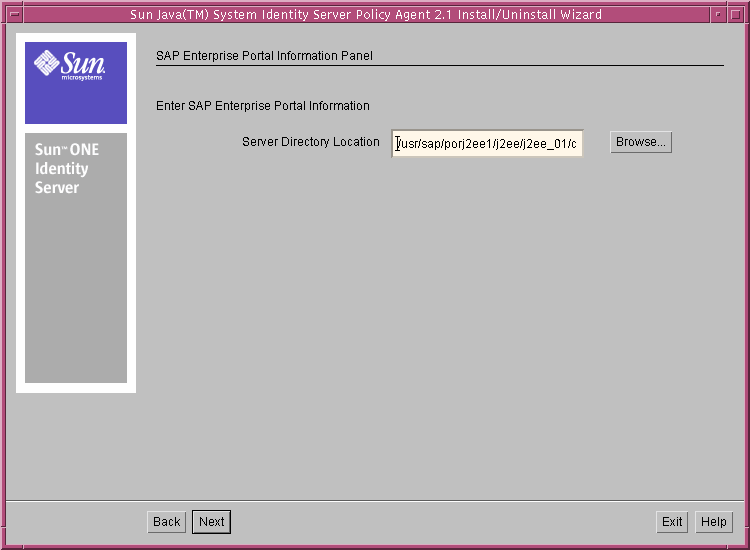
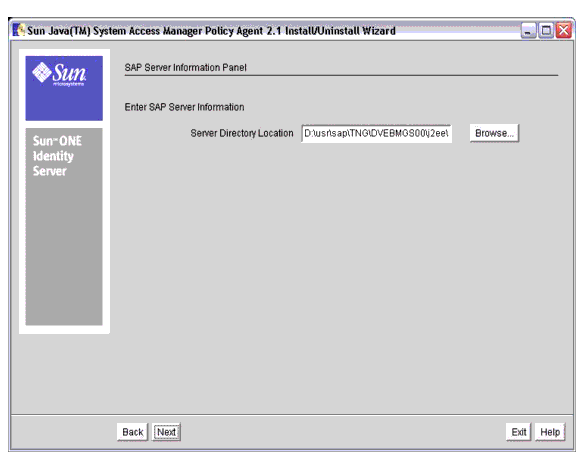
Agent for SAP Enterprise Portal 6.0 SP2
If you are installing the agent for SAP Enterprise Portal 6.0 SP2, enter the configuration information on this screen as explained in this section.
Figure 2-20 SAP Enterprise Portal Information screen
Server Directory Location: Enter the complete path to the installation directory of the server that will be protected by this agent. Use the browse button to locate this directory if necessary.
Note
You must ensure that the SAP Enterprise Portal server is not running during the agent installation.
Next, the installation program displays a summary of all the information that you have provided to install the agent. For details about this screen and to get started with the installation, proceed to the Summary Screen section.
Agent for Macromedia JRun 4
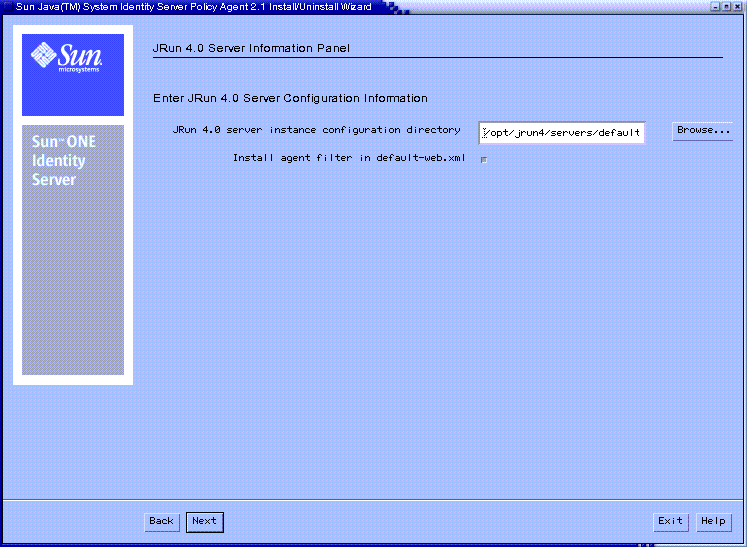
If you are installing the agent for Macromedia JRun 4, enter the configuration information in this screen as explained in this section.
Figure 2-21 JRun Server 4.0 Information panel
JRun 4.0 server instance configuration directory: Enter the complete path to the SERVER-INF directory of the Macromedia JRun server instance.
Install agent filter in default-web.xml: Choose this option if you want to install the agent filter in the global deployment descriptor of Macromedia JRun server.
Next, the installation program displays a summary of all the information that you have provided to install the agent. For details about this screen and to get started with the installation, proceed to the Summary Screen section.
Agent for SAP Enterprise Portal 6.0 SP2 and Web Application Server 6.20 SP1
If you are installing Agent for SAP Enterprise Portal 6.0 SP2 and Web Application Server 6.20 SP1, enter the configuration information on the SAP Enterprise Portal and Web Application Server information screen as explained in this section.
Figure 2-22 SAP Enterprise Portal and Web Application Server Information Screen
Server Directory Location Enter the complete path to the installation directory of the server that will be protected by this agent. Use the browse button to locate this directory if necessary.
Next, the installation program displays a summary of all the information that you have provided to install the agent. For details about this screen and to get started with the installation, proceed to the Summary Screen section.
Agent for BEA WebLogic 8.1 SP2/SP3 Server/Portal
If you are installing the agent for WebLogic 8.1 Server/Portal, enter the configuration information on the WebLogic 8.1 information screen as explained in this section.
Figure 2-23 BEA WebLogic 8.1 Server/Portal Information Screen
Startup Script Location: Enter the full path to the startup script that is used to start your BEA WebLogic Server/Portal instance. This script is typically located under the following directory:
WebLogic_Portal_Install_Dir/user_projects/portal-domain-name
WebLogic Server MBeans Directory: Enter the full path to the mbeantypes directory:
WebLogic_Portal_Install_Dir/weblogic81/server/lib/mbeantypes
This directory stores MBeans required to deploy on WebLogic.
Next, the installation program displays a summary of all the information that you have provided to install the agent. For details about this screen and to get started with the installation, proceed the Summary Screen section.
Agent for Sun Java System Application Server 8.1
If you are installing the agent for Sun Java System Application Server 8.1 enter the configuration information on the screen as explained in this section.
Figure 2-24 Sun Java System Application Server 8.1 Information Screen
As explained previously, Sun Java System Application Server 8.1 makes use of administrative domains.
Each domain has its own configuration, log files, and application deployment areas that are independent of other domains. Therefore, each domain has its own Application Server instance, which is referred to as Domain Administration Server (DAS).
During the installation you are prompted for the server instance that the agent will protect and the corresponding DAS information.
Application Server Bin Directory: Enter the complete path to the bin directory of the Sun Java System Application Server 8.1 installation.
Enter the complete path to the Domain Config Directory. Thisconfig directory can be found in the domain directory of a Sun Java System Application Server 8.1 instance, specifically the instance that will be protected by this agent. For example:
ApplicationServer-base/domains/domain1/config
where ApplicationServer-base represents the directory where the Sun Java System Application Server 8.1 software was installed.
The following is the default location for ApplicationServer-base:
/var/opt/SUNWappserver/
For deployments where instances are remote, see Note about the Domain Config Directory.
Instance Name: Enter the name of the Application Server instance that will be protected by the agent.
Admin Server Host: Enter the host on which the DAS for this instance is running.
Admin Server Host Is Remote: Enable this field only if the DAS for this instance is not on the host where the instance is running.
Admin Server Port: Enter the port number on which the DAS for this instance is available.
Admin Server Protocol: Select the appropriate protocol of the DAS. This protocol value may be either HTTP or HTTPS
Admin User Name: Enter the authorized domain Application Server administrative username
Admin Password: Enter the Administrator password for the domain. The password is defined as AS_ADMIN_PASSWORD in the password file.
Re-enter Admin Server Password: Re-enter the administrative password for the domain.
Next, the installation program displays a summary of all the information that you have provided to install the agent. For details about this screen and to get started with the installation, proceed to the next section, the Summary Screen section.
Summary Screen
- Click Next and in the Summary screen, review the information carefully. You can use the Back button to navigate back and change any information, if needed. Sensitive information like passwords are not displayed in this screen.
- Once you have reviewed this information, click the Next button. The installation program now checks for the available disk space and displays the Ready to Install screen.
- Click the Install Now button to start the installation of agent on your system.
Once you click the Install Now button, the installation program starts making changes to your system. When making these changes, the installation program will not allow you to cancel the installation.
The next screen displays the progress of installation as the installation program makes changes to your system. This screen does not require any user input or action and will automatically proceed to the next screen when the installation program finishes making the necessary changes to your system. This process may take a while. Take care not to terminate the process in between.
The next screen displays the installation summary. The installation program displays the status of the installation in this screen. Click on the Details button to see more information on the actions performed by the installation program.
At this stage, you are now ready to proceed to the Post-Installation Tasks section that details the tasks you must now perform in order to use the agent.
Using the Command-Line Installation Program
When the agent installation program is launched in the command line mode, it presents the user with a series of questions to gather the necessary information and report the status of the installation at certain stages of the overall installation. The command line installation program also provides active feedback, by way of text messages, to help the user enter correct information. The help messages for a set of installation questions are displayed before the common set of queries are made.
Follow these steps to install the agent in the command line mode:
- Launch the installation program in the nodisplay mode as explained in the earlier sections. The installation program begins with a series of messages aimed at familiarizing you with the command line interface as well as providing some other necessary information. Read all these messages and press the Enter key on your keyboard to continue when prompted.
The installation program now displays the following message:
- At the prompt, press the Enter key to display the License agreement. The installation program now displays the License Agreement on the terminal.
Note
Depending on your terminal size settings, it is possible that the License text may scroll too fast for you to read. In such a case, you must either use the scroll bar on your terminal to carefully read the License Agreement, or in case when using the scroll bar does not give access to the full License Agreement, you must read the accompanying LICENSE.TXT file for the terms and conditions of the License Agreement.
- Read and understand all the terms and conditions as detailed in this agreement. If you do not agree with any term or condition of this agreement, enter No at the following prompt. If you agree to the terms and conditions, enter Yes to continue.
Have you read, and do you accept, all of the terms of the preceding Software License Agreement [no] {"<" goes back, "!" exits}?
If you do not agree with these terms and conditions, the agent installation program will exit without making any changes to your system.
- To install the agent in the displayed default directory, press only the Enter key. To use a different directory, type in the full path to the directory and press the Enter key.
Install Sun(tm) ONE Identity Server Policy Agent in this directory [C:\\Sun]{"<" goes back, "!" exits}:
- At the following prompts, enter information about the Sun ONE Identity Server Services.
Enter the server information where the Sun ONE Identity Server Service and Console are installed.
Sun ONE Identity Server Host [mycomputer.example.com] {"<" goes back, "!" exits}
Sun ONE Identity Server Services Port [58080] {"<" goes back, "!" exits}
Sun ONE Identity Server Services Protocol [http] {"<" goes back, "!" exits}
Sun ONE Identity Server Services Deployment URI [/amserver] {"<" goes back, "!" exits}
Sun ONE Identity Services Host: Enter the fully qualified host name of the system on which the Sun ONE Identity Server is installed.
Sun ONE Identity Server Services Port: Enter the port number for the Web Container that is used by Sun ONE Identity Server to provide its services.
Sun ONE Identity Server Services Protocol: Enter the appropriate protocol that will be used by the agent when communicating with Sun ONE Identity Server services. This protocol value may either be HTTP or HTTPS.
Sun ONE Identity Server Services Deployment URI: Enter the URI that will be used by the agent to access various Sun ONE Identity Server services.
- At the following prompts, enter information about the Sun ONE Identity Server Console.
Sun ONE Identity Console Host [mycomputer.example.com] {"<" goes back, "!" exits} :
Sun ONE Identity Server Console Port [58080] {"<" goes back, "!" exits}
Sun ONE Identity Server Console Protocol [http] {"<" goes back, "!" exits}:
Sun ONE Identity Server Console Deployment URI [/amconsole] {"<" goes back,"!" exits}
amAdmin Password [] {"<" goes back, "!" exits}
Re-enter amadmin Password [] {"<" goes back, "!" exits}
amldapuser Password [] {"<" goes back, "!" exits}
Re-enter amldapuser Password [] {"<" goes back, "!" exits}
Sun ONE Identity Server Console Host: Enter the fully qualified hostname of the system on which the Sun ONE Identity Server console is installed.
Sun ONE Identity Server Console Port: Enter the port number of the Web Container that is used by Sun ONE Identity Server console.
Sun ONE Identity Server Console Protocol: Enter the appropriate protocol that will be used by the agent when communicating with Sun ONE Identity Server console. This protocol value may either be HTTP or HTTPS.
Sun ONE Identity Server Console Deployment URI: Enter the URI that will be used by the agent to access the Sun ONE Identity Server console.
amAdmin Password: Enter the amAdmin user password specified during Sun ONE Identity Server installation. The password entered here should be the amAdmin user password originally used during the installation of Sun ONE Identity Server. Even if after the installation of Sun ONE Identity Server, the password for the amAdmin user has been changed, you should still enter the original password and not the changed password.
Re-enter Password: Re-enter the amAdmin password to ensure that the correct value is used by the agent.
amldapuser Password: Enter the amldapuser password specified during Sun ONE Identity Server installation.
Re-enter amldapuser Password: Re-enter the amldapuser password to ensure that the correct value is used by the agent.
Note
- In situations where you are not using the features of the agent that require LDAP connectivity, you may choose to leave the amAdmin password blank. By doing so, the value for this password will be set to “changeit”, which can be changed at a later stage as necessary.
- If you select the HTTPS as either Sun ONE Identity Server Services Protocol, or Sun ONE Identity Server Console Protocol, you must ensure that the Certificate Authority certificate for the signer of the corresponding server certificates is added to the trusted list for the Application Server’s JDK keystore. Please refer to the Application Server documentation to learn how this can be done.
- At the following prompts, provide details about the Directory Server corresponding to Sun ONE Identity Server services.
Enter the directory information corresponding to the Sun(tm) ONE Identity Server Services
Directory Host [mycomputer.example.com] {"<" goes back, "!" exits}
Directory Port [389] {"<" goes back, "!" exits}
Is the directory SSL enabled [false] {"<" goes back, "!" exits}?
Root Suffix [dc=iplanet,dc=com] {"<" goes back, "!" exits}
Installation Organization [dc=iplanet,dc=com] {"<" goes back, "!" exits}
Directory Host: Enter the fully qualified hostname of the system where the Directory Server is installed.
Directory Port: Enter the port number used by this Directory Server.
SSL Enabled: Enter the value ‘true’ if the Directory Server uses SSL to communicate on the said port. Press the Enter key or enter ‘false’ if the Directory Server does not use SSL.
Root Suffix: Enter the root suffix to be used for accessing information stored in this Directory Server.
Installation Organization: Enter the complete DN of the default organization that was created when Sun ONE Identity Server was installed.
Note
If you enter true for SSL Enabled prompt, you must ensure that the Certificate Authority certificate for the signer of the corresponding server certificates is added to the trusted list for the application server’s JDK keystore. Please refer to the application server documentation to learn how this can be done.
- At the following prompts, enter details of agent configuration.
Enter Agent configuration values.
Agent Host Name [mycomputer.example.com] {"<" goes back, "!" exits}
Preferred protocol listening port [80] {"<" goes back, "!" exits}
Server's preferred protocol [http] {"<" goes back, "!" exits}
Config Reload Interval [10] {"<" goes back, "!" exits}
Enable Not-Enforced List Cache [false] {"<" goes back, "!" exits}
Number of Entries in Cache [1000] {"<" goes back, "!" exits}
Cache Expiration Time in Seconds [60] {"<" goes back, "!" exits}
Primary Application Context Path [/] {"<" goes back, "!" exits}
Enter Agent Filter Mode Options are: ALL, J2EE_POLICY, URL_POLICY, SSO_ONLY, NONE [ALL] {"<" goes back, "!" exits}
Access Denied URL [] {"<" goes back, "!" exits}
Maximum allowed Login Attempts [5] {"<" goes back, "!" exits}
Agent Host Name: Enter the fully qualified hostname on which the application server protected by the agent is installed.
Preferred protocol listening port: Enter the preferred port number on which the application server provides its services.
Server’s preferred protocol: Enter the protocol used by the application server to provide its services on the given port number as entered for the field Preferred protocol listening port. This protocol value may either be HTTP or HTTPS.
Config Reload Interval: Enter the amount of time in seconds after which the agent will automatically reload any changes made to the its configuration. Specify the value 0 to disable this feature.
The agent supports Hot-Swappable configuration, which can be changed without requiring the application server to be restarted. This feature can be very helpful in a controlled development and test environment where frequent changes to the configuration are needed to arrive to the correct configuration settings. It is recommended that this feature be disabled for production systems to ensure the optimal use of system resources and to avoid accidental changes being picked up by the agent. Also note that although the majority of agent configuration is hot-swap enabled, there are some configuration settings which require a complete application server restart. Please refer to Chapter 3, "Agent Configuration" to learn more about this feature.
Enable Not-Enforced List Cache: Enter true if you wish to enable the caching of Not-Enforced List entries as evaluated by the agent against incoming user requests.
It is recommended that the Not-Enforced List caching be enabled in order to optimize system performance. However, the overall system performance can degrade if the corresponding values of Cache Size and Cache Expiration time are not suited for your deployment. It is therefore recommended that the values used for these configuration settings be carefully evaluated in a controlled testing environment before being used in production. It should also be noted that the agent maintains two caches in its memory—one for recording the URIs that were evaluated as enforced and the other for recording the URIs that were evaluated as not-enforced. The specified values of Number of Entries in Cache and Cache Expiration time are equally applicable to both of these caches. This factor must be considered when setting the values for the size and expiration time of the cache.
Number of Entries in Cache: Enter the size of cache used by the agent to store the evaluated results.
Cache Expiration Time in Seconds: Enter the amount of time in seconds after which the agent can purge an entry from its cache to free up the cache memory for newer entries.
Primary Application Context Path: Enter the Context path for the primary application being protected by this agent. If this application is deployed at the root context of the application server, enter the value “/”.
When installing the agent for SAP Enterprise Portal 6.0 SP2, enter the context path as /irj.
When installing the agent for SAP Enterprise Portal 6.0 SP2 and Web Application Server 6.20 SP1, you should ensure that the primary application context path is set to the context path of the application that will be available throughout the life of the server. If your SAP installation does not include the Enterprise Portal, you must specify the value corresponding to one of the applications that will be protected by this agent. If, however, your SAP installation does include the Enterprise Portal, you may use the context path /irj as well
In a situation where there are multiple applications deployed on the application server, you must choose the context path of the application that is available for as long as the application server is alive. This value is used by the agent to receive notifications from Sun ONE Identity Server and is also used to provide support for legacy browsers, etc. Providing an incorrect value for this configuration setting may lead to the malfunction of the agent and the application server.
Agent Filter Mode: Enter the agent filter mode that you would like to run the agent in. For a complete description of the available agent filter modes, refer to the chapter Chapter 3, "Agent Configuration".
When installing the agent for SAP Enterprise Portal 6.0 SP2, the agent filter mode must be set to either SSO_ONLY or URL_POLICY. Other agent filter modes are not supported by this agent.
Access Denied URL: Enter the complete URI for the access denied page to be used by the agent. If this value is not specified, the agent will use HTTP error status code 403 (FORBIDDEN) to deny access to resources as needed.
Maximum allowed Login Attempts: Enter the number of unsuccessful access attempts in succession after which the user will not be allowed to access the requested URL temporarily for security purposes. Specify the value 0 to disable this feature.
This feature can be used to guard the hosted application from Denial-Of-Service attacks where the end user can overload the application server by repeated authentication requests. By disabling this feature, the system remains vulnerable to such attacks. Therefore this feature should not be disabled unless there is a specific requirement that necessitates the disabling of this feature.
Note
If you select HTTPS as Server’s preferred protocol, you must ensure that the Certificate Authority certificate for the signer of the corresponding server certificates is added to the trusted list for Sun ONE Identity Server. Please refer to Sun ONE Identity Server documentation to learn how this can be done.
- At the following prompts, provide information about the JDK installation directory for the application server and JCE/JSSE configuration for that specific JDK:
Enter the server information where the JDK is installed.
JDK Directory [C:\jdk1.3.1_01] {"<" goes back, "!" exits}
Install JCE for this JDK [false] {"<" goes back, "!" exits}
Install JSSE for this JDK [false] {"<" goes back, "!" exits}
JDK Directory: Enter the complete path to the directory where the JDK being used by your application server is installed.
Install JCE for this JDK: Enter the value true if the JDK being used by your application server does not have JCE installed.
Install JSSE for this JDK: Enter the value true if the JDK being used by your application server does not have JSSE installed.
Note
- If the JDK being used by your application server does not have JCE installed, you must select the Install JCE for this JDK checkbox. Failing to do so can result in the installation program failure.
- If your application server is based on JDK 1.4 or above, the options to install JCE and JSSE will not be provided by the agent installation program.
- If you are installing the agent for BEA WebLogic Server 8.1, you must accept the default values (false) for the prompts Install JCE for this JDK and Install JSSE for this JDK.
- If you are installing the agent for Tomcat Server 4.1.27, Oracle 9iAS R2, Oracle 10g, SAP Enterprise Portal 6.0 SP2, or Macromedia JRun 4, the installation program will now display the following prompts where you must enter the user and group information for the process owner of the application server.
Enter the user and group information for the process owner of the Application Server.
User Name [root] {"<" goes back, "!" exits} root
Group Name [root] {"<" goes back, "!" exits} other
User Name: The user name of the user running the application server process.
Group Name: The group name of the group to which the user running the Application Server process belongs to.
Note
- The above prompts are displayed only when the agent is installed on various Unix platforms.
- Valid but inappropriate values supplied for the user name and/or group name can lead to severe problems with the configuration of the application server and can render the application server unusable.
- The server instance should be started or stopped only by the process owner of the application server. If these tasks are done by another user, it will cause the agent to malfunction.
The prompts displayed thus far by the installation program are the same for all the agents. However, the prompts that follow are specific to the application server agent that is being installed. From the following list, click the appropriate link depending on which application server agent you are installing. After you perform the steps in the respective section, proceed to the Summary Information Prompt section.
Agent for Sun ONE Application Server 7.0
If you are installing the agent for Sun ONE Application Server 7.0, enter the configuration information at these prompts as explained in this section.
Enter the answers to Sun ONE Application Server specific questions as prompted by the agent installation program:
Enter Sun ONE Appserver configuration Details:
Application Server bin directory [C:\Sun\AppServer7\bin] {"<" goes back, "!" exits}
Instance Config Directory [C:\Sun\AppServer7\domains\domain1\server1\config] {"<" goes back, "!" exits}
Admin User Name [admin] {"<" goes back, "!" exits}
Admin Server Port [4848] {"<" goes back, "!" exits}
Admin Server Password [] {"<" goes back, "!" exits}
Re-enter Admin Server Password [] {"<" goes back, "!" exits}
Application Server bin directory: Enter the complete path to the bin directory of the Sun ONE Application Server 7.0 installation.
Instance Config Directory: Enter the complete path to the config directory of the Sun ONE Application Server 7.0 instance which will be protected by this agent.
Admin User Name: Enter the user name of the Administrator of this Sun ONE Application Server 7.0 instance.
Admin Server Port: Enter the port number on which the Administration Server for this Sun ONE Application Server 7.0 is available.
Admin Password: Enter the password for the Administrator of this Sun ONE Application Server 7.0 instance.
Re-enter Admin Server Password: Re-enter the password for the Administrator of this Sun ONE Application Server 7.0 instance.
Note
You must ensure that the Sun ONE Application Server 7.0 Administration Server is running at the time of the agent installation.
Next, the installation program displays a summary of all the information that you have provided to install the agent. For details about this screen and to get started with the installation, proceed to the Summary Information Prompt section.
Agent for BEA WebLogic Server 6.1 SP2
If you are installing the agent for BEA WebLogic Server 6.1 SP2, answer the following prompt as explained here:
Startup Script Location [C:\bea\wlserver6.1\config\mydomain\startWebLogic.cmd] {"<" goes back, "!" exits}
Startup Script Location: Enter the full path to the startup script that is used to start your BEA WebLogic Server instance.
Note
- When the WebLogic Server is in a cluster environment, the agent installation program may not update the startup script used to launch a managed server. In this situation, the administrator must manually edit the script and insert all the CLASSPATH and Java VM options that were inserted in the original startup script by the installation program. For the exact details on the values of CLASSPATH and Java VM options, please refer to the startup script that was modified by the agent installation program.
- When modifying any startup script to add the agent CLASSPATH to the Java VM, you must ensure that the agent classes are placed before the WebLogic Server classes in the final class path. Failing to do so can cause the agent to malfunction during runtime.
Next, the installation program displays a summary of all the information that you have provided to install the agent. For details about this screen and to get started with the installation, proceed to the Summary Information Prompt section.
Agent for IBM WebSphere Application Server 5.0/5.1
If you are installing the agent for IBM WebSphere Application Server 5.0/5.1, enter the following information at these prompts.
Enter WebSphere Application Server configuration Details:
WebSphere Root Directory [/space/ibm/WebSphere/AppServer] {"<" goes back, "!" exits}
Instance Config Directory [/space/ibm/WebSphere/AppServer/config/cells/heros/nodes/euros/s ervers/server1] {"<" goes back, "!" exits}
WebSphere Admin Connector [SOAP] {"<" goes back, "!" exits}
WebSphere Admin Connector Port [8880] {"<" goes back, "!" exits}
WebSphere Cell Name [euros] {"<" goes back, "!" exits}
WebSphere Node Name [euros] {"<" goes back, "!" exits}
WebSphere Server Instance Name [server1] {"<" goes back, "!" exits}
WebSphere Root Directory: Enter the complete path to the root directory for the WebSphere Application Server.
Instance Config Directory: Enter the complete path to the config directory of the WebSphere Application Server instance that will be protected by this agent.
WebSphere Admin Connector: Specify the protocol for connecting to WebSphere Administration Service. You can choose between SOAP and RMI.
WebSphere Admin Connector Port: Enter the Administration Service Port for specified Connector.
WebSphere Cell Name: Enter the cell name for the IBM WebSphere Application Server.
WebSphere Node Name: Enter the node name for the IBM WebSphere Application Server.
WebSphere Server Instance Name: Enter the instance name of the IBM WebSphere Application Server instance.
Next, the installation program displays a summary of all the information that you have provided to install the agent. For details about this screen and to get started with the installation, proceed to the Summary Information Prompt section.
Agent for BEA WebLogic Server 7.0 SP2 or BEA WebLogic Server 8.1
If you are installing the agent for BEA WebLogic Server 7.0 SP2 or BEA WebLogic Server 8.1, answer the following prompts as explained here:
Startup Script Location [/bea/user_projects/mydomain/startWebLogic.sh] {"<"goes back, "!" exits}
WebLogic Server MBeans directory [/bea/weblogic700/server/lib/mbeantypes]{"<" goes back, "!" exits}
Startup Script Location: Enter the full path to the startup script that is used to start your BEA WebLogic Server instance. This script is typically located under the following directory:
WebLogic_Install_Dir/bea/user_projects/server-domain-name
WebLogic Server MBeans Directory: Enter the full path to the mbeantypes directory:
WebLogic_Install_Dir/bea/weblogic700/server/lib/mbeantypes
This directory stores MBeans required to deploy on WebLogic.
Note
- When the WebLogic Server is being operated in a cluster environment, the agent installation program may not update the startup script used to launch a managed server. In this situation, the administrator must manually edit the script and insert all the CLASSPATH and Java VM options that were inserted in the original startup script by the installation program. For the exact details on the values of CLASSPATH and Java VM options, please refer to the startup script that was modified by the agent installation program.
- When modifying any startup script to add the agent CLASSPATH to the Java VM, you must ensure that the agent classes are placed before the WebLogic Server classes in the final class path. Failing to do so can cause the agent to malfunction during runtime.
Next, the installation program displays a summary of all the information that you have provided to install the agent. For details about this screen and to get started with the installation, proceed to the Summary Information Prompt section.
Agent for PeopleSoft 8.3/8.4/8.8
If you are installing the agent for PeopleSoft, perform the following steps:
- At the following prompt, enter the item number to choose the PeopleSoft application version on which you are going to install the agent.
Choose the PeopleSoft version on which you want to install the agent:
PeopleSoft HRMS 8.3
PeopleSoft Financial 8.4
PeopleSoft HRMS 8.8
Choose one of the options from above [1] {"<" goes back, "!" exits}
- Enter the item number to choose one of the following agent deployment options.
1. Agent on WebLogic Server hosting PeopleSoft application
2. Proxy Solution - Agent on a Separate Proxying Web Server
Choose one of the options from above [1] {"<" goes back, "!" exits}
Agent on WebLogic Server hosting PeopleSoft application: Select this option to install the agent on top of BEA WebLogic Server hosting the PeopleSoft application.
Proxy Solution - Agent on a Separate Proxying Web Server: Select this option if you want to configure Sun ONE Web Server (also referred as iPlanet Web Server) as a proxy for BEA WebLogic Server that hosts the PeopleSoft application.
Note
When installing the agent on PeopleSoft 8.3 HRMS with BEA WebLogic 5.1 front-end server, ensure that the BEA WebLogic 5.1 server has the Service Pack 12 installed. Not having this service pack installed on BEA WebLogic server could result in the malfunction of the PeopleSoft application after the installation of the agent.
To upgrade the BEA WebLogic server to Service Pack 12, you can download the binaries from PeopleSoft distribution site located at ftp://ftp.peoplesoft.com/outgoing/GSC/jim/weblogic510. Please follow the instructions provided at this location to upgrade the server.
- At the following prompts, provide the PeopleSoft installation information.
PeopleSoft Installation Details
PeopleSoft Application Server installed locally [true] {"<" goes back, "!"exits}
WebLogic Server installed locally [true] {"<" goes back, "!" exits}
PeopleSoft AppServer Directory [/usr/psft/appserv] {"<" goes back, "!"exits}
PeopleSoft Domain Name [HDMO] {"<" goes back, "!" exits}
WebLogic Instance Directory [/usr/psft/weblogic/myserver] {"<" goes back,"!" exits}
PeopleSoft user ID [psft] {"<" goes back, "!" exits}
PeopleSoft user’s primary group [sys] {"<" goes back, "!" exits}
PeopleSoft Application Server Installed locally: Press Enter to specify that you have PeopleSoft Application Server installed locally.
WebLogic Server Installed locally: Press Enter if you have WebLogic Server installed locally.
Note
Select one or both of the above options according to your installation. You need to select at least one to proceed.
PeopleSoft AppServer Directory: Enter the full path to the directory where the PeopleSoft Application Server is installed. For example, PS_HOME/appserv
PeopleSoft Domain Name: Enter the PeopleSoft domain that this agent will protect. For example, HDMO.
WebLogic Instance Directory: Enter the full path to the WebLogic instance directory. For example, PS_HOME/weblogic/myserver or BEA_HOME/wlserver6.1/config/peoplesoft
PeopleSoft user ID: Enter the system user ID used to install PeopleSoft software. For example, psft
PeopleSoft user’s primary group: Enter the primary group of the PeopleSoft user. For example, sys
- At the following prompts, enter the locations of the application server’s JDK.
Enter the server information where the JDK is installed.
Directory containing JRE used by PeopleSoft [/export/home/psft4/pt] {"<"goes back, "!" exits}
Install JCE for this [true] {"<" goes back, "!" exits}
Install JSSE for this [true] {"<" goes back, "!" exits}
WebLogic JDK Directory [/export/home/psft4/bea/jdk131] {"<" goes back, "!"exits}
Install JCE for this [true] {"<" goes back, "!" exits}
Install JSSE for this [true] {"<" goes back, "!" exits}
Directory containing JRE used by PeopleSoft: Enter the complete path to the directory containing the JRE used by the application server.
Install JCE for this: Press Enter if the Sun JCE provider needs to be installed on the JDK.
Install JSSE for this: Press Enter if the Sun JSSE provider needs to be installed on the JDK.
WebLogic JDK Directory: Enter the complete path to the JDK used by WebLogic Server.
Install JCE for this: Press Enter if the Sun JCE provider needs to be installed on the JDK.
Install JSSE for this: Press Enter if the Sun JSSE provider needs to be installed on the JDK.
- At the following prompts, enter the configuration details for this installation.
Configuration details for this installation.
PeopleSoft DEFAULT_USER [DEFAULT_USER] {"<" goes back, "!" exits}:
PeopleSoft DEFAULT_USER Password [] {"<" goes back, "!" exits}:
Re-enter Password [] {"<" goes back, "!" exits}:
Name of the PIA Site [ps] {"<" goes back, "!" exits}:
Name of the PIA web application [PORTAL] {"<" goes back, "!" exits}:
PeopleSoft DEFAULT_USER: This field displays the generic PeopleSoft user ID that the web server uses to identify itself to the application server. For example, DEFAULT_USER.
PeopleSoft DEFAULT_USER Password: Enter the PeopleSoft DEFAULT_USER password assigned while creating the DEFAULT_USER.
Re-enter Password: Enter the password for DEFAULT_USER again for confirmation.
Name of the PIA Site: Enter the name of the PIA site, as given during PeopleSoft installation. For example, peoplesoft8.
Name of the PIA web application: Enter the name of the PIA web application as given during PeopleSoft installation. For example, PORTAL.
Next, the installation program displays a summary of all the information that you have provided to install the agent. For details about this screen and to get started with the installation, proceed to the Summary Information Prompt section.
Agent for Apache Tomcat Server 4.1.27
If you are installing the agent for Tomcat Server 4.1.27, the installation program will now display the following prompts.
Enter Tomcat Server Configuration Information
Tomcat server instance configuration directory [/opt/jakarta-tomcat-4.1.27/conf] {"<" goes back, "!" exits}:
Install agent filter in global web.xml [true] {"<" goes back, "!" exits}?
Instance Configuration Directory: Provide the complete path to the configuration directory of the Tomcat Server Instance.
Enable Global Filter: Enter true if you want to install the agent filter for the global web.xml, otherwise enter false. Enabling global filter will enforce Identity Server policies on the entire instance including its index page, if any. Moreover, you will not be required to manually add filter definition for any individual web application deployed on this instance.
Note
There is more than one way to deploy the agent filter. To see details about both these options, see the section Agent for Apache Tomcat Server 4.1.27 under Post-Installation Tasks.
Next, the installation program displays a summary of all the information that you have provided to install the agent. For details about this screen and to get started with the installation, proceed to the Summary Information Prompt section.
Agent for Oracle 9iAS R2 and Oracle 10g
When installing the agent for Oracle 9iAS R2 or Oracle 10g, you must enter the following information about the Oracle Server that is to be secured by the agent.
Oracle instance config directory [/ora/j2ee/home/config] {"<" goes back, "!"
exits} /export/home/orcl/ora9ias/j2ee/home/config
Oracle instance config directory: Enter the complete path to the Oracle instance configuration directory. Ensure that you have write privileges for this directory.
Next, the installation program displays a summary of all the information that you have provided to install the agent. For details about this screen and to get started with the installation, proceed to the Summary Information Prompt section.
Agent for SAP Enterprise Portal 6.0 SP2
If you are installing the agent for SAP Enterprise Portal 6.0 SP2, enter the configuration information on this screen as explained in this section.
Enter SAP Enterprise Portal Information
Server Directory Location [/usr/sap/porj2ee1/j2ee/j2ee_01/cluster/server]
{"<" goes back, "!" exits}
Server Directory Location: Enter the complete path to the directory that contains the server installation to be protected by this agent.
Note
You must ensure that the SAP Enterprise Portal server is not running during the agent installation.
Agent for Macromedia JRun 4
If you are installing the agent for Macromedia JRun 4, enter the configuration information at these prompts as explained in this section.
Enter JRun Server Configuration Information
JRun server instance configuration directory [/opt/jrun4/servers/default/SERVER-INF] {"<" goes back, "!" exits}:
Install agent filter in default-web.xml [true] {"<" goes back, "!" exits}?
Instance Configuration Directory: Enter the complete path to the configuration directory of the Macromedia JRun Server Instance.
Install agent filter in default-web.xml: Enter true if you want to install the agent filter for default-web.xml, otherwise enter false. If you choose true, the agent will enforce Sun ONE Identity Server policies on the specified JRun server instance, including its index page, if any. However, you will not be required to manually add filter definition to every individual web application deployed on this instance anymore.
Note
If you select this option, all resources in the server instance will be protected by the servlet filter defined in the default web.xml and users will not be able to access even the welcome page of the server, if any, without providing the credentials and adding a rule to access that resource in Sun ONE Identity Server. One way to handle this problem is to add your server’s welcome page URL or any other resource that does not need the protection, to the property com.sun.am.policy.amFilter.notenforcedList[<index>] in the agent configuration file AMAgent.properties.
Agent for SAP Enterprise Portal 6.0 SP2 and Web Application Server 6.20 SP1
If you are installing the agent for SAP Enterprise Portal 6.0 SP2 and Web Application Server 6.20 SP1, enter the configuration information on this screen as explained in this section.
Enter SAP Server Information
Server Directory Location [D:\usr\sap\TNG\DVEBMGS00\j2ee\cluster\server]
{"<" goes back, "!" exits}
Enter the complete path to the installation directory of the server that will be protected by this agent. Use the browse button to locate this directory if necessary.
Agent for BEA WebLogic 8.1 SP2/SP3 Server/Portal
If you are installing the agent for WebLogic 8.1 Server/Portal, answer the following prompts as explained in this section:
Startup Script Location [/bea/user_projects/mydomain/startWebLogic.sh] {"<"goes back, "!" exits}
WebLogic Server MBeans directory [/bea/weblogic/server/lib/mbeantypes]{"<" goes back, "!" exits}
Startup Script Location: Enter the full path to the startup script that is used to start your BEA WebLogic Server/Portal instance. This script is typically located under the following directory:
WebLogic_Portal_Install_Dir/user_projects/portal-domain-name
WebLogic Server MBeans Directory: Enter the full path to the mbeantypes directory:
WebLogic_Portal_Install_Dir/weblogic81/server/lib/mbeantypes
This directory stores MBeans required to deploy on WebLogic.
Note
- When the WebLogic Portal/Server is in a cluster environment, the agent installation program may not update the startup script used to launch a managed server. In this situation, the administrator must manually edit the script and insert all the CLASSPATH and Java VM options that were inserted in the original startup script by the installation program. For the exact details on the values of CLASSPATH and Java VM options, please refer to the startup script that was modified by the agent installation program.
- When modifying any startup script to add the agent CLASSPATH to the Java VM, you must ensure that the agent classes are placed before the WebLogic Server classes in the final class path. Failing to do so can cause the agent to malfunction during runtime.
Next, the installation program displays a summary of all the information that you have provided to install the agent. For details about this screen and to get started with the installation, proceed to the Summary Information Prompt section.
Agent for Sun Java System Application Server 8.1
If you are installing the agent for Sun Java System Application Server 8.1, answer the following prompts as explained in this section:
Emter Sun ONE Appserver configuratioin Details
Application Server bin directory [/opt/SUNWappserver/appserver/bin] {"<"
goes back, "!" exits}Domain Config Directory[/var/opt/SUNWappserver/domains/
domain1/config]{"<" goes back, "!" exits}Instance Name [server] {"<" goes back, "!" exits}}
Admin Server Host [example.company22.com] {"<" goes back, "!" exits}
Admin Server Host is Remote ? [false] {"<" goes back, "!" exits}
Admin Server Port [4849] {"<" goes back, "!" exits}
Admin User Name [admin] {"<" goes back, "!" exits}
Admin Server Password [] {"<" goes back, "!" exits}
Re-enter Admin Server Password [] {"<" goes back, "!" exits}
Application Server Bin Directory: Enter the complete path to the bin directory of the Sun Java System Application Server 8.1 installation.
Enter the complete path to the Domain Config Directory. Thisconfig directory can be found in the domain directory of a Sun Java System Application Server 8.1 instance, specifically the instance that will be protected by this agent. For example:
ApplicationServer-base/domains/domain1/config
where ApplicationServer-base represents the directory where the Sun Java System Application Server 8.1 software was installed.
The following is the default location for ApplicationServer-base:
/var/opt/SUNWappserver/
For deployments where instances are remote, see Note about the Domain Config Directory.
Instance Name: Enter the name of the Application Server instance that will be protected by the agent.
Admin Server Host: Enter the host on which the DAS for this instance is running.
Admin Server Host Is Remote: Enable this field only if the DAS for this instance is not on the host where the instance is running.
Admin Server Port: Enter the port number on which the DAS for this instance is available.
Admin Server Protocol: Select the appropriate protocol of the DAS. This protocol value may be either HTTP or HTTPS.
Admin User Name: Enter the authorized domain Application Server administrative user name.
Admin Password: Enter the Administrator password for the domain. The password is defined as AS_ADMIN_PASSWORD in the password file.
Re-enter Admin Server Password: Re-enter the administrative password for the domain.
Note
You must ensure that the Sun Java System Application Server 8.1 Domain Administration Server (DAS) is available at the time of installation of the agent.
For instances where DAS is not on the agent host, therefore DAS is remote, verify the DAS information is correct and the following field is enabled:
Admin server host is remote?When DAS is remote, the domain config directory is available at the following location
ApplicationServer-base/nodeagents/node1/instance1/config
where instance1 is the Application Server instance the agent protects
and
where node1 is the node agent to which instance1 belongs.
For more information about node agents, see Sun Java System Application Server 8.1 Administration Guide.
Next, the installation program displays a summary of all the information that you have provided to install the agent. For details about this screen and to get started with the installation, proceed to the next section, the Summary Information Prompt section.
Summary Information Prompt
- At the next prompt, review the summary of information as gathered by the installation program. You can use the “<” option to navigate back and change any information, if needed. Sensitive information like passwords are not displayed in the console. To continue press the Enter key on your keyboard.
The installation program now checks for the necessary disk space and displays a Ready to Install prompt.
- Choose from the given choices to proceed. You may:
- continue with the installation by selecting the option 1,
- start over again by using the option 2, or
- simply exit the installation program by using the option 3.
If you choose to continue, the installation program will start making changes to your system. If you choose to exit, no changes will be made to your system.
On continuing with the installation, the installation program displays the progress of the installation as changes are made to your system. This phase does not require any input and the installation program proceeds to the next prompts when installation changes being made to your system are complete. It may take a while to display the next prompt. Take care not to terminate the process.
The final prompt displayed by the installation program provides the status of the installation and gives you an option to either view the details of the installation logs, or simply exit the installation program.
Installation Details:
Product Result More Information
1. Sun ONE Identity Server Policy Agent Installed Available
2. Done
Enter the number corresponding to the desired selection for more information, or enter 2 to continue [2] {"!" exits}:
To view installation log enter the choice 1. To exit the installation program, enter 2.
At this stage, you are now ready to proceed to the next section that details the post- installation tasks that must be performed in order to use the agent.
Note
The installation program for the IBM WebSphere Application Server 5.0/5.1 agent stops the application server at the end of the installation. You must manually restart it during post-installation.
Post-Installation TasksOnce the agent is installed, you must follow the steps in this section to configure the agent to run with your application server and the deployed and protected applications. You can directly go to the agent-specific section from the list given below to see the tasks you need to perform in order to enable the agent for your application server.
Agent for Sun ONE Application Server 7.0
Once you have installed the agent for Sun ONE Application Server 7.0, you must complete the following post-installation task:
The following is a detailed description of this task:
Install the Agent Filter for the Deployed Application
The agent filter can be installed by simply modifying the deployment descriptor of the application that needs to be protected. The following list of sub-tasks explains how the agent filter can be installed for the application you want to be protected by the agent.
- To install the agent filter, you must ensure that the application is not currently deployed on the application server. If it is currently deployed, you must remove it before proceeding any further.
- In order to install the agent filter, you will have to modify the deployed application’s deployment descriptor. It is therefore recommended that you create the necessary backups before proceeding to modify these descriptors.
- Edit the application’s web.xml descriptor as follows:
Since filters were introduced in Servlet Specification 2.3, the web.xml’s <DOCTYPE> element must be changed to reflect that the deployment descriptor is a Servlet 2.3 compliant deployment descriptor. This can be done by setting the <DOCTYPE> element as:
<!DOCTYPE web-app PUBLIC "-//Sun Microsystems, Inc.//DTD Web Application2.3//EN" "http://java.sun.com/dtd/web-app_2_3.dtd">
After modifying the <DOCTYPE> element, you now need to add the <filter> elements in the deployment descriptor. This can be done by specifying the <filter> and the <filter-mapping> elements immediately following the description element of the <web-app> element in the descriptor web.xml. The following is a sample web.xml descriptor with the <filter> and the <filter-mapping> elements added:
<web-app>
<display-name>...</display-name>
<description>...</description>
<filter>
<filter-name>Agent</filter-name>
<display-name>Agent</display-name>
<description>SunTM ONE Identity Server Policy Agent</description>
<filter-class>com.sun.identity.agents.filter.AmAgentFilter</filter-class>
</filter>
<filter-mapping>
<filter-name>Agent</filter-name>
<url-pattern>/*</url-pattern>
</filter-mapping>
...
...
</web-app>
Once the web.xml deployment descriptor is modified to reflect the new <DOCTYPE> and <filter> elements, the agent filter is added to the application. You can now redeploy your application on the application server.
Agent for BEA WebLogic Server 6.1 SP2
Once you have installed the agent for BEA WebLogic Server 6.1 SP2, you must complete the following post-installation tasks:
Installing the Agent Realm for the BEA WebLogic Server 6.1 SP2
Once the agent has been installed on your system, the BEA WebLogic Server must be configured to use the Realm provided as a part of the agent installation. The following list of sub-tasks explains how the agent realm can be installed for your BEA WebLogic Server installation.
Note
This section outlines the steps necessary to successfully add the agent realm to the WebLogic Server. It must be noted that the information provided in this section is only to facilitate the installation of agent realm and should not be taken as a substitute for the information provided in WebLogic Server documents. For a complete in-depth discussion on WebLogic Custom Realms, refer WebLogic Server documentation at: http://www.bea.com.
Creating a Custom Realm for the Agent
Note
The WebLogic Realm class name attribute is backward compatible. So if the realm has been previously installed using the Policy Agent, version 1.0 or 2.0, it will continue to function appropriately. If so, you can skip this subtask and directly jump to the next sub-task.
- Make sure that the BEA WebLogic Server is currently running.
- In the left pane of the WebLogic Server Administration Console, expand the Security Node by clicking the “+” sign.
- In the left pane under Security node, click the “Realms” item to display a list of available Realms in the system on the right pane.
- On the right pane, click the “Configure a new Custom Realm” link. This displays a form that can be used to enter the information regarding the new Custom Realm that you are trying to create.
- In this form, enter the following information and click on Create:
Name: Agent Realm
Realm Class Name: com.sun.identity.agents.weblogic.AmWebLogicRealm
- After creating the new Realm, restart the WebLogic Server.
Once the WebLogic Server is restarted, using the Administration Console, navigate to Security > Realms node. You should be able to see the newly created agent realm in the list of Realms displayed on the right pane.
Creating a Caching Realm for Agent Realm
- Logon to the WebLogic Server Administration Console. Use the configured system username and password for logging on to the console.
- In the left pane of the WebLogic Server Administration Console, expand the Security Node by clicking the “+” sign next to it.
- In the left pane under Security node, click the Caching Realms to display a list of available Caching Realms in the system on the right pane.
- On the right pane, click the “Configure a new Caching Realm” link. This displays a form that can be used to enter the information regarding the new Caching Realm that you are trying to create.
- In this form, enter the following information:
Name: Agent Caching Realm
Basic Realm: Select Agent Realm from the pull down menu.
- Click on the Create button. This refreshes the right pane and a new Caching Realm is created. The right pane displays the configuration of this newly created Caching Realm.
- In the right pane, disable all the caching attributes. Click the ACL Tab. This displays the ACL caching attributes. Uncheck the check box next to Enable ACL Cache and Click on the Apply button.
- Repeat the last step for the rest of the available tabs—Authentication, Groups, Users, and Permissions. Uncheck the appropriate Enable Cache check box and click the Apply button.
- Restart the WebLogic Server.
Once the WebLogic Server is restarted, using the Administration Console, navigate to Security > Caching Realms node. You should be able to see the newly created Agent Caching Realm in the list of Caching Realms displayed on the right pane.
Configuring the File Realm
- Logon to the WebLogic Server Administration Console.
- On the left pane click the Security node. This forces the console to display the Security configuration of the WebLogic Server in the right pane.
- In the right pane, click the Filerealm tab. This causes the console to display the details of the current File Realm.
- In the form that is displayed on the right pane, under Caching Realm, select the Agent Caching Realm from the pull down menu and click on the Apply button.
- Restart the WebLogic Server.
Once the File Realm is configured and the WebLogic Server is restarted, the agent realm has been successfully installed.
Note
It is recommended that after the agent realm has been successfully configured, you should create a backup of the WebLogic Server's config.xml file. You may name this backup as config.xml.withAgent, so that the next time you install the agent, you can simply copy this file on top of your existing config.xml and bypass the manual steps necessary to install the agent realm.
Installing the Agent Filter for the Deployed Application
The agent filter can be installed by simply modifying the deployment descriptor of the application that needs to be protected. The following list of sub-tasks detail how the agent filter can be installed for your application that must be protected by the agent.
- To install the agent filter you must ensure that the application is not currently deployed on the application server. If it is currently deployed you must remove it before proceeding any further.
- In order to install the agent filter, you will have to modify the deployed application’s deployment descriptor. It is therefore recommended that you create the necessary backups before proceeding to modify these descriptors.
- Edit the application’s web.xml descriptor as follows:
Since filters were introduced in Servlet Specification 2.3, the web.xml’s <DOCTYPE> element must be changed to reflect that the deployment descriptor is a Servlet 2.3 compliant deployment descriptor. This can be done by setting the <DOCTYPE> element as follows:
<!DOCTYPE web-app PUBLIC "-//Sun Microsystems, Inc.//DTD Web Application2.3//EN" "http://java.sun.com/dtd/web-app_2_3.dtd">
After modifying the <DOCTYPE> element, you now need to add the <filter> elements in the deployment descriptor. This can be done by specifying the <filter> and the <filter-mapping> elements immediately following the description element of the <web-app> element in the descriptor web.xml. The following is a sample web.xml descriptor with the <filter> and the <filter-mapping> elements added:
<web-app>
<display-name>...</display-name>
<description>...</description>
<filter>
<filter-name>Agent</filter-name>
<display-name>Agent</display-name>
<description>SunTM ONE Identity Server Policy Agent</description>
<filter-class>com.sun.identity.agents.filter.AmAgentFilter</filter-class>
</filter>
<filter-mapping>
<filter-name>Agent</filter-name>
<url-pattern>/*</url-pattern>
</filter-mapping>
...
...
</web-app>
Once the web.xml deployment descriptor is modified to reflect the new <DOCTYPE> and <filter> elements, the agent filter is added to the application. You can now redeploy your application on the application server.
Agent for IBM WebSphere Application Server 5.0/5.1
Once you have installed the agent for IBM WebSphere Application Server 5.0/5.1, you must complete the following post-installation tasks:
Enabling Security for IBM WebSphere Application Server
- Start the Application Server instance, for which the agent was configured as part of the installation.
- Login to the IBM WebSphere Administrative Console.
- Enable Global Security. This is under the Global Security Settings.
- Optionally enable Java 2 Security, if your applications are designed to work with Java 2 Security enabled.
- Apply the changes and save the changes to Master configuration.
- Perform this step when the following two conditions apply:
- When configuring the agent against an SSL enabled Identity Server
- If the IBM WebSphere Application Server was installed with samples
Remove the sample URL provider for the HTTPS protocol installed as a part of samples. This sample URL provider conflicts with the https URL provider (from IBM JSSE implementation) used by the agent. Search for and, if found, remove this provider as follows:
- Log on to the WebSphere Application Server Administration Console.
- In the left panel, click the Resources node.
This expands the node to reveal various resources that can be configured for the server.
- Click the URL Providers resource link.
This loads the corresponding properties on the right content panel.
- In the right content panel, expand the Scope node by clicking it, if it is not already expanded.
- Select the radio button next to the server entry.
- Click the Apply button.
- Search the list of properties displayed at the bottom of the panel for the Samples URL Provider - https entry.
- If this provider is present, select the check box next to it.
- Click Delete.
- Click Save at the top of the page to save this change to the master configuration.
This brings you to a page that has the Save button.
- Click Save to commit your changes.
- Restart the Application Server.
Note
Once the global security is enabled and the IBM WebSphere application Server restarted, the WebSphere administration console becomes password protected. The only user that is allowed to access this console is the amldapuser. Therefore in order to access the console for any administration purposes, you must supply the user name amldapuser and the corresponding password before the agent grants access to the WebSphere Administration console.
Installing the Agent Filter for the Deployed Application
The agent filter can be installed by simply modifying the deployment descriptor of the application that needs to be protected. The following list of sub-tasks detail how the agent filter can be installed for your application that must be protected by the agent.
- To install the agent filter you must ensure that the application is not currently deployed on the application server. If it is currently deployed you must remove it before proceeding any further.
- In order to install the agent filter, you will have to modify the deployed application’s deployment descriptor. It is therefore recommended that you create the necessary backups before proceeding to modify these descriptors.
- Edit the application’s web.xml descriptor as follows:
Since filters were introduced in Servlet Specification 2.3, the web.xml’s <DOCTYPE> element must be changed to reflect that the deployment descriptor is a Servlet 2.3 compliant deployment descriptor. This can be done by setting the <DOCTYPE> element as:
<!DOCTYPE web-app PUBLIC "-//Sun Microsystems, Inc.//DTD Web Application2.3//EN" "http://java.sun.com/dtd/web-app_2_3.dtd">
After modifying the <DOCTYPE> element, you now need to add the <filter> elements in the deployment descriptor. This can be done by specifying the <filter> and the <filter-mapping> elements immediately following the description element of the <web-app> element in the descriptor web.xml. The following is a sample web.xml descriptor with the <filter> and the <filter-mapping> elements added:
<web-app>
<display-name>...</display-name>
<description>...</description>
<filter>
<filter-name>Agent</filter-name>
<display-name>Agent</display-name>
<description>SunTM ONE Identity Server Policy Agent</description>
<filter-class>com.sun.identity.agents.websphere.AmWAS50AgentFilter</filter-class>
</filter>
<filter-mapping>
<filter-name>Agent</filter-name>
<url-pattern>/*</url-pattern>
</filter-mapping>
...
...
</web-app>
Once the web.xml deployment descriptor has been modified to reflect the new <DOCTYPE> and <filter> elements, the agent filter has been added to the application. You can now redeploy your application on the application server.
Agent for BEA WebLogic Server 7.0 SP2 or BEA WebLogic Server 8.1
Once the policy agent for BEA WebLogic Server 7.0 SP2 or BEA WebLogic Server 8.1 has been installed on your system, you must configure the WebLogic Server to use the agent authentication provider as explained in the following sections:
Configuring the Agent Authentication Provider
The agent authentication provider can be added to the WebLogic Server by using the WebLogic Server Console. This section outlines the steps necessary to add the agent authentication provider to the WebLogic Server. It must be noted that the information provided in this section is only to facilitate the configuration of agent authentication provider and should not be taken as a substitute for the information provided in WebLogic Server documents. For a complete in-depth discussion on WebLogic Authenticators, refer WebLogic Server documentation located at http://www.bea.com.
To configure the server to use the agent authentication provider:
- Logon to the WebLogic Server console.
- On the left frame, click on agentdomain > Security > Realms > myrealm, where agentdomain is the domain you had configured. It is not mandatory that you select the default ‘myrealm.’ You may configure a new realm and select it for configuration.
- On the right frame, click on the Providers tab.
- Click on Authentication.
- Click on the link Configure a New Agent Authenticator.
- Click Create to create a new agent authenticator.
- Change the control flag value from REQUIRED to OPTIONAL and click Apply.
- Go back to Agent Providers tab and you should now be able to see an Agent Authenticator.
- Now click on Default Authenticator.
- Change the control flag from REQUIRED to OPTIONAL. Click Apply.
Note
It is not mandatory that you use the default ‘myrealm’ to configure the agent. You can also use a new realm to configure the agent. However, in that case, you must make sure that the control flag value for the Agent Authenticator is set to OPTIONAL. Also make sure that any additional Authentication Providers you use are also set to OPTIONAL.
- Restart WebLogic Server.
Application Configuration
The agent authentication provider component of the policy agent for BEA WebLogic Server 7.0 SP2 or BEA WebLogic Server 8.1 provides runtime mapping of various principals in Sun ONE Identity Server. Abstract security role names are used by the hosted application in order to determine if the currently authenticated user is authorized to access a particular resource or is otherwise a member of a given role. This runtime evaluation can occur only if the user is authenticated as a Sun ONE Identity Server principal by the means of Sun ONE Identity Server's authentication service. Without the user being authenticated appropriately, the results of such evaluations done by the agent authentication provider will always be negative, resulting in access being denied to the user for the requested resource.
It is the agent filter component that enforces authentication for users who try to access particular application resources, thereby enabling the agent authentication provider to correctly evaluate the principal mappings as desired.
Unlike the agent authentication provider, which is installed in the core of WebLogic Server, the agent filter is installed in the deployed application which must be protected by Sun ONE Identity Server. This is true for every application that must be protected on the WebLogic Server using the agent. It is recommended that applications that are not protected using the agent should not be deployed on the WebLogic Server on which the agent authentication provider has been installed. This is to ensure that such applications can independently enforce their own security requirements as necessary. The presence of agent authentication provider will interfere with the security evaluations done by such applications resulting in their malfunction.
Installing the Agent Filter in an Application
The agent filter can be installed by simply modifying the deployment descriptor of the application that needs to be protected. The following steps outline the process to install the agent filter for a given application:
- If the application is currently deployed on the WebLogic Server, it must be removed using the WebLogic Server's Administration Console or WebLogic Server's deployment tools.
- It is recommended that you create a backup of the deployment descriptor that will be edited in order to install the agent filter in this application.
- Edit the application's web.xml deployment descriptor. Since filters were introduced in Servlet Specification 2.3, the web.xml's <DOCTYPE> element must be changed to reflect that the deployment descriptor is a Servlet 2.3 compliant deployment descriptor. This can be done by setting the <DOCTYPE> element as:
<!DOCTYPE web-app PUBLIC "-//Sun Microsystems, Inc.//DTD Web Application 2.3//EN" "http://java.sun.com/dtd/web-app_2_3.dtd">
- Once the <DOCTYPE> element has been changed, add the <filter> elements in the deployment descriptor. This can be done by specifying the <filter> element and the <filter-mapping> element in the web.xml deployment descriptor immediately following the description element of the <web-app> element. The following is a sample web.xml with the <filter> and <filter-mapping> elements.
<web-app>
<display-name>...</display-name>
<description>...</description>
<filter>
<filter-name>Agent</filter-name>
<display-name>Agent</display-name>
<description>SunTM ONE Identity Server Policy Agent for WebLogic 7.0SP2</description>
<filter-class>com.sun.identity.agents.filter.AmAgentFilter</filter-class>
</filter>
<filter-mapping>
<filter-name>Agent</filter-name>
<url-pattern>/*</url-pattern>
</filter-mapping>
...
...
</web-app>
- Once the web.xml deployment descriptor has been modified to reflect the new <DOCTYPE> and <filter> elements, the agent filter has been added to the application.
Creating Role-to-Principal Mappings
Once the application has been configured to have the agent filter component in it, the agent filter will enforce authentication, thereby enabling the agent authentication provider to successfully resolve the role-to-principal mappings. However, these mappings must first be created in order that the hosted application may use them during runtime.
The following are two ways to create such mappings:
The WebLogic Server specific deployment descriptors may be edited to create the role to principal mappings. These descriptors are in weblogic.xml and weblogic-ejb-jar.xml files. Refer WebLogic Server reference documentation to learn the details of how these descriptors may be edited to create the role to principal mappings. For sample descriptors, which create such mappings, refer to Appendix B, "Sample Application Scenario".
Using the WebLogic Server Administration Console.
The WebLogic Server administration console allows you to create the role to principal mappings by editing the deployed application's deployment descriptors on the fly. In order to use this facility, the application must be deployed and the WebLogic Server must be up and running at that time. Refer WebLogic Server documentation on how to use the Administration console to create such mappings for deployed applications.
Agent for PeopleSoft 8.3/8.4/8.8
Once you have installed the agent for PeopleSoft, you must perform a set of post-installation tasks. The following sections describe these post-installation tasks as well as list a few points that you must take note of before you start using the agent:
Configuring Sun ONE Web Server 6.0sp5 for Proxy Solution
The following procedure explains how to configure Sun ONE Web Server 6.0sp5 as proxy for BEA WebLogic Server that hosts PeopleSoft servlets. This procedure is required only if you selected the deployment option as proxy solution during the agent installation.
- Install Sun ONE Web Server 6.0sp5 and the supported Sun ONE Identity Server policy agent. For more information on installing the policy agent for Sun ONE Web Server 6.0sp5, access the documentation at:
http://docs.sun.com/db/doc/816-6772-10
- Download and install BEA WebLogic plug-in for Sun ONE Web Server. To do so, make a directory libproxy_Dir, for example web_server_dir/server_instance/libproxy_dir.
- Go to WebLogic_Dir/lib/platform
- Copy libproxy.so to libproxy_dir created in the above step. If you are installing the agent on HPUX 11, you must copy libproxy.sl. For detailed information, see:
http://www.weblogic.com/docs51/admindocs/nsapi.html
http://e-docs.bea.com/wls/docs61/adminguide/nsapi.html
- Make the following modifications to the files magnus.conf and obj.conf, which are located at web_server_dir/server_instance/config
- Append the following lines at the end of the file magnus.conf.
Init fn="load-modules" funcs="wl-proxy,wl-init"\
shlib=_libproxy_Dir/libproxy.so
Init fn="wl-init"
- Append the following lines at the end of the file obj.conf
<Object name="weblogic" ppath="*">
Service fn=wl-proxy WebLogicHost=myserver.com\
WebLogicPort=7001
</Object>
Object is given a name weblogic. This object instructs the web server to redirect all the URLs that match the pattern defined as the value of ppath. The library method invoked when such a pattern occurs, is defined as the value of the fn variable. The rest of the parameters are input parameters to the wl-proxy function itself.
The above example shows that all the requests to this server are serviced by the wl-proxy function. If you modify the ppath=*/weblogic/* then all URLs that matches the pattern */weblogic/* are serviced by the wl-proxy function.
It is recommended that only the proxy web server be allowed to access the BEA WebLogic 5.1 server that hosts PeopleSoft servlets and all other accesses be blocked. You can do this using one of the following tasks:
- Installing a firewall on the machine executing the BEA WebLogic server with appropriate firewall rules. For example, you can allow http access only from the proxy web server machine, and deny all other http access.
- Enabling the SimpleConnectionFilter class on the BEA WebLogic server. For more information, refer the documentation at:
http://www.weblogic.com/docs51/examples/security/net/package-examples.security.net.html
Installing the Agent Filter for the Deployed Application
The agent filter can be installed by simply modifying the deployment descriptor of the application that needs to be protected. The following list of tasks explains how the agent filter can be installed for the application you want to protect with the agent. This procedure is not required for PeopleSoft 8.3.
- In order to install the agent filter, you must modify the deployed application’s deployment descriptor. It is recommended that you create the necessary backups before modifying these descriptors.
- Stop the BEA WebLogic Server instance that hosts PeopleSoft application using the following command:
$psftHome/bea-home/wlserver6.1/config/peoplesoft/stopPIA.sh
- Edit the application’s web.xml descriptor as follows:
[psftHome/bea-home/wlserver6.1/config/peoplesoft/applications/PORTAL/WEB-INF/web.xml]
Since filters were introduced in Servlet Specification 2.3, web.xml’s <DOCTYPE> element must be changed to reflect that the deployment descriptor is a Servlet 2.3 compliant deployment descriptor. This can be done by setting the <DOCTYPE> element as follows:
<!DOCTYPE web-app PUBLIC "-//Sun Microsystems, Inc.//DTD Web Application2.3//EN" "http://java.sun.com/dtd/web-app_2_3.dtd">
- After modifying the <DOCTYPE> element, you must add the <filter> elements in the deployment descriptor. This can be done by specifying the <filter> and the <filter-mapping> elements immediately following the description element of the web-app element in the descriptor web.xml. The following is a sample web.xml descriptor with the <filter> and the <filter-mapping> elements added:
<web-app>
<display-name>...</display-name>
<description>...</description>
<filter>
<filter-name>Agent</filter-name>
<display-name>Agent</display-name>
<description>SunTM ONE Identity Server Policy Agent</description>
<filter-class>com.sun.identity.agents.filter.AmAgentFilter</filter-class>
</filter>
<filter-mapping>
<filter-name>Agent</filter-name>
<url-pattern>/*</url-pattern>
</filter-mapping>
...
...
</web-app>
- Start the BEA WebLogic Server instance that hosts the PeopleSoft application using the following command:
$psftHome/bea-home/wlserver6.1/config/peoplesoft/startPIA.sh
Configuring agentauthenticatorservlet
Use the following steps to configure agentauthenticatorservlet. These steps are not required for PeopleSoft 8.3.
- Edit the application’s web.xml descriptor as follows to configure agentauthenticatorservlet:
[<psftHome>/<bea-home>/wlserver6.1/config/peoplesoft/applications/PORTAL/WEB-INF/web.xml]
- Add the following code to web.xml:
<servlet>
<servlet-name>agentauthenticatorservlet</servlet-name>
<servlet-class>com.sun.identity.agents.peoplesoft.AgentAuthenticatorServle t</servlet-class>
<load-on-startup>0</load-on-startup>
</servlet>
..........
<servlet-mapping>
<servlet-name>agentauthenticatorservlet</servlet-name>
<url-pattern>/agentauthenticatorservlet/*</url-pattern>
</servlet-mapping>
Creating URL Policies in Sun ONE Identity Server to Allow Access to PeopleSoft Application
The following policies must be created in Sun ONE Identity Server in order to allow access to PeopleSoft application:
Table 2-4 URL Policies to be created in Sun ONE Identity Server
PeopleSoft Application
Policies
HRMS 8.3
http://myhost.mydomain.com:8001/servlets/iclientservlet/*
http://myhost.mydomain.com:8001/servlets/iclientservlet/piaSiteName/*
http://myhost.mydomain.com:8001/servlets/cs/*
http://myhost.mydomain.com:8001/servlets/agentauthenticatorservlet*
http://myhost.mydomain.com:8001/*.gif
FIN 8.4 and HRMS 8.8
http://myhost.mydomain.com:8001/cs*
http://myhost.mydomain.com:8001/PSAttachServlet*
http://myhost.mydomain.com:8001/psc*
http://myhost.mydomain.com:8001/SyncServer*
http://myhost.mydomain.com:8001/psp*
http://myhost.mydomain.com:8001/xmllink*
http://myhost.mydomain.com:8001/SchedulerTransfer*
http://myhost.mydomain.com:8001/psreports*
http://myhost.mydomain.com:8001/agentauthenticatorservlet*
http://myhost.mydomain.com:8001/*.gif
Creating User Mapping in Sun ONE Identity Server
- Log on to Sun ONE Identity Server Console as Administrator.
- Select the LDAP attribute to be used to map Sun ONE Identity Server user ids to PeopleSoft user ids.
- Update the attribute for each Sun ONE Identity Server user that needs access to PeopleSoft depending on the mode of operation you have chosen.
User Mapping Modes
The agent can be configured to work in any of the following modes using this configurable property in AMAgent.properties:
com.sun.am.policy.amPeopleSoft.user.mapping = USE_DN | HTTP_HEADER | LDAP
- USE_DN
This is the default mode of operation. In this mode of operation, user Id attribute is used to determine the corresponding PeopleSoft user. In this case, user Id attribute in Sun ONE Identity Server should match the PeopleSoft user. Here, the following attribute becomes useless:
com.sun.am.policy.amPeopleSoft.user.attribute.name
- HTTP_HEADER
In this mode of operation, the PeopleSoft user mapping is obtained from a particular HTTP Header specified as the value of the following parameter:
com.sun.am.policy.amPeopleSoft.user.attribute.name = httpHeaderName
It is therefore required that either the filter or the agent installed on the proxying Sun ONE Web Server sets the name of the HTTP Header which contains the value of the PeopleSoft user. See "Enabling LDAP Attributes" for information on how to enable forwarding of LDAP Attributes as HTTP Headers. In case you are using Sun ONE Web Server as proxy, refer to documentation at following location:
http://docs.sun.com/db/doc/816-6772-10
Note
This mode cannot be used in the case of HRMS 8.3, when the agent is working in the filter-mode (when the agent is deployed on PeopleSoft provided WebLogic Server).
- LDAP
In this mode of operation, PeopleSoft user mapping is obtained as the value of the LDAP attribute set for the following configurable parameter:
com.sun.am.policy.amPeopleSoft.user.attribute.name = employeename
In this case, the value of employeenumber LDAP Attribute will be used as the corresponding PeopleSoft user.
This mode of operation expects the correct amAdmin password in serverconfig.xml.
If you are using this mode of user mapping, the amAdmin password must be provided at the time of agent installation. In case you have not provided the correct amAdmin password, you can change it as follows:
- Execute agent_install_dir/SUNWamj2ee_agents/bin/agentadmin -encrypt plain text amAdmin password
It will print the encrypted password as:
Encrypted Value => encrypted_password
- Replace the puser and dsameuser passwords in the file serverconfig.xml with the encrypted_password value you just generated.
Note
In a default installation of Sun ONE Identity Server, these two passwords are the same as the amAdmin password. If your Sun ONE Identity Server is customized and these passwords have been changed, use the tool agentadmin to generate an encrypted password for each of these users and replace the values with the same.
Important Notes
Read these points before you start using the PeopleSoft agent:
- After installing the agent, always start the application server domain using the following script installed by the agent:
psft_home/appserv/psamadmin_domain_name
For example, /usr/psft/appserv/psamadmin_HDMO
- PeopleSoft agent must always operate either in the SSO_ONLY or the URL_POLICY filter mode. Setting the filter mode to any other value may lead to the application being unreachable.
- Always invoke agentadmin utility as PeopleSoft user. For example psft
- To configure the agent to use some specific login module, do this:
- If you have enabled SSL on Sun ONE Identity Server and are using the JSSE supplied with the agent for SSL communications, then make sure that the following entry is added to the configuration file psappsrv.cfg:
JavaOptions = -Djava.protocol.handler.pkgs=com.sun.net.ssl.internal.www.protocol
The file psappsrv.cfg is located in the directory $PS_HOME/appserv/DOMAIN/.
- If the properties that are not hot-swap enabled are modified, you must restart both the BEA WebLogic Server and the PeopleSoft Application Server.
Verifying a Successful Installation
- Start the application server domain using the following script installed by the agent:
psft_home/appserv/psamadmin_domain_name
For example, /usr/psft/appserv/psamadmin_HDMO
- Start BEA WebLogic Server that hosts the PeopleSoft application.
- Try to access the PeopleSoft application. You will be able to see the Sun ONE Identity Server login page.
On a successful login, Sun ONE Identity Server displays the PeopleSoft application with the appropriately mapped PeopleSoft user logged in. An unsuccessful login will not allow access to the PeopleSoft application.
Agent for Apache Tomcat Server 4.1.27
Once you have installed the agent for Apache Tomcat Server 4.1.27, you must install the agent filter to protect the web applications deployed on Tomcat Server. The agent filter can be deployed in any one of the following ways:
Installing the Filter in the Global Deployment Descriptor
Unlike some other J2EE containers, Apache Tomcat Server provides you with an option to install a filter for all available resources and web applications at a single place in the server, using a global deployment descriptor (web.xml). If you had selected this option during installation— by default, this is selected— you can ignore this section as the necessary filter configuration code would have already been installed in the global deployment descriptor (web.xml) of your Tomcat server instance.
Note
If you do select this option, all resources in the server will be protected by the filter and you will not be able to access even the welcome page of the server, if any, without providing the credentials and adding a rule to the Identity Server to access that resource. One way to handle this situation is to add your server’s welcome page URL or any other resource that does not need the protection, to the com.sun.am.policy.amFilter.notenforcedList[<index>] property in the AMAgent.properties file. For details on this property, see "Not-Enforced List".
Installing the Filter in the Application’s Deployment Descriptor
If you have chosen not to install the filter in the global deployment descriptor (web.xml), an agent filter must be installed in the web application’s deployment descriptor (web.xml) to protect the application. It can be installed by simply modifying the deployment descriptor of the application that needs to be protected. The following sub-tasks explain how the agent filter can be installed for the application.
- To install the agent filter, you must ensure that the application is not currently deployed on the Tomcat Server. If it is currently deployed, you must remove it before proceeding any further.
- In order to install the agent filter, you will have to modify the deployed application’s deployment descriptor (web.xml). It is therefore recommended that you create the necessary backups before proceeding to modify these descriptors.
- Edit the application’s deployment descriptor (web.xml) as follows.
Ever since servlet filter was introduced in Servlet Specification 2.3, the <DOCTYPE> element in a web application’s deployment descriptor must be changed so that the deployment descriptor is compliant with Servlet 2.3 specification. This can be done by simply setting the <DOCTYPE> element as shown in the following figure:
<!DOCTYPE web-app
PUBLIC "-//Sun Microsystems, Inc.//DTD Web Application2.3//EN"
"http://www.java.sun.com/dtd/web-app_2_3.dtd">
After modifying the <DOCTYPE> element, you now need to add the <filter> and <filter-mapping> elements in the deployment descriptor. This can be done by specifying the <filter> and <filter-mapping> elements immediately before the <listener> or <servlet> element in web.xml. Please see the Web Application Deployment Descriptor DTD at http://www.java.sun.com/dtd/web-app_2_3.dtd for more information. The following is a sample web.xml with the <filter> and <filter-mapping> elements added.
<web-app>
<display-name>...</display-name>
<description>...</description>
<filter>
<filter-name>Agent</filter-name>
<display-name>Agent</display-name>
<description>Sun Java System Identity Server Policy Agent</description>
<filter-class>com.sun.identity.agents.filter.AmAgentFilter</filter-class>
</filter>
<filter-mapping>
<filter-name>Agent</filter-name>
<url-pattern>/*</url-pattern>
</filter-mapping>
...
...
</web-app>
Agent for Oracle 9iAS R2 and Oracle 10g
Once you have installed the agent for Oracle 9iAS R2 or Oracle 10g, you must complete the following post-installation tasks:
The following sections provide a detailed description of these tasks.
Creating the Oracle Administrative Users and Roles in Sun ONE Identity Server
By default, the installation program configures a second agent to protect the Enterprise Manager. When used without the agent, the Enterprise Manager supports basic authentication and uses the default realm supplied with Oracle 9iAS R2 or Oracle 10g. The agent, however, modifies the Enterprise Manager’s web.xml to support FORM-based authentication. In this scenario, when you try to authenticate with the Enterprise Manager for the first time, you will be redirected to Sun ONE Identity Server console to authenticate as Administrator. The following users and roles need to be present in Sun ONE Identity Server before any user tries to authenticate with Enterprise Manager and perform various operations supported through the Enterprise Manager console.
Table 2-5
User
Role
Comments
ias_admin
ias_admin
Needed to logon to Enterprise Manager.
admin
administrators
Needed to browse and perform various operations using the Enterprise Manager console.
For detailed steps on creating users and roles, and adding users to roles in Sun ONE Identity Server, refer Sun ONE Identity Server documentation at http://docs.sun.com/db/prod/s1.s1idsrv#hic.
Note
After creating the two users, do not forget to add the ias_admin user to the role ias_admin and the admin user to the role administrators.
Installing the Agent Filter for the Deployed Application
The agent filter can be installed by simply modifying the deployment descriptor of the application that needs to be protected. The following list of tasks explains how the agent filter can be installed for the application you want to protect with the agent.
Note
- When installing the agent filter, you must ensure that the application is not currently deployed on the application server. If it is deployed, you must remove it before proceeding any further.
- In order to install the agent filter, you will have to modify the deployed application’s deployment descriptor. It is therefore recommended that you create the necessary backups before proceeding to modify these descriptors.
- Edit the application’s web.xml descriptor as follows:
Since filters were introduced in Servlet Specification 2.3, the web.xml’s <DOCTYPE> element must be changed to reflect that the deployment descriptor is a Servlet 2.3 compliant deployment descriptor. This can be done by setting the <DOCTYPE> element as:
<!DOCTYPE web-app PUBLIC "-//Sun Microsystems, Inc.//DTD Web Application2.3//EN" "http://java.sun.com/dtd/web-app_2_3.dtd">
- After modifying the <DOCTYPE> element, you now need to add the filter elements in the deployment descriptor. This can be done by specifying the <filter> and the <filter-mapping> elements immediately following the <description> element of the <web-app> element in the descriptor web.xml. The following is a sample web.xml descriptor with the <filter> and the <filter-mapping> elements added.
<web-app>
<display-name>...</display-name>
<description>...</description>
<filter>
<filter-name>Agent</filter-name>
<display-name>Agent</display-name>
<description>Sun Java System Identity Server Policy Agent</description>
<filter-class> com.sun.identity.agents.filter.AmAgentFilter </filter-class>
</filter>
<filter-mapping>
<filter-name>Agent</filter-name>
<url-pattern>/*</url-pattern>
</filter-mapping>
...
...
</web-app>
Once web.xml is modified to reflect the new <DOCTYPE> and filter elements, the agent filter is added to the application. You can now redeploy your application on the application server.
For more information on descriptors specific to Oracle 9iAS R2 and Oracle 10g, please refer to "Assembly Descriptors".
Installing the Application Through Enterprise Manager Console
Once the application is mapped to Sun ONE Identity Sever roles and principals, the user can deploy the application through the Enterprise Manager console or the dcmctl tool. For steps, refer http://download-west.oracle.com/docs/cd/A97329_03/web.902/a95880/config.htm#1047207. As you progress through installation, you will notice that a custom User Manager (com.sun.identity.agents.oracle.AmOracleUserManager) has been installed for Enterprise Manager and is picked as a default option. This custom User Manager is the Identity Server-specific realm that is installed by the agent. If you choose to use any of the other two options/realms in this page, you will not be able to complete the installation.
Configuring the Agent for Enterprise Manager
While installing the agent for Oracle 9iAS R2 or Oracle 10g, the installation program configures a second agent in the J2EE_POLICY mode to protect Enterprise Manager (a web application for Oracle 9iAS R2 and Oracle 10g consoles). To learn more about the agent filter modes, see "Agent Filter Modes".
The installation program does not ask any questions about the protocol or the port of the Enterprise Manager. It assumes a default protocol (http) and a default port (1810) for Enterprise Manager. If, however, you want to change the default protocol and the port of Enterprise Manager, then you need to change two properties as shown below.
- The agent configuration file AMAgent.properties. This property is hot swappable; hence you do not have to restart Enterprise Manager for changes to take effect.
com.sun.am.policy.amFilter.port.check.map[1810]=http
For example, if Enterprise Manager is running on https instead of http, the property should be as follows:
com.sun.am.policy.amFilter.port.check.map[1810]=https
- The file ORACLE_HOME/bin/emctl. If you want session notifications for the modified port or protocol, you need to change the following -D java option in this file and restart emctl.
-Dcom.iplanet.am.notification.url=http://hostname.domainname:1810/emd/n otification
For example, if Enterprise Manager is running on https instead of http, the -D java option should be set as follows:
-Dcom.iplanet.am.notification.url=https://hostname.domainname:1810/emd/not ification
Agent for SAP Enterprise Portal 6.0 SP2
The following post-installation tasks must be performed before starting the SAP Enterprise Portal for the first time after the installation of the agent:
Removing Backed Up Files from the Server Directory
When the agent is installed, it modifies various files in the SAP Enterprise Portal installation and takes backups where necessary. When the agent installation program makes multiple changes to a particular file, it may create more than one backup depending upon the installation requirements. These backup files can be easily identified by their suffix of the form -preAgent-timestamp. For example, if a file named sample.xml is modified by the installation program on 03/25/2004, it may create a backup such as sample.xml-preAgent-20040325.
It is recommended that these sample files be removed from their respective directories and copied to another location outside the server directory before the SAP Enterprise Portal is started for the first time after the installation of the agent. This is necessary to ensure that none of these backup files is mistaken for a configuration file by the SAP Enterprise Portal runtime. Moreover, even though the files left behind are harmless, they can cause clutter in the long run and can be difficult to remove if the SAP Enterprise Portal has marked them for being stored in its database.
These files are located in the following directories. The base-instance-dir referred here indicates the location of the SAP EP6 instance.
Creating the Necessary URL Policies
If the agent is installed and configured to operate in the URL Policy mode, the appropriate URL policies must be created. For instance, if the SAP Enterprise Portal is available on port 50000 using HTTP protocol, at least a policy must be created to allow access to the resource:
http://myhost.mydomain.com:50000/irj/*
If no policies are defined and the agent is configured to operate in the URL_POLICY mode, then no user will be allowed access to the SAP Enterprise Portal resources. Refer to the Identity Server Administration guide to learn how to create these policies using the Identity Server console or command line utilities.
Configuring the User Mapping Mode
After you complete the above steps, you must configure the user mapping mode used by the agent. This can be done by specifying the appropriate value for the property com.sun.am.policy.amSAP.user.mapping in the AMAgent.properties file. The following properties values can be set for this property:
com.sun.am.policy.amSAP.user.mapping = USE_DN
com.sun.am.policy.amSAP.user.mapping = LDAP
com.sun.am.policy.amSAP.user.mapping = HTTP_HEADER
When set to USE_DN, the agent uses the Identity Server user-id of the user to log him into the SAP Enterprise Portal. When set to LDAP or HTTP_HEADER mode, the SAP user-id is obtained by either reading a profile attribute for the user or by reading a header field in the request. The name of the profile attribute or the header field to be read by the agent can be configured by setting the value for the property com.sun.am.policy.amSAP.user.attribute.name.
For more details on these and other properties, see "AMAgent.properties Reference".
Agent for Macromedia JRun 4
After installing the agent for Macromedia JRun 4, perform the following post-installation tasks:
Installing the Agent Filter
The agent filter can be deployed in either of the following ways for the applications deployed on Macromedia JRun 4:
Installing the filter in the global deployment descriptor
Macromedia JRun Server 4.0 provides an option to install a servlet filter for all available resources and web applications at a single place in the server instance by using the global deployment descriptor default-web.xml. If you have selected to install the agent filter in default-web.xml during installation, ignore the following filter installation instructions as the installation program would have already installed the necessary filter configuration code in the global deployment descriptor (default-web.xml) of your server instance.
Note
If you select this option, all resources in the server instance will be protected by the servlet filter defined in default-web.xml and users will not be able to access even the welcome page of the server, if any, without providing the credentials and adding a rule to access that resource in Sun ONE Identity Server. One way to handle this problem is to add your server’s welcome page URL or any other resource that does not need the protection, to the property com.sun.am.policy.amFilter.notenforcedList[<index>] in the agent configuration file AMAgent.properties.
Installing the filter in the application’s deployment descriptor
If you have chosen not to install the filter in the global deployment descriptor, an agent filter must be installed in the web application’s deployment descriptor web.xml to protect the application. It can be installed by simply modifying the deployment descriptor of the application that needs to be protected. The following sub-tasks explain how the agent filter can be installed for the application:
- Before installing the agent filter, you must ensure that the application is not currently deployed on the Macromedia JRun Server instance. If it is already deployed, you must remove it before proceeding any further.
- In order to install the agent filter, you will have to modify the application’s deployment descriptor web.xml. It is therefore recommended that you make the necessary backups before modifying this descriptor file.
- Edit the application’s deployment descriptor web.xml as explained here.
Ever since servlet filter was introduced in Servlet Specification 2.3, the <DOCTYPE> element in a web application’s deployment descriptor is required to be changed to reflect that the deployment descriptor is compliant to Servlet 2.3 specification. This can be done by simply setting the <DOCTYPE> element as follows:
<!DOCTYPE web-app
PUBLIC "-//Sun Microsystems, Inc.//DTD Web Application2.3//EN"
"http://www.java.sun.com/dtd/web-app_2_3.dtd">
After modifying the <DOCTYPE> element, you must add the <filter> and <filter-mapping> elements in the deployment descriptor. This can be done by specifying the <filter> and <filter-mapping> elements immediately before the first <listener> or <servlet> element in web.xml. See the Web Application Deployment Descriptor DTD for more information. The following is a sample web.xml with the <filter> and <filter-mapping> elements added:
<web-app>
<display-name>...</display-name>
<description>...</description>
<filter>
<filter-name>Agent</filter-name>
<display-name>Agent</display-name>
<description>Sun Java System Identity Server Policy Agent</description>
<filter-class>com.sun.identity.agents.filter.AmAgentFilter</filter-class>
</filter>
<filter-mapping>
<filter-name>Agent</filter-name>
<url-pattern>/*</url-pattern>
</filter-mapping>
...
...
</web-app>
Starting and Stopping Macromedia JRun 4 Instance
After you have installed the policy agent for Macromedia JRun 4 Application Server instance, you will be unable to start, stop and restart the server instance using Macromedia JRun 4 Management Console. This is because, by default, Macromedia JRun 4 uses the same JVM configuration file jvm.config for all its instances. However, you can perform these tasks in the following ways:
- When you have multiple JRun instances, you would want to use the instance’s own JVM configuration file to maintain their multiple JVM configurations. In such multiple JVM configurations, where there is a different JVM configuration for each instance, the JRun 4 server instance must be started from the command line using the -config option followed by the complete path name to the location of the JVM configuration file.
The policy agent installation program creates a new JVM configuration file called jrun_instance_name_jvm.config for each instance that is configured with this agent. This file is located in the directory jrun_install_directory/bin. You can use this file to start, stop or restart the JRun 4 server instance as explained in the following table. However, you can continue to use all other JRun4 command line options unchanged.
Table 2-6 Starting, Stopping and Restarting the Macromedia JRun 4 instances
Task
Command
Start
# jrun_install_directory/bin/jrun -config jrun_instance_name_jvm.config -start [instance_name]
Stop
# jrun_install_directory/bin/jrun -config jrun_instance_name_jvm.config -stop [instance_name]
Restart
# jrun_install_directory/bin/jrun -config jrun_instance_name_jvm.config -restart [instance_name]
Note
If no instance name is specified, each of the commands applies to all the configured instances.
- When you have only one Macromedia JRun 4 server instance, you can use the Macromedia JRun Management Console to start, stop and restart the instance by simply copying the jrun_instance_name_jvm.config to jvm.config file. However, if you uninstall or unconfigure the agent for this instance, you must make sure the original jvm.config file is restored after you have uninstalled or unconfigured the agent.
Agent for SAP Enterprise Portal 6.0 SP2 and Web Application Server 6.20 SP1
Before starting the SAP Enterprise Portal or Web application Server for the first time after the agent has been installed, perform the following post-installation tasks.
Removing Backed up Files from the Server Directory
When the agent is installed, it modifies various files in the SAP Web Application Server installation and Enterprise Portal installation and takes backups where necessary. When the agent installation program makes multiple changes to a particular file, it may create more than one backup depending upon the installation requirements. These backup files can be easily identified by their suffix of the form -preAgent-timestamp. For example, if a file named sample.xml is modified by the installation program on 03/25/2004, it may create a backup such as sample.xml-preAgent-20040325.
Remove these sample files from their respective directories and copy them to another location outside the server directory before the SAP Enterprise Portal or Web Application Server is started for the first time after the installation of the agent. This is necessary to ensure that none of these backup files is mistaken for a configuration file by the SAP runtime. Moreover, even though the files left behind are harmless, they can cause clutter in the long run and can be difficult to remove if the SAP runtime has marked them for being stored in its database.
These files are located in the following directories where base-instance-dir refers to the location of the SAP instance.
- base-instance-dir
- base-instance-dir/ume (only if Enterprise Portal is installed)
- base-instance-dir/cluster/server
- base-instance-dir/cluster/server/managers
- base-instance-dir/cluster/server/services/servlet_jsp/work/jspTemp/irj/root/WEBINF (only if Enterprise Portal is installed)
- base-instance-dir/cluster/server/services/security
- base-instance-dir/cluster/server/services/security/work
Creating the Necessary URL Policies
If the agent is installed and configured to operate in the URL Policy mode, the appropriate URL policies must be created. For instance, if the SAP Enterprise Portal is available on port 50000 using HTTP protocol, at least a policy must be created to allow access to the resource:
http://myhost.mydomain.com:50000/*
If no policies are defined and the agent is configured to operate in the URL_POLICY mode, then no user will be allowed access to the SAP Enterprise Portal resources or Web Application Server resources. Refer to the Identity Server Administration Guide to learn how to create these policies using the Identity Server console or command line utilities.
Configuring the User Mapping Mode
After you complete the above steps, you must configure the user mapping mode used by the agent. This can be done by specifying the appropriate value for the property com.sun.am.policy.user.mapping in the AMAgent.properties file. The following properties values can be set for this property:
com.sun.am.policy.user.mapping = USE_DN
com.sun.am.policy.user.mapping = LDAP
com.sun.am.policy.user.mapping = HTTP_HEADER
When set to USE_DN, the agent uses the Identity Server user ID of the user to log that user into SAP Enterprise Portal or Web Application Server. When set to LDAP or HTTP_HEADER mode, the SAP user ID is obtained by either reading a profile attribute for the user or by reading a header field in the request. The name of the profile attribute or the header field to be read by the agent can be configured by setting the value for the property com.sun.am.policy.user.attribute.name.
For more details on these and other properties, refer to "AMAgent.properties Reference" of this guide.
Installing the Agent Filter
This step is not needed if you intend to protect only the Enterprise Portal and do not have any other hosted applications on the underlying Web Application Server.
Before deploying any applications on the Web Application Server, you need to add the agent filter to the application's deployment descriptor web.xml. To add the agent filter:
- If the application is deployed, remove it from the application server.
- Create the necessary backups of the application’s deployment descriptor since you need to modify these descriptors.
- Change the web.xml <DOCTYPE>.
Since filters were introduced in Servlet Specification 2.3, the <DOCTYPE> element of web.xml must be changed to reflect that the deployment descriptor is a Servlet 2.3 compliant deployment descriptor. Reflect this compliance by setting the <DOCTYPE> element as follows:
<!DOCTYPE web-app PUBLIC
"-//Sun Microsystems, Inc.//DTD Web Application2.3//EN"
"http://www.java.sun.com/dtd/web-app_2_3.dtd">
- Add the <filter> elements to the deployment descriptor.
Specify the <filter> and <filter-mapping> elements immediately following the description element of the <web-app> element in the descriptor web.xml. The following is a sample web.xml descriptor with the <filter> and the <filter-mapping> elements added:
<web-app>
<display-name>...</display-name>
<description>...</description>
<filter>
<filter-name>Agent</filter-name>
<display-name>Agent</display-name>
<description> Identity Server Policy Agent</description>
<filter-class>com.sun.identity.agents.filter.AmAgentFilter</filter-class>
</filter>
<filter-mapping>
<filter-name>Agent</filter-name>
<url-pattern>/*</url-pattern>
</filter-mapping>
...
...
</web-app>
Once the web.xml deployment descriptor is modified to reflect the new <DOCTYPE> and <filter> elements, the agent filter has been added to the application.
Enabling Web-Tier Declarative Security
This step is not needed if you intend to protect only the Enterprise Portal and do not have any other hosted applications on the underlying Web Application Server. In order for the agent to achieve single-sign on, enable web-tier declarative security for your protected applications. Enable this type of security by modifying the deployment descriptor web.xml and by modifying the agent configuration. Refer to "Enabling Web-Tier Declarative Security" for more information.
Configuring the Library Reference for Application
Once the Agent Filter has been added to the application you need to create a library reference in order to ensure that the filter classes are available for your application at runtime. Create the library reference by modifying the following file:
base-instance-dir/cluster/server/managers/reference.txt
Where <Application Name> refers to the application that the agent will protect.
Agent for BEA WebLogic 8.1 SP2/SP3 Server/Portal
Caution
The post-installation steps for this agent are unique. These steps are specifically tailored to BEA WebLogic 8.1 SP2/SP3 Portal. They are not tailored to BEA WebLogic 8.1 SP2/SP3 Server. Therefore, if you have installed the agent on WebLogic 8.1 SP2 Server or WebLogic 8.1 SP3 Server, do not follow these post-installation steps. Instead, follow the steps outlined in "Agent for BEA WebLogic Server 7.0 SP2 or BEA WebLogic Server 8.1".
After installing this agent on BEA WebLogic 8.1 SP2/SP3 Portal, attend to the following post-installation considerations and tasks:
Configure the Agent Authenticator Provider
The agent authentication provider can be added to the WebLogic Portal by using the WebLogic Server Console. This section outlines the steps necessary to add the agent authentication provider to the WebLogic Portal. The information provided in this section is only to facilitate the configuration of the agent authentication provider and is not a substitute for the information provided in WebLogic Portal documents. For a complete in-depth discussion on WebLogic Authenticators, refer WebLogic Portal documentation located at http://www.bea.com.
To configure the server to use the agent authentication provider:
- Log on to the WebLogic Server console.
- In the left frame, click
agentdomain> Security> Realms> myrealm
Where agentdomain is the domain you had configured. The myrealm selection is the default. It is not mandatory. Instead, you could configure a new realm and select it for configuration.- In the right frame, click the Providers tab.
- Click Authentication.
- Click Configure a New Agent Authenticator.
- Click Create to create a new agent authenticator.
- Change the control flag value from REQUIRED to OPTIONAL
- Click Apply.
- Go back to Agent Providers tab.
You should now be able to see an Agent Authenticator.- Click Default Authenticator.
- Change the control flag from REQUIRED to OPTIONAL.
- Click Apply.
Note
Using the default, myrealm, to configure the agent is not mandatory. You could use a new realm to configure the agent. However, in the case of a new realm, make sure that the control flag value for the Agent Authenticator and any additional authentication providers are set to OPTIONAL.
- Restart WebLogic Portal.
Application Configuration
The agent authentication provider component of this policy agent provides runtime mapping of various principals in Sun ONE Identity Server. Abstract security role names are used by the hosted application in order to determine if the currently authenticated user is authorized to access a particular resource or is otherwise a member of a given J2EE role. This runtime evaluation can occur only if the user is authenticated as a Sun ONE Identity Server principal by the means of Sun ONE Identity Server's authentication service. Without the user being authenticated appropriately, the results of such evaluations by the agent authentication provider will always be negative, resulting in access being denied to the user for the requested resource.
It is the agent filter component that enforces authentication for users who try to access particular application resources, thereby enabling the agent authentication provider to correctly evaluate the principal mappings as desired.
Unlike the agent authentication provider, which is installed in the core of WebLogic Portal, the agent filter is installed in the deployed application which must be protected by Sun ONE Identity Server. This is true for every portal application that must be protected on the WebLogic Portal using the agent. Applications that are not protected using the agent should not be deployed on the WebLogic Portal on which the agent authentication provider has been installed. This is to ensure that such applications can independently enforce their own security requirements as necessary. The presence of the agent authentication provider will interfere with the security evaluations by such applications, resulting in their malfunction.
Install the Agent Filter in an Application
Install the agent filter by modifying the deployment descriptor of the application that needs to be protected. To install the agent filter for a given portal application:
- Edit the application's web.xml deployment descriptor.
Since filters were introduced in Servlet Specification 2.3, the <DOCTYPE> element of web.xml must be changed to reflect that the deployment descriptor is a Servlet 2.3 compliant deployment descriptor. Reflect this compliance by setting the <DOCTYPE> element as follows:
<!DOCTYPE web-app PUBLIC
"-//Sun Microsystems, Inc.//DTD Web Application2.3//EN"
"http://www.java.sun.com/dtd/web-app_2_3.dtd">
- Add the <filter> elements to the deployment descriptor.
Specify the <filter> and <filter-mapping> elements immediately following the description element of the <web-app> element in the descriptor web.xml. The following is a sample web.xml descriptor with the <filter> and the <filter-mapping> elements added:
<web-app>
<display-name>...</display-name>
<description>...</description>
<filter>
<filter-name>Agent</filter-name>
<display-name>Agent</display-name>
<description>Sun Java System Identity Server Policy Agent for WebLogic 8.1 Portal Application</description>
<filter-class>com.sun.identity.agents.filter.AmAgentFilter</filter-class>
</filter>
<filter-mapping>
<filter-name>Agent</filter-name>
<url-pattern>/*</url-pattern>
</filter-mapping>
...
...
</web-app>
Once the web.xml deployment descriptor is modified to reflect the new <DOCTYPE> and <filter> elements, the agent filter has been added to the application.
Installing the agent filter should be done similar to other J2EE applications except that the web.xml for the portal application could have a set of pre-existing filters. Ensure that the agent filter element precedes all the other <filter> elements. Similarly, the filter mapping element should be before all the other <filter-mapping> elements. In practice, the agent filter should first intercept the request to properly enforce policies on the whole application.
Creating the WebLogic Users in Identity Server
Irrespective of the filter mode in which you run the agent, ensure that users who can log into the WebLogic Portal are also present in Identity Server. Users not present in either WebLogic Portal or Identity Sever are denied access.
Creating the Necessary URL Policies
If the agent is installed and configured to operate in the URL_POLICY/All mode, the appropriate URL policies must be created. For instance, if the WebLogic Portal sample application is available on port 7001 using HTTP protocol, at least one policy must be created to allow access to the resource:
http://myhost.mydomain.com:7001/sampleportal/*
If no policies are defined and the agent is configured to operate in the URL_POLICY/All mode, then no user will be allowed access to the sample portal resources. Refer to the Sun Java System Identity Server Administration Guide to learn how to create these policies using the Identity Server Console or command-line utilities.
Add the WebLogic Administrative User to the Realm Bypass List
Add the WebLogic administrative user to the bypass principal list before starting the portal. The following is an example of how to add an administrative user named weblogic to the list:
com.sun.am.policy.amRealm.bypass.auth.principalList[0] = weblogic
This property will bypass authentication of the WebLogic 8.1 SP2/SP3 Portal administrative user with the agent authentication provider.
Customizing the WebLogic Portal Agent:
This section lists newly added properties, all of which can be customized. These properties are applicable to web applications running on WebLogic Server domains as well as WebLogic Portal domains. For the full list of J2EE policy agent properties and their descriptions, see "AMAgent.properties Reference".
The properties listed in this section are linked to their respective property descriptions in the “AMAgent.properties.Reference” section. These four properties can be changed in order to customize the portal agent:
Add an Entry to the Verification Handler Map Property
(Mandatory for WebLogic 8.1 SP3 Portal Applications Only)
Caution
This step is a required post-install step for WebLogic 8.1 SP3 Portal applications protected by the policy agent. Failure to perform this step can lead to malfunctioning of the agent, resulting in the application or portions thereof becoming inaccessible.
For each portal application running on WebLogic 8.1 SP3 portal domain, add an entry to the Verification Handler Map property as demonstrated in the following:
For more information on this property see "Verification Handler Map".
Agent for Sun Java System Application Server 8.1
Once you have installed the agent for Sun Java System Application Server 8.1, complete the following post-installation tasks:
The following is a detailed description of these tasks:
Install the Agent Filter for the Deployed Application
The agent filter can be installed by simply modifying the deployment descriptor of the application that needs to be protected. The following list of sub-tasks explains how the agent filter can be installed for the application you want the agent to protect.
- To install the agent filter, you must ensure that the application is not currently deployed on the application server. If it is currently deployed, you must remove it before proceeding any further.
- In order to install the agent filter, you must modify the deployed application’s deployment descriptor. Therefore, create the necessary backups before proceeding to modify these descriptors.
- Edit the application’s web.xml descriptor as follows:
- Set the <DOCTYPE> element as shown in the following table.
<!DOCTYPE web-app version="2.4" xmlns="http://java.sun.com/xml/ns/j2ee" xmlns:xsi="http://www.w3.org/2001/XMLSchema-instance" xsi:schemaLocation="http://java.sun.com/xml/ns/j2ee http://java.sun.com/xml/ns/j2ee/web-app_2_4.xsd">
Sun Java System Application Server supports the Java Servlet Specification version 2.4. Note that Servlet API version 2.4 is fully backward compatible with version 2.3, so all existing servlets should work without modification or recompilation. For more information refer to the Sun Java System Application Server Developer’s Guide.
- Edit the application’s web.xml descriptor.
Add the <filter> elements in the deployment descriptor. Do this by specifying the <filter>, <filter-mapping>, and <dispatcher> elements immediately following the description element of the <web-app> element in the descriptor web.xml. The following table displays a sample web.xml descriptor with the <filter>, <filter-mapping>, and <dispatcher> elements added.
<web-app>
<display-name>...</display-name>
<description>...</description>
<filter>
<filter-name>Agent</filter-name>
<display-name>Agent</display-name>
<description>Sun Java System Access Manager Policy Agent</description>
<filter-class>com.sun.identity.agents.filter.AmAgentFilter</filter-class>
</filter>
<filter-mapping id="FilterMapping_PolicyAgent">
<filter-name>Agent</filter-name>
<dispatcher>REQUEST</dispatcher>
<dispatcher>INCLUDE</dispatcher>
<dispatcher>FORWARD</dispatcher>
<dispatcher>ERROR</dispatcher>
<url-pattern>/*</url-pattern>
</filter-mapping>
...
...
</web-app>
Once the web.xml deployment descriptor is modified to reflect the new <DOCTYPE> and <filter> elements, the agent filter is added to the application. You can now redeploy your application on Application Server.
Note
The J2EE agent filter-class attribute is backward compatible. So, an application protected by a previous version of agent filter class (for example com.sun.amagent.as.filter.AgentFilter) does not need to modify web.xml to reflect the new filter class for the latest version of the agent.
Configure Domain Configuration Files for Remote Instances
For instances where Domain Administration Server (DAS) is not on the agent host, therefore DAS is remote, two files need to be changed: server.policy and login.conf.
To configure these files, manually add the lines displayed in the following code examples to the domain configuration files located on the host where DAS is running. Ensure that these lines do not already exist. If the configuration has been completed sometime in the past, the code might already exist.
Code Example 2-1 Configuration to server.policy File
ApplicationServer-base/domains/domain1/config/server.policy
grant codeBase "file: agent-base/SUNWam/j2ee_agents/
lib/am_as81_agent_2_1.jar" {permission com.sun.appserv.security.ProgrammaticLoginPermission "login";
};
grant codeBase "file: agent-base/SUNWam/j2ee_agents/lib/am_agent_sdk_2_1.jar" {
permission java.security.AllPermission;
};
grant codeBase "file: agent-base/SUNWam/j2ee_agents/lib/am_agent_filter_2_1.jar" {
permission java.security.AllPermission;
};
grant codeBase "file: agent-base/SUNWam/j2ee_agents/lib/am_logging.jar" {
permission java.security.AllPermission;
};
Code Example 2-2 Configuration to login.conf File
ApplicationServer-base/domains/domain1/config/login.conf
amAS81Realm {
com.sun.identity.agents.as81.AmAS81LoginModule required;
};
Common Tasks
The following sections detail a few tasks that you need to perform to enable Cross Domain Single Sign On (CDSSO) after installing a J2EE agent. CDSSO is a feature that helps the J2EE agents to successfully achieve Single Sign-On in a multi-domain deployment scenario.
Enabling CDSSO
If the agent is installed in a domain different from the Sun ONE Identity Server, then CDSSO can be enabled by using the property called com.sun.am.policy.amFilter.cdsso.enabled available in the AmAgent.properties file. For detailed information on this property, see the section "AMAgent.properties Reference" in Chapter 3 of this guide.
Synchronizing the Agent Host and the Sun ONE Identity Server 6.1 Host
When using the J2EE agents, it is necessary to sync the agent host machine with the Sun ONE Identity Server host machine. This is important because of two main reasons:
If the machines are not synced up, there is a great possibility that the requested resources are denied by the agent (even though URL policies allow access) because of the above mentioned reasons.
Moreover, when the J2EE agent is installed to work with Sun ONE Identity Server 6.1 and functions in the CDSSO mode, the AuthnResponse time validity is just 1 minute time interval. This may cause the agent to deny access because of expired assertions. To avoid this, increase the skew factor property for CDSSO com.sun.am.policy.amFilter.cdsso.clock.skew to a suitable value. This will expand the validity interval set for the assertion time. By default this value is 0.
For example, if you set the value for this skew factor property as 90 seconds, the validity interval of the assertion time will now be increased to 4 minutes (2 x 90 + 1 minute).
Customizing the Agent InstallationNow that you have the agent installation complete, you may want to customize it to suit your particular deployment scenario. The agent provides a rich set of properties that can be used to fine tune your deployment for performance as well as the desired degree of security for your deployed applications.
Certain features such as Web-Tier declarative security support require that you modify the agent configuration in order to enable them. To learn more on such features, please refer to Chapter 3, "Agent Configuration" to learn how the agent can be configured to suit your requirements.