Creating RAID5 Metadevices
This section describes how to create RAID5 metadevices.
Preliminary Information for Creating RAID5 Metadevices
-
A RAID5 metadevice uses storage capacity equivalent to one slice in the metadevice to store redundant information about user data stored on the remainder of the RAID5 metadevice's slices. The redundant information is distributed across all slices in the metadevice. Like a mirror, a RAID5 metadevice increases data availability, but with a minimum of cost in terms of hardware.
-
The system must contain at least three state database replicas before you can create RAID5 metadevices.
-
A RAID5 metadevice can only handle a single slice failure.
-
Follow the 20-percent rule when creating a RAID5 metadevice: because of the complexity of parity calculations, metadevices with greater than about 20 percent writes should probably not be RAID5 metadevices. If data redundancy is needed, consider mirroring.
-
There are drawbacks to a slice-heavy RAID5 metadevice: the more slices a RAID5 metadevice contains, the longer read and write operations will take if a slice fails.
-
A RAID5 metadevice must consist of at least three slices.
-
A RAID5 metadevice can be grown by concatenating additional slices to the metadevice. The new slices do not store parity information, however they are parity protected. The resulting RAID5 metadevice continues to handle a single slice failure.
-
The interlace value is key to RAID5 performance. It is configurable at the time the metadevice is created; thereafter, the value cannot be modified. The default interlace value is 16 Kbytes. This is reasonable for most applications.
-
Use the same size disk slices. Creating a RAID5 metadevice from different size slices results in unused disk space in the metadevice.
-
Do not create a RAID5 metadevice from a slice that contains an existing file system. Doing so will erase the data during the RAID5 initialization process.
-
RAID5 metadevices cannot be striped, concatenated, or mirrored.
How to Create a RAID5 Metadevice (DiskSuite Tool)
-
Make sure you have met the prerequisites ("Prerequisites for Creating DiskSuite Objects") and have read the preliminary information ("Preliminary Information for Creating RAID5 Metadevices").
-
Click the RAID5 template.
An unassigned and uncommitted RAID5 object appears on the canvas. The metadevice name is automatically assigned.
-
[Optional] Change the default metadevice name.
-
[Optional] Change the default interlace size of 16 Kbytes.
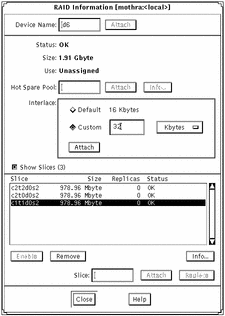
Display the object's pop-up menu and choose Info. The RAID Information window for this RAID5 metadevice appears.

-
To change the interlace value, click Custom and type the new value in the field next to Custom. This value can be in Kbytes, Mbytes, or sectors, and is configurable via the drop-down menu beside this field. Click Attach to set the value, then click Close.
See Solstice DiskSuite 4.2.1 Reference Guide for more information on setting the interlace value.
-
Click Slices to open the Slice Browser.
-
Select the slices and drag them to the top of the RAID5 object.
Use Control-click to select multiple slices. You need at least three slices.
-
Click the top rectangle of the RAID5 object then click Commit.
DiskSuite starts initializing the RAID5 metadevice.
-
To verify that the RAID5 metadevice was committed, display the Configuration Log.
Note -You must wait for the initialization to finish before you can use the RAID5 metadevice.
Example
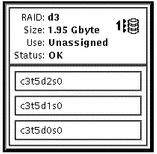
This example shows a RAID5 metadevice. Notice that the size displayed is 1.95 Gbytes even though the metadevice is made of three 999.63 Mbyte slices. (One slice's worth of storage capacity is used for parity.)

Where to Go From Here
To prepare the newly created RAID5 metadevice for a file system, refer to "How to Create a File System on a Metadevice (File System Manager)". An application, such as a database, that uses the raw metadevice must have its own way of recognizing the metadevice.
To associate a hot spare pool with a RAID5 metadevice, refer to "How to Associate a Hot Spare Pool (DiskSuite Tool)".
How to Create a RAID5 Metadevice (Command Line)
After checking the prerequisites ("Prerequisites for Creating DiskSuite Objects"), and the preliminary information ("Preliminary Information for Creating RAID5 Metadevices"), use the metainit(1M) command to create the RAID5 metadevice. For more information, refer to the metainit(1M) man page.
Example -- Creating a RAID5 Metadevice of Three Slices
# metainit d45 -r c2t3d0s2 c3t0d0s2 c4t0d0s2 d45: RAID is setup |
The RAID5 metadevice d45 is created with the -r option from three slices. Because no interlace is specified, d45 uses the default of 16 Kbytes. The system verifies that the RAID5 metadevice has been set up, and begins initializing the metadevice.
Note -
You must wait for the initialization to finish before you can use the RAID5 metadevice.
Where to Go From Here
To prepare the newly created RAID5 metadevice for a file system, refer to "How to Create a File System on a Metadevice (Command Line)". An application, such as a database, that uses the raw metadevice must have its own way of recognizing the metadevice.
To associate a hot spare pool with a RAID5 metadevice, refer to "How to Associate a Hot Spare Pool (Command Line)".
- © 2010, Oracle Corporation and/or its affiliates
