Chapter 4 Changing DiskSuite Objects
This chapter describes how to change DiskSuite devices, both with the DiskSuite Tool graphical interface and with the command line utilities.
Use the following to proceed directly to the section that provides step-by-step instructions using DiskSuite Tool.
-
"How to Save a DiskSuite Configuration to Disk (DiskSuite Tool)"
-
"How to Restore a DiskSuite Configuration From Disk (DiskSuite Tool)"
-
"How to Share a Logging Device Among File Systems (DiskSuite Tool)"
Use the following to proceed directly to the section that provides step-by-step instructions using the command line interface.
Overview of Changing DiskSuite Objects
After you have created a DiskSuite object, the occasion may arise where you need to change it, modify its parameters, or reconfigure it. This section describes such tasks as:
-
Saving and restoring the uncommitted changes to the DiskSuite configuration
-
Replacing and restoring state database replicas
-
Changing mirror's options
For general information on DiskSuite, see Solstice DiskSuite 4.2.1 Reference Guide.
Prerequisites for Changing DiskSuite Objects
Here are the prerequisites for the steps in this chapter:
-
Make sure you have a current backup of all data.
-
Make sure you have root privilege.
-
If using the graphical user interface, start DiskSuite Tool.
To work with "local" metadevices (metadevices not in a diskset configuration), type:
# metatool &
To work with metadevices in a diskset, make sure you are the diskset owner and type:
# metatool -s diskset_name &
Working With the DiskSuite Configuration
This section describes how to save and restore the current DiskSuite configuration that you are working on.
Preliminary Information for the DiskSuite Configuration
-
Saving a configuration saves uncommitted "state" changes on the Metadevice Editor's canvas. It does not save the current in-memory configuration. That is maintained by the state database replicas.
-
The save and restore configuration options enable you to create, in effect, a template configuration. This could be useful in configuring like machines: you create a configuration on one machine then copy to another, saving time in creating the second configuration.
-
The save and restore configuration options are also useful if you need to interrupt work, yet ensure that what you have configured so far (but not yet committed) will not be lost.
How to Save a DiskSuite Configuration to Disk (DiskSuite Tool)
Use this task to save uncommitted changes that appear on the Metadevice Editor canvas. This does not save a "backup" of your configuration, only uncommitted changes.
-
Make sure you have met the prerequisites ("Prerequisites for Changing DiskSuite Objects") and have read the preliminary information ("Preliminary Information for the DiskSuite Configuration").
-
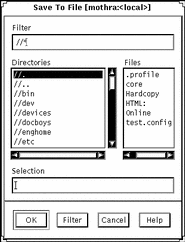
Select Save to File from the File Menu.
The following dialog box appears:

-
Type a file name in the Selection text field to save to and click OK.
You can also choose a file name from the Files list in the Save to File window. If the file exists, you can overwrite it, or cancel and use a different file name.
-
When you save the DiskSuite configuration, a dialog box appears indicating the configuration was saved. Click OK.
How to Restore a DiskSuite Configuration From Disk (DiskSuite Tool)
Use this task to bring back to the Metadevice Editor canvas a configuration previously saved to disk. This does not restore a configuration in the sense of restoring from a backup. Instead, it opens a previously saved configuration of uncommitted changes on the canvas.
-
Make sure you have met the prerequisites ("Prerequisites for Changing DiskSuite Objects") and have read the preliminary information ("Preliminary Information for the DiskSuite Configuration").
-
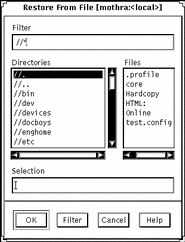
Select Restore From File from the File menu.
The following dialog box appears.

-
Choose a file from the Files list in the Restore from File window.
You can also type a file name in the Selection text field.
-
When you restore a configuration, a Restore From File dialog box appears, indicating the configuration was restored to the canvas. Click OK.
 Caution -
 Restoring from a file will undo any uncommitted changes you have made to the current configuration.
Modifying State Database Replicas
This section explains how to use the Metadevice State Database Information window to view and modify state database replicas.
Preliminary Information for Modifying State Database Replicas With the Metadevice State Database Information Window
-
You must have at least three state database replicas on the system. You should place them on different controllers to eliminate a single point-of-failure.
-
The maximum number of state database replicas is 50. This also applies to replicas that are part of a diskset.
How to Modify State Database Replicas (DiskSuite Tool)
-
Make sure you have met the prerequisites ("Prerequisites for Changing DiskSuite Objects") and have read the preliminary information ("Preliminary Information for Modifying State Database Replicas With the Metadevice State Database Information Window").
-
View the Metadevice State Databse Information window.
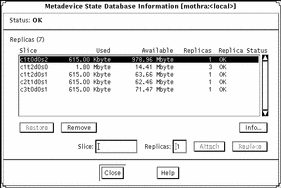
Drag the MetaDB Object to the canvas then double-click it. The Metadevice State Database Information window appears:

-
Make desired changes to the state database replicas by clicking or entering the required information. Click Close when done.
-
Once changes are made, you must commit the MetaDB Object before the changes take effect.
-
The Configuration Log shows that the MetaDB object was committed.
Table 4-1 lists the functionality associated with the regions of the Metadevice State Database Information window.
Table 4-1 Metadevice State Database Information Window FunctionalityField
Functions
Status
Description of the metadevice state database's status. See "How to Check the Status of State Database Replicas (DiskSuite Tool)" for a description of these values.
Replica manipulation region
This region shows the following information and allows for manipulation.
-
Replicas - The number of replicas.
-
Scrolling List - A scrolling list of the slices that contains replicas. Includes the name of the slice, the amount of space used, space available, number of replicas on the slice and the replica status.
-
Remove - Removes the selected slices.
-
Restore - Restores the selected slices if they are in error.
-
Info - Displays the Slice Information window for the selected slice.
-
Slice - Specifies a new slice to attach to the MetaDB or replace the selected slice.
-
Replicas - Shows the number of replicas that will be created on the slice. The default is 1.
-
Attach - Adds the slice entered in the slice field to the Replica list. Available only when a slice name is entered.
-
Changing Mirror Options
This section explains how to use the Mirror Information window to view and modify mirror options.
Preliminary Information for Changing Mirror Options
-
You can change a mirror's pass number, and read and write policies.
-
Mirror options can be changed while the mirror is running.
Note -
If you need to change the interlace value of stripe that is used as a submirror, refer to "How to Change the Interlace Value of Stripes in Mirrors (DiskSuite Tool)".
How to Change a Mirror's Options (DiskSuite Tool)
Table 4-2 describes mirror options that can be configured.
Table 4-2 Mirror Options
You can use the Mirror Information window to set options for mirrors, including read and write policy, the order in which mirrors are resynced during reboot, and if a submirror has a hot spare.
-
Make sure you have met the prerequisites ("Prerequisites for Changing DiskSuite Objects") and have read the preliminary information ("Preliminary Information for Changing Mirror Options").
-
Double-click an existing Mirror object in the Objects list.
The Mirror object appears on the canvas.
-
Display the Mirror object's pop-up menu and choose Info.
The Mirror Information window appears.
-
Change the desired options.
Refer to Table 4-2 for a description of mirror options. After making a change to a mirror option, click Close.
-
Click the top rectangle of the Mirror object, then click Commit.
-
To verify that the change was committed, display the Configuration Log.
How to Change a Mirror's Options (Command Line)
After checking the prerequisites listed ("Prerequisites for Changing DiskSuite Objects"), and the preliminary information ("Preliminary Information for Changing Mirror Options"), use the metaparam(1M) command to display and change a mirror's options. Refer to Table 4-2 for a description of mirror options. For more information, refer to the metaparam(1M) man page.
Example -- Changing a Mirror's Read Policy
# metaparam -r geometric d30
# metaparam d30
d30: mirror current parameters are:
    Pass: 1
    Read option: geometric (-g)
    Write option: parallel (default)
|
The -r option changes a mirror's read policy to geometric.
Example -- Changing a Mirror's Write Policy
# metaparam -w serial d40
# metaparam d40
d40: mirror current parameters are:
    Pass: 1
    Read option: roundrobin (default)
    Write option: serial (-S)
|
The -w option changes a mirror's write policy to serial.
Example -- Changing a Mirror's Pass Number
# metaparam -p 5 d50
# metaparam d50
d50: mirror current parameters are:
    Pass: 5
    Read option: roundrobin (default)
    Write option: parallel (default)
|
The -p option changes a mirror's pass number to five.
Sharing a Logging Device Among File Systems
This section explains how to configure trans metadevices to share logging devices.
Preliminary Information for Sharing a Logging Device
-
Once you set up a trans metadevice, you can share the logging device among file systems.
-
When sharing a logging device, it is a good idea to make the logging device a mirror.
-
Consider sharing a logging device among file systems if your system does not have many available slices, or if the file systems sharing the logging device are read-mostly.
When one master device of a shared logging device goes into an errored state, the logging device is unable to roll its changes forward. This causes all master devices sharing the logging device to go into the hard error state.
How to Share a Logging Device Among File Systems (DiskSuite Tool)
This procedure assumes you have already set up a trans metadevice with a logging device for another file system.
-
Make sure you have met the prerequisites ("Prerequisites for Changing DiskSuite Objects") and have read the preliminary information ("Preliminary Information for Sharing a Logging Device").
-
Identify the slice or metadevice that contains the file system. You'll need this when creating the master device.
If necessary, click Slices to display the Slice Browser for identifying the slice used by the file system.
-
Click the trans metadevice template.
An unassigned and uncommitted Trans Metadevice object appears on the canvas. The metadevice name is automatically assigned.
-
[Optional] To change the default metadevice name, display the object's pop-up menu and select Info. Type the new metadevice name in the Device Name field and click Attach. Then click Close.
-
Double-click the existing Trans Metadevice object in the Objects list.
The objec is displayed on the canvas. The new trans metadevice will share logs with this one.
-
Note the logging device name used by this trans metadevice.
-
Drag the slice from the Slice Browser, or the metadevice from the Objects List, containing the file system to be logged into the master rectangle of the new trans metadevice. A warning dialog box appears. Click Continue.
Note -If an entry exists in the /etc/vfstab file for the file system, and the file system is currently mounted, DiskSuite Tool automatically updates it to use the trans metadevice's name.
-
Display the Information window for the new trans metadevice and type the slice or metadevice name noted in the existing trans metadevice (Step 6) into the Log text field.
-
Click Attach. You may see an evaluation warning dialog box. If so, click Accept. Then click Close on the Information window.
-
Click the top rectangle of the Trans Metadevice object then click Commit.
Click Really Commit on the warning dialog box that appears. This creates the new trans metadevice, sharing the logging device of the existing trans metadevice.
-
To verify that the trans metadevice was committed, display the Configuration Log.
-
Logging becomes effective for the file system when you reboot the system.
Upon subsequent reboots, instead of checking the file systems, fsck(1M) displays message such as this for each logged file system:
/dev/md/rdsk/trans: is logging.
How to Share a Logging Device Among File Systems (Command Line)
This procedure assumes you have already set up a trans metadevice with a log for another file system.
After checking the prerequisites ("Prerequisites for Changing DiskSuite Objects"), and the preliminary information ("Preliminary Information for Sharing a Logging Device"), use the metainit(1M) to share a log. Refer to the metainit(1M) man page for more information.
Example -- Sharing a Logging Device
# umount /xyzfs # metainit d64 -t c0t2d0s4 d10 d64: Trans is setup (Edit the /etc/vfstab file so that the entry for /xyzfs references the trans metadevice d64) # mount /xyzfs # metastat ... d10: Logging device for d63 d64 ... |
This example shares a logging device (d10) defined as the log for a previous trans metadevice, with a new trans metadevice (d64). The file system to be set up as the master device is /xyzfs and is using slice /dev/dsk/c0t2d0s4. metainit -t specifies the configuration is a trans metadevice. The /etc/vfstab file must be edited to change (or enter for the first time) the entry for the file system to reference the trans metadevice. For example, the following line:
/dev/dsk/c0t2d0s4 /dev/rdsk/c0t2d0s4 /xyzfs ufs 2 yes - |
should be changed to:
/dev/md/dsk/d64 /dev/md/rdsk/d64 /xyzfs ufs 2 yes - |
The metastat command verifies that the log is being shared. Logging becomes effective for the file system when the system is rebooted.
Upon subsequent reboots, instead of checking the file system, fsck(1M) displays these messages for the two file systems:
/dev/md/rdsk/d63: is logging. /dev/md/rdsk/d64: is logging. |
- © 2010, Oracle Corporation and/or its affiliates
