How to Create a Hot Spare Pool (DiskSuite Tool)
You can create an empty hot spare pool, and add hot spares later if necessary. If you choose to do so, skip Step 4 and Step 5 in this task.
-
Make sure you have met the prerequisites ("Prerequisites for Creating DiskSuite Objects") and have read the preliminary information ("Preliminary Information for Creating Hot Spare Pools").
-
Click the Hot Spare Pool template.
An unassigned and uncommitted Hot Spare Pool object appears on the canvas. The metadevice name is automatically assigned.
-
[Optional] Change the default hot spare pool name.
Display the object's pop-up menu and choose Info. Type the new metadevice name in the Device Name field and click Attach. Then click Close.
-
Click Slices to open the Slice Browser.
-
Select the slices and drag them into the Hot Spare Pool object.
Use Control-click to select multiple slices.
-
Click the top rectangle of the Hot Spare Pool object then click Commit.
-
To verify that the hot spare pool was committed, display the Configuration Log.
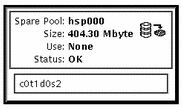
Example -- Committed Hot Spare Pool Object
This example shows a committed hot spare pool object, hsp000, consisting of slice c0t1d0s2.

Where to Go From Here
To add hot spares to the hot spare pool, refer to "How to Add a Hot Spare Slice to a Hot Spare Pool (DiskSuite Tool)". After creating the hot spare pool, you need to associate it with a submirror or RAID5 metadevice. See "How to Associate a Hot Spare Pool (DiskSuite Tool)".
- © 2010, Oracle Corporation and/or its affiliates
