Using Font Editor
This section describes how to edit, create, and install Portable Compiled Format (PCF) fonts used by the Traditional Chinese Solaris operating environment. You can save your changes and use the edited font(s) on your local system. This process involves the following steps:
-
Preparing a workspace for the font(s) you edit or create
-
Editing Bitmap Distribution Format (BDF) font file(s) with Font Editor
-
Converting BDF font file(s) to PCF format
-
Making the font(s) usable on your system
Note -
zh_TW.BIG5 messages are not supported by Font Editor. If you run Font Editor under the zh_TW.BIG5 locale, the Font Editor interface will be in English.
Setting Up a Working Directory
-
Create a new directory workspace for editing fonts, for example:
system% mkdir /tmp/newfont
-
Change your working directory to that directory:
system% cd /tmp/newfont
Starting the Font Editor
The Traditional Chinese Solaris operating environment provides Font Editor for editing fonts.
-
Start the Font Editor.
A Font Editor window is displayed.
system% fontedit |
Font Editor does not operate on PCF format font files (file extension .pcf), which are used by the Solaris operating environment. This tool handles only fonts in BDF, a portable format defined by the MIT X Consortium.
Preparing a Font File
-
Get the font file you want to edit in BDF format.
The font's encoding should start at 8481 (0x2121). For an example, assume that you have a BDF file such as the following myfont14.bdf:
STARTFONT 2.1 COMMENT Sample Font FONT Myfont-Medium14 SIZE 14 75 75 ... STARTCHAR C101 ENCODING 8481 ... |
Editing a BDF Font File
-
In the Font Editor tool window, choose FileLoad and load the font template file for the character(s) you will create.
-
For example, to edit or create myfont14 font characters, load myfont14.bdf:

-
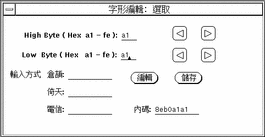
Click Select button to display the Fontedit: Select window.

-
To edit a character, type the hexadecimal high and low bytes of the font encoding code assigned to the character.
Click the right or left arrows to increase or decrease the numbers.
-
Click Edit in the Fontedit: Select window.
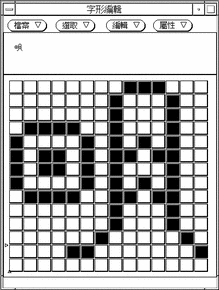
This clears the field or displays the character for editing in the Font Editor main window:

-
Edit the glyph by turning on or off the pixels on the main canvas:
-
Click the SELECT mouse button to turn on a pixel.
-
Click the ADJUST mouse button to turn off a pixel.
-
Hold down the MENU mouse button for a menu of additional functions.
Note -The character glyph in the upper left corner of the main window shows the actual appearance of the glyph as you turn its pixels on and off.
-
-
In the Select window, type the TsangChieh, I-Tien, and Telecode input methods keystroke sequences for the character.
-
Save the character, including its glyph and input strokes, by clicking Store in the Select window.
-
Repeat the preceding steps as needed to create or modify font glyphs.
-
After you have edited the character(s), select Save... from the File menu and type the name of the font file.
In this example, you would save the font file in /tmp/newfont/myfont14.bdf.
-
Select Save Dictionary from the File menu to save the input keystrokes in the dictionary.
In this exercise, save the dictionary in /tmp/newfont/eucinput.usr.
-
Click Continue in the message that appears to save the dictionary.
The dictionary is saved when you click Continue. A message appears saying you must install the dictionary in the /usr/lib/mle/zh_TW/eucinput.usr file on your system before you can use the new input method keystrokes to type the new characters.
Converting From BDF to PCF Format
Before Solaris applications can use a modified BDF file, it must be converted to a file in PCF format. It must then be replaced in the $OPENWINHOME/lib/locale/zh_TW/fonts directory as follows:
-
Convert the file to PCF format by typing:
system% bdftopcf -o myfont14.pcf myfont14.bdf |
The -o option enables the matrix encoding used for Asian PCF font files. For more information, see the bdftopcf(1) and mkfontdir(1) man pages.
Installing and Checking the Edited Font
-
To add a new bitmap, move the .pcf font file into your font directory. You may compress the .pcf font file before moving it, as follows:
system% compress myfont14.pcf
-
Run the following commands in your font directory.
The .bdf file should not be in the font directory.
system% cat >> fonts.alias
-new-myfont-medium-r-normal--16-140-75-75-c-140-cns11643-16
Myfont-Medium14
^D
system% mkfontdir
system% xset +fp `pwd`
-
You can view your font by entering:
system% xfd -fn Myfont-Medium14
Installing the User Dictionary
You must install the dictionary file created during the Font Editor session in /usr/lib/mle/zh_TW/eucinput.usr to make the new characters accessible by Chinese input methods.
Normally you must be superuser to install such a feature. If you do not have superuser privileges on your system, contact your system administrator for help.
-
To install the dictionary file, become superuser and type the following command:
system% su # cp /tmp/newfont/eucinput.usr /usr/lib/mle/zh_TW |
Restarting the htt Input Method Server
Before you can use your input method keystrokes to access the new characters, you must start a new htt to find the dictionary and new characters.
-
Click the Reset Input Method button in the htt Properties window to start a new input method server.
For more information on this operation, see Chapter 3, "Using the htt Input Method Server."
Accessing Edited Fonts
The edited font characters are then accessible to all applications using htt. You can test this by starting a new application, such as a Terminal, turning on input conversion (Control-spacebar), and typing the keystrokes you assigned to the new character.
- © 2010, Oracle Corporation and/or its affiliates
