| C H A P T E R 5 |
|
Sun Blade Zone Manager |
This chapter contains information on the Sun Blade Zone Manager feature as described in the following table.
|
Learn about features of the Sun Blade Zone Manager and prerequisites for use of the application |
|
This section covers the following topics:
The Sun Blade Zone Manager handles the SAS-2 storage assignments for the Sun Blade Modular System CPU blades, storage devices, and NEMs. The Zone Manager runs on the chassis monitoring module (CMM) and communicates to the storage resources over Ethernet links between it and the SAS-2 expanders on the storage blades and the NEMs.
Zone Manager allows storage devices from a storage module installed in the chassis to be assigned to a server blade. Storage devices can be assigned to more than one server module (blade) in the case of a cluster.
Currently, Zone Manager is only available for the Sun Blade 6000 Modular System.
The Sun Blade Zone Manager is available in the Sun Blade 6000 Modular System CMM SW 3.0.10 or later, which includes ILOM 3.0.10 and later.
You can access the Zone Manager through either the ILOM web interface or command-line interface (CLI). The web interface and the CLI are functionally equivalent, but the web interface has some additional ease-of-use features.
This section covers the following topics:
The Sun Blade Zone Manager is accessible through the CMM ILOM Storage tab. It provides two options for setting up the storage configuration:
The following example shows one of the configurations available through Quick Setup.
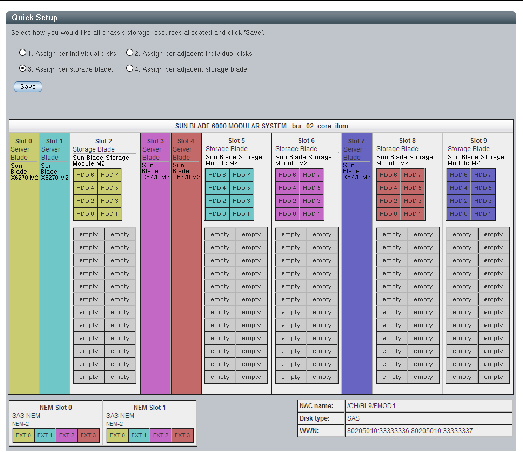
| Note - NEM0 and NEM1 targets appear in the Zone Manager when these NEMs are installed; however, external SAS connections in the Sun Blade Zone Manager are not supported at this time. |
See Creating the Chassis Storage Access Configuration Using Quick Setup for more information on Quick Setup.
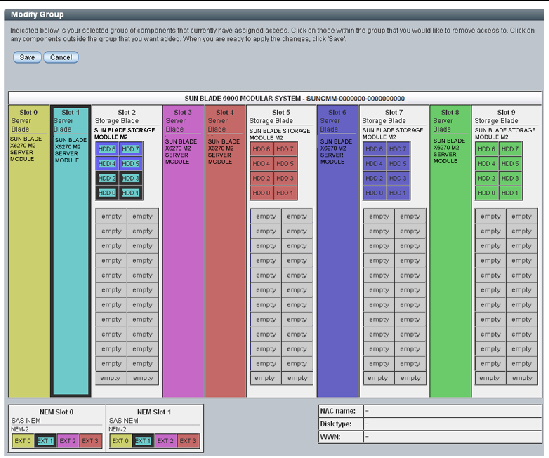
Detailed Setup enables you to make changes to the zoning configuration that you set up in Quick Setup or to make individual assignments of storage devices to server blades. The following example shows drives being selected for removal from the server blade assignment.
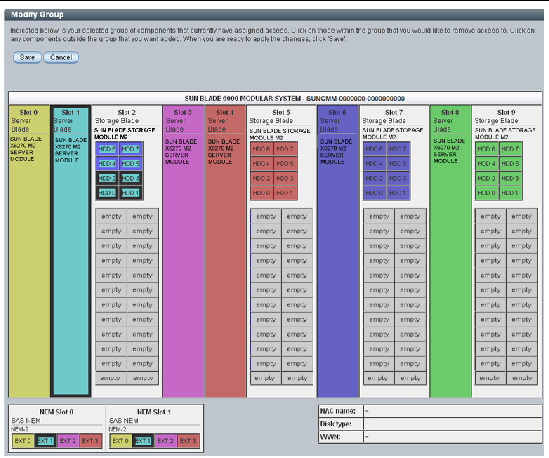
Drives HDD4-HDD7 are selected and highlighted in blue. When the configuration is saved, these storage devices will no longer be associated with the server blade in Slot 1.
For more information on changing a zoning configuration using Detailed Setup, see View and Modify the Chassis Storage Configuration Using the Web Interface.
The command-line interface (CLI) provides access to the zoning for blades and storage devices through the /STORAGE/sas_zoning namespace.
When zoning is enabled, blades and NEMs that are SAS-2 capable will be displayed as targets under /STORAGE/sas_zoning. For example:
|
zone_management_state = enabled reset_password_action = (Cannot show property) |
| Note - NEM0 and NEM1 targets appear in the Zone Manager when these NEMs are installed; however, external SAS connections in the Sun Blade Zone Manager are not supported at this time. |
Storage devices installed on a storage blade are shown as targets of the storage blade. For example, if BL9 is a storage blade installed in Slot 9, the storage devices installed on this blade are shown as follows:
You can access and modify the zoning configurations either through the server blade or the storage blade. Either method has the same result.
The following topics provide an overview of the zoning configurations through the CLI:
You can assign storage to a server blade or a server blade to a storage device. Either method produces the same result.
When you are assigning storage devices to a server blade, use the following command:
-> set add_storage_access=/CH/BLn/HDDn
Where BLn is the storage blade, HDDn is a hard disk drive installed on the storage blade.
Optionally, you can assign multiple storage devices to a blade in the same command line by separating storage devices with a comma. For example:
-> set add_storage_access=/CH/BLn/HDD0,/CH/BLn/HDD1
When you are assigning a server blade to a storage device, use the following command:
-> set add_host_access=/CH/BLn
Where BLn is the server blade that you are assigning the storage device to.
Before a server blade has a storage device assigned to it, no targets are displayed under the blade. In the following example, BL0 is a server blade in Slot 0.
The following command assigns the HDD0 installed on the storage blade in chassis Slot 9 to the server blade installed in Slot 0.
-> set add_storage_access=/CH/BL9/HDD0
After a storage device is assigned to a server blade, the storage device appears as a target under the server blade. For example:
Before a storage device has a blade assigned to it, no targets are displayed under the storage device. In the following example, HDD0 is a storage device installed on a storage blade installed in Slot 9 of the chassis.
|
-> cd /STORAGE/sas_zoning/BL9/HDD0 wwn = 0x5000c50003d3a765, 0x5000c50003d3a766 |
The following command assigns server blade in Slot 0 to HDD0 on storage blade 9:
-> set add_host_access=/CH/BL0
After a server blade is assigned to the storage device, the server blade appears as a target under the storage device. For example:
For detailed instructions on creating and modifying zoning, see the following procedures:
The following sections describe the hardware and firmware configurations to support the Sun Blade Zone Manager:
All of the following hardware in the chassis must be SAS-2 capable in order to be recognized by the Sun Blade Zone Manager:
If a storage module or server blade is not SAS-2 capable, it is not included in the Zone Manager configuration. The web interface acknowledges the presence of the blade, but it is labeled as a “non SAS-2” device. The blade is not displayed at all in the CLI if it is not SAS-2 enabled.
SAS-2 devices, except for CPU blades, must be powered on to be recognized by the Zone Manager. In addition, SAS-2 devices in a failed state might not be recognized by Zone Manager. Refer to your platform ILOM Supplement documentation or platform Administration Guide for information on detecting component faults.
This section contains information on how to access and enable the Zone Manager. This section covers the following topics:
|
Before You Begin: Ensure that your chassis configurations meets the requirements in Supported Hardware and Firmware Configurations.
Follow these steps to access and enable the Zone Manager using the web interface:
1. Open a web browser and log in to the CMM by entering the following URL:
Where chassis_sp_ipaddress is the IP address of your chassis service processor.
2. Log in as the root user account.
The CMM ILOM main page is displayed.
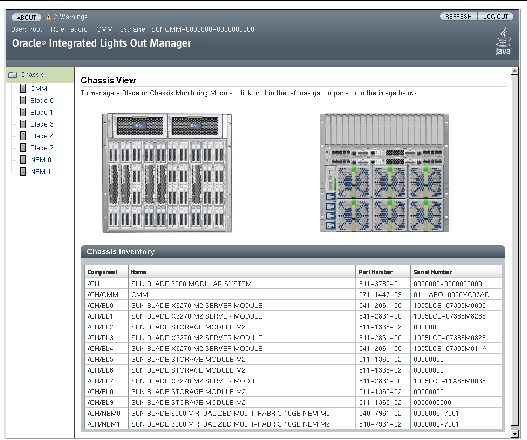
| Note - In the left pane, installed server blades are listed, but not installed storage modules. This is because the CMM ILOM controls storage module Integrated Lights Out Management functions. |
3. Click on CMM in the left Chassis navigation pane and then click the Storage tab.
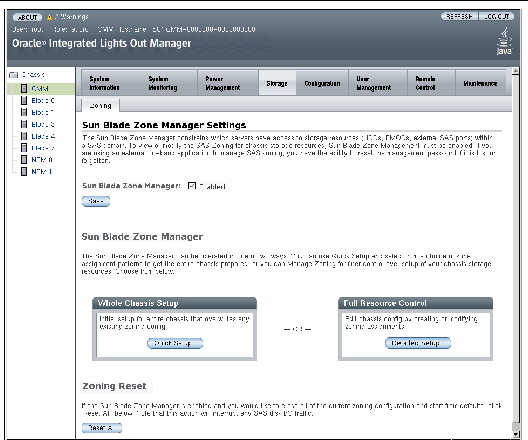
The Zone Manager Settings sub-page is displayed.
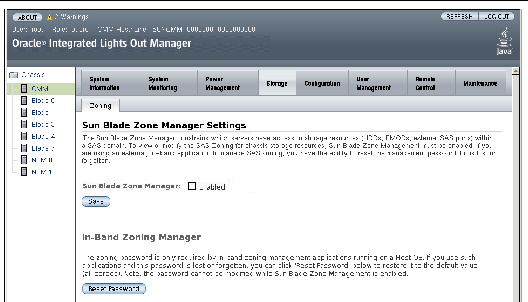
4. Enable CMM zoning by clicking the Enable check box, and then clicking the Save button.
This enables you to create, view, and manage zoning settings through the CMM.
You might get the following message if the CMM ILOM services are still initializing:
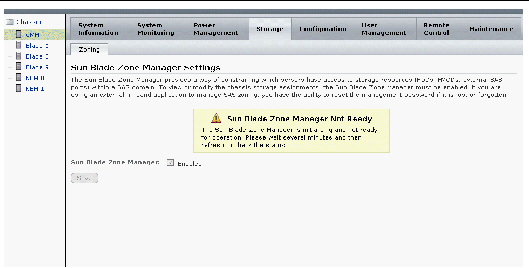
If you get this message, wait an additional five minutes and then try again. You need to close and reopen, or refresh the page.
5. Use the procedures in Creating the Chassis Storage Access Configuration to set up the storage zoning.
|
Before You Begin: Ensure that your chassis configurations meets the requirements in Supported Hardware and Firmware Configurations.
Follow these steps to access and enable Zone Manager using the CLI:
1. Open a terminal window and establish an SSH connection to the CMM by entering the following command:
Where cmm_ipaddress is the IP address of the CMM.
The login prompt is displayed.
2. Log in as root and enter the root password:
After you have successfully logged in, the CLI prompt is displayed:
3. Confirm that you have the minimum CMM firmware version required for zoning by entering the command:
You need ILOM firmware 3.0.10 at a minimum. If you have an earlier version, you need to download CMM ILOM software version 3.2.1 (or later). See Chapter 3 for firmware download and upgrade procedures. Then you need to upgrade your CMM ILOM firmware.
4. Change directories to sas_zoning by entering the command:
5. Check whether sas_zoning is enabled by entering the show command. For example:
|
zone_management_state = disabled reset_password_action = (Cannot show property) |
If the zone_management_state = disabled, then there are no saved SAS-2 zone configurations.
6. If necessary, enable zoning by entering:
-> set zone_management_state=enabled
Enabling the Sun Blade Zone Manager will result in the clearing of all zoning configuration in the installed chassis SAS hardware, and any SAS disk I/O in progress will be interrupted.
Are you sure you want to enable the Sun Blade Zone Manager (y/n)? y
Set ’zone_management_state’ to ’enabled’
set: The Sun Blade Zone Manager is initializing and not ready for operation. Please wait several minutes and try again.
If you get this message, wait five minutes and retry the command.
7. Use the procedures in Creating the Chassis Storage Access Configuration to set up the storage zoning.
There are three options for creating chassis storage access: the web interface using Quick Setup, the web interface using Detailed Setup, and the CLI. You can also use a backup zoned configuration by recovering the configuration as shown in Recovering Zoning Configurations.
Quick Setup is a wizard for automating the process of creating an initial chassis storage access configuration for SAS-2 compliant CPU blades. Quick Setup is only available through the ILOM web interface. There is no Quick Setup equivalent for the CLI.
This section covers the following topics:
The Quick Setup option through the ILOM web interface enables you to choose from four different configuration options to zone the blades and storage devices in the chassis.
| Note - NEM0 and NEM1 targets appear in the Zone Manager when these NEMs are installed; however, external SAS connections in the Sun Blade Zone Manager are not supported at this time. |
This section covers the following topics:
There are four options available for Quick Setup described in the following topics:
This option uses a round-robin algorithm to assign disks to hosts. Ownership of disks is spread evenly across available storage modules.
This option is best for fault tolerance where the failure or removal of a single storage module will not bring down an array.
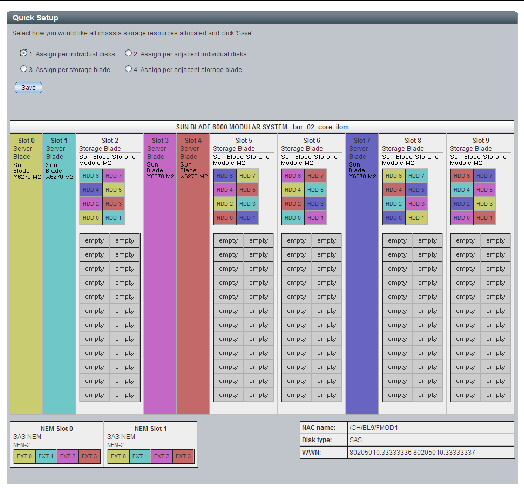
This option equally divides the number of storage devices among the server blades. All servers are assigned as close to the same number of disks as possible.
Instead of assigning the storage in a round-robin fashion among all available storage blades, the storage is assigned from storage blades that are adjacent to the server blades. If there are no storage blades adjacent to the server blade, then the nearest possible storage blade is used.
This is a good option to use if you have more server blades than storage blades, and want to have an equal number of storage devices assigned to each storage blade.
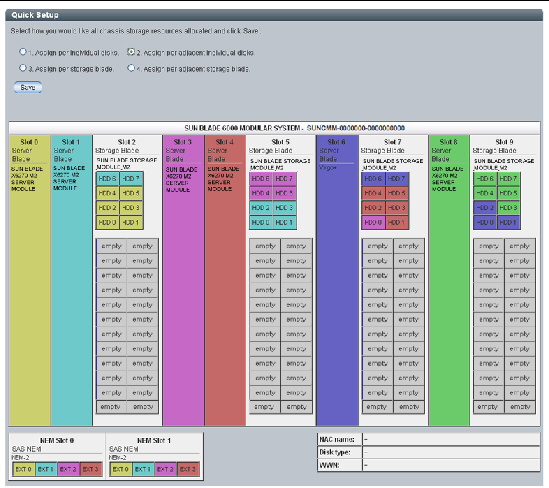
This option looks for servers (starting at Slot 0) and assigns the closest available storage module. If there are seven servers and three storage modules, only the first three servers will be assigned a storage module.
This option is best to use when there are an equal number of storage blades and modules or more storage blades than modules. Otherwise, some server blades will not be assigned to any storage device.
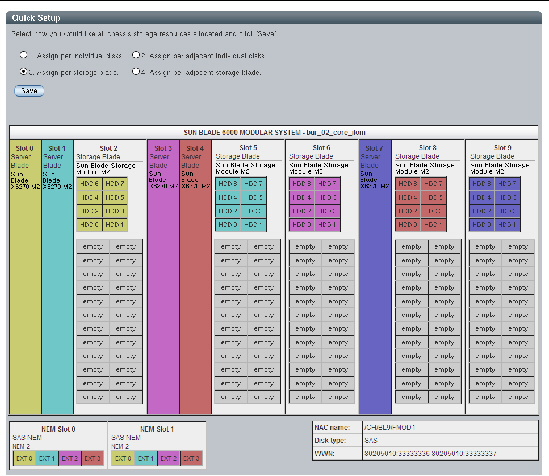
This option looks for servers with storage modules in adjacent slots and one per server. If the server does not have a storage module in an adjacent slot, it is not assigned any storage.
This option works best when there are an equal number of storage blades and server blades, and each server blade has a unique storage blade installed adjacent to it.
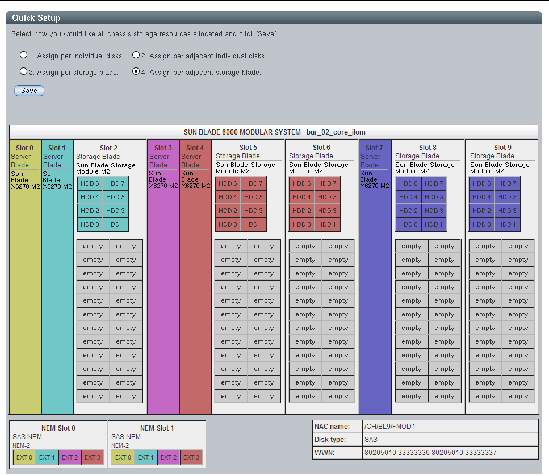
|
|
Before You Begin: Ensure that your chassis configuration meets the requirements in Supported Hardware and Firmware Configurations.
1. Access the Sun Blade Zone Manager. See Accessing the Sun Blade Zone Manager.
2. In the Sun Blade Zone Manager section, click the Quick Setup button.

3. Click OK if you are willing to overwrite any existing zoning.
The Quick Setup screen appears.
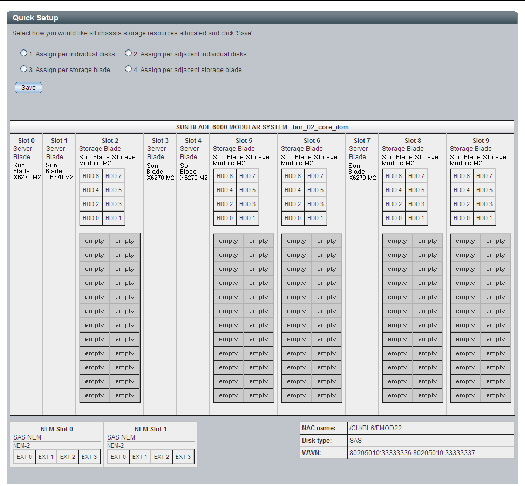
Note that any HDD slots that do not have a storage device installed are labeled “empty.” These slots are not included in the Quick Setup configuration.
4. Choose one of the Quick Setup options.
See Quick Setup Options for explanation of each option.
After you make the selection, the screen shows the color-coded zoning assignments between the CPU blades and storage devices (HDDs). Although the Sun Blade Zone Manager assigns the NEM0 and NEM1 External SAS connections, these connections are not officially supported.
| Note - Until you click the Save button, the configuration is not saved. |
5. Click the Save button to save the configuration.
See Saving the Chassis Storage Access Configuration for more information on what happens when you save the configuration.
See Backing Up the Storage Access Configuration.
You can use the New Assignments option in Detailed Setup to manually create the chassis storage access configuration.
| Note - NEM0 and NEM1 targets appear in the Zone Manager when these NEMs are installed; however, external SAS connections in the Sun Blade Zone Manager are not supported at this time. |
|
|
Before You Begin: Ensure that your chassis configuration meets the requirements in Supported Hardware and Firmware Configurations.
1. Access the Sun Blade Zone Manager.
See Accessing the Sun Blade Zone Manager.
2. In the Sun Blade Zone Manager section, click the Detailed Setup button.
The following message appears if you do not have a chassis storage configuration set up.

Clicking Cancel will open the Detailed Setup page.
Clicking OK will open the Quick Setup page. See Creating the Chassis Storage Access Configuration Using Quick Setup for more information on Quick Setup.
4. Click the New Assignments button.
5. Click on a server blade and then click on the HDDs to be assigned to the server blade. Alternatively, select more than one server blade for the assignment.
Note that any HDD slots that do not have a storage device installed are labeled “empty.” These slots cannot be assigned to a server blade.

|
Caution - If you assign an HDD to more than one server blade, ensure that the server blade is enabled for multipathing. For more information see Assign Multiple Server Blades to a Storage Device Using the Web Interface. |
Although the Sun Blade Zone Manager can assign them, NEM0 and NEM1 External SAS connections are not supported at this time.
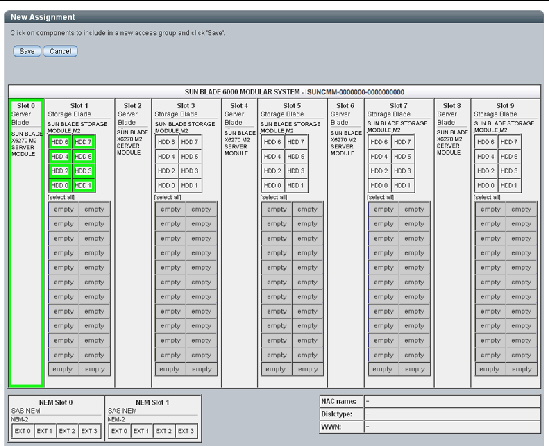
6. Click Save to save the configuration.
See Saving the Chassis Storage Access Configuration for more information on what happens when you save the configuration.
See Backing Up the Storage Access Configuration.
You can create a chassis storage configuration either by assigning storage to a server blade or assigning a server blade to a storage device. Either method provides the same results.
Before You Begin: Ensure that your chassis configuration meets the requirements in Supported Hardware and Firmware Configurations.
1. Access the Sun Blade Zone Manager.
See Accessing the Sun Blade Zone Manager.
2. Use one of the following methods to create a chassis storage configuration:
-> cd /STORAGE/sas_zoning/BLn
-> set add_storage_access=path_to_storage_device
Where BLn is a server blade and path_to_storage_device is the path to the storage device that you want to assign to the blade. For example, /CH/BL1/HDD0.
-> cd /STORAGE/sas_zoning/BLn/HDDn
Followed by:
-> set add_host_access=path_to_blade_server
Where BLn is a storage blade, HDDn is a storage device installed on the storage blade, and path_to_blade_server is the path to the server that you want to assign to the storage device. For example, /CH/BL0.
The following examples show how to use these commands to set up zoning between storage devices on a storage blade in Slot 1 and a server blade in Slot 0.
See Backing Up the Storage Access Configuration.
You can use the Detailed Setup through the web interface or the CLI to view or modify the current chassis storage access configuration.
Use one of the procedures in the following table to view or modify the current storage configuration.
|
View and modify the current storage configuration using the web interface. |
View and Modify the Chassis Storage Configuration Using the Web Interface |
|
View and modify the current storage configuration using the CLI. |
View and Modify the Chassis Storage Configuration Using the CLI |
|
Assign Multiple Server Blades to a Storage Device Using the Web Interface |
|
|
View the Storage Access Configuration Table Using the Web Interface |
|
Before You Begin: Ensure that your chassis configuration meets the requirements in Supported Hardware and Firmware Configurations.
1. Access the Sun Blade Zone Manager.
See Accessing the Sun Blade Zone Manager.
2. In the Sun Blade Zone Manager section, click the Detailed Setup button.
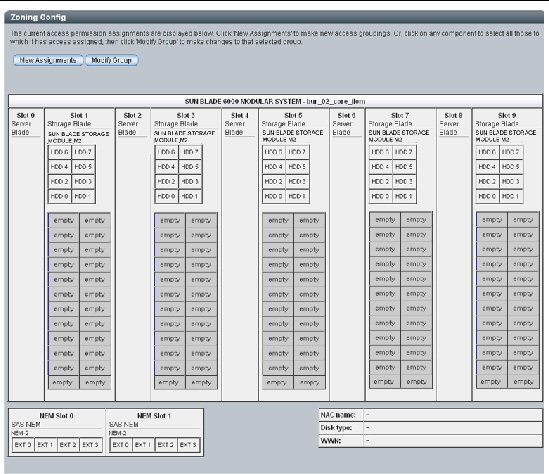
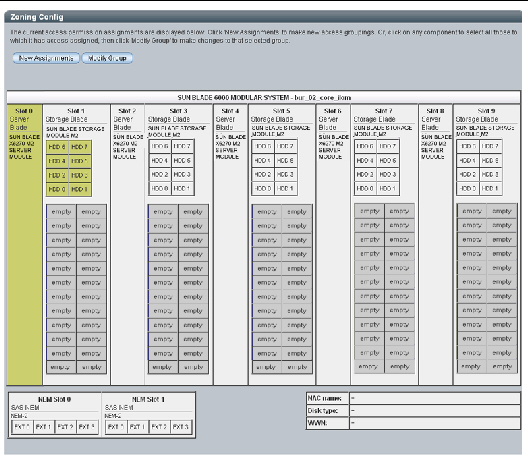
The current chassis zoning configuration is displayed, as shown in the following example.
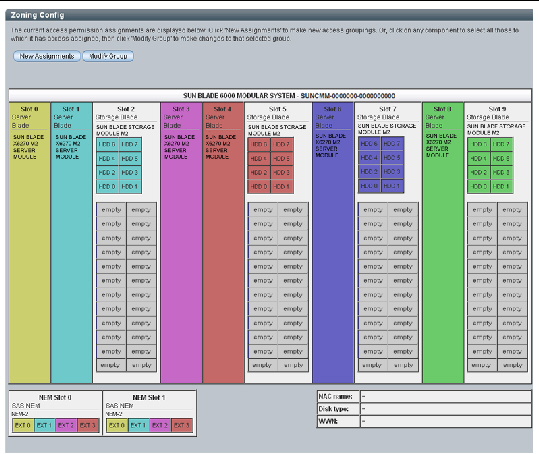
| Note - Any HDD slots that do not have a storage device installed are labeled “empty.” These slots cannot be assigned to a server blade. |
3. To modify a blade/storage group, select a blade that is part of the group.
The storage that is assigned to the group will be highlighted.
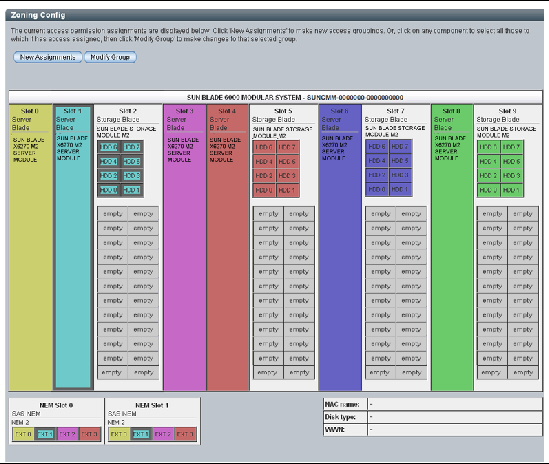
4. Click the Modify Group button.
The group that you selected is still highlighted.
5. To remove a storage device that is in the group, click on it.
The following illustration shows HDD 4-7 selected to be unassigned from the processor blade in Slot 1.
6. Click Save to remove the modules from the group.
See Saving the Chassis Storage Access Configuration for more information on what happens when you save the configuration.
7. If you do not plan to make additional storage assignments, back up the configuration.
See Backing Up the Storage Access Configuration.
8. To make a new storage group assignment, click the New Assignments button.
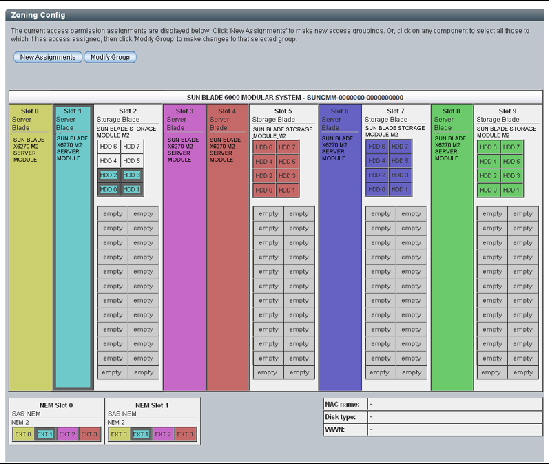
9. Click on the server blade and storage devices that you want to include in the group.
In the following example, the selected storage group is highlighted in green.
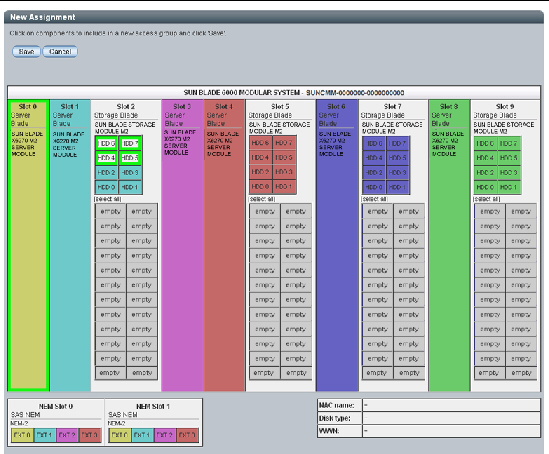
HDD 4-7 are now assigned to Slot 0.
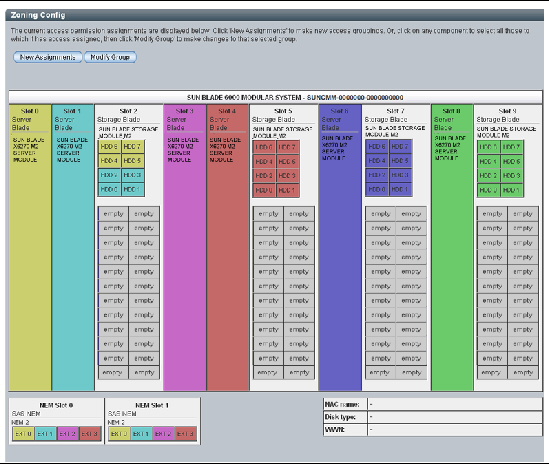
11. Back up the configuration.
See Backing Up the Storage Access Configuration.
|
Before You Begin: Set up the initial chassis zoning configuration using Quick Setup or Detailed Setup. See Creating the Chassis Storage Access Configuration.
1. Access Zone Manager using the CLI.
See Accessing the Sun Blade Zone Manager.
2. To view storage device assignments to a server blade, you can either view the assignments per server blade or per storage module.
In the following examples, HDD0 and HDD1 from a storage blade in Slot 2 are assigned to server blade in Slot 0.
In this example, HDD0 and HDD1 from a storage blade in Slot 2 are assigned to server blade in Slot 0.
3. Modify storage assignments.
You can modify storage device assignments to server blades or modify server blade assignments to storage devices. Either method provides the same result.
Method 1: Add or remove storage access to the server blade.
-> cd /STORAGE/sas_zoning/BLn
-> set add_storage_access=path_to_storage_device
-> cd /STORAGE/sas_zoning/BLn
-> set remove_storage_access=path_to_storage_device
Where BLn is a server blade and path_to_storage_device is the path to the storage device that you want to assign to the blade. For example, /CH/BL1/HDD0.
Method 2: Add or remove server blade access to storage blades.
Use one of the following commands:
-> cd /STORAGE/sas_zoning/BLn/HDDn
Followed by:
-> set add_host_access=path_to_blade_server
Use one of the following commands:
-> cd /STORAGE/sas_zoning/BLn/HDDn
Followed by:
-> set remove_host_access=path_to_blade_server
Where BLn is a storage blade, and HDDn is storage device in the storage blade, and path_to_blade_server is the path to the server that you want to assign to the storage device. For example, /CH/BL0.
See Backing Up the Storage Access Configuration.
|
The Sun Blade Zone Manager enables you to assign more than one server blade to a single storage device. This option should only be used with an Oracle-supported clustering solution. See the Sun Blade Storage Module Administration Guide for more information.
| Note - Check your server blade documentation for information on whether the server module is enabled for sharing storage with another server. |
1. Access the Sun Blade Zone Manager.
See Accessing the Sun Blade Zone Manager.
2. In the Sun Blade Zone Manager section, click the Detailed Setup button.
In the following example, HDD6 in storage module Slot 2 is assigned only to the server blade in Slot 0.
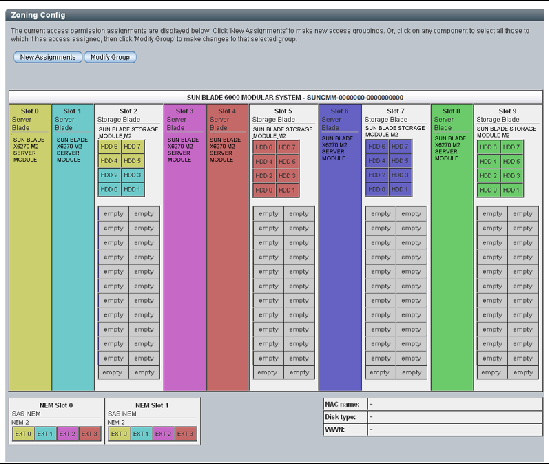
4. To assign HDD6 to both the server blade in Slot 0 and the server blade in Slot 1, click Slot 1 and click HDD6 in Slot 2.
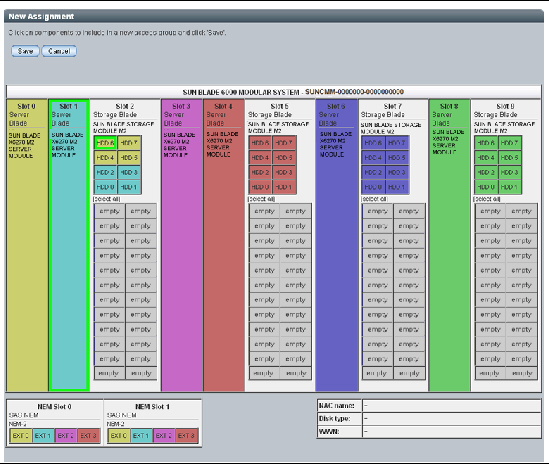
The following message appears.
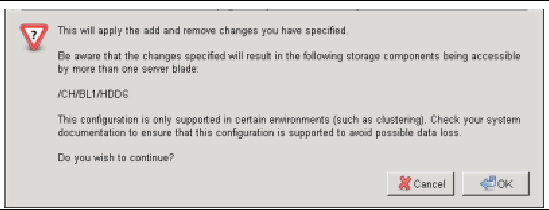
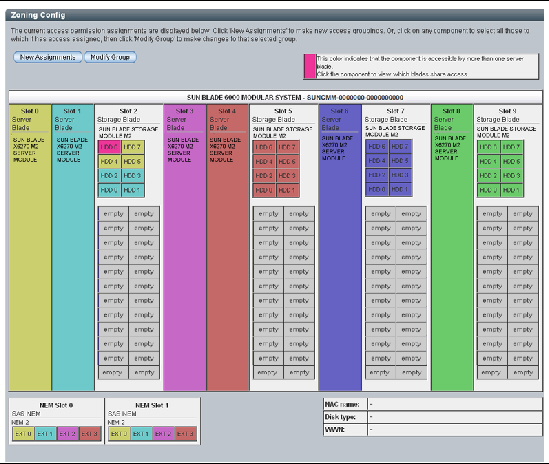
The following example shows the HDD6 in Slot 2 colored pink to indicate that it is shared by more than one server blade.
See Backing Up the Storage Access Configuration
|
1. Access the Sun Blade Zone Manager.
See Accessing the Sun Blade Zone Manager.
2. In the Sun Blade Zone Manager section, click the Detailed Setup button.
The following is an example storage access configuration.
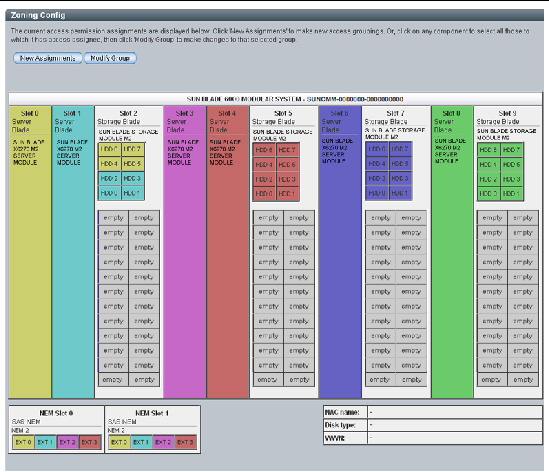
3. Select one of the server blade slots.
In this example, Slot 0 is selected.
4. Scroll down to the Current Assignments table.
All of the storage device assignments for the selected server blade are shown in table format.
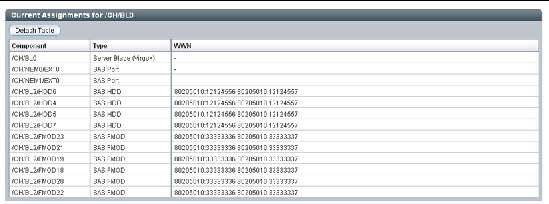
5. To detach the table from the rest of the screen, click Detach Table.
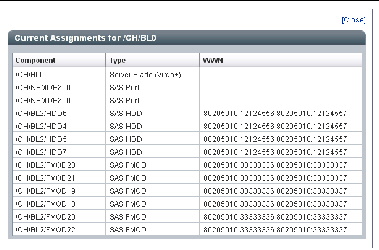
This section lists important considerations when saving a new or modified storage access zoning configuration and describes the actions that occur when a storage access zoning configuration is saved.
This section covers the following sections:
When you save a storage access configuration, keep the following in mind:
Refer to the storage blade or NEM documentation for further information on the effect of hot-plugging these components.
You can save a new or modified storage access configuration using either the ILOM web interface or the CLI.
While the new configuration is being saved, the following takes place:
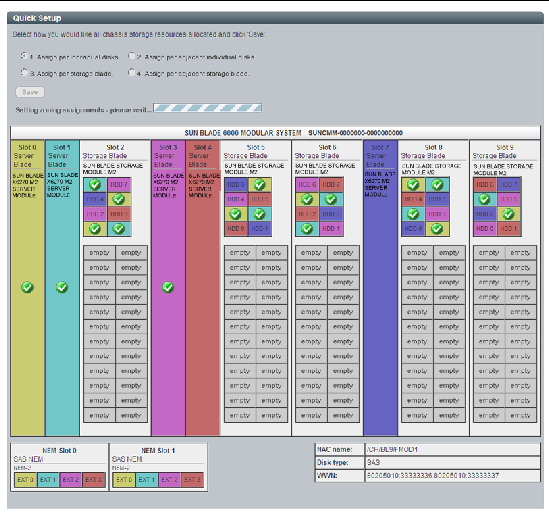

After saving the zoning configuration, you should back up the configuration in case you lose it and need to recover it.
This section covers the following procedures:
|
1. After saving a configuration in the Quick Setup or Detailed Setup screen, Click the Maintenance tab for the CMM.
The CMM maintenance sub-tabs are displayed.
2. Click the Backup/Restore tab.
The Configuration Backup/Restore page is displayed.
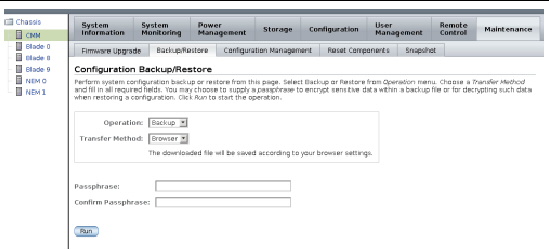
3. Select Backup from the Operation drop-down list.
4. Fill out the information on the page to create your backup file.
For complete instructions on using ILOM Backup/Restore, refer to the Oracle Integrated Lights Out Manager (ILOM) 3.0 Web Interface Procedures Guide.
|
1. After setting the storage access configuration, change to the /SP/config directory.
2. If you want sensitive data, such as user passwords, SSH keys, certificates, and so forth, to be backed up, you must provide a passphrase.
3. To initiate the Backup operation, enter the command:
transfer_method://username:password@ipaddress_or_hostname/directorypath/filename.config
For complete instructions on using ILOM Backup/Restore, refer to the Oracle Integrated Lights Out Manager (ILOM) 3.0 CLI Procedures Guide.
This section describes how to recover host-to-storage zoning configurations that might have been lost by accident or due to hardware replacement.
This section covers the following procedures:
|
You must have previously created a backup CMM ILOM configuration file that contains the zoning configurations you want to restore.
1. Open a web browser and log in to the CMM by entering the following URL:
Where chassis_sp_ipaddress is the IP address of your chassis service processor.
The CMM ILOM main page is displayed.
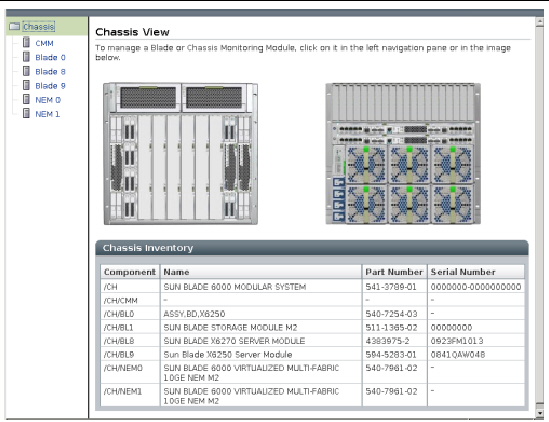
3. With CMM selected in the Chassis navigation pane, click the Maintenance tab for the CMM.
The CMM maintenance sub-tabs are displayed.
4. Click the Backup/Restore tab.
The Configuration Backup/Restore page is displayed.
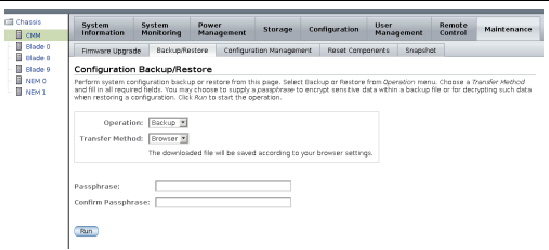
5. Select Restore from the Operation drop-down list.
Fill out the information on the page to restore your backup file.
For complete instructions on using ILOM Backup/Restore, refer to the Oracle Integrated Lights Out Manager (ILOM) 3.0 Web Interface Procedures Guide.
6. To initiate the Restore operation, click Run.
The Restore operation executes.
|
You must have previously created a backup CMM ILOM configuration file that contains the zoning configurations you want to restore.
1. Open a terminal window and establish an SSH connection to the CMM by entering the following command:
Where cmm_ipaddress is the IP address of the CMM.
The login prompt is displayed.
2. Log in as root and enter the root password:
After you have successfully logged in, the CLI prompt is displayed:
3. Change to the /SP/config directory:
4. To initiate the Restore operation, enter the command:
transfer_method://username:password@ipaddress_or_hostname/directorypath/filename.config
The Restore operation executes.
This section describes how to reset the current zoning configuration.
The following procedures are included in this configuration:
|
1. Access the Sun Blade Zone Manager.
See Accessing the Sun Blade Zone Manager.
2. Navigate to Storage --> Zoning.
If Zoning is enabled, a Reset All button is available on the Zone Manager Settings page.
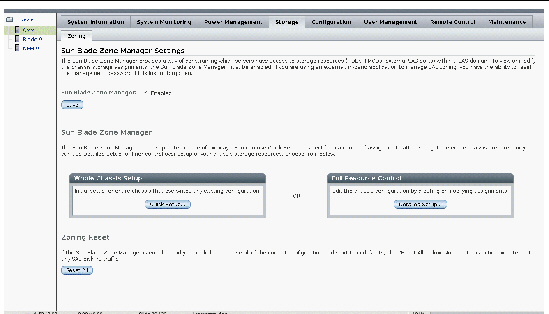
3. Click the Reset All button to reset the current zoning assignments.
|
1. Access the Sun Blade Zone Manager using the CMM CLI.
See Accessing the Sun Blade Zone Manager.
2. Navigate to /STORAGE/sas_zoning using the following command:
3. Reset the current zoning assignments using the following command:
-> set reset_access_action=true
If the Zone Manager is disabled, you will get the following warning:
set: The CMM is not the SAS Zone Manager
If you receive this message, enable Zone Manager and re-issue the reset command.
The zoning password is only required by in-band zoning management applications running on a Host OS.
If you use such applications and this password is lost or forgotten, restore the password to the default value (all-zeroes).
| Note - The Sun Blade Zone Manager must be disabled to reset this password. |
The following procedures are included in this configuration:
|
1. Access the Sun Blade Zone Manager.
See Accessing the Sun Blade Zone Manager.
2. Navigate to Storage --> Zoning.
If Zoning is disabled, a Reset Password button is available on the Zoning page.
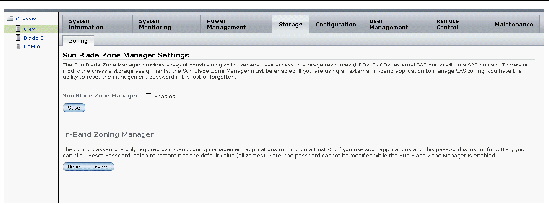
3. Click the Reset Password button to reset the password to the default (all zeros).
|
1. Access the Sun Blade Zone Manager using the CMM CLI.
See Accessing the Sun Blade Zone Manager.
2. Navigate to /STORAGE/sas_zoning using the following command:
3. Reset the current zoning assignments using the following command:
-> set reset_password_action=true
The password is set to the default (all zeros).
Copyright © 2010, Oracle and/or its affiliates. All rights reserved.