| C H A P T E R 4 |
|
Setting Up the Server |
This chapter describes how to connect cables and power on the server for the first time. It includes the following topics:
Connect the power and data cables to the server back panel.
FIGURE 4-1 shows and describes the locations of the Sun Fire X4170 Server back panel connectors.
FIGURE 4-1 Sun Fire X4170 Server Back Panel Connectors
|
Service processor (SP) network management (NET MGT) Ethernet port |
|||
FIGURE 4-2 shows and describes the locations of the Sun Fire X4270 and X4275 Servers back panel connectors.
FIGURE 4-2 Sun Fire X4270 and X4275 Server Back Panel
|
Service processor (SP) network management (NET MGT) Ethernet port |
|||
|
Connect the server power cables and external cables in the following order:
1. Connect two grounded server power cords to grounded electrical outlets.
| Note - Connect only one cable if your server does not have a redundant power supply. |
2. Connect the two server power cords to the AC power connectors on the back panel of the server [1, 2].
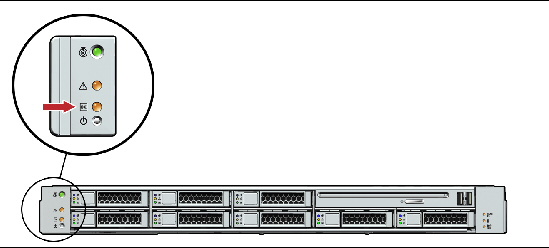
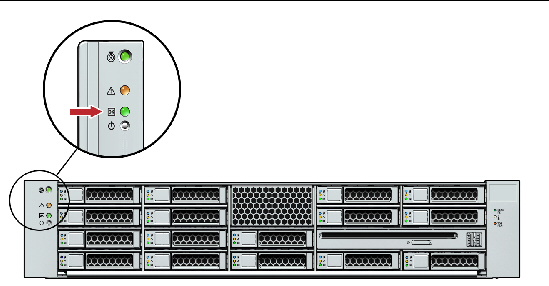
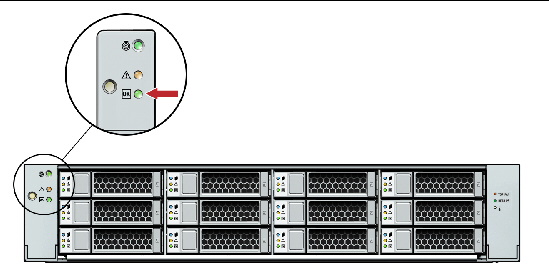
In standby power mode, the Power/OK LED on the front panel blinks, indicating that the service processor (SP) is working as shown in FIGURE 4-3, FIGURE 4-4, and FIGURE 4-5. At this point, before initial configuration, standby power is supplied only to the SP and power supply fans.
FIGURE 4-3 Sun Fire X4170 Server Front Panel Power/OK LED

FIGURE 4-4 Sun Fire X4270 Server Front Panel Power/OK LED

FIGURE 4-5 Sun Fire X4275 Server Front Panel Power/OK LED

| Note - Do not push the Power button at this time. Do not apply main power to the rest of the server until you are ready to install a platform operating system. |
3. Connect a serial null modem cable to the SER MGT/RJ-45 serial port [4].
See Connecting to the ILOM Service Processor for the First Time for more information about viewing system output from a serial console.
4. Connect Ethernet cables to the SP NET MGT Ethernet port [5].
5. Connect Ethernet cables to the Gigabit Ethernet (NET) connectors as needed for OS support [6].
6. (Optional) Connect any additional external devices, as required, to the server’s USB [7] and/or HD15 Video [8] connectors.
7. Connect to the Integrated Lights Out Manager (ILOM) SP. See the next section.
This section describes how to connect to the ILOM service processor (SP) for initial setup and configuration. It covers the following topics:
The ILOM SP is assigned a DHCP IP address by default. There are two requirements for DHCP IP address assignment to occur:
If a DHCP server cannot be reached after three DHCP requests, the ILOM SP is assigned a static IP address based on the network management port MAC address. This IP address is always in the format 192.168.xxx.xxx.
Choose from one of several ILOM SP interfaces to support system management on your server. You can access SP firmware applications through the following ILOM SP interfaces:
You can use either of the following methods to determine the IP address of the ILOM SP for remote network access:
|
|
To access the BIOS Setup utility and view the ILOM SP IP address, complete the following steps:
1. Power on the server (or restart the server if it is running).
2. When the Sun Microsystems splash screen or text prompt appears during the power-on self-test (POST) operation, press F2 to access the BIOS settings.
3. Using the left and right arrow keys on the keyboard, navigate to the Advanced tab.
4. Using the up and down arrow keys, select the IPMI Configuration option and press Enter to go to the subscreen.
The IPMI Configuration subscreen appears.
5. Using the up and down arrow keys, select the Set LAN Configuration option and press Enter.
The LAN Configuration subscreen appears and shows the current ILOM SP IP address.
6. Record the IP address as you will need it to log in to ILOM using SSH or a web browser.
| Note - If the IP address is in the form of 192.168.xxx.xxx, the DHCP server might not have assigned an address and the SP might use a static address. |
|
|
To establish a connection to the SP using a serial connection (SER MGT port), complete the following steps:
1. Ensure that the server hardware is installed and cables are connected.
Ensure that the power is in standby mode and the green Power/OK LED blinks. See Connecting the Cables.
2. Verify that your terminal, laptop, PC, or terminal server is operational.
3. Configure the terminal device or the terminal emulation software running on a laptop or PC to the following settings:
4. Connect a null serial modem cable from the SER MGT/RJ-45 serial port on the server back panel to the terminal device (if not connected already).
See FIGURE 4-1 and FIGURE 4-2 for the position of the serial port on the back panel.
5. Press Enter on the terminal device to establish a connection between the terminal device and the ILOM SP.
ILOM displays a login prompt, after a short wait.
| Note - If you connect to the serial port on the server before the ILOM SP has been powered on or during its power-on sequence, SP boot messages might be displayed prior to the login prompt. |
6. Type the default user name, and the default password to log in to the ILOM SP.
ILOM displays a default command prompt (
7. To display the current SP IP address, type:
The IP information appears, as shown in the following sample:
commitpending = (Cannot show property)
macaddress = 00:1E:68:0F:4A:84
outofbandmacaddress = 00:14:4F:E7:2E:48
pendingipaddress = 129.148.53.128
pendingipgateway = 129.148.53.248
pendingipnetmask = 255.255.255.0
pendingmanagementport = /SYS/SP/NET0
sidebandmacaddress = 00:14:4F:E7:2E:49
8. Record the IP address as you will need it to log in to ILOM using SSH or an internet browser.
You can use any of the following methods to change the current IP address of the ILOM SP:
To access the BIOS Setup utility and change the ILOM SP IP address, complete the following steps:
1. Follow Step 1 through Step 5 in the procedure Use the BIOS Setup Utility to View the Assigned ILOM SP IP Address.
The LAN Configuration subscreen appears and shows the current SP IP address.
2. In the LAN Configuration subscreen, using the up and down arrow keys, navigate to the IP Assignment field.
The current IP assignment mode is highlighted.
3. If necessary, change the IP Assignment field from DHCP to static.
4. Using the up and down arrow keys, navigate to the IP Address field.
The current IP address is highlighted.
| Note - If the IP address is in the form of 192.168.xxx.xxx, the DHCP server might not have assigned an address and the SP might use a static address. |
6. Press F10 to save the change and exit the BIOS Setup utility.
This section provides two examples of using the serial connection to change the ILOM SP IP address.
To change the SP DHCP IP address to a static IP address using the serial connection (SER MGT port), complete the following steps:
1. Follow Step 1 through Step 6 in the procedure Use a Serial Connection to View the Assigned ILOM SP IP Address.
2. At the ILOM command prompt, type the following command to determine the SP IP address:
3. To assign a static IP address, type the following commands in the exact order shown:
-> set /SP/network/ pendingipdiscovery=static
-> set /SP/network/ pendingipaddress=xxx.xxx.xxx.xxx
-> set /SP/network/ pendingipnetmask=xxx.xxx.xxx.xxx
-> set /SP/network/ pendingipgateway=xxx.xxx.xxx.xxx
-> set /SP/network/ commitpending=true
Where xxx are the IP address numbers.
4. Type show /SP/network to view and verify the newly assigned static IP address settings.
To change the SP static IP address to a DHCP IP address using the serial connection (SER MGT port), complete the following steps:
1. Follow Step 1 through Step 6 in the procedure Use a Serial Connection to View the Assigned ILOM SP IP Address.
2. At the ILOM command prompt, type the following command to change a static address to a DHCP address:
-> set /SP/network pendingipdiscovery=dhcp
-> set /SP/network commitpending=true
3. Type show /SP/network to view the newly assigned DHCP IP address.
DHCP enabled is shown as ipdiscovery=dhcp
| Note - The SP web browser interface can be accessed only if you know the SP IP address. See Determining the ILOM SP IP Address. |
To change a static IP address, using the SP ILOM web browser interface, complete the following steps:
1. Open a supported web browser, such as Internet Explorer, Mozilla, or Firefox.
2. Type the IP address of the ILOM SP in the browser address bar.
For example: http://xxx.xxx.xxx.xxx
Where xxx.xxx.xxx.xxx is the IP address of the ILOM SP.
3. Accept the certificate when prompted.
4. Enter your user name (root) and password (changeme).
5. Select the Configuration tab and then the Network tab.
6. Set configurations, such as IP configuration, as required.
b. If you manually change the IP address, you must manually change the subnet mask, because the subnet mask changes according to the IP address class.
9. If the IP address changes, you must reconnect to ILOM using the newly assigned IP address, because the current session will become unresponsive.
For detailed information on using ILOM, see the Sun Integrated Lights Out Manager 2.0 User’s Guide (820-1188).
When you are ready to install a supported operating system, you can apply main power to the server.
|
To turn on main power to the server for the first time, following these steps:
1. Verify that the power cord has been connected and that standby power is on.
In standby power mode, the Power/OK LED on the front panel blinks. See FIGURE 4-3, FIGURE 4-4, or FIGURE 4-5.
2. Verify that you are connected to the server through the serial management (SER MGT) port; perform the following sub-steps:
a. Ensure that the server hardware is installed and cables are inserted.
b. Verify that your terminal, laptop, PC, or terminal server is operational.
c. Configure the terminal device or the terminal emulation software running on a laptop or PC to the following settings:
d. Connect a null serial modem cable from the server’s back panel SER MGT/RJ-45 port to the terminal device (if not connected already).
See FIGURE 4-1 and FIGURE 4-2 for the SER MGT/RJ-45 port location.
e. Press Enter on the terminal device to establish a connection between the terminal device and the ILOM SP.
ILOM displays a login prompt, after a short wait.
f. Type the default user name, and the default password to log in to the ILOM SP.
ILOM displays a default command prompt (->
3. Use a nonconductive stylus such as a pencil, or other pointed object, to press and release the recessed Power button on the server front panel.
When main power is applied to the server, the green Power/OK LED next to the Power button lights and remains lit.
4. To display a screen for installing the preinstalled Solaris or OpenSolaris OS from the server SER MGT port, type:
5. To install and configure the preinstalled Solaris or OpenSolaris OS software, proceed to Configuring the Preinstalled Solaris 10 Operating System or Configuring the Preinstalled OpenSolaris Operating System.
| Note - To return to the ILOM command-line interface from the serial console, press ESC ( , depending on your keyboard (U.S.A. or international). |
Copyright © 2009 Sun Microsystems, Inc. All rights reserved.