| Sun StorEdge 3000 Family RAID Firmware 4.2x User's Guide |
| Sun StorEdge 3000 Family RAID Firmware 4.2x User's Guide |
| A P P E N D I X F |
|
SNMP Management Using HP OpenView |
HP OpenView is a complete enterprise network management, maintenance, and monitoring solution. Included with the HP OpenView software are tools for sending SNMP GET and SET messages and tools for listening for SNMP traps.
This appendix discusses using HP OpenView for SNMP management with Sun StorEdge 3000 family arrays. Topics covered include:
By itself, OpenView can listen for and dispatch SNMP traps. However, MIBs are supplied to make the best use of the management feature.
|
Note - The agent.ini file must be configured with trap destinations in order to receive traps. See To Create and Save the NPC Configuration File (agent.ini). |
It is assumed that HP OpenView has discovered the Sun StorEdge 3000 family nodes. Refer to your HP OpenView documentation for details on node discovery.
On Solaris, type the following command to launch OpenView.
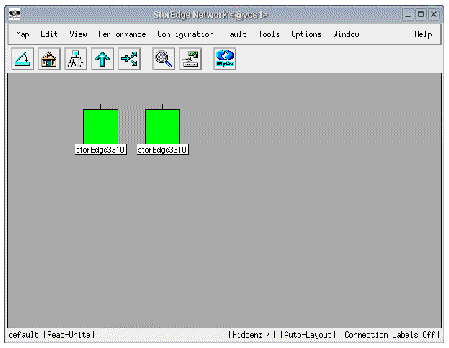
From the Root dialog, navigate to the network segment on which the Sun StorEdge nodes reside. The following screen shows a typical network segment displayed by OpenView with two Sun StorEdge nodes.
To load MIBs, perform the following steps.
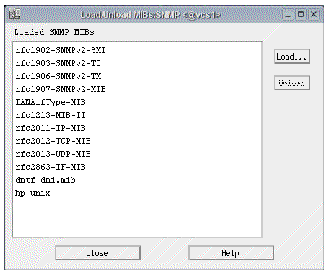
1. Choose Options  Load/Unload MIBs: SNMP.
The following dialog is displayed.
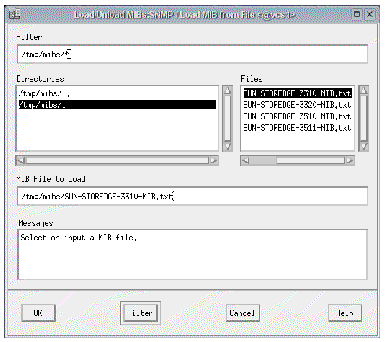
The following dialog is displayed.
3. Select the MIBs to be loaded and click OK.
Since the MIB contains TRAP/NOTIFICATION information, OpenView will detect this. A dialog is displayed requesting confirmation to load the definitions into the OpenView event system.
If the definitions load successfully, an information dialog is displayed.
If more than one array product type is being monitored (for example, a Sun StorEdge 3320 SCSI array and a Sun StorEdge 3510 FC array), you can load multiple MIBs.
6. Repeat the preceding steps for each MIB to be loaded.
|
Note - You can also unload MIBs by selecting them from the list and clicking "Unload". |
|
Note - MIBs are distributed with firmware patches. You might have to reload MIBs if firmware changes impact the SNMP agent on the array controller. |
Since the MIBs contain information on traps, it is possible to configure these events. Events can be displayed in the Alarm browser, in a pop-up window, forwarded to other hosts, and logged to files. Refer to your HP OpenView documentation for details.
If the MIBs have been loaded successfully, the Enterprise Name and Enterprise ID will be displayed in the Event Configuration dialog.
To view and modify events, perform the following steps.
1. Choose Options Event Configuration.
The Event Configuration dialog is displayed.
2. To modify an event, select the Enterprise Name in the upper pane and double-click on the Event Name in the lower pane.
The Modify Event dialog is displayed.
3. To display the event in the Alarm browser, select an appropriate category.
Since only one trap type is supported, all events will go into this category. In this example, a category of "Status Alarms" is used.
4. Enter a message for the event in the Event Log Message text box.
In this example, "$1" represents the variable string of the SNMP trap. See the HP OpenView documentation for details on other "$" variables available as part of the event message.
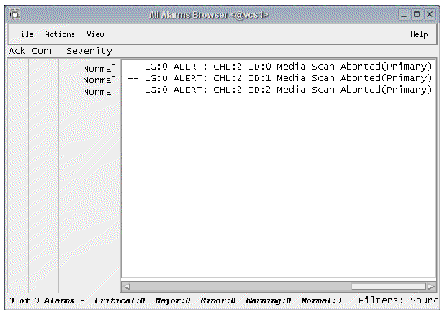
5. To view alarms, from the main menu bar, choose Fault Alarms.
The following dialog is displayed.
SNMP must be enabled on the array to view and set system group objects. From the RAID firmware Main Menu, choose "view and edit Configuration parameters Communication Parameters Network Protocol Support SNMP" and verify that SNMP is enabled.
1. From HP OpenView, browse the system group objects for a node by selecting the node on the segment map.
2. Choose Tools SNMP MIB Browser.
Confirm that the correct Name or IP Address is displayed.
3. Navigate to the following MIB Object ID:
iso.org.dod.internet.mgmt.mib-2
4. Select system from the list and click Start Query.
Read/Write values can be set from this dialog.
5. To set the system name, select sysName.0 from the list and enter a new value in "SNMP Set Value".
A new query on the system group shows the new value.
SNMP must be enabled on the array to view enterprise objects. From the RAID firmware Main Menu, choose "view and edit Configuration parameters Communication Parameters Network Protocol Support SNMP" and verify that SNMP is enabled.
Certain array information can be obtained by browsing the MIB. These objects are located under the following subtree:
.iso.org.dod.internet.private.enterprises.sun.product.storEdgeEL
1. Navigate to this object ID with the MIB browser and select the appropriate branch for the product.
2. Continue to browse to the extInterface node and select the desired item from the list.
For details on OIDs and descriptions available for enterprise objects, see the MIB for your array.
| Sun StorEdge 3000 Family RAID Firmware 4.2x User's Guide | 817-3711-18 |
Copyright © 2009, Dot Hill Systems Corporation. All rights reserved.