Working with Assumed Matches on the EDM
The Matching Review function of the EDM allows you to view any object profiles that were automatically updated by the master index application as a result of an assumed match. You can reverse the assumed match if necessary. This section provides instructions for finding profiles updated by an assumed match and then reversing the update if necessary. Perform the following tasks to work with profiles that were automatically matched.
Finding Assumed Matches on the EDM
You can find object profiles that were updated by an assumed match using the Matching Review function of the EDM. When you search for assumed matches, you can select an object profile to view from a results list.
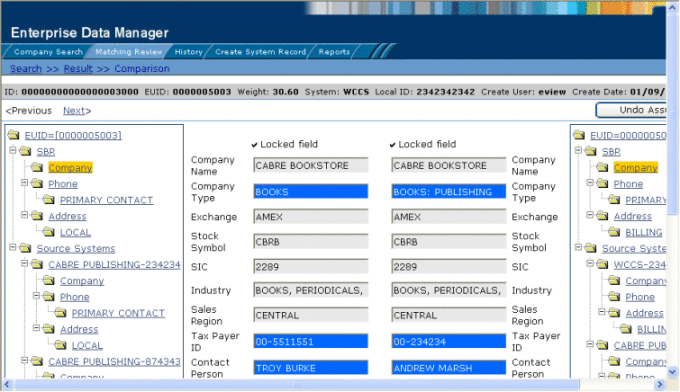
Figure 46 Assumed Match Page

 To Find Assumed Matches
-
Obtain information about the object profile you want to view, such as their EUID, a system in which they are registered, or the login ID of the user who added the record that caused the update.
-
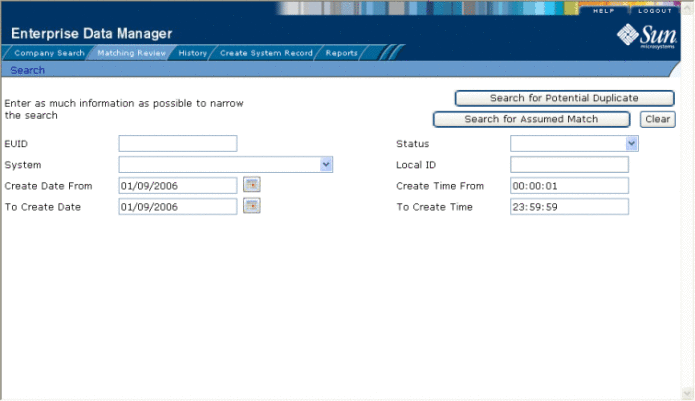
On the EDM, select Matching Review. The Matching Review Search page appears.
Figure 47 Matching Review Search Page

-
On the Matching Review Search page, enter the search criteria (for more information, see About Matching Review Search Fields on the EDM).
-
In the upper portion of the page, click Search for Assumed Match.
One of the following occurs:
-
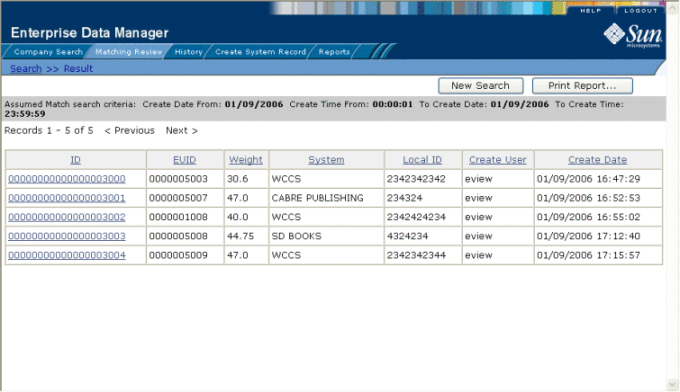
If more than one profile matches the search criteria, the Assumed Match Result page appears (for more information, see About Assumed Match Results Fields on the EDM). Continue to step 5.
-
If only one profile matches the search criteria, the Assumed Match page appears with a comparison of the two profiles that were combined with the differences between the two profiles highlighted in blue. Skip to step 6.
Figure 48 Assumed Match Results List

-
-
In the Results list, click the ID of the assumed match profile you want to view.
The Assumed Match page appears with the parent object of the SBR displayed.
-
To view additional information about the object, review the instructions provided under Viewing Object Profiles on the EDM.
-
To view the next entry in the assumed match results list, click Next>.
-
To view the previous entry in the assumed match results list, click <Previous.
-
To return to the assumed match results list, click Result.
About Assumed Match Results Fields on the EDM
The fields located in the assumed match results list help you to identify an assumed match transaction to display on the Comparison page.
Table 11 Assumed Match Results Fields|
This field … |
displays this information … |
|---|---|
|
The assumed match ID of the transaction that caused the assumed match. |
|
|
The enterprise-wide unique identification number of the object profile that was updated by the assumed match. |
|
|
The matching probability weight between the updated profile and the record that caused the assumed match. |
|
|
The system with which the record that caused the assumed match is associated. |
|
|
The local ID in the above system for the record that caused the assumed match. The name of this field might be different for your implementation. |
|
|
The login ID of the user who added the profile that created the assumed match. |
|
|
The date and time the transaction that caused the assumed match occurred. |
Reversing an Assumed Match on the EDM
If you find that an assumed match was made in error, you can reverse the assumed match. This process returns the updated object profile to its status just prior to the assumed match update, creates a new object profile for the record that caused the assumed match, and recalculates the SBR for the existing profile.
 To Reverse an Assumed Match
-
View the assumed match profile, as described in Finding Assumed Matches on the EDM.
-
In the upper portion of the page, click Undo Assumed Match.
A confirmation dialog box appears, providing the EUID number of the new profile that will be created as a result of reversing the match.
-
On the confirmation dialog box, click OK.
The assumed match is reversed, the updated profile is returned to its state prior to the assumed match, and a new object profile is created for the system record that caused the assumed match. Any changes that were made after the assumed match but before reversing the assumed match are retained.
- © 2010, Oracle Corporation and/or its affiliates
