Quick Start Guide to the CASA Editor
This tutorial provides an introduction to the CASA Editor provided with NetBeans 6.1.
For more information about working with NetBeans IDE, see the Support and Docs page on the NetBeans web site.
Tutorial Requirements
Before you proceed, make sure you review the requirements in this section.
Prerequisites to Creating the Project
This tutorial assumes that you have basic knowledge of the following technologies:
Composite Applications and Service-oriented Architecture (SOA)
Web Services
Software Needed for This Tutorial
To follow this tutorial, you need the following software and resources.
Software or Resources |
Version Required |
|---|---|
NetBeans IDE |
|
Java Developer Kit (JDK) |
|
Java EE-compliant web or application server |
GlassFish V2 UR2 for NetBeans 6.1 GlassFish V2 UR1 for NetBeans 6.0 |
Note - The Download “All” option includes SOA Pack and the GlassFish V2 Application Server, which are required for this tutorial.
Window Layout of the NetBeans IDE
This tutorial assumes you have a standard window layout of the NetBeans IDE which includes the following visible windows:
Projects
Files
Services
Properties
Palette (for editors using the Palette window)
Output
Use the Window menu of the NetBeans IDE to change the layout if necessary.
Overview
This tutorial shows how to use the CASA Editor to edit the configuration and build a composite application.
The composite application you configure and build is the Synchronous Sample composite application provided with the NetBeans 6.1 distribution.
The tutorial illustrates the following:
Building a composite application from within the CASA Editor
Deleting a connection to an existing WSDL endpoint in the existing composite application
Adding a connection to a new WSDL endpoint to the composite application
Modifying the properties of the new WSDL endpoint
Deploying the composite application
Running a test case for the composite application
Create the Sample Application Project
In this section you create a project for the sample Synchronous Composite Application, which is provided with NetBeans 6.1.
To create the Synchronous Sample Application project
- In the NetBeans IDE, select the Projects tab to display the Projects window.
- From the File menu, select New Project.
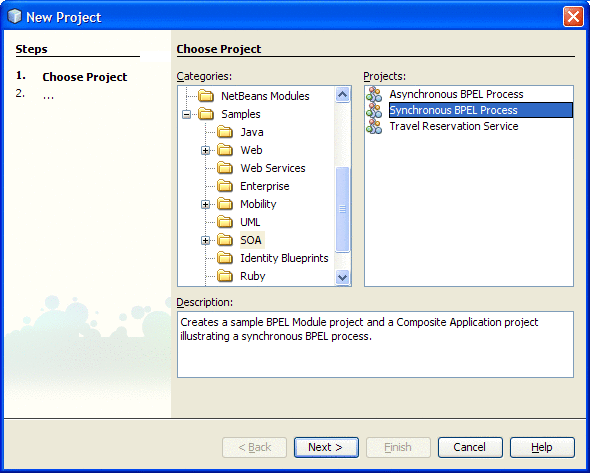
- In the Categories list of the New Project window, select Samples > SOA > Synchronous BPEL Process and click
Next.
- Accept the default project name and location (or specify an alternate location using the Browse button).
- Click Finish to create the project.
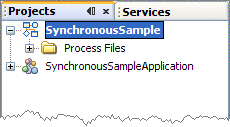
The following projects appear in the Projects window:
SynchronousSample, the BPEL project
SynchronousSampleApplication, the composite application project
Open the CASA Editor and Build the Application
This section shows how you can use the CASA Editor to build a composite application.
To open the CASA Editor and build the composite application
- In the NetBeans IDE, expand the SynchronousSampleApplication node in the Projects window, right-click
Service Assembly and select Edit.

Note - To invoke the CASA Editor in NetBeans 6.0, right-click the composite application in the Projects window and select Edit Application Configuration.
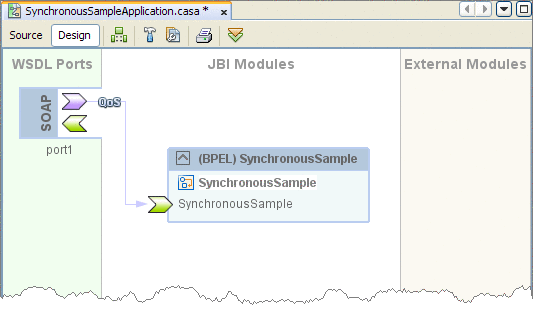
The CASA Editor opens in the NetBeans IDE, as shown in the next step, displaying the Design View of the Synchronous Sample application.
The CASA editor creates and modifies a .casa file, which contains the configuration information for the composite application. For this sample, the CASA Editor created the SynchronousSampleApplication.casa file.
- In the CASA Editor, select the Build Project icon to build the composite
application.
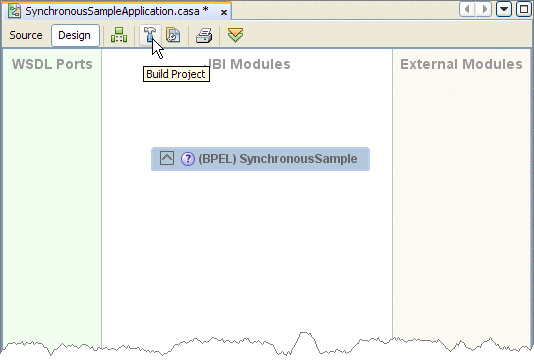
The Output window displays messages about the build.
When the build successfully completes, the Design View displays a WSDL port endpoint, a JBI module, and the connection between the endpoint and the JBI module.
Modify the WSDL Bindings of the Composite Application
This section shows how to modify connections between a WSDL port and a JBI module, and also how to add and configure new WSDL ports.
To modify the endpoints of the composite application
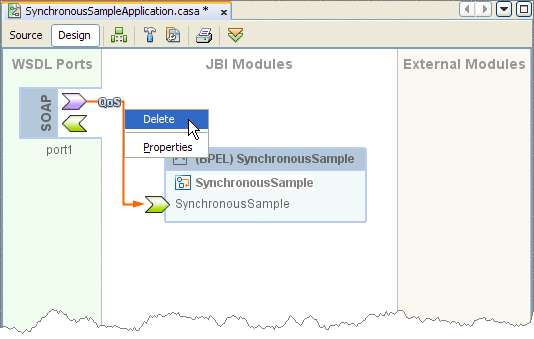
- In the Design View of the CASA Editor, select the connection between the WSDL port and the JBI module.
- Delete the selected connection using the Delete key from your keyboard.
You can also right-click the connection and select Delete to delete the connection.
- In the Palette Window of the NetBeans IDE, select the Soap WSDL Binding
and drag it to the WSDL Ports area of the CASA Editor.
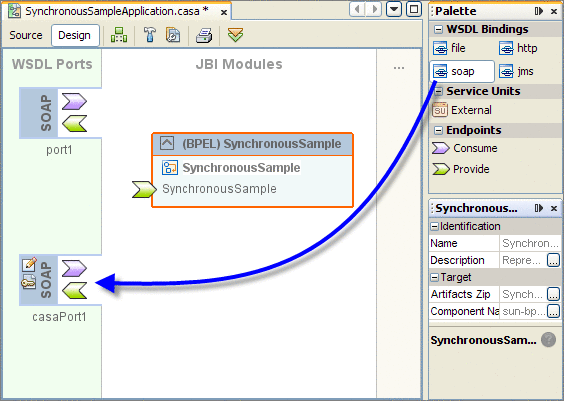
- Select the Consume endpoint (outbound endpoint) of the newly added SOAP Binding, and
drag it to the Provide endpoint (inbound endpoint) of the JBI module.
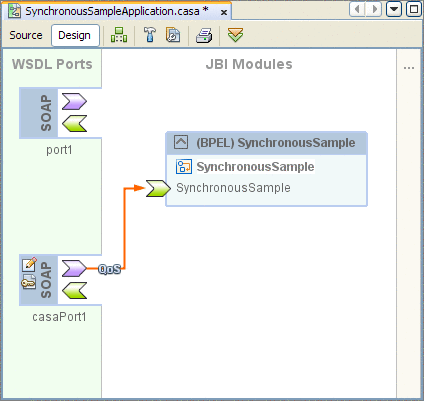
This creates a connection between the SOAP Binding and BPEL JBI module.
- Click the Edit icon for the newly added SOAP Binding to view
its properties.
This feature allows you to view details of the underlying WSDL without having to navigate through the WSDL file using the WSDL editor interface.
- In the Properties window, click the Edit button for the Location property and
enter the property value: http://localhost:18181/Service.
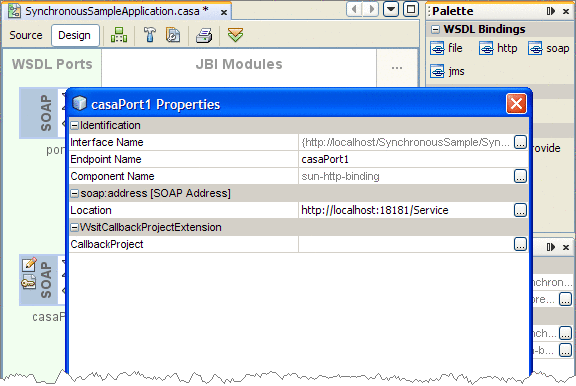
For the next procedure, you will specify this same location, http://localhost:18181/Service, in a test case for the composite application.
Run a Test Case for the Composite Application
This section shows how to test the newly configured composite application.
To run a test case for the composite application
- In the Projects Window of the NetBeans IDE, expand the SynchronousSampleApplication > Test node,
right-click the default test case, TestCase0, and select Properties.
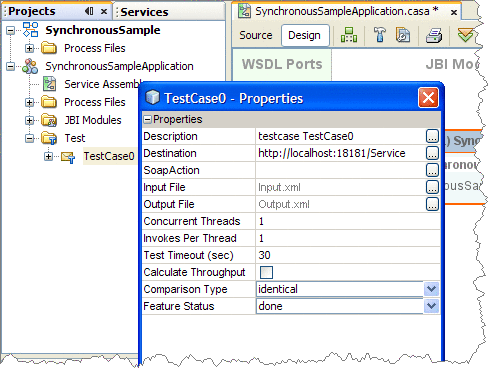
- In the Properties window for TestCase0, select the Edit button for the Destination property.
- Replace the default Destination property with the destination from the previous procedure: http://localhost:18181/service.
- Click OK, and then close the Properties window.
- Right-click the SynchronousSampleApplication node, and select Deploy. In the Select Server
window, specify the GlassFish Application Server.
The Output window informs you when the composite application has been successfully deployed.
Notice that the SynchronousSampleApplication Service Assembly has been deployed. You can also view the properties of the Service Units within the Service Assembly to see details of the composite application.
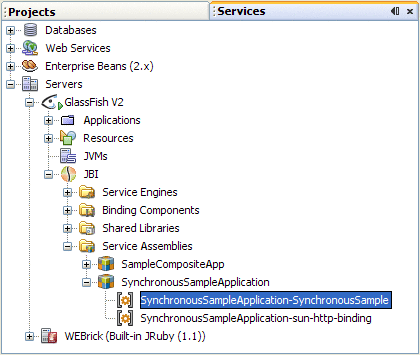
- In the Services window of the NetBeans IDE, expand the servers > GlassFish V2 > JBI > Service Assemblies
node.
The Output window informs you when the composite application has been successfully deployed.
Notice that the SynchronousSampleApplication Service Assembly has been deployed. You can also view the properties of the Service Units within the Service Assembly to see details of the composite application.
- In the Projects window, right-click the TestCase0 and select Run.
Because this is the first time the test case is run, the output is an empty test case, and the Overwrite Empty Output dialog box appears. Select yes to save your most recent output as the test case's expected output.
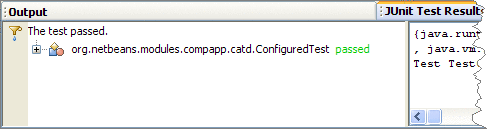
- Run the test for TestCase0 again.
The Output window indicates that the test case was successful.