Post-Installation of Agent for SAP Enterprise Portal 7.0/Web Application Server 7.0: Both Deployment Containers
The tasks in this section apply to both of the deployment containers supported by Agent for SAP Enterprise Portal 7.0/Web Application Server 7.0: SAP Enterprise Portal 7.0 and SAP Web Application Server 7.0.
 To Deploy the Agent Software Delivery Archive for SAP Enterprise Portal 7.0/Web Application Server 7.0
This post-installation task is required with Agent for SAP Enterprise Portal 7.0/Web Application Server 7.0, regardless of which deployment container the agent is deployed on: SAP Enterprise Portal 7.0 or SAP Web Application Server 7.0.
Before You Begin
The following file is the Software Delivery Archive for this agent: AMSAPAgent2.2.sda.
For this task, you must provide the full path name to this Software Delivery Archive, as such:
PolicyAgent-base/etc/AmSAPAgent2.2.sda
Therefore, locate this file and record the full path name for use as part of the task.
-
(Conditional) If the SAP Enterprise Portal 7.0/Web Application Server 7.0 is not running, start it now.
-
Start the Software DeploymentManager (SDM) Remote GUI.
The following example provides the path to the SDMRemote GUI on UNIX based systems:
/usr/sap/SID/instanceName/SDM/program/RemoteGui.sh
- SID
-
represents the SAP system ID.
- instanceName
-
represents the SAP Enterprise Portal 7.0 instance.
-
Navigate to the login screen by selecting these options: Menu SDMGui > Login.
-
Log in as the appropriate user as follows:
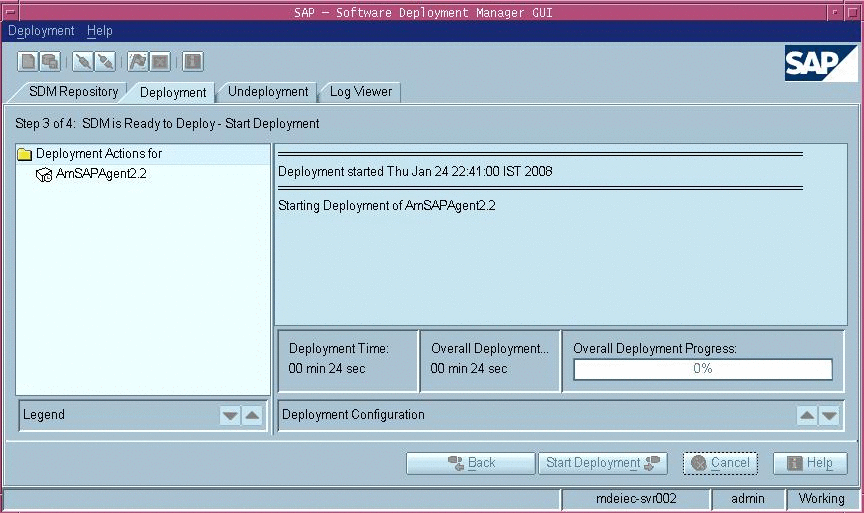
The SAP Software Deployment Manager (SDM) Graphical User Interface (GUI) appears. For a graphical representation of the SDM as it pertains to this task, see Figure 4–1.
-
Select the Deployment tab.
-
Click the plus sign button.
-
Browse to the following file:
PolicyAgent-base/etc/AmSAPAgent2.2.sda
-
Click Next until you reach the Start Deployment button.
On successful deployment, “Overall Deployment progress” is shown as 100%.
-
Click Confirm.
-
Close the SAP Deployment Manager (SDM) application.
You can close this application by selecting the following options: Menu Deployment > Exit.
Figure 4–1 SAP Software Deployment Manager (SDM) GUI: Deploying the Agent Software Delivery Archive
 To Make a Class Loader Reference to the Login Module
for SAP Enterprise Portal 7.0/Web Application Server 7.0
This post-installation task is required with Agent for SAP Enterprise Portal 7.0/Web Application Server 7.0, regardless of which deployment container the agent is deployed on: SAP Enterprise Portal 7.0 or SAP Web Application Server 7.0.
-
(Conditional) If SAP Enterprise Portal 7.0/Web Application Server 7.0 is not running, start it now.
-
Start the Visual Administration tool.
The following example provides the path to the Visual Administration tool on UNIX systems:
/usr/sap/SID/instanceName/j2ee/admin/go
- SID
-
represents the SAP system ID.
- instanceName
-
represents the SAP Enterprise Portal 7.0 instance.
-
Log in to the Visual Administration tool.
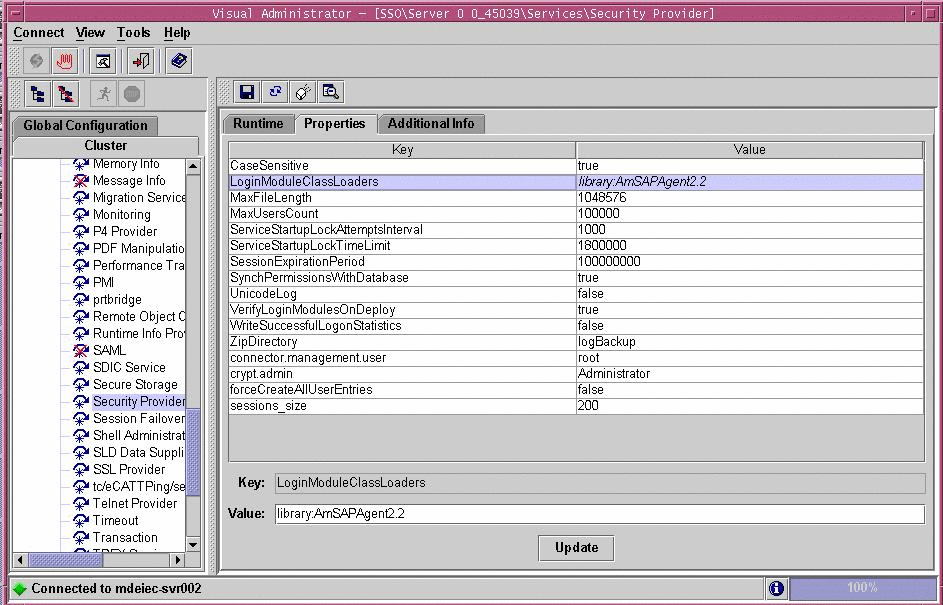
For a graphical representation of the Visual Administration tool as described in the steps that follow in this task, see Figure 4–2.
-
Select the Security Provider service.
-
Switch to the edit mode by clicking the pencil icon in the far left corner of the right panel.
-
Select the Properties tab.
-
For the value of the LoginModuleClassLoaders property, enter the following:
library:AmSAPAgent2.2
If multiple entries are required in this field, separate the entries by commas.
Figure 4–2 SAP Visual Administrator: Making a Class Loader Reference
 To Modify the SAP Enterprise Portal 7.0/Web Application Server 7.0 Class Path
This post-installation task is required with Agent for SAP Enterprise Portal 7.0/Web Application Server 7.0, regardless of which deployment container the agent is deployed on: SAP Enterprise Portal 7.0 or SAP Web Application Server 7.0.
This task description explains how to modify the SAP Enterprise Portal 7.0/Web Application Server 7.0 class path by adding a locale directory and a config directory.
-
Start the J2EE Engine configuration tool.
The following example provides the path to the configuration tool on UNIX systems:
/usr/sap/SID/instanceName/j2ee/configtool/configtool.sh
- SID
-
represents the SAP system ID.
- instanceName
-
represents the SAP Enterprise Portal 7.0/Web Application Server 7.0 instance.
-
Log in to the configuration tool.
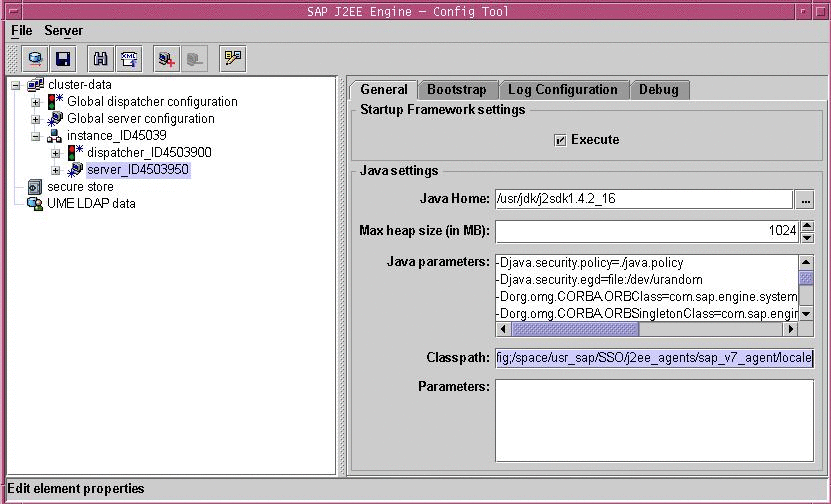
For a graphical representation of the configuration tool as described in the steps that follow in this task, see Figure 4–2.
-
Highlight the SAP Enterprise Portal 7.0/Web Application Server 7.0 instance server (SID).
-
In the right panel, in the Classpath text field, add the locale directory and the config directory to the end of the class path as follows:
;PolicyAgent-base/locale;PolicyAgent-base/AgentInstance-Dir/config
To simplify this step, you might want to access the agentclasspath.txt file within the config directory of the current agent instance. This file contains the exact class path that you must append to the class path of the SAP Enterprise Portal 7.0/Web Application Server 7.0 instance.
Figure 4–3 SAP Config Tool: Modifying the SAP Enterprise Portal 7.0/Web Application Server 7.0 Class Path
 To Modify the SAP Enterprise Portal 7.0/Web Application Server 7.0 JVM Options (AIX Systems
Only)
This task is specific to AIX systems and is necessary because AIX systems come with an IBM JDK which does not come with the Sun Microsystems JCE provider.
-
Start the J2EE Engine configuration tool.
The following example provides the path to the configuration tool on UNIX systems:
/usr/sap/SID/instanceName/j2ee/configtool/configtool.sh
- SID
-
represents the SAP system ID.
- instanceName
-
represents the SAP Enterprise Portal 7.0/Web Application Server 7.0 instance.
-
Log in to the configuration tool.
-
Highlight the SAP Enterprise Portal 7.0/Web Application Server 7.0 instance server (SID).
-
In the right panel, in the Java Parameters field, add the following lines:
-DamKeyGenDescriptor.provider=IBMJCE
-DamCryptoDescriptor.provider=IBMJCE
 To Deploy the agentapp.war file
for SAP Enterprise Portal 7.0/Web Application Server 7.0
This post-installation task is required with Agent for SAP Enterprise Portal 7.0/Web Application Server 7.0, regardless of which deployment container the agent is deployed on: SAP Enterprise Portal 7.0 or SAP Web Application Server 7.0.
-
Start the J2EE engine deploy tool by issuing the following command:
/usr/sap/SID/instanceName/j2ee.deploying/DeployTool
- SID
-
represents the SAP system ID.
- instanceName
-
represents the SAP Enterprise Portal 7.0/Web Application Server 7.0 instance.
 Caution –
 Create a subdirectory for the agent application in DeployContainer-base. In this scenario, DeployContainer-base represents the directory within which the SAP Enterprise Portal 7.0/Web Application Server 7.0 instance was installed. Creating a subdirectory ensures that no other directories are affected by the agent application. If you undeploy the agentapp.war file without creating this subdirectory, DeployTool removes other critical content in the DeployContainer-base directory.
-
Create a new project.
You can create a new project by selecting the following options: Menu > Project > New Project.
A dialog box appears.
-
Browse to an empty directory owned by SAP Instance user (j2eadm).
-
Enter agentapp for the address field.
-
Click OK.
-
Select the Assembler tab.
-
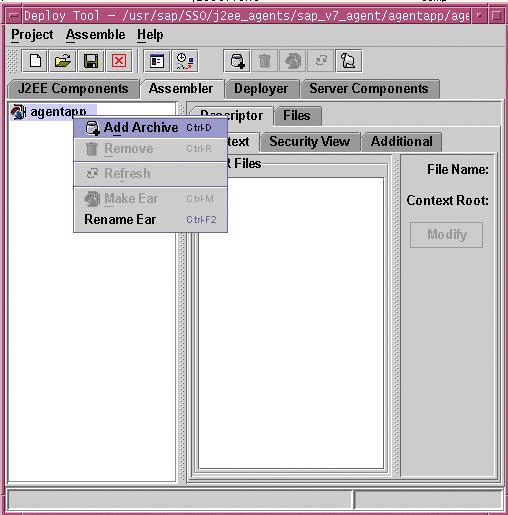
Right click the agentapp node to select Add Archive from the context menu.
See the following figure for a visual reference.
Figure 4–4 SAP J2EE Engine Deploy Tool: agentapp Deployment, Add Archive
-
Browse to the PolicyAgent-base/etc directory to select agentapp.war.
-
Save the Project.
You can save the project by selecting the following options: Menu > Project > Save.
-
Browse to the directory specified previously in this task as owned by SAP Instance user (j2eadm).
-
Enter agentapp for the address field.
-
Click OK.
-
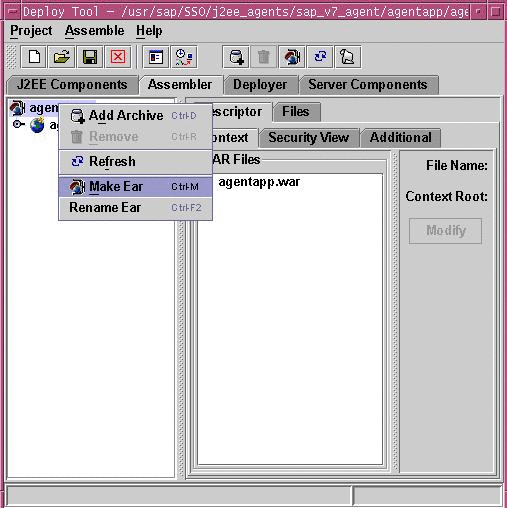
Right click the agentapp root node to select Make Ear from the context menu.
See the following figure for a visual reference.
Figure 4–5 SAP J2EE Engine Deploy Tool: agentapp Deployment, Make Ear
-
Select the Deployer tab.
-
Connect to SAP Enterprise Portal 7.0/Web Application Server 7.0
You can connect to SAP Enterprise Portal 7.0/Web Application Server 7.0 by selecting the following options: Menu >Deploy >Connect.
-
Log in as the appropriate user as follows:
-
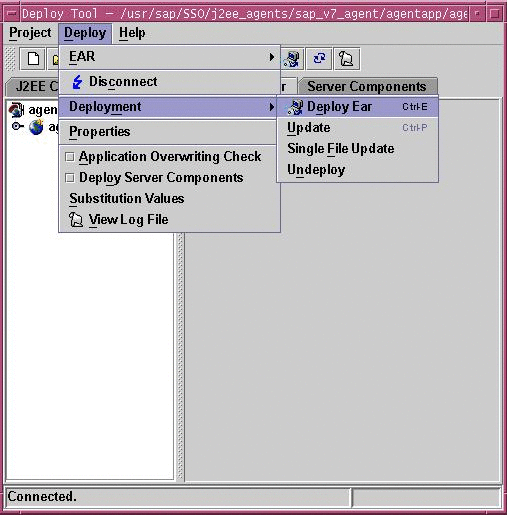
Deploy agentapp.
You can deploy the agentapp by selecting the following options: Menu > Deploy > Deployment >Deploy Ear.
See the following figure for a visual reference.
Figure 4–6 SAP J2EE Engine Deploy Tool: Deploying agentapp
A prompt appears to start the deployed application.
-
Select Yes.
 To Add a Reference From sap.com/agentapp to
the New AmSAPAgent2.2 Library for SAP Enterprise Portal 7.0/Web Application Server 7.0
This post-installation task is required with Agent for SAP Enterprise Portal 7.0/Web Application Server 7.0, regardless of which deployment container the agent is deployed on: SAP Enterprise Portal 7.0 or SAP Web Application Server 7.0.
This task description explains how to add a library reference from the sap.com/agentapp application to the newly deployed AmSAPAgent2.2 library.
Use the command line for this task.
-
Telnet to the J2EE telnet port by issuing a command such as the following:
$ telnet j2ee-engine-host instance-telnet-port
- j2ee-engine-host
-
represents the machine that hosts the SAP Enterprise Portal 7.0/Web Application Server 7.0 instance.
- instance-telnet-port
-
represents the port number of the telnet administration service of the SAP Enterprise Portal 7.0/Web Application Server 7.0 instance.
The following example demonstrates the format of the telnet command to issue:
telnet saphost.example.com 50008
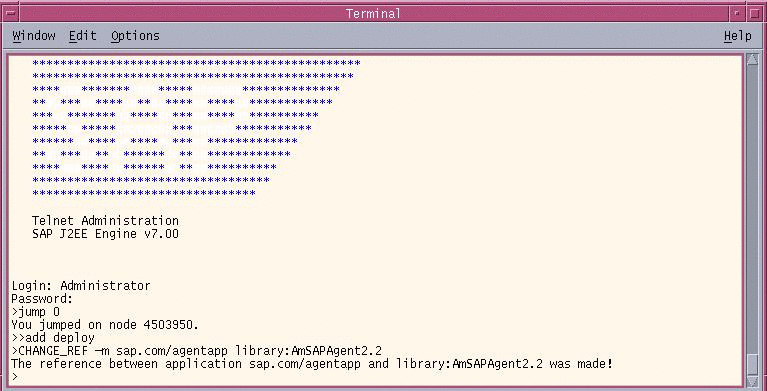
For a graphical representation of telnet administration as described in the steps that follow in this task, see the following figure.
Figure 4–7 SAP J2EE Telnet Administration: Adding the Agent Library Reference to agentapp
-
Log in using Administrator as the user and the corresponding Administrator password.
-
Issue the following command:
$ jump 0
A message such as the following appears:
You jumped on node 4503950.
-
Issue the following command:
$ add deploy
-
Issue the following command:
$ CHANGE_REF -m sap.com/agentapp library:AmSAPAgent2.2
The following message appears:
The reference between application sap.com/agentapp and
library:AmSAPAgent2.2 was made!
-
Stop and start the SAP Enterprise Portal 7.0/Web Application Server 7.0 instance.
- © 2010, Oracle Corporation and/or its affiliates
