Chapter 4 Post-Installation Tasks of Policy Agent 2.2 for SAP Enterprise Portal 7.0/Web Application Server 7.0
This chapter describes configuration and other post-installation considerations and tasks. The chapter is divided into three broad categories as follows:
-
Common Post-Installation Steps for All J2EE Agents in Policy Agent 2.2
-
Post-Installation Steps Specific to Agent for SAP Enterprise Portal 7.0/Web Application Server 7.0
-
Conditional Post-Installation Steps for J2EE Agents in Policy Agent 2.2
After completing the applicable tasks described in this chapter, perform the tasks to configure the agent to your site's specific requirements as explained in Chapter 5, Managing Policy Agent 2.2 for SAP Enterprise Portal 7.0/Web Application Server 7.0.
Common Post-Installation Steps for All J2EE Agents in Policy Agent 2.2
The task described in this section applies to all J2EE agent installations.
Updating the Agent Profile for J2EE Agents in Policy Agent 2.2
This procedure is not required. The agent profile is created and updated in Access Manager Console. The agent profile should originally be created prior to installing an agent. However, after you install a J2EE agent, you can update the agent profile at anytime. If you do update the agent profile in Access Manager Console, you must then configure the J2EE agent accordingly as described in this section.
 To Update the Agent Profile for J2EE Agents in Policy Agent 2.2
Before You Begin
Change the agent profile in Access Manager using Access Manager Console. For more information about the agent profile, see Creating a J2EE Agent Profile.
-
Change the password in the password file to match the new password you just created in Access Manager Console as a part of the agent profile.
The password file should originally have been created as a J2EE agent pre-installation task. For more information about pre-installation, see Preparing to Install Agent for SAP Enterprise Portal 7.0/Web Application Server 7.0.
-
In the command line, issue the agentadmin --encrypt command to encrypt the new password.
For more information on this command, see agentadmin --encrypt.
-
Access the J2EE agent AMAgent.properties configuration file at the following location:
PolicyAgent-base/AgentInstance-Dir/config
-
In this configuration file, edit the property for the agent ID to match the new ID in the agent profile as follows:
com.sun.identity.agents.app.username = agentID
where agentID represents the new agent ID that you created for the agent profile in Access Manager Console.
-
Edit the property for the agent password as follows:
com.iplanet.am.service.secret = encryptedPassword
where encryptedPassword represents the new encrypted password you created when you issued the agentadmin --encrypt command.
-
Restart the J2EE agent container.
The container needs to be restarted because neither property that you edited in this task is hot-swap enabled.
Post-Installation Steps Specific to Agent for SAP Enterprise Portal 7.0/Web Application Server 7.0
Once you have installed Policy Agent 2.2 for SAP Enterprise Portal 7.0/Web Application Server 7.0 and you have performed the post-installation steps that apply to all J2EE agents in the Policy Agent 2.2 release, complete the tasks in this section that apply to your site's deployment. This section contains the following subsections:
Perform the applicable tasks depending upon which deployment container you are configuring.
Post-Installation of Agent for SAP Enterprise Portal 7.0/Web Application Server 7.0: Both Deployment Containers
The tasks in this section apply to both of the deployment containers supported by Agent for SAP Enterprise Portal 7.0/Web Application Server 7.0: SAP Enterprise Portal 7.0 and SAP Web Application Server 7.0.
 To Deploy the Agent Software Delivery Archive for SAP Enterprise Portal 7.0/Web Application Server 7.0
This post-installation task is required with Agent for SAP Enterprise Portal 7.0/Web Application Server 7.0, regardless of which deployment container the agent is deployed on: SAP Enterprise Portal 7.0 or SAP Web Application Server 7.0.
Before You Begin
The following file is the Software Delivery Archive for this agent: AMSAPAgent2.2.sda.
For this task, you must provide the full path name to this Software Delivery Archive, as such:
PolicyAgent-base/etc/AmSAPAgent2.2.sda
Therefore, locate this file and record the full path name for use as part of the task.
-
(Conditional) If the SAP Enterprise Portal 7.0/Web Application Server 7.0 is not running, start it now.
-
Start the Software DeploymentManager (SDM) Remote GUI.
The following example provides the path to the SDMRemote GUI on UNIX based systems:
/usr/sap/SID/instanceName/SDM/program/RemoteGui.sh
- SID
-
represents the SAP system ID.
- instanceName
-
represents the SAP Enterprise Portal 7.0 instance.
-
Navigate to the login screen by selecting these options: Menu SDMGui > Login.
-
Log in as the appropriate user as follows:
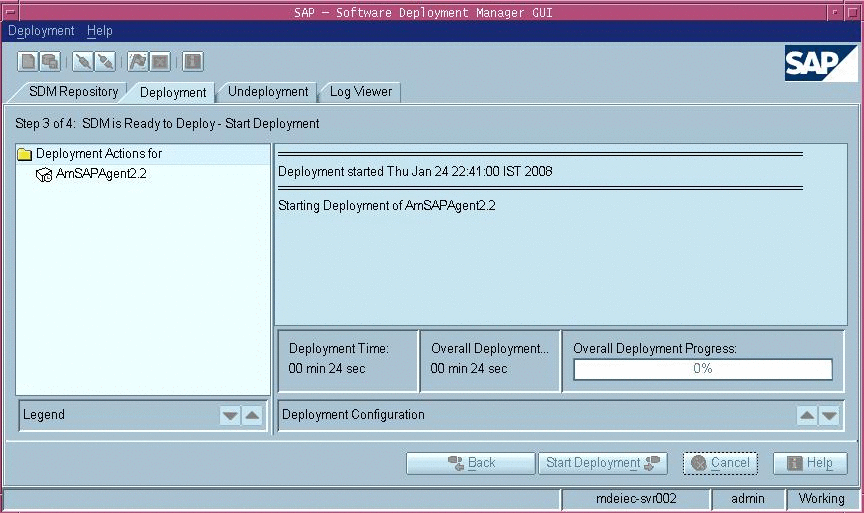
The SAP Software Deployment Manager (SDM) Graphical User Interface (GUI) appears. For a graphical representation of the SDM as it pertains to this task, see Figure 4–1.
-
Select the Deployment tab.
-
Click the plus sign button.
-
Browse to the following file:
PolicyAgent-base/etc/AmSAPAgent2.2.sda
-
Click Next until you reach the Start Deployment button.
On successful deployment, “Overall Deployment progress” is shown as 100%.
-
Click Confirm.
-
Close the SAP Deployment Manager (SDM) application.
You can close this application by selecting the following options: Menu Deployment > Exit.
Figure 4–1 SAP Software Deployment Manager (SDM) GUI: Deploying the Agent Software Delivery Archive
 To Make a Class Loader Reference to the Login Module
for SAP Enterprise Portal 7.0/Web Application Server 7.0
This post-installation task is required with Agent for SAP Enterprise Portal 7.0/Web Application Server 7.0, regardless of which deployment container the agent is deployed on: SAP Enterprise Portal 7.0 or SAP Web Application Server 7.0.
-
(Conditional) If SAP Enterprise Portal 7.0/Web Application Server 7.0 is not running, start it now.
-
Start the Visual Administration tool.
The following example provides the path to the Visual Administration tool on UNIX systems:
/usr/sap/SID/instanceName/j2ee/admin/go
- SID
-
represents the SAP system ID.
- instanceName
-
represents the SAP Enterprise Portal 7.0 instance.
-
Log in to the Visual Administration tool.
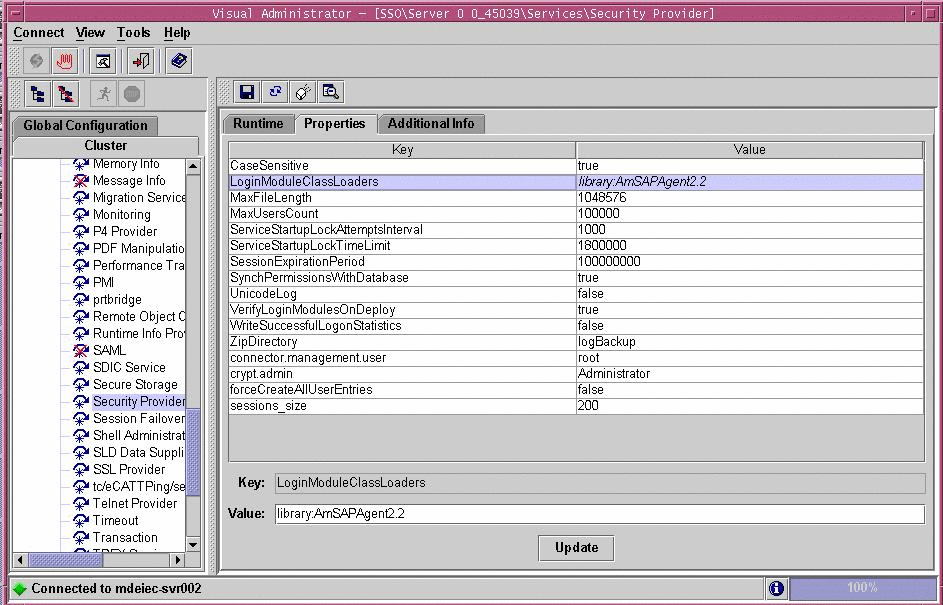
For a graphical representation of the Visual Administration tool as described in the steps that follow in this task, see Figure 4–2.
-
Select the Security Provider service.
-
Switch to the edit mode by clicking the pencil icon in the far left corner of the right panel.
-
Select the Properties tab.
-
For the value of the LoginModuleClassLoaders property, enter the following:
library:AmSAPAgent2.2
If multiple entries are required in this field, separate the entries by commas.
Figure 4–2 SAP Visual Administrator: Making a Class Loader Reference
 To Modify the SAP Enterprise Portal 7.0/Web Application Server 7.0 Class Path
This post-installation task is required with Agent for SAP Enterprise Portal 7.0/Web Application Server 7.0, regardless of which deployment container the agent is deployed on: SAP Enterprise Portal 7.0 or SAP Web Application Server 7.0.
This task description explains how to modify the SAP Enterprise Portal 7.0/Web Application Server 7.0 class path by adding a locale directory and a config directory.
-
Start the J2EE Engine configuration tool.
The following example provides the path to the configuration tool on UNIX systems:
/usr/sap/SID/instanceName/j2ee/configtool/configtool.sh
- SID
-
represents the SAP system ID.
- instanceName
-
represents the SAP Enterprise Portal 7.0/Web Application Server 7.0 instance.
-
Log in to the configuration tool.
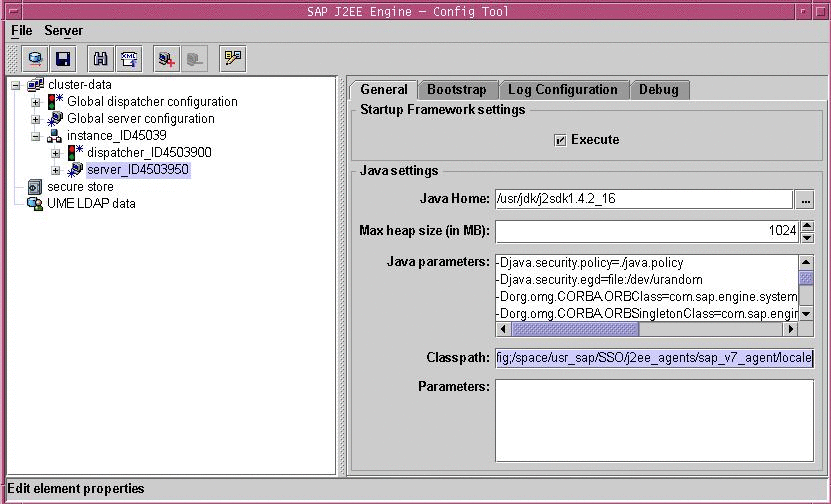
For a graphical representation of the configuration tool as described in the steps that follow in this task, see Figure 4–2.
-
Highlight the SAP Enterprise Portal 7.0/Web Application Server 7.0 instance server (SID).
-
In the right panel, in the Classpath text field, add the locale directory and the config directory to the end of the class path as follows:
;PolicyAgent-base/locale;PolicyAgent-base/AgentInstance-Dir/config
To simplify this step, you might want to access the agentclasspath.txt file within the config directory of the current agent instance. This file contains the exact class path that you must append to the class path of the SAP Enterprise Portal 7.0/Web Application Server 7.0 instance.
Figure 4–3 SAP Config Tool: Modifying the SAP Enterprise Portal 7.0/Web Application Server 7.0 Class Path
 To Modify the SAP Enterprise Portal 7.0/Web Application Server 7.0 JVM Options (AIX Systems
Only)
This task is specific to AIX systems and is necessary because AIX systems come with an IBM JDK which does not come with the Sun Microsystems JCE provider.
-
Start the J2EE Engine configuration tool.
The following example provides the path to the configuration tool on UNIX systems:
/usr/sap/SID/instanceName/j2ee/configtool/configtool.sh
- SID
-
represents the SAP system ID.
- instanceName
-
represents the SAP Enterprise Portal 7.0/Web Application Server 7.0 instance.
-
Log in to the configuration tool.
-
Highlight the SAP Enterprise Portal 7.0/Web Application Server 7.0 instance server (SID).
-
In the right panel, in the Java Parameters field, add the following lines:
-DamKeyGenDescriptor.provider=IBMJCE
-DamCryptoDescriptor.provider=IBMJCE
 To Deploy the agentapp.war file
for SAP Enterprise Portal 7.0/Web Application Server 7.0
This post-installation task is required with Agent for SAP Enterprise Portal 7.0/Web Application Server 7.0, regardless of which deployment container the agent is deployed on: SAP Enterprise Portal 7.0 or SAP Web Application Server 7.0.
-
Start the J2EE engine deploy tool by issuing the following command:
/usr/sap/SID/instanceName/j2ee.deploying/DeployTool
- SID
-
represents the SAP system ID.
- instanceName
-
represents the SAP Enterprise Portal 7.0/Web Application Server 7.0 instance.
 Caution –
 Create a subdirectory for the agent application in DeployContainer-base. In this scenario, DeployContainer-base represents the directory within which the SAP Enterprise Portal 7.0/Web Application Server 7.0 instance was installed. Creating a subdirectory ensures that no other directories are affected by the agent application. If you undeploy the agentapp.war file without creating this subdirectory, DeployTool removes other critical content in the DeployContainer-base directory.
-
Create a new project.
You can create a new project by selecting the following options: Menu > Project > New Project.
A dialog box appears.
-
Browse to an empty directory owned by SAP Instance user (j2eadm).
-
Enter agentapp for the address field.
-
Click OK.
-
Select the Assembler tab.
-
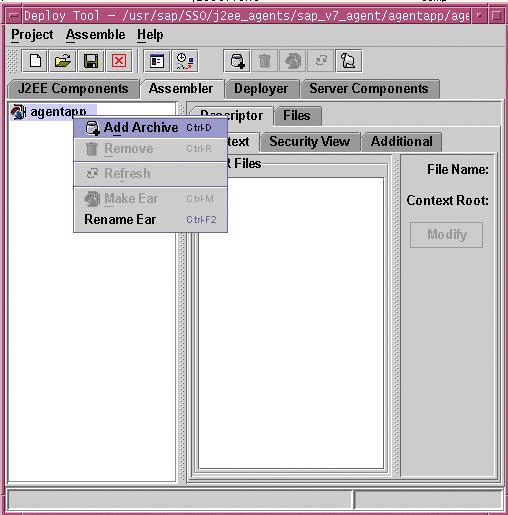
Right click the agentapp node to select Add Archive from the context menu.
See the following figure for a visual reference.
Figure 4–4 SAP J2EE Engine Deploy Tool: agentapp Deployment, Add Archive
-
Browse to the PolicyAgent-base/etc directory to select agentapp.war.
-
Save the Project.
You can save the project by selecting the following options: Menu > Project > Save.
-
Browse to the directory specified previously in this task as owned by SAP Instance user (j2eadm).
-
Enter agentapp for the address field.
-
Click OK.
-
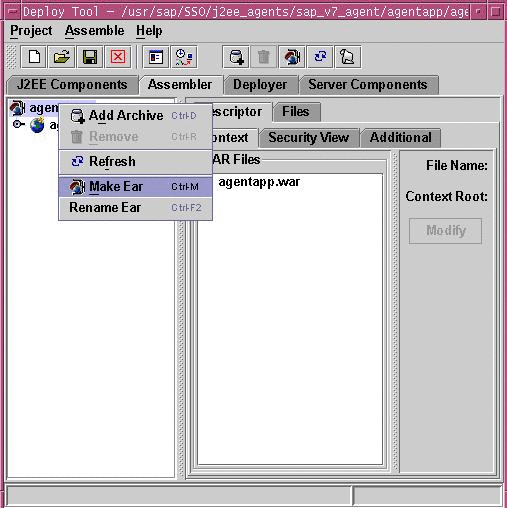
Right click the agentapp root node to select Make Ear from the context menu.
See the following figure for a visual reference.
Figure 4–5 SAP J2EE Engine Deploy Tool: agentapp Deployment, Make Ear
-
Select the Deployer tab.
-
Connect to SAP Enterprise Portal 7.0/Web Application Server 7.0
You can connect to SAP Enterprise Portal 7.0/Web Application Server 7.0 by selecting the following options: Menu >Deploy >Connect.
-
Log in as the appropriate user as follows:
-
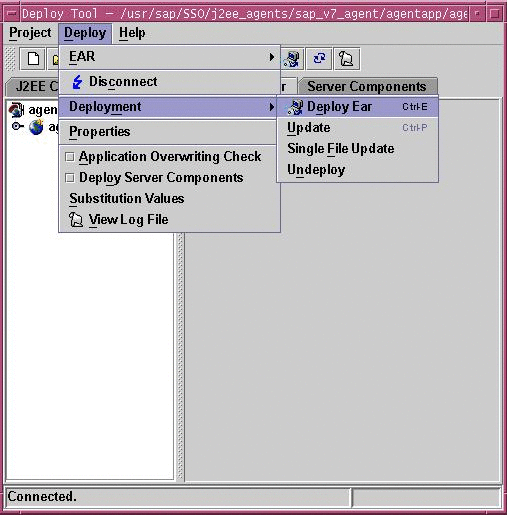
Deploy agentapp.
You can deploy the agentapp by selecting the following options: Menu > Deploy > Deployment >Deploy Ear.
See the following figure for a visual reference.
Figure 4–6 SAP J2EE Engine Deploy Tool: Deploying agentapp
A prompt appears to start the deployed application.
-
Select Yes.
 To Add a Reference From sap.com/agentapp to
the New AmSAPAgent2.2 Library for SAP Enterprise Portal 7.0/Web Application Server 7.0
This post-installation task is required with Agent for SAP Enterprise Portal 7.0/Web Application Server 7.0, regardless of which deployment container the agent is deployed on: SAP Enterprise Portal 7.0 or SAP Web Application Server 7.0.
This task description explains how to add a library reference from the sap.com/agentapp application to the newly deployed AmSAPAgent2.2 library.
Use the command line for this task.
-
Telnet to the J2EE telnet port by issuing a command such as the following:
$ telnet j2ee-engine-host instance-telnet-port
- j2ee-engine-host
-
represents the machine that hosts the SAP Enterprise Portal 7.0/Web Application Server 7.0 instance.
- instance-telnet-port
-
represents the port number of the telnet administration service of the SAP Enterprise Portal 7.0/Web Application Server 7.0 instance.
The following example demonstrates the format of the telnet command to issue:
telnet saphost.example.com 50008
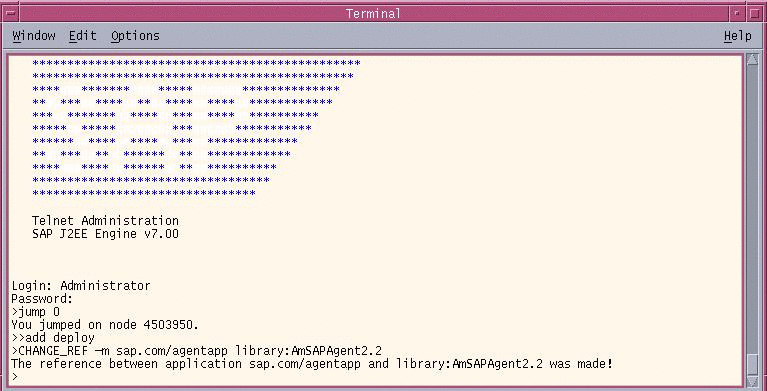
For a graphical representation of telnet administration as described in the steps that follow in this task, see the following figure.
Figure 4–7 SAP J2EE Telnet Administration: Adding the Agent Library Reference to agentapp
-
Log in using Administrator as the user and the corresponding Administrator password.
-
Issue the following command:
$ jump 0
A message such as the following appears:
You jumped on node 4503950.
-
Issue the following command:
$ add deploy
-
Issue the following command:
$ CHANGE_REF -m sap.com/agentapp library:AmSAPAgent2.2
The following message appears:
The reference between application sap.com/agentapp and
library:AmSAPAgent2.2 was made!
-
Stop and start the SAP Enterprise Portal 7.0/Web Application Server 7.0 instance.
Post-Installation of Agent for SAP Enterprise Portal 7.0/Web Application Server 7.0: SAP Enterprise Portal 7.0
Perform the tasks in this section if you are configuring Agent for SAP Enterprise Portal 7.0/Web Application Server 7.0 on SAP Enterprise Portal 7.0. This section includes a variety of short configuration tasks that are required for the agent to work on this specific deployment container. Complete all the tasks described in this section before performing the applicable tasks described in Conditional Post-Installation Steps for J2EE Agents in Policy Agent 2.2.
 To Add a Reference From sap.com/irj to
the New AmSAPAgent2.2 Library for SAP Enterprise Portal
7.0
This is one of the post-installation tasks required when Agent for SAP Enterprise Portal 7.0/Web Application Server 7.0 has been installed on SAP Enterprise Portal 7.0.
This task description explains how to add a library reference from the sap.com/irj application to the newly deployed AmSAPAgent2.2 library.
Use the command line for this task.
-
Telnet to the J2EE telnet port by issuing a command such as the following:
$ telnet j2ee-engine-host instance-telnet-port
- j2ee-engine-host
-
represents the machine that hosts the SAP Enterprise Portal 7.0 instance.
- instance-telnet-port
-
represents the port number of the telnet administration service of the SAP Enterprise Portal 7.0 instance.
The following example demonstrates the format of the telnet command to issue:
telnet saphost.example.com 50008
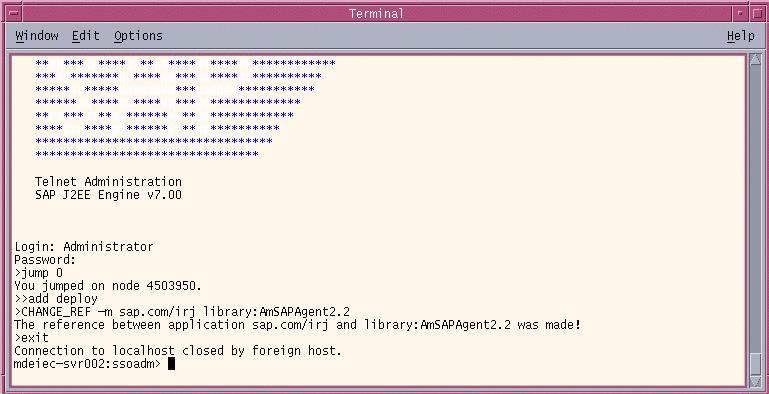
For a graphical representation of telnet administration as described in the steps that follow in this task, see the following figure.
Figure 4–8 SAP J2EE Telnet Administration: Adding the Agent Library reference to SAP Enterprise Portal 7.0
-
Log in using Administrator as the user and the corresponding Administrator password.
-
Issue the following command:
$ jump 0
A message such as the following appears:
You jumped on node 4503950
-
Issue the following command:
$ add deploy
-
Issue the following command:
$ CHANGE_REF -m sap.com/irj library:AmSAPAgent2.2
The following message appears:
The reference between application sap.com/irj and
library:AmSAPAgent2.2 was made!
-
Stop and start the SAP Enterprise Portal 7.0 instance.
 To Provide Access to the New Login Module for SAP
Enterprise Portal 7.0
This is one of the post-installation tasks required when Agent for SAP Enterprise Portal 7.0/Web Application Server 7.0 has been installed on SAP Enterprise Portal 7.0.
This task description explains how to add the new login module to the J2EE engine list of login modules.
-
(Conditional) If the SAP Enterprise Portal 7.0 is not running, start it now.
-
Start the Visual Administration tool.
The following example provides the path to the Visual Administration tool on UNIX systems:
/usr/sap/SID/instanceName/j2ee/admin/go
- SID
-
represents the SAP system ID.
- instanceName
-
represents the SAP Enterprise Portal 7.0 instance.
-
Log in to the Visual Administration tool.
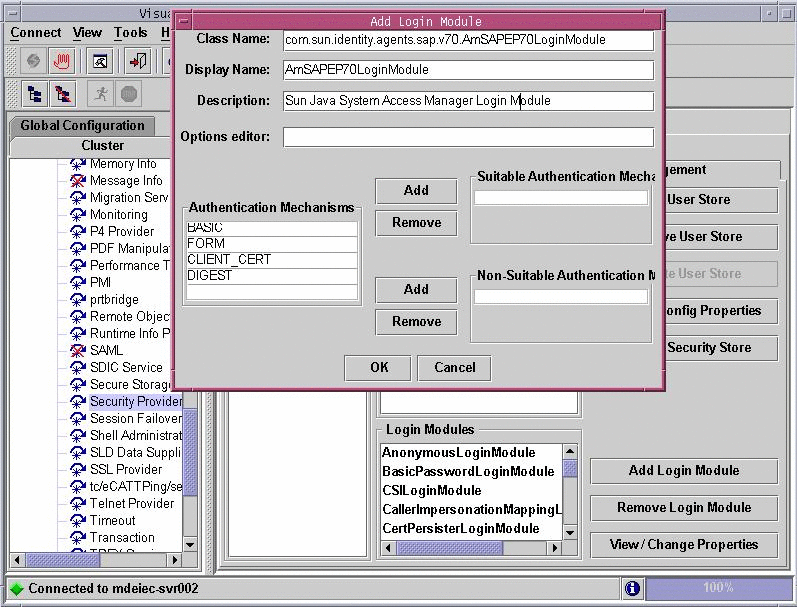
For a graphical representation of the Visual Administration tool as described in the steps that follow in this task, see Figure 4–9.
-
Select the Security Provider service.
-
Select the User Management tab.
-
Switch to the edit mode by clicking the pencil icon in the far left corner of the right panel.
-
Click Manage Security Stores.
-
Click Add Login Module.
A dialog box appears.
-
Click OK.
-
In the Class Name text field, enter the following:
com.sun.identity.agents.sap.v70.AmSAPEP70LoginModule
-
In the Display Name text field, enter the following:
AmSAPEP70LoginModule
-
Click OK.
Figure 4–9 SAP Visual Administrator: Adding a New Login Module
 To Modify the Ticket Template to Use the New Login
Module for SAP Enterprise Portal 7.0
This is one of the post-installation tasks required when Agent for SAP Enterprise Portal 7.0/Web Application Server 7.0 has been installed on SAP Enterprise Portal 7.0.
This task description explains how to modify the ticket template in order to list the new login module that you just added to the J2EE engine list of login modules.
Before You Begin
If necessary, start and log in to the Visual Administration tool as detailed in the preceding task description.
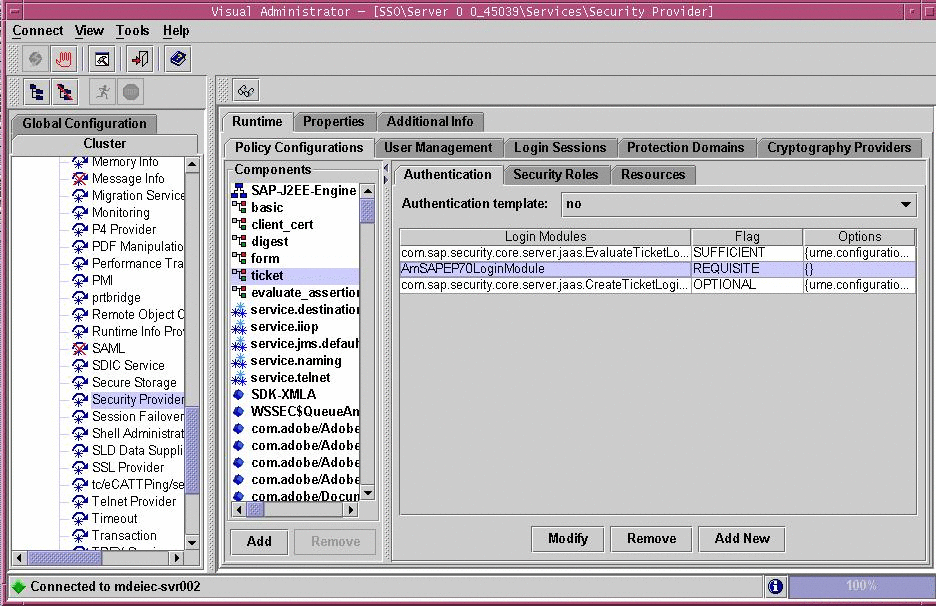
For a graphical representation of the Visual Administration tool as described in the steps in this task, see Figure 4–10.
-
Select the Security Provider service.
-
Select the Policy Configurations tab.
-
Switch to the edit mode by clicking the pencil icon in the far left corner of the right panel.
-
In the Components list, select the ticket authentication template.
-
Delete all login modules, except for the following:
com.sap.security.core.server.jaas.EvaluteTicketLoginModule
com.sap.security.core.server.jaas.CreateTicketLoginModule
-
Click Add New.
-
From the list of modules, select AmSAPEP70LoginModule.
-
Click Modify.
-
Move AmSAPEP70LoginModule between the following two remaining login modules:
com.sap.security.core.server.jaas.EvaluteTicketLoginModule
com.sap.security.core.server.jaas.CreateTicketLoginModule
The new ticket authentication template appears as such:
- EvaluateTicketLoginModule
-
SUFFICIENT
- AmSAPEP70LoginModule
-
REQUISITE
- CreateTicketLoginModule
-
OPTIONAL
 Caution –
 Ensure that the ticket authentication template resembles the preceding list in that it follows the same sequence (EvaluateTicketLoginModule, AmSAPEP70LoginModule, and CreateTicketLoginModule) with the same values (SUFFICIENT, REQUISITE, and OPTIONAL).
Figure 4–10 SAP Visual Administrator: Modifying the Ticket Template
Next Steps
Save the ticket authentication template configuration.
 To Configure the ume.logoff.redirect.url Parameter
for SAP Enterprise Portal 7.0
This is one of the post-installation tasks required when Agent for SAP Enterprise Portal 7.0/Web Application Server 7.0 has been installed on SAP Enterprise Portal 7.0.
-
Start the J2EE Engine configuration tool.
The following example provides the path to the configuration tool on UNIX systems:
/usr/sap/SID/instanceName/j2ee/configtool/configtool.sh
- SID
-
represents the SAP system ID.
- instanceName
-
represents the SAP Enterprise Portal 7.0 instance.
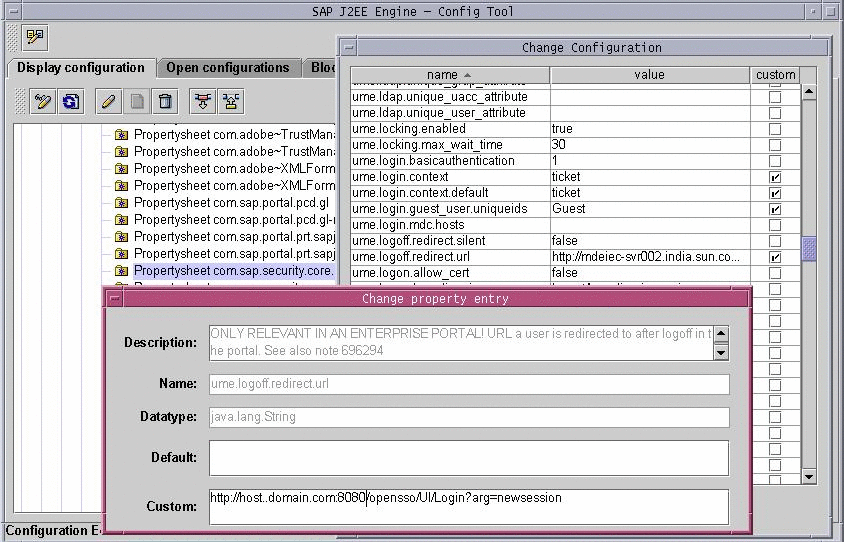
For a graphical representation of the configuration tool as described in the steps that follow in this task, see Figure 4–11.
-
Click the pencil icon to switch to the configuration editor mode.
-
Click the pencil and glasses icon.
-
Select cluster_data -> server -> cfg -> services.
The UME service property sheet appears.
-
Double click the following property sheet: com.sap.security.core.ume.service
-
Add the following custom value to the property named ume.logoff.redirect.uri:
http://AMServices-host:AMServices-port/amserver/UI/Login?arg=newsession
- AMServices-host
-
represents the fully qualified host name of the server where Access Manager Services are installed.
- AMServices-port
-
represents the port number of the server where Access Manager Services are installed.
Figure 4–11 SAP Config Tool: Configuring the ume.logoff.redirect.url Parameter
 To Enable Cookie Reset for SAP Enterprise Portal 7.0
This task enables single logout between the Access Manager instance and the SAP Enterprise Portal 7.0 instance. Otherwise, single logout might fail, potentially creating a security risk.
-
Access the J2EE agent AMAgent.properties configuration file.
-
Change the following properties as shown:
-
com.sun.identity.agents.config.cookie.reset.enable = true
-
com.sun.identity.agents.config.cookie.reset.name[0] = MYSAPSSO2
-
com.sun.identity.agents.config.cookie.reset.domain[MYSAPSSO2] = EP–DomainName
where EP–DomainName represents the name of the domain of the machine where the SAP Enterprise Portal 7.0 instance is installed, such as .example.com.
-
Post-Installation of Agent for SAP Enterprise Portal 7.0/Web Application Server 7.0: SAP Web Application Server 7.0
Perform the tasks in this section if you are configuring Agent for SAP Enterprise Portal 7.0/Web Application Server 7.0 on SAP Web Application Server 7.0. This section includes a variety of short configuration tasks that are required for the agent to work on this specific deployment container. Complete all the tasks described in this section before performing the applicable tasks described in Conditional Post-Installation Steps for J2EE Agents in Policy Agent 2.2.
 To Install the Agent Filter for the Deployed Application
on SAP Web Application Server 7.0
The agent filter can be installed by modifying the deployment descriptor of the application to be protected. The following steps explain how to install the agent filter for the application you want the agent to protect:
-
To install the agent filter, ensure that the application is not currently deployed on SAP Enterprise Portal 7.0/Web Application Server 7.0.
If it is currently deployed, remove it before proceeding any further.
-
Create the necessary backups before proceeding to modify these descriptors.
Since you will modify the deployment descriptor in the next step, creating backup files at this point is important.
-
Edit the application's web.xml descriptor as follows:
-
Set the <DOCTYPE> element as shown in the following code example:
<!DOCTYPE web-app version="2.4"
 xmlns="http://java.sun.com/xml/ns/j2ee"
xmlns:xsi="http://www.w3.org/2001/XMLSchema-instance"
xsi:schemaLocation="http://java.sun.com/xml/ns/j2ee
http://java.sun.com/xml/ns/j2ee/web-app_2_4.xsd">
SAP Enterprise Portal 7.0/Web Application Server 7.0 supports the Java Servlet Specification version 2.4.
Note that Servlet API version 2.4 is fully backward compatible with version 2.3. Therefore, all existing servlets should work without modification or recompilation.
-
Edit the application's web.xml descriptor.
Add the <filter> elements in the deployment descriptor. Do this by specifying the <filter>, <filter-mapping>, and <dispatcher> elements immediately following the description element of the <web-app> element in the descriptor web.xml. The following code example displays a sample web.xml descriptor with the <filter>, <filter-mapping>, and <dispatcher> elements added.
<web-app>
..
..
<filter>
        <filter-name>Agent</filter-name>
        <filter-class> com.sun.identity.agents.filter.AmAgentFilter </filter-class>
    </filter>
    <filter-mapping>
        <filter-name>Agent</filter-name>
        <url-pattern>/*</url-pattern>
        <dispatcher>REQUEST</dispatcher>
        <dispatcher>INCLUDE</dispatcher>
        <dispatcher>FORWARD</dispatcher>
        <dispatcher>ERROR</dispatcher>
    </filter-mapping>
..
..
</web-app>
If you want to protect your application with J2EE declarative security, refer to the PolicyAgentBase/sampleapp directory to learn how to build and deploy an application. The sampleapp directory is by no means a full fledged J2EE application. Rather it is a simple application that provides you with a quick reference to application specific deployment descriptors and various deployment modes of a J2EE agent. Once you successfully deploy sampleapp and test all of its features, you can use it as a reference to other applications that will be protected by the J2EE agent.
Once the web.xml deployment descriptor is modified to reflect the new <DOCTYPE> and <filter> elements, the agent filter is added to the application. You can now redeploy your application on SAP Enterprise Portal 7.0/Web Application Server 7.0.
Note –Ensure that role-to-principal mappings in container specific deployment descriptors are replaced with Access Manager roles or principals. You can retrieve Access Manager roles or principals for Access Manager 7 by issuing the agentadmin --getUuid command. For more information on the agentadmin --getUuid command, see agentadmin --getUuid.
You can also retrieve the universal ID for the user (UUID) using Access Manager 7 Console to browse the user profile.
-
 To Add a Reference From Protected Application to the
New AmSAPAgent2.2 Library for SAP Web Application Server
7.0
This is one of the post-installation tasks required when Agent for SAP Enterprise Portal 7.0/Web Application Server 7.0 has been installed on SAP Web Application Server 7.0.
This task description explains how to add a library reference from the sap.com/app-context application to the newly deployed AmSAPAgent2.2 library.
Use the command line for this task.
-
Telnet to the J2EE telnet port by issuing a command such as the following:
$ telnet j2ee-engine-host instance-telnet-port
- j2ee-engine-host
-
represents the machine that hosts the SAP Web Application Server 7.0 instance.
- instance-telnet-port
-
represents the port number of the telnet administration service of the SAP Enterprise Portal 7.0/Web Application Server 7.0 instance.
The following example demonstrates the format of the telnet command to issue:
telnet saphost.example.com 50008
After you issue a command similar to the preceding command, a message such as the following appears:
Telnet Administration [SAP J2EE Engine] Login: Password: -
Log in using Administrator as the user and the corresponding Administrator password.
-
Issue the following command:
$ jump 0
A message such as the following appears:
You jumped on node 56457550
-
Issue the following command:
$ add deploy
-
Issue the following command:
$ CHANGE_REF -m sap.com/app-context library:AmSAPAgent2.2
The following message appears:
The reference between application sap.com/app-context and
library:AmSAPAgent2.2 was made!
 To Provide Access to the New Login Module for SAP
Web Application Server 7.0
This is one of the post-installation tasks required when Agent for SAP Enterprise Portal 7.0/Web Application Server 7.0 has been installed on SAP Web Application Server 7.0.
This task description explains how to add the new login module to the J2EE engine list of login modules.
-
(Conditional) If the SAP Web Application Server 7.0 is not running, start it now.
-
Start the Visual Administration tool.
The following example provides the path to the Visual Administration tool on UNIX systems:
/usr/sap/SID/instanceName/j2ee/admin/go
- SID
-
represents the SAP system ID.
- instanceName
-
represents the SAP Web Application Server 7.0 instance.
-
Log in to the Visual Administration tool.
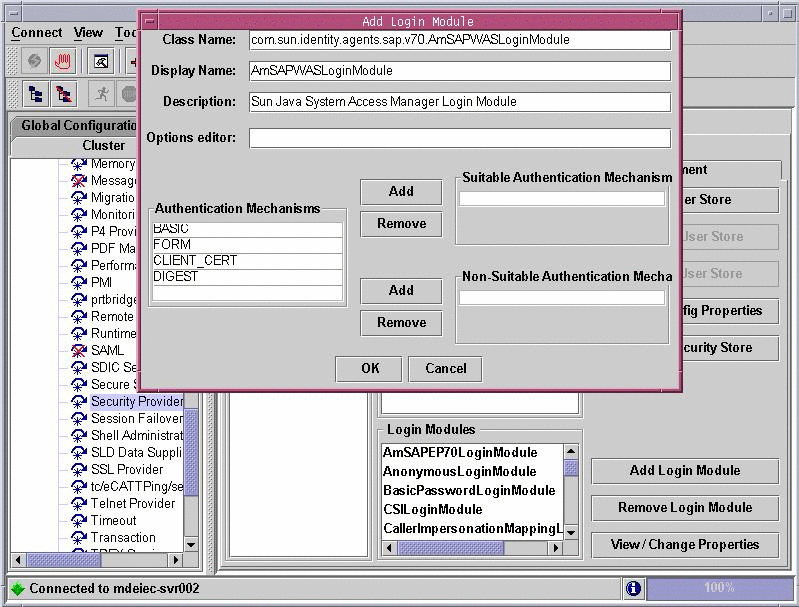
For a graphical representation of the Visual Administration tool as described in the steps that follow in this task, see Figure 4–12.
-
Select the Security Provider service.
-
Select the User Management tab.
-
Switch to the edit mode by clicking the pencil icon in the far left corner of the right panel.
-
Click Manage Security Stores
-
Click Add Login Module.
A dialog box appears.
-
Click OK.
-
In the Class Name text field, enter the following:
com.sun.identity.agents.sap.v70.AmSAPWASLoginModule
-
In the Display Name text field, enter the following:
AmSAPWASLoginModule
-
Click OK.
Figure 4–12 SAP Visual Administrator: New Login Module for SAP Web Application Server 7.0
 To Configure Applications to Use the New Login Module
for SAP Web Application Server 7.0
This is one of the post-installation tasks required when Agent for SAP Enterprise Portal 7.0/Web Application Server 7.0 has been installed on SAP Web Application Server 7.0.
This task description explains how to use the new login module that you just added to the J2EE engine list of login modules.
Before You Begin
If necessary, start and log in to the Visual Administration tool as detailed in the preceding task description.
-
Select the Security Provider service.
-
Select the User Management tab.
-
In the Components list, select the application you want to configure.
-
In the right pane, remove BasicPasswordLoginModule.
-
Ensure that no other authentication template is being used at this point.
-
Click Add New.
-
From the list of modules, select AmSAPWASLoginModule.
-
Save the configuration.
Conditional Post-Installation Steps for J2EE Agents in Policy Agent 2.2
Steps described in this section might be required, depending on your site's specific deployment.
Enabling URL Decoding for the SSO Token
The task that follows is required when Access Manager is deployed on Sun Java System Web Server.
 To Enable URL Decoding for the SSO Token (Conditional)
Only perform this task when Access Manageris deployed on Sun Java System Web Server. The task involves editing a property in the J2EE agent AMAgent.properties configuration file.
-
Change to the location of the J2EE agent AMAgent.properties configuration file. For information about this file, see Location of the J2EE Agent Base Directory in Policy Agent 2.2.
-
Open the AMAgent.properties file.
-
Set the property com.sun.identity.agents.config.sso.decode to true.
Therefore, the property appears as follows when properly set:
com.sun.identity.agents.config.sso.decode = true
-
Save and close the J2EE agent AMAgent.properties configuration file.
Creating the Necessary URL Policies
If the agent is installed and configured to operate in the URL_POLICY mode, the appropriate URL policies must be created. The following examples demonstrate conceivable locations for resources that would need to have policies created for them.
Example 4–1 Configuring the Necessary URL Policies for SAP Enterprise Portal 7.0
If the agent is protecting SAP Enterprise Portal 7.0 at the /irj context URI using port 50000 with the HTTP protocol, at least one policy must be created to allow access to the following resource:
http://myhost.mydomain.com:50000/irj |
Example 4–2 Configuring the Necessary URL Policies for SAP Web Application Server 7.0
If SAP Web Application Server 7.0 is available on port 8080 using HTTP protocol, at least one policy must be created to allow access to the following resource:
http://myhost.mydomain.com:8080/sampleApp/ |
where sampleApp is the context URI for the sample application.
For either of the preceding deployment containers, if no policies are defined and the agent is configured to operate in the URL_POLICY mode, then no user is allowed access to SAP Enterprise Portal 7.0/Web Application Server 7.0 resources. See Sun Java System Access Manager 7 2005Q4 Administration Guide to learn how to create these policies using the Access Manager Console or command-line utilities.
Creating the Necessary User Mappings
Regarding Agent for SAP Enterprise Portal 7.0/Web Application Server 7.0, user mapping must be created between Access Manager and the SAP Enterprise Portal 7.0/Web Application Server 7.0 instance. By default, the mapping is based on USER_ID. For this mapping, all users with an account in SAP Enterprise Portal 7.0/Web Application Server 7.0 must also be given an appropriate account in Access Manager.
- © 2010, Oracle Corporation and/or its affiliates
