 To Deploy the agentapp.war file
for SAP Enterprise Portal 7.0/Web Application Server 7.0
This post-installation task is required with Agent for SAP Enterprise Portal 7.0/Web Application Server 7.0, regardless of which deployment container the agent is deployed on: SAP Enterprise Portal 7.0 or SAP Web Application Server 7.0.
-
Start the J2EE engine deploy tool by issuing the following command:
/usr/sap/SID/instanceName/j2ee.deploying/DeployTool
- SID
-
represents the SAP system ID.
- instanceName
-
represents the SAP Enterprise Portal 7.0/Web Application Server 7.0 instance.
 Caution –
 Create a subdirectory for the agent application in DeployContainer-base. In this scenario, DeployContainer-base represents the directory within which the SAP Enterprise Portal 7.0/Web Application Server 7.0 instance was installed. Creating a subdirectory ensures that no other directories are affected by the agent application. If you undeploy the agentapp.war file without creating this subdirectory, DeployTool removes other critical content in the DeployContainer-base directory.
-
Create a new project.
You can create a new project by selecting the following options: Menu > Project > New Project.
A dialog box appears.
-
Browse to an empty directory owned by SAP Instance user (j2eadm).
-
Enter agentapp for the address field.
-
Click OK.
-
Select the Assembler tab.
-
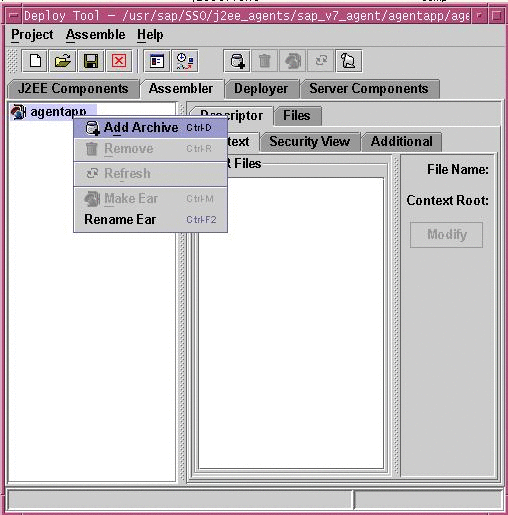
Right click the agentapp node to select Add Archive from the context menu.
See the following figure for a visual reference.
Figure 4–4 SAP J2EE Engine Deploy Tool: agentapp Deployment, Add Archive

-
Browse to the PolicyAgent-base/etc directory to select agentapp.war.
-
Save the Project.
You can save the project by selecting the following options: Menu > Project > Save.
-
Browse to the directory specified previously in this task as owned by SAP Instance user (j2eadm).
-
Enter agentapp for the address field.
-
Click OK.
-
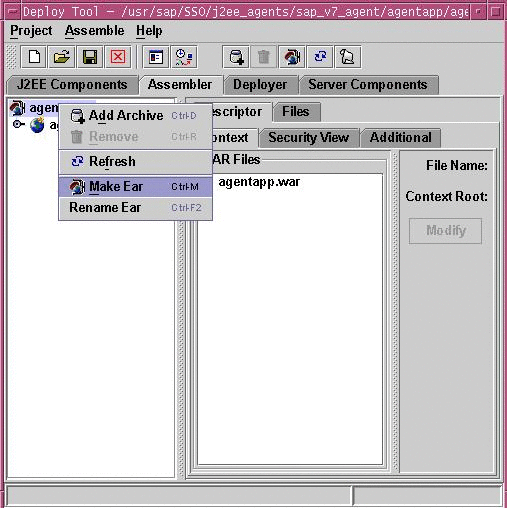
Right click the agentapp root node to select Make Ear from the context menu.
See the following figure for a visual reference.
Figure 4–5 SAP J2EE Engine Deploy Tool: agentapp Deployment, Make Ear

-
Select the Deployer tab.
-
Connect to SAP Enterprise Portal 7.0/Web Application Server 7.0
You can connect to SAP Enterprise Portal 7.0/Web Application Server 7.0 by selecting the following options: Menu >Deploy >Connect.
-
Log in as the appropriate user as follows:
-
Deploy agentapp.
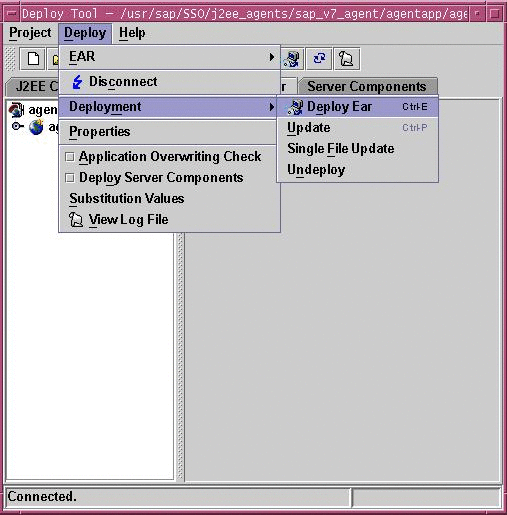
You can deploy the agentapp by selecting the following options: Menu > Deploy > Deployment >Deploy Ear.
See the following figure for a visual reference.
Figure 4–6 SAP J2EE Engine Deploy Tool: Deploying agentapp

A prompt appears to start the deployed application.
-
Select Yes.
- © 2010, Oracle Corporation and/or its affiliates
