Structures
A structure can be used by any number of templates and articles within the community in which the structure is defined. When you create a structure, you have to define an XML schema for it.
 To create a Structure
-
Log in to Web Space Server.
-
Navigate to Control Panel -> Content -> Web Content from the Welcome menu.
-
To create a structure, click the Structures tab in the Web Content portlet, and then click on the Add Structure button.
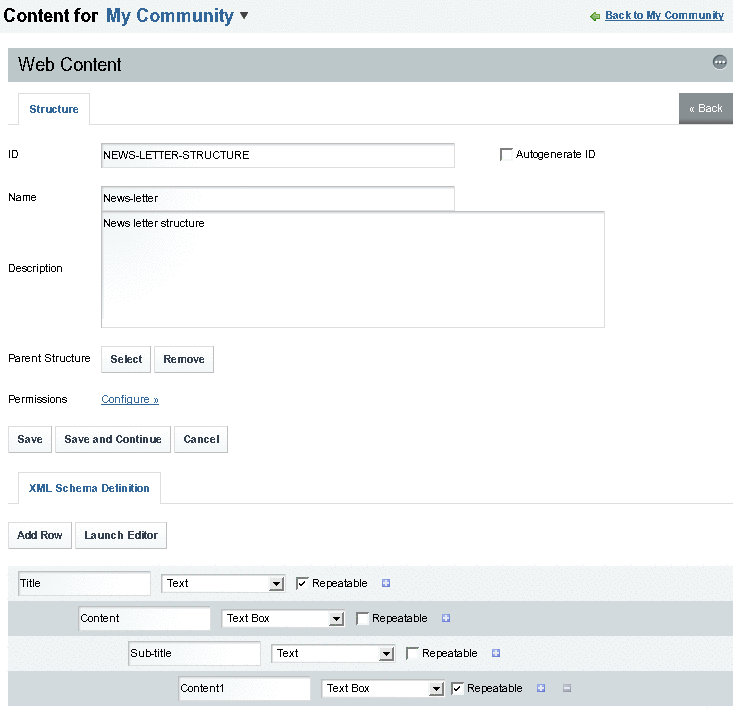
The structure creation page is displayed.
Figure 6–5 Creating a Structure

-
Type an ID, or select the Autogenerate ID option for the system to generate an ID.
Choosing your own ID means that the structure will be easier to identify when associating it with templates and articles. The convention is to separate words in the ID with a hyphen, NEWS-LETTER-STRUCTURE. The structure ID cannot be changed once your structure has been saved, so be sure you provide the ID exactly how you want it to appear.
-
Type a name and a description for the structure.
-
Design your XML Schema Definition.
-
Click Add Row button to add the XML scheme from the user interface.
-
In the new field, type a name and a content type for the field image, text, Boolean flag, and so on.
Tip –If you are comfortable with XML or HTML you can edit the XSL directly by clicking Launch Editor. One simple approach is to add a few elements using the GUI. Then edit the XML directly by copying the syntax for the already added elements.
Empty spaces are not allowed within a field name. Rows can be moved up or down by clicking on Arrow buttons. You can use the Plus button to add multiple levels of rows nested inside one another. A field can be repeatable or non-repeatable. Selecting the Repeatable option makes a field repeatable. If a field is repeatable, you can repeat the field in an article using the structure. You will be able to add the field as many times as it is desired, by clicking a plus sign.
-
-
Click Save.
The Structure is created and the system generates a WebDAV URL for the structure. WebDAV (Web-based distributed authoring and versioning) enables remote access of the structure. To determine the WebDAV URL for the structure, open the structure in edit mode after creating it.
For details about WebDAV, go to:
 To Edit a Structure
-
Log in to Web Space Server.
-
Navigate to Control Panel -> Content -> Web Content from the Welcome menu.
-
Click the Structures tab.
-
Click the Actions button corresponding to a structure, and choose Edit from the menu.
The Structure opens in Edit mode.
You can edit anything in the structure except for the structure ID, which can not be changed once the structure has been created.
-
Backup the current XML file by clicking the Download button so you can easily revert to your old structure if necessary.
-
Edit the structure.
Editing the name and description will not affect other features of the Web Content portlet, but adding, deleting, and modifying fields will affect the templates and articles that are associated with the structure.
If you add fields, the articles associated will have extra fields for additional content. If you delete fields, associated content in associated articles will be deleted.
-
Click Save to save changes.
 To Delete a Structure
-
Log in to Web Space Server.
-
Navigate to Control Panel -> Content -> Web Content from the Welcome menu.
-
Click the Structures tab.
To delete a structure, you must first delete all the articles and disassociate or delete all the templates associated with that structure.
-
To delete all articles,
-
Click the Structure tab again.
-
Click the Actions button corresponding to a Structure, and select View Templates from the menu.
All the templates associated with the structure are listed.
-
To delete all the remplates associated with the structure, select all templates and then click the Delete button.
-
Select the structure and click the Delete button to delete the structure.
Alternatively, click the Actions button and choose Delete from the menu.
- © 2010, Oracle Corporation and/or its affiliates
