Using the Software Catalog Portlet
The Software Catalog portlet is not an instanceable portlet, which means that each community can have only one instance of the portlet. If you add the portlet to another page in the community, it will hold the same data as the portlet that was first added. Different communities, however, can have different software repositories, so you can host several software repositories on the same instance of Web Space Server if you wish they just have to be in different communities.
The Software Catalog portlet has several tabs. The first tab is labeled Products. The default view of the portlet, when populated with software, displays what plugins are available for install or download. This can be seen in the version on Web Space Server's home page.
The first step in adding a plugin to your software repository is to add a license for your product. A license communicates to users the terms upon which you are allowing them to download and use your software. Click the Licenses tab and then click the Add License button that appears. You will then see a form which allows you to type the title of your license, a URL pointing to the actual license document, and check boxes denoting whether the license is open source, active, or recommended.
When you have finished filling out the form, click the Save button. Your license will be saved. Once you have at least one license in the system, you can begin adding software products to your software catalog. Your next step will be to create the product record in the software catalog portlet. This will register the product in the software catalog and allow you to start adding versions of your software for users to download and/or install directly from their instances of Web Space Server. You will first need to put the .war file containing your software on a web server that is accessible without authentication to the users who will be installing your software. If you are creating a software catalog for an internal Intranet, you would place the file on a web server that is available to anyone inside your organization's firewall.
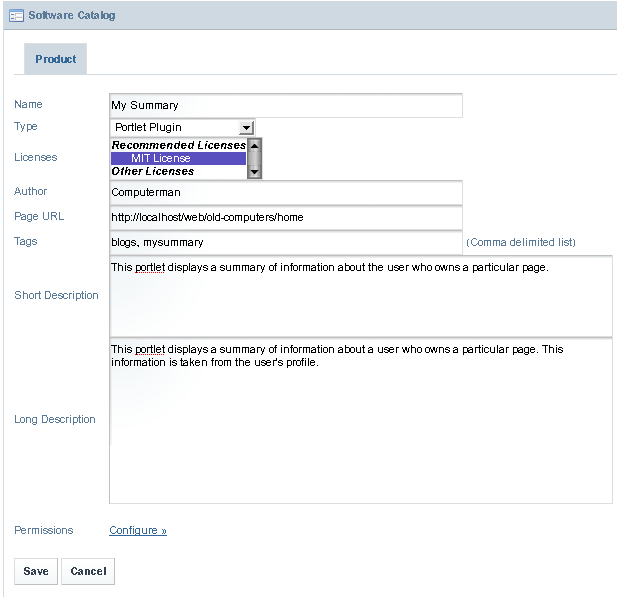
To create the product record in the Software Catalog portlet, click the Products tab, and then click the Add Product button. Fill out the form with information about your product.
Figure 8–1 Adding a Product to the Software Catalog (partial)

Name: The name of your software product.
Type: Select whether this is a portlet or a theme plugin.
Licenses: Select the license(s) under which you are releasing this software.
Author: Type the name of the author of the software.
Page URL: If the software has a home page, type its url here.
Tags: Type any tags you would like added to this software.
Short Description: Type a short description. This will be displayed in the summary table of your software catalog.
Long Description: Type a longer description. This will be displayed on the details page for this software product.
Permissions: Click the Configure link to set permissions for this software product.
Group ID: Type a group ID. A group ID is a name space which usually identifies the company or organization that made the software. For example, use old-computers.
Artifact ID: Type an Artifact ID. The artifact ID is a unique name within the name space for your product. For example, use my-summary-portlet.
Screenshot: Click the Add Screenshot button to add a screenshot of your product for users to view.
When you have finished filling out the form, click the Save button. You will be brought back to the product summary page, and you will see that your product has been added to the repository.
Notice that in the version column, N/A is being displayed. This is because there are not yet any released versions of your product. To make your product downloadable, you need to create a version of your product and point it to the file you uploaded to your HTTP server earlier.
Before you do that, however, you need to add a Framework Version to your software catalog. A Framework version denotes what version of Web Space Server your plugin is designed for and works on. You cannot add a version of your product without linking it to a version of the framework for which it is designed.
Why is this so important? Because as Web Space Server gains more and more features, you may wish to take advantage of those features in future versions of your product, while still keeping older versions of your product available for those who are using older versions of Web Space Server.
So click the Framework Versions tab and then click the Add Framework Version button. Give the framework a name, a URL, and leave the Active check box checked.
Now go back to the Products tab and click your product. You will notice that a message is displayed stating that the product does not have any released versions. Click the Add Product Version button.
Note –
It is a must to specify a group ID and artifact ID before you specify a product version. You can specify the group ID and artifact ID for the product from the Product Version page by clicking on the It is a must to specify a group ID and artifact ID before you specify a product version link, which appears in the Product Version page if a group ID and artifact ID are not specified for the product.
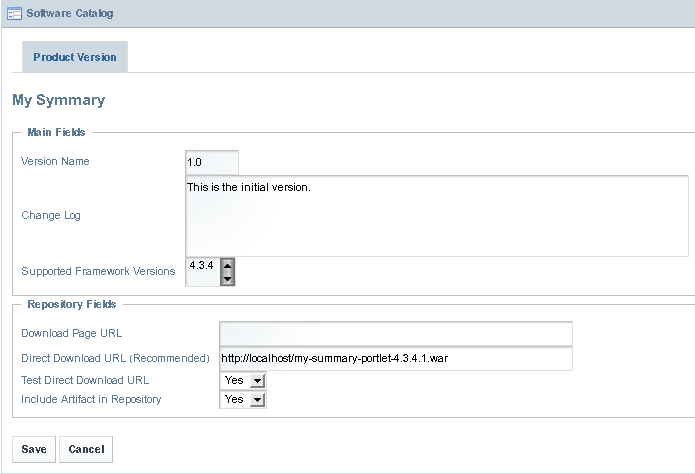
Figure 8–2 Adding a Product Version to the Software Catalog

Version Name: Type the version of your product.
Change Log: Type some comments regarding what changed between this version and any previous versions.
Supported Framework Versions: Select the framework version for which your software product is intended.
Download Page URL: If your product has a descriptive web page, type its URL here.
Direct Download URL (Recommended) : Type a direct download link to your software product here. The Plugin Installer portlet will follow this link in order to download your software product.
Include Artifact in Repository: To enable others to use the Plugin Installer portlet to connect to your repository and download your plugin, select Yes here.
When you are finished filling out the form, click the Save button. Your product version will be saved, and your product will now be available in the software repository.
- © 2010, Oracle Corporation and/or its affiliates
