Using Snapshot
Snapshot takes a "snapshot" of a window, of a region of the desktop, or of the entire desktop screen. You can then view, save, or edit the snapshot in Image Viewer.
To Start Image Viewer Snapshot
Choose Snapshot from the Image Viewer File menu
Or, start Image Viewer with the -snapshot option:
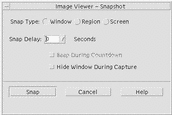
Figure 14-5 Snapshot window

To Take a Snapshot of a Window
-
If Snapshot is not running, choose Snapshot from the Image Viewer File menu.
-
Click the Snap button.
The mouse pointer becomes a plus sign.
-
Move the mouse pointer to the window to be snapped and click mouse button 1.
The message at the bottom of the Snapshot dialog box reads "Snap succeeded" once the window is snapped.
To Take a Snapshot of a Region
-
If Snapshot is not running, choose Snapshot from the Image Viewer File menu.
-
Click the Snap button.
The mouse pointer becomes a plus sign.
-
Move the mouse pointer to a corner of the region to be snapped, press and hold mouse button 1, drag the mouse diagonally to encompass the region to be snapped, and release mouse button 1.
The message at the bottom of the window reads "Snap succeeded" once the region is snapped.
To Take a Snapshot of the Screen
-
If Snapshot is not running, choose Snapshot from the Image Viewer File menu.
-
Click the Snap button.
The message at the bottom of the window reads "Snap succeeded" once the screen is snapped.
To Take a Delayed Snapshot
When taking a snapshot of a menu or some other pop-up or pull-down element, you can delay the time between clicking Snap and the snapshot being taken.
-
If Snapshot is not running, choose Snapshot from the Image Viewer File menu.
-
Determine the number of seconds to delay by using the down arrow button and selecting a value or by typing in the text field.
The next time you click Snap, the snapshot will be delayed by the specified number of seconds.
-
(Optional) If you want to hear the seconds counted off before the snapshot is taken, select Beep During Countdown.
-
Select a Snap Type and click Snap.
If Snap Type is Region, drag mouse button 1 to select the region to be snapped.
-
Make any necessary adjustments to the image during the snap delay time.
You can display a menu, for instance, by clicking on an item in a menu bar.
After the specified number of seconds, the window, region, or screen is snapped and "Snap succeeded" is displayed in the message area at the bottom of the window.
To Hide the Snapshot Dialog Box While Taking a Snapshot
If you want a snapshot of the entire screen and do not want the Snapshot dialog box to be included in the image, you can hide the Snapshot dialog box while you take a snapshot.
-
If Snapshot is not running, choose Snapshot from the Image Viewer File menu.
-
Select the Hide Window During Capture check box.
The Snap Delay changes to 8 seconds and the message area at the bottom of the Snapshot dialog box displays "Timer adjusted to guarantee correct operation."
-
Click Snap to take the snapshot.
All Image Viewer windows disappear and do not reappear until after the snapshot has been taken.
To Save a Snapshot
See "To Save an Image as a New File" for instructions for saving a captured snapshot image.
- © 2010, Oracle Corporation and/or its affiliates
