Creating Structure within a Topic
Within the body of a help topic, you have the following elements to choose from to organize and present your information:
-
Paragraphs are used for bodies of text.
-
Lists are used for itemized information. There are several types of lists including bulleted, ordered (numbered), and plain.
-
Subheadings are used to partition sections within a topic.
-
Graphics can be included within your text as inline graphics or displayed between paragraphs as standalone figures.
-
Hyperlinks provide references to related topics. A hyperlink may lead to a subtopic, deeper in the hierarchy, or branch to a topic in a completely different part of the hierarchy, or even in another help volume.
-
Computer literals are computer-recognized text, such as file names and variable names, that can be displayed as either separate example listings or inline elements.
-
Notes, cautions, and warnings call the reader's attention to important information.
-
Emphasis is used to highlight important words and phrases within paragraph text.
To Start a Paragraph
Insert a blank line after the previous paragraph or other element.
Or, use the <p indent> element and parameter if the paragraph is to be indented.
Or, use the <image> element if you want the paragraph to maintain the line breaks that you enter in your source file.
An end tag for <p> is not required. However, the <\image> end tag is required with the <image> element.
Examples
Here are two paragraphs, separated by a blank line. Because neither paragraph has any special parameters, the <p> tag does not have to be entered (it is assumed when you enter one or more blank lines):
The Application Builder provides an interactive, graphical
environment that facilitates the development of desktop
applications.

The Application Builder is designed to make it easier for developers
to construct applications that integrate well into the desktop. It
provides two basic services: assembles Motif objects into the
desired application user interface, and generates appropriate calls
to the routines that support desktop integration services.
If you want a paragraph indented from the left margin, include the optional indent parameter:
<p indent> An indented paragraph can be used to draw the reader's attention to an idea.
The following paragraph overrides the automatic word wrap in help windows and maintains the line breaks exactly as entered in the source file. The <image> element is especially useful for entering addresses.
<image>
Brown and Reed Financial Investors
100 Baltic Place  Suite 40 New York, New York
<\image>
To Enter a List
Use the <list> element as shown:
<list type spacing>
 * item
 * item
  .
  .
  .
 * item
 <\list>
Where type indicates the type of list you want: bullet (default), order, or plain; and spacing is loose (default) or tight. Each item in the list is marked with an * (asterisk).
Examples
Here's a simple list. Because the type isn't specified, it defaults to a bulleted list. Because spacing isn't specified, it defaults to loose, which leaves a blank line between each item.
<list>
* Creating a Mail Message
* Sending a Message
* Reading Your Mail
<\list>
The online format of the preceding markup is:

To format the same list with numbers and reduced spacing between items, use:
<list order tight>
* Creating a Mail Message
* Sending a Message
* Reading Your Mail
<\list>
The output is:

To Enter a Lablist
A lablist is a two column list with optional column headings.
To create a labeled list without headings, use the <lablist> element as shown:
<lablist spacing>
     \ label 1\ item 1  text
     \ label 2\ item 2  text
       .
       .
       .
     \ label N\ item N  text
 <\lablist>
Where spacing is loose (default) or tight.
Example
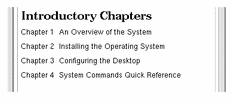
Here's a list of labeled chapter descriptions. The optional label headings are not provided.
<lablist tight>
\Chapter 1\ An Overview of the System
\Chapter 2\ Installing the Operating System
\Chapter 3\ Configuring the Desktop
\Appendix A\ System Commands Quick Reference
<\lablist>
The output is:

To Enter a Lablist with Headings
<lablist spacing>
    <labheads>  \ heading for labels \ heading for items
    \ label 1\  item 1 text
     \ label 2\  item 2 text
      .
       .
       .

     \ label N\ item N text
 <\lablist>
Example
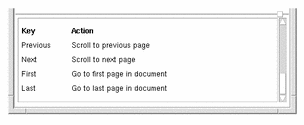
This markup:
<lablist>
<labheads>\Key \Action
\Previous\ Scroll to previous page
\Next\ Scroll to next page
\First\ Go to first page in document
\Last\ Go to last page in document
<\lablist>
produces this output:

See Also
-
"<list> " summarizes the use of the <list> element.
-
"<lablist> " summarizes the use of the <lablist>.
To Provide Subheadings within a Topic
For medium headings (slightly smaller than the topic title), use the following markup:
<otherhead> Heading
Or, for small headings, use the following markup:
<procedure> Heading
Subheadings add structure within a topic, but they do not appear in the list of topics in the topic tree.
Example
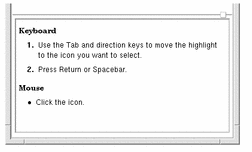
Here, the <procedure> element is used to add a small heading before each list.
<procedure>Keyboard
<list order>
* Use the Tab and direction keys to move the highlight to the icon
   you want to select.
* Press Return or Spacebar.
<\list>
<procedure>Mouse
<list bullet>
* Click the icon.
<\list>This markup creates this output:

To Show a Computer Listing
For computer listings that do not contain any special character sequences that will be interpreted as HelpTag markup, use the <ex> (example) element as shown:
<ex size>
Computer text here.
<\ex>
For computer listings that contain special character sequences used by HelpTag, use the <vex> (verbatim example) element as shown:
<vex size>
Computer text here.
<\vex>
The optional size attribute, which determines the size of the font used to display the example, can be specified as smaller or smallest.
Example
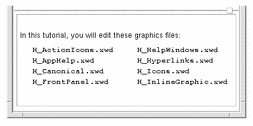
Here the <ex> element is used to represent a directory listing in a terminal window.
In this tutorial, you will edit these graphics files:
<ex>
H_ActionIcons.xwd     H_HelpWindows.xwd
H_AppHelp.xwd         H_Hyperlinks.xwd
H_Canonical.xwd       H_Icons.xwd
H_FrontPanel.xwd      H_InlineGraphic.xwd
<\ex>
The markup produces this output:

Line breaks appear where you enter them in your source file. If the example is too wide for the help window, a horizontal scroll bar appears so the user can scroll to see all the example text.
See Also
To Add a Note, Caution, or Warning
Include the <note>, <caution>, or <warning> element as follows:
<note>
 Body of note here.
 <\note>

 <caution>
 Body of caution here.
 <\caution>

 <warning>
 Body of warning here.
 <\warning>
To associate an icon with the note, caution, or warning element, define a file entity that identifies the graphics file containing the icon. Use one of the predefined entity names:
-
<!ENTITY NoteElementDefaultIconFile FILE "filename">
-
<!ENTITY CautionElementDefaultIconFile FILE "filename">
-
<!ENTITY WarningElementDefaultIconFile FILE "filename">
If you do not want icons with notes, cautions, or warnings, don't declare the corresponding entities. (Remember, all entity declarations must come before any other markup at the beginning of your help volume.) If you include such an entity reference, be sure the graphics file is in your HelpTag search path (helptag.opt).
Names of the default icons used by the Help System for note, caution, and warning elements are specified in the following entities.
-
<!ENTITY NoteElementDefaultIconFile FILE "noteicon.pm">
-
<!ENTITY CautionElementDefaultIconFile FILE "cauticon.pm">
-
<!ENTITY WarningElementDefaultIconFile FILE "warnicon.pm">
These default icons are located in the /usr/dt/dthelp/dthelptag/icons directory.
If you create your own icon images for notes, cautions, and warnings, be sure to keep them small so they will fit into the area allotted. Also, the graphic images must be in your HelpTag search path, which is specified in your helptag.opt file.
Example
The following markup for a note, warning, and caution produces the output shown in Figure 3-1.
<note>
Before installing your application, complete the options checklist
to determine the amount of disk space required.
 <\note>

<warning>
This product is highly acidic and can cause skin irritation. Wearing
protective gloves is mandatory when applying this product.
 <\warning>

<caution>
     Do not place your fingers near the parrot cage!
 <\caution>
Figure 3-1 Note, warning, and caution help icons
See Also
-
"To Create a Run-Time Help Volume" describes using a helptag.opt file.
- © 2010, Oracle Corporation and/or its affiliates
