Customizing the File System
When you perform a full install of the Solaris 7 operating environment on a domain, the suninstall utility allows you to manually enter the disk partition sizes for your file systems. Sun Microsystems suggests that you do not use disk partitions that are less than the minimum sizes in Table 6-10.
If two disks are used, root (/) and /usr must be on the device specified in the OBP boot alias.
Table 6-10 Minimum Partition Sizes|
Partition |
Minimum Sizes |
Notes |
|
|---|---|---|---|
|
0 |
/ |
256 Mbyte |
Bare minimum size |
|
1 |
swap |
1024 Mbyte |
Bare minimum size |
|
2 |
overlap |
|
Actual total disk size |
|
3 |
/var |
512 Mbyte |
|
|
4 |
|
2 Mbyte |
This slice must be reserved for the Alternate Pathing and Solstice DiskSuite products. Otherwise, subsequent Alternate Pathing installations will overwrite the operating system. |
|
5 |
/opt |
512 Mbyte |
This may be larger depending upon remaining space. |
|
6 |
/usr |
1 Gbyte |
Asian-language users may need more space here. |
Use the Tab key to move the cursor, and use the keyboard to type the size for each partition. Press F2 when you are done.
During the upgrade, the suninstall utility may notify you that your disk partition sizes are not large enough for Solaris 7, as in the following example:
- More Space Needed ------------------------------------------
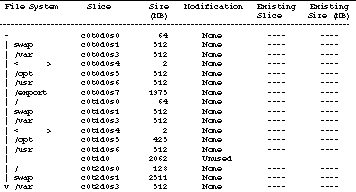
If you see this message during the upgrade, you should check the /usr partition. If this partition is smaller than 653-Mbytes, you must repartition the boot disk by performing the following steps:
-
Press F2 to select Auto Layout.
The File System Modification screen appears.

 Caution -
 Make sure that the partition sizes for the root (/), /swap, /usr, and /var file systems are not reduced below the minimum sizes shown in Table 6-10.
-
If the proposed modifications are acceptable, press F2 to continue.
Otherwise, press F4 to change the constraints that the suninstall utility uses to reconfigure the disk partitions. Your data will be temporarily backed up during the partition reconfiguration, and then it will be restored. For more information, refer to the Solaris Advanced Installation Guide.
Note -For systems with a large Volume Manager configuration (100 disks or more), the size of the root (/) file system should be increased. Sun Microsystems suggests that you use sizes of approximately 256 Mbyte to 512 Mbyte to allow for additional space, which will be required for device name entries.
-
Shut down the domain from the superuser prompt:
domain_name# init 0
-
ssp% bringup -A on
Note -This step assumes that you are upgrading the boot disk that is defined in the OBP boot-device variable. If you are upgrading a different boot disk, you must supply the device's alias as an argument to the command.
-
Change to the /Tools directory:
ssp# cd /cdrom/cdrom0/s0/Solaris_2.7/Tools
-
Remove the host domain as an install client:
ssp# ./rm_install_client domain_name
-
If you are done with the upgrade, remove the Solaris 7 CD:
ssp# cd /
ssp# unshare /cdrom/cdrom0/s0
ssp# eject cdrom
- © 2010, Oracle Corporation and/or its affiliates
