Appendix A Pluggable Authentication Modules
This appendix explains how to configure Identity Synchronization for Windows 6.0 and Pluggable Authentication Methods (PAM) so an LDAP store can provide synchronization capabilities between Solaris and Windows. The information is organized into the following sections:
Note –
In this appendix, Windows refers to Windows environments using Active Directory for authentication. Windows NT environments may impose different approaches.
Overview
If your enterprise environment contains both Solaris and Windows hosts, you can simplify the administration of the user community if you use Identity Synchronization for Windows to manage the two environments as a single set of users.
Combining PAM and Identity Synchronization for Windows can accomplish the following goals:
-
Enable an LDAP store to provide synchronization capabilities between Solaris and Windows
For example, enable user information (including passwords) created or modified on one system (Solaris or Windows) to replicate to its counterpart so either system can act on the information.
-
Use PAM to authenticate Solaris and to manage passwords against an LDAP store
-
Enable users to change their own passwords (if doing so does not contradict security policy)
Configure your environment to ensure that passwords are never sent over a medium that permits eavesdropping
Solaris implementation of PAM has long-offered the ability to use an LDAP store. However, the inclusion of PAM modules in Solaris 9 has made it possible to use a product such as Identity Synchronization for Windows.
Note –
You can patch Solaris 8 to support this functionality using Patch number 108993 for Sparc® or Patch number 108994 for Solaris x86.
PAM comes by default with Solaris 9 and later.
While some Solaris PAM modules are LDAP-aware, other modules do not use LDAP in a way that triggers Identity Synchronization for Windows’ interception actions.
For example, when you configure the PAM_UNIX module to use LDAP (using a directive specified in the /etc/nsswitch.conf file), the module never binds (as the user in question) against the LDAP store when authenticating. Instead, the PAM_UNIX module reads the user's LDAP entry, internally compares the password found on the LDAP entry to the password provided, and then PAM_UNIX makes its authentication decision accordingly.
The PAM_UNIX module authentication is done outside the purview of the LDAP store so none of the hooks put into place by Identity Synchronization for Windows will be used. Consequently, passwords will fail to replicate from the LDAP store to Windows.
Specifically, to initiate the synchronization process, Identity Synchronization for Windows requires all authentication systems to bind to the LDAP store. Furthermore, the binding mechanism must present the user's password in a clear manner, such as a simple bind, which rules out the use of SASL and Digest mechanisms. Using Transport Layer Security (TLS) for the connection between PAM and the LDAP store makes the use of simple binds acceptable for security.
The PAM_UNIX module’s authentication methods should suffice in environments where passwords never change or where password changes always flow from the LDAP store to Windows. However, you must not use the PAM_UNIX module in environments where passwords change on Windows.
In contrast to the PAM_UNIX module, the PAM_LDAP module binds to the LDAP store using a preformed, “user-centric” DN and a user-provided password when authenticating. This action in particular allows Identity Synchronization for Windows to maintain the synchronization of an entry. As a result, you will use this PAM_LDAP module in conjunction with Identity Synchronization for Windows and existing PAM modules.
The following section explains how to configure PAM and Identity Synchronization for Windows.
Configuring PAM and Identity Synchronization for Windows
Note –
In this section, Windows refers to Windows environments using Active Directory for authentication. Windows NT environments might require different approaches.
Use the following steps to configure Identity Synchronization for Windows and PAM for environments in which passwords can change on Windows:
-
Configure an LDAP repository for PAM (Step 1: Configure an LDAP Repository for PAM)
-
Install and configure Identity Synchronization for Windows to synchronize the LDAP repository and Windows (Step 2: Configuring Identity Synchronization for Windows
-
Populate the LDAP repository with user data (Step 3: Populating the LDAP Repository)
-
Configure a Solaris host to use the LDAP repository (Step 4: Configuring a Solaris Host to Use PAM)
-
Establish password authentication through the LDAP repository and enable users to change their own passwords (Step 5: Verifying that PAM is Interoperating with the LDAP Store)
-
Verify that user information (including passwords) flows between environments (Step 6: Demonstrating that User Changes are Flowing to the Reciprocal Environment)
The rest of this section provides detailed information about each step and uses examples to illustrate the process.
Step 1: Configure an LDAP Repository for PAM
This section explains how to configure an Identity Synchronization for Windows - supported LDAP repository for PAM, using the following example information:
-
The LDAP store is a Directory Server system that is hosted in a Solaris environment.
-
The host machine’s DNS name is LDAPHOST.EXAMPLE.COM.
-
The machine’s IP address is 192.168.220.219 in the test environment.
In this example, the IP address has a concrete value so that when you configure the PAM clients, you can use the repository’s IP address to avoid potential conflicts based on how the PAM client machine resolves its DNS queries.
Note –
Before you begin, consult the Sun Java System Directory Server Enterprise Edition 6.1 Installation Guide to verify that you are using a supported directory server.
To get PAM to work with Directory Server, edit the /usr/lib/ldap/idsconfig script and change 5 to 6 in the following code:
if [ "${IDS_MAJVER}" != "5" ]; then
Use the following steps to configure an Identity Synchronization for Windows- supported LDAP repository for PAM.
-
Configure the LDAP store using the Solaris idsconfig command line tool.
The idsconfig tool prompts you for values that are needed to form the Directory Information Tree (DIT) to be contained in the LDAP store. The idsconfig tool will manipulate the requisite LDAP store schema to accommodate the impending user population.
When you configure the test system, the following idsconfig summary screen is displayed:

Note –While executing the idsconfig command line tool, you need to know the values that have to be provided to the various configuration parameters. If you do not know the values, provide the default values that are prompted (other than the configuration parameters 1,2 and 4).
-
Change the value of the configuration parameters by selecting the configuration number against them.
-
Select an option from the list of predefined options that can be supplied to the selected parameter.
-
Evaluate the following key parameters’ values:
-
Domain to serve
-
Profile name to create
-
Service Auth Method pam_ldap
If necessary, use the idsconfig tool to change the context of these parameter values so they are appropriate for your deployment scenario. If you are working in a test environment where you can change DNS entries and set machine IP addresses to arbitrary values, you could use the names and addresses provided in this appendix.
-
-
Continue with the proxy creation initiated by the idsconfig tool. Provide the appropriate values (default or custom) for the various parameters to complete the configuration.
-
After idsconfig stores the generated configuration, the idsconfig tool will direct you to create virtual list view (VLV) indexes.
Note –VLV indexes (also called browsing indexes) enable PAM to quickly search for groups, users, and so forth. Refer to the following website for information about creating VLV indexes:
Pay particular attention to the number of VLV indexes that you are prompted to create. The idsconfig tool will provide a list of VLV indexes that are contextually sensitive to the state in which it finds the LDAP store.
The following figure shows the resulting topology, as seen from the Sun Java System Directory Server console:

When you are finished configuring the LDAP repository for PAM, continue to Step 3: Populating the LDAP Repository.
Step 2: Configuring Identity Synchronization for Windows
Now you can begin the process of bridging the LDAP store with the Windows’ authentication system. You accomplish this process by installing and configuring Identity Synchronization for Windows against the following two systems:
-
LDAPHOST.EXAMPLE.COM
-
WINHOST.EXAMPLE.COM.
You can install Identity Synchronization for Windows on the Solaris 8 host (LDAPHOST.EXAMPLE.COM) and then configure the software so that all of the distributed processes required by Identity Synchronization for Windows will run on LDAPHOST.EXAMPLE.COM.
Note –
Instructions for installing and configuring Identity Synchronization for Windows are provided in the Sun Java System Directory Server Enterprise Edition 6.1 Installation Guide.
When you finish configuring Identity Synchronization for Windows, continue to Step 3: Populating the LDAP Repository.
Step 3: Populating the LDAP Repository
After configuring an LDAP repository for PAM, you can push user entries to the LDAP store.
For example, you want to create a new, single user named George Washington that is subordinate to the following entry:
ou=people,dc=pam,dc=example,dc=com
In addition, you want to use an ou=people “container” that is subordinate to the Base DN you provided to idsconfig. You may have to make contextual changes to the Base DN you are going to use.
Use the following steps to populate the LDAP repository:
-
In the Directory Server Control Center console, select the Entry Management tab and then select the Browse tab, the various entity management controls display in the right pane.
-
Press New Entry to display the New Entry page.
-
Enter a value in the Entry Parent DN field to specify the location to save the entity in Directory Server and click Next.

-
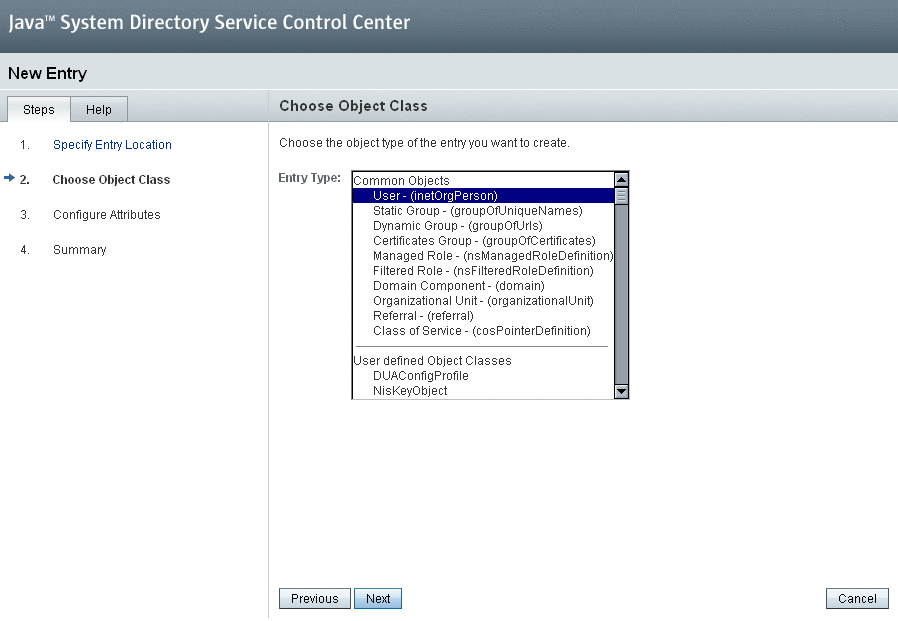
Associate your entity with an object class by selecting an option from the Entry type drop-down menu and then press Next. Based on the object class you associate with your entity, number of different parameters display
-
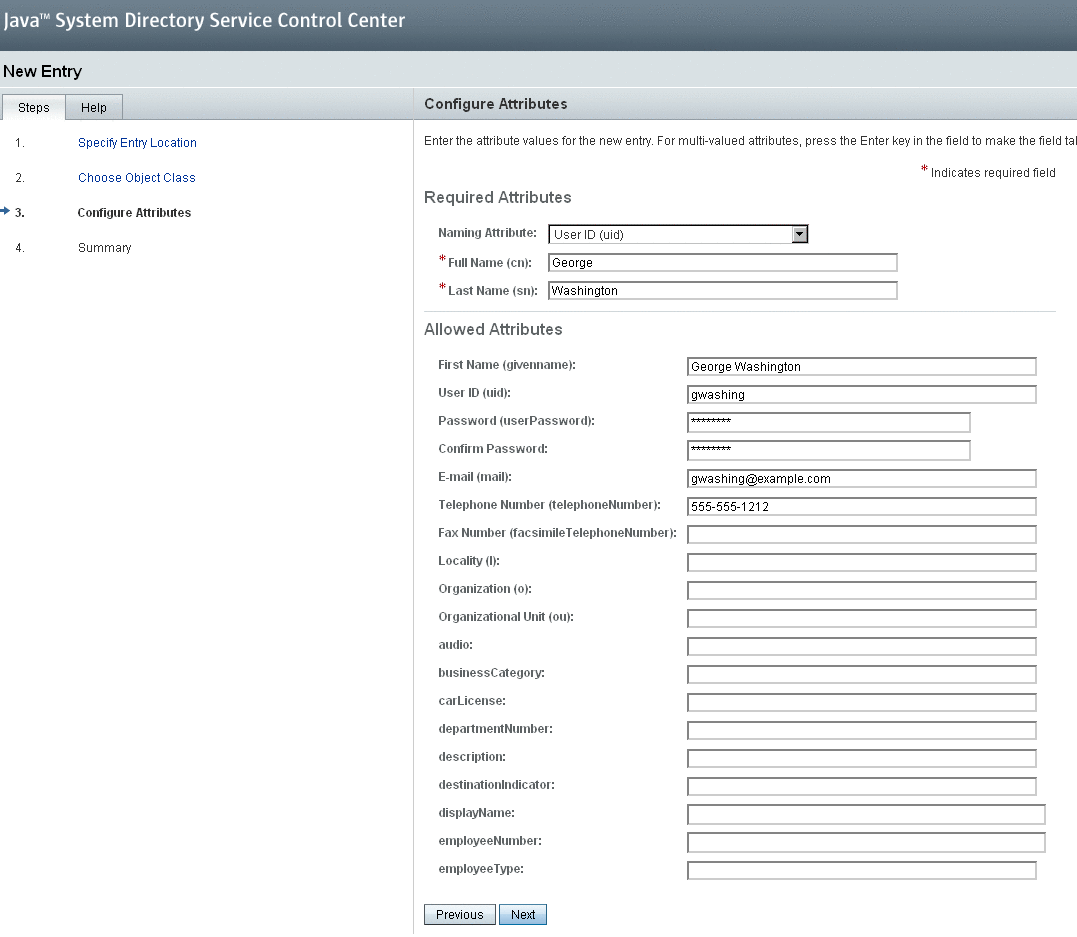
Enter the appropriate values and press Next. The summarized information of the entity displays.
-
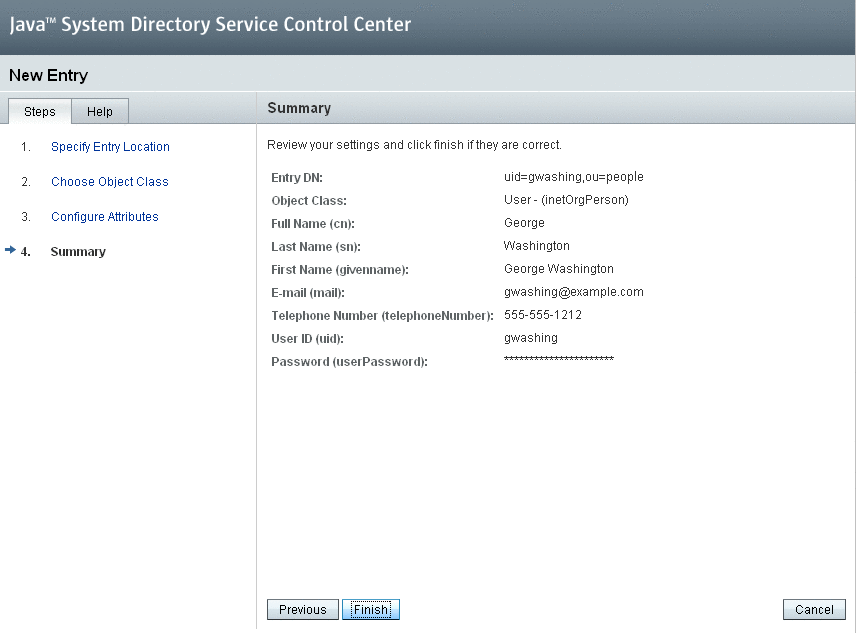
Click Finish to save the changes.
-
Verify that the new user (George Washington) is displayed in the console.
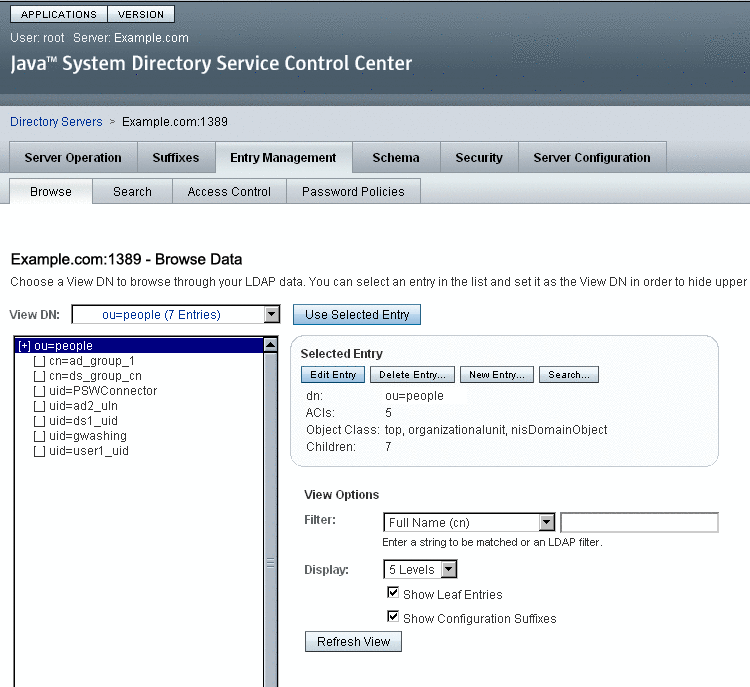
PAM clients can now authenticate against (and change the password for) this entry.
Step 4: Configuring a Solaris Host to Use PAM
After configuring the LDAP store, you must configure a Solaris system and create a PAM client to test the viability of PAM-based authentication.
To configure a Solaris host and create a PAM client you must
-
Install and configure a test Solaris system.
-
Configure the client machine.
-
Specify new rules for authentication and password management.
To illustrate this process, example instructions are provided in the next three sections.
Installing and Configuring a Solaris Test System
Install and configure a test Solaris system as an independent, standalone machine.
Note –
To simplify this example, consider configuring a machine that is devoid of any naming service directives (such as NIS or NIS+).
Consider using a Solaris 9 x86 4/04 system, which contains patches required for PAM and its associated subsystems.
Configuring the Client Machine
The following example instructions assume that you installed and configured the Solaris host as described in the previous section.
You must configure a PAM client machine to locate the LDAP host with a repository that the client will use to access (and effectively change) the LDAP store. To configure the PAM client, use the Solaris ldapclient command, which stores the client’s configuration information on the local host.
Note –
Be sure to make a back-up copy of the /etc/nsswitch.conf file before you run the ldapclient command. Running ldapclient has several side effects— which includes completely replacing the system’s /etc/nsswitch.conf file with a copy of the content in /etc/nsswitch.ldap.
The following image illustrates an example ldapclient command:
Figure A–1 Example ldapclient Command

-
You should use an IP address for this configuration instead of a DNS name, because a DNS might not available when the PAM system needs it.
-
It is also important to use a proxy credential set to prevent anonymous authenticators from manipulating data in the LDAP store.
The system provides a set of proxy credentials you can use when manipulating PAM data on the host LDAP store. (These proxy credentials match those created when you used the idsconfig command to initialize the LDAP store.)
-
The generated configuration stores the proxy’s password as an encrypted value, which is done for security purposes.
In addition to generating the requisite LDAP contact information, running ldapclient replaces the contents of the /etc/nsswitch.conf file with a copy of the contents found in /etc/nsswitch.ldap (the /etc/nsswitch.conf file you backed up earlier). Consequently, most (or all) of the directives found in /etc/nsswitch.conf will include the LDAP directive (which means the LDAP store will be consulted when resolving the associated service request).
In this example, the resulting /etc/nsswitch.conf file left on the system by the ldapclient command dropped the DNS directive from the list of used services when resolving hosts. As the example LDAP store may not be populated with the requisite host information needed to supplant DNS, the /etc/nsswitch.conf file is adjusted (which is the only change made to the post ldapclient command version of the /etc/nsswitch.conf file in this example).
You should edit the host’s declaration to read as follows:
hosts: files ldap dns
Instead of the following reconfigured value (using ldapclient):
hosts: ldap [NOTFOUND=return] files
It is possible that this adjustment will not address your environment’s needs correctly if you are running your DNS from the LDAP store. Be sure to apply this change only if your environment’s context depends on it. In addition, continue to compare and contrast the service directives with the effective /etc/nsswitch.conf file to the pre-ldapclient variant to validate that all services are now being directed correctly.
Specifying Rules for Authentication and Password Management
Note –
The example instructions provided in this section assume that you installed and configured the Solaris host as described in the Installing and Configuring a Solaris Test System section.
When you configure a Solaris host to use PAM, change the /etc/pam.conf file to incorporate the new rules you want it to use for authentication and password management. (See Introducing Windows NT into the configuration for an example /etc/pam.conf file.)
Before making any changes to the /etc/pam.conf file, be sure you make a backup copy of the original /etc/pam.conf file. Changes made to the /etc/nsswitch.conf and the /etc/pam.conf files can render your PAM client host inaccessible, which means that your configuration is set to deny everyone’s (including root) authentication access to the machine.
To recover from this situation:
-
Edit the pam.conf file in the current terminal/command session.
-
In a new terminal window, try connecting to the localhost using the rsh or ssh command and then try logging in.
-
If you fail to authenticate, you can still correct the problem using the open terminal/command window from .
-
If you are still unable to recover, restore the /etc/nsswitch.conf and /etc/pam.conf files back to their original state.
Using the Solaris sys-unconfig command may not restore your system because this command does not affect the /etc/nsswitch.conf and /etc/pam.conf files.
-
-
Repeat the steps 1 and 2 until you achieve the expected system behavior.
The changes you must make to /etc/pam.conf are trivial, but important. They are explained here:
Authentication
For purposes of authentication, you must edit the file as follows:
-
Locate any entries in the original /etc/pam.conf file that direct the system to use a rule requiring PAM_UNIX_AUTH, and edit them to accept a binding directive and to pass the server_policy parameter to the PAM_UNIX_AUTH module.
The following figure shows a diff between the original /etc/pam.conf file and the edited file.

-
Edit the file to add a new rule after the altered rule line. (the /etc/pam.conf file is processed from the top down, the line’s order is important here.)
The new rule requires the service to include PAM_LDAP when deciding to accept an authentication request. The use_first_pass parameter tells the PAM_LDAP module that it must accept a password collected by an earlier rule’s module (usually satisfied by the PAM_AUTHTOK_GET module).
Note –A use case that deserves special consideration is how PAM treats local user log on. A local user is a user who is permitted by /etc/nsswitch.conf directives to examine files (such as the root account) and is enumerated in the /etc/passwd file. Local users are not necessarily stored in the LDAP store.
Allowing the root user to be listed in the LDAP store would simplify management of an important user account that spans the topology; however, you could make an equally powerful case for systems whose root user must be kept "private" for a given machine.
To accommodate the need to keep an account (such as root) as a local user, it is important to configure PAM in such a way so that it does not access the LDAP back-end store if the user information has been saved in the local files. You can address this situation by specifying the server_policy parameter for the PAM_UNIX_AUTH module in the /etc/pam.conf configuration file.
Password Management
The only effective change required for password management is to append the server_policy parameter to the PAM_AUTHTOK_STORE module. When you use the server_policy parameter, the module will update passwords for local users (if found) or access the LDAP store accordingly. If the module cannot find a user either locally or in the LDAP store, then the system will provide an appropriate error message.
When you have finished configuring the Solaris host, continue to Step 5: Verifying that PAM is Interoperating with the LDAP Store.
Step 5: Verifying that PAM is Interoperating with the LDAP Store
You are now ready to test whether the newly configured Solaris host can operate as a PAM client. However, before trying to log in as the example user, George Washington, you need to “cheat” just a bit.
Note that George’s default home directory is /pres/home/gwashington. This directory does not yet exist on your test host nor have you configured the auto_home system on which to mount that file system automatically. You can create the directory manually to avoid any kind of problem.
Figure A–2 Creating a Directory

You should be able to see the PAM system in action immediately (because gwashing is both understood and displayed). The following image shows that the PAM LDAP client system you configured can authenticate as gwashing. In addition, this figure demonstrates that a password change can be accomplished and that the new password will be accepted on a subsequent authentication request.
Figure A–3 Configured PAM LDAP System
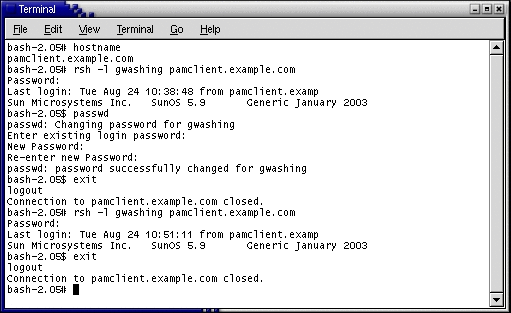
If you check the LDAP store log (specifically looking for non-search operations) you should see an audit of the LDAP operations done in support of the preceding log-in and password-change test.
Figure A–4 Auditing LDAP Operations

Step 6: Demonstrating that User Changes are Flowing to the Reciprocal Environment
Both Windows and the LDAP store (if so configured) use a one-way hash when storing passwords. This configuration prevents true replication of password data between the two systems, but does not prevent the password synchronization.
For an environment that is participating in bidirectional password synchronization, any existing user’s entry being tracked in both environments must be in one of the following states:
-
Case 1 (Case 1): Both Windows and the LDAP store contain current information
-
Case 2 (Case 2): Windows is current but the LDAP store is outdated or stale
-
Case 3 (Case 3): Windows is stale but the LDAP store is current
-
Case 4 (Case 4): Both Windows and the LDAP store are stale
Case 1
Case 1 is trivial — there is no work to do on either system because the entries are current.
Case 2
In Case 2, the LDAP store is in a state of waiting. Specifically, the system is waiting for an opportunity to capture the current, correct password for the LDAP store. In this case, a properly configured Identity Synchronization for Windows system marks the corresponding entry in the LDAP store as outdated or stale.
When an Identity Synchronization for Windows - enhanced Directory Server system gets a bind against a stale user, Identity Synchronization for Windows replays the given bind credentials to the configured Windows Active Directory to see if the user-supplied password is acceptable. If Active Directory authenticates the password, Identity Synchronization for Windows modifies the LDAP store so that it now possesses the password. Directory Server may eventually hash the value as part of its password policy and clears the stale status.
This process is known as on-demand synchronization, which results in both systems becoming synchronized with regard to the given entry after a successful bind occurs against the LDAP store.
Case 3
Case 3 can occur under normal circumstances, but most frequently occurs due to one of the following situations:
-
When the LDAP store possesses all the entries and Windows is waiting to be populated by Directory Server entries.
This situation requires the most attention to get the system into a synchronized state because existing entries in the LDAP store presumably have one-way, hashed passwords. When Identity Synchronization for Windows tries to migrate data to Windows, there are no usable values to push when propagating the user’s password. In this case, Windows will request a password when a user logs in first time.
If multiple users' sign-on to your Windows environment without an effective password is not acceptable, you can address this issue by setting a password programmatically for each entry in question. After Identity Synchronization for Windows reports that the system is synchronizing, you can use LDAP operations to specify the generated passwords on the LDAP store side or the Windows side of your environment.
To complete this process, you must specify a must-change password policy after the user’s next log on. This policy facilitates the transformation of an end user’s password from an openly known value to a secretly known value.
-
When an end user changes their password on the LDAP store side and the Identity Synchronization for Windows system is propagating the change through the system (either actively or by scheduling the work).
In this situation, the information on Windows remains stale for just a short time. The Identity Synchronization for Windows components have captured all of the information needed to bring the Windows system into a synchronized state. Identity Synchronization for Windows takes the time only to process the information and then the entry will be synchronized.
Case 4
This case is a contradiction. If both systems are stale, then how can you ascertain which system contains the authoritative information? Human intervention will be required in this case, and you must decide where to place the true state of an entry into one of the three, previously mentioned cases.
Note –
This situation can lead you into a very tedious process as you may be required to examine every user entry
For example, moving the entry from your LDAP store creates Case 3. If you created an new user called George Washington on a Solaris PAM machine, and then use the idsync resync command to push the entry to Windows, you can verify that Identity Synchronization for Windows has also created the entry on Windows in the following section.
 Verifying the entries on Windows
-
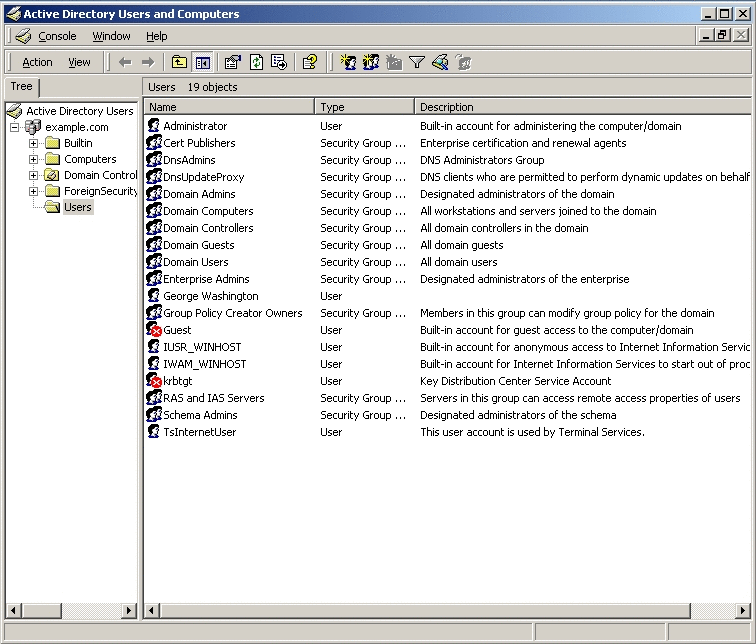
From the Windows Start menu, go to Control Panel -> Administrative Tools -> Active Directory User and Computers.
-
When the Active Directory User and Computers window is displayed, go the Active Directory Users pane (on the right) and select Users.
-
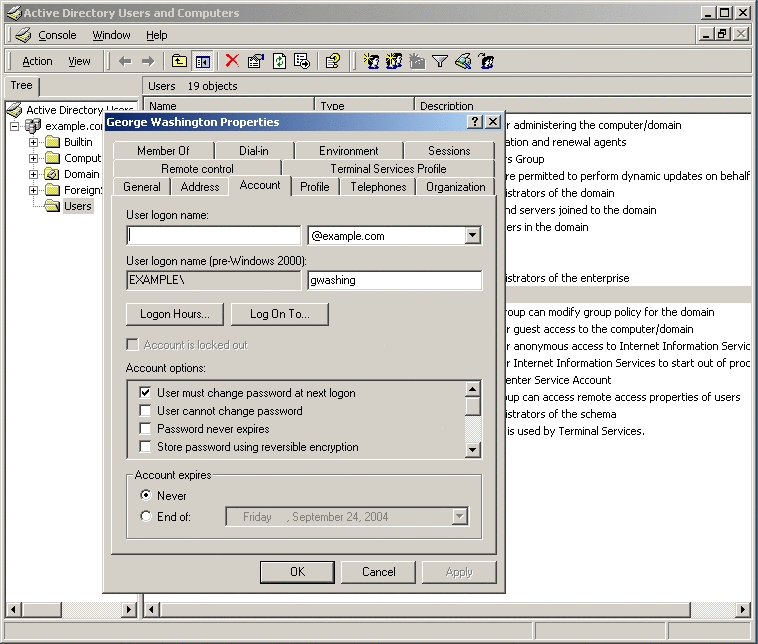
Right-click the George Washington entry and select Properties from the pop-up menu.
When the George Washington Properties dialog box is displayed, check the Account options section and you can see that the User must change password at next logon check box is enabled, which means George Washington will be required to change his password the next time he logs on.
-
If you log in as George Washington, you can see that Windows is correctly tracking the entry because the log-in attempt displays the Logon Message dialog box stating, “Your password has expired and must be changed.”
-
Click OK to close the Logon Message dialog box and to display the Change Password dialog box to provide a new password.
-
Enter and confirm a new password, but do not provide a value for the Old Password field.
This is first time the user has logged on (since being created over protocol), so supplying an old password value will cause an error message and Windows will ask you to enter the new password again.
-
Click OK to save the new password and close the Change Password dialog box.
If Windows accepts the new password, a message is displayed stating that the new password has been accepted.
At this point, George Washington's entry has moved from Case 3 (where the Windows entry is stale and the LDAP store is current) to Case 2 (where Windows is current and the LDAP store entry is stale).
George Washington's entry will maintain this condition until the next time he binds to the LDAP store. At that time, the entry will move to the Case 1 (where the entry is current on both Windows and the LDAP store).
Configuring Systems to Prevent Eavesdropping
This appendix does not include the procedure for configuring systems so that communication between systems is always conducted securely to prevent eavesdropping.
Some of the required configuration changes are addressed when you configure Identity Synchronization for Windows. For example, on Windows (for Windows 2000 or later), the Windows's password policies require that all password changes must be made using secured methods. Consequently, simply configuring the system partially addresses the security requirement.
However, it is still possible for eavesdroppers to see the bind attempts when Identity Synchronization for Windows components replay bind credentials. To address this issue, you must configure Identity Synchronization for Windows to communicate securely with its Windows data source by configuring the Identity Synchronization for Windows Connectors to trust certificates offered by the Windows’ Active Directory system.
In addition, you must ensure that all clients authenticating to the LDAP store do so over TLS. For PAM clients, you must configure them to trust the LDAP store and ensure that idsconfig specifies TLS:pam_ldap:simple as the only authentication method for the LDAP store.
The root accounts cannot use the passwd command arbitrarily to change an user’s password on PAM client hosts. You might consider this restriction to be a limitation, it depends on whether you trust the PAM client administrators or not.
Introducing Windows NT into the configuration
Previously in this appendix, it was stated that the term Windows referred to Windows platforms using Active Directory for authentication. However, the system being discussed in this appendix can use Windows NT in place of (or along with) newer variations of Windows.
Be aware however, Windows NT lacks the ability to use on-demand synchronization normally provided by Identity Synchronization for Windows.
The Identity Synchronization for Windows’ on-demand synchronization process must be able to bind to Windows over LDAP, with a set of candidate credentials — an ability that the Windows NT authentication system lacks. When Identity Synchronization for Windows environments are configured with Windows NT they expect password changes to be captured at their source and at the time the change is made. This capture requirement has ramifications when you initially bring up an Identity Synchronization for Windows environment. Specifically, the Identity Synchronization for Windows system needs to see a password change for any entry before the entry is actually synchronized.
Synchronization in an NT environment is similar to the proceeding steps described in Case 3, where you can modify the passwords of all entries in the LDAP store using an LDAP-based utility. As these modifications go through the LDAP store system, Identity Synchronization for Windows forwards the captured passwords to the Windows NT system, and then neither of the two systems would contain stale passwords. However, because you created the passwords by deterministic means, it may be easy to guess these passwords.
With this technique, you can limit potential damage if you use Windows NT’s password policy administration to force all users to change their password at their next logon. As each user changes their password, the Identity Synchronization for Windows password DLL installed on the Primary Domain Controller will forward the password change to the LDAP store.
Example /etc/pam.conf File
The following /etc/pam.conf file is provided to help you configure and run Identity Synchronization for Windows and PAM.
Note –
This /etc/pam.conf file is only an example.
The file’s configuration is not appropriate for all situations. Analyze the content thoroughly before using it in a production environment.
Example A–1 Example /etc/pam.conf File
# #ident "@(#)pam.conf 1.20 02/01/23 SMI" # # Copyright 1996-2006 Sun Microsystems, Inc. All rights reserved. # Use is subject to license terms. # # PAM configuration # # Unless explicitly defined, all services use the modules # defined in the "other" section. # # Modules are defined with relative pathnames, i.e., they are # relative to /usr/lib/security/$ISA. Absolute path names, as # present in this file in previous releases are still acceptable. # # Authentication management # # login service (explicit because of pam_dial_auth) # login auth requisite pam_authtok_get.so.1 login auth required pam_dhkeys.so.1 login auth required pam_dial_auth.so.1 login auth binding pam_unix_auth.so.1 server_policy login auth required pam_ldap.so.1 use_first_pass # # rlogin service (explicit because of pam_rhost_auth) # rlogin auth sufficient pam_rhosts_auth.so.1 rlogin auth requisite pam_authtok_get.so.1 rlogin auth required pam_dhkeys.so.1 rlogin auth binding pam_unix_auth.so.1 server_policy rlogin auth required pam_ldap.so.1 use_first_pass # # rsh service (explicit because of pam_rhost_auth, # and pam_unix_auth for meaningful pam_setcred) # rsh auth sufficient pam_rhosts_auth.so.1 rsh auth binding pam_unix_auth.so.1 server_policy rsh auth required pam_ldap.so.1 use_first_pass # # PPP service (explicit because of pam_dial_auth) # ppp auth requisite pam_authtok_get.so.1 ppp auth required pam_dhkeys.so.1 ppp auth required pam_dial_auth.so.1 ppp auth binding pam_unix_auth.so.1 server_policy ppp auth required pam_ldap.so.1 use_first_pass # # Default definitions for Authentication management # Used when service name is not explicitly mentioned for authenctication # other auth requisite pam_authtok_get.so.1 other auth required pam_dhkeys.so.1 other auth binding pam_unix_auth.so.1 server_policy other auth required pam_ldap.so.1 use_first_pass # # passwd command (explicit because of a different authentication module) # passwd auth binding pam_passwd_auth.so.1 server_policy passwd auth required pam_ldap.so.1 use_first_pass # # cron service (explicit because of non-usage of pam_roles.so.1) # cron account required pam_projects.so.1 cron account required pam_unix_account.so.1 # # Default definition for Account management # Used when service name is not explicitly mentioned for account management # other account requisite pam_roles.so.1 other account required pam_projects.so.1 other account required pam_unix_account.so.1 # # Default definition for Session management # Used when service name is not explicitly mentioned for session management # other session required pam_unix_session.so.1 # # Default definition for Password management # Used when service name is not explicitly mentioned for password management # other password required pam_dhkeys.so.1 other password requisite pam_authtok_get.so.1 other password requisite pam_authtok_check.so.1 other password required pam_authtok_store.so.1 server_policy # # Support for Kerberos V5 authentication (uncomment to use Kerberos) # #rlogin auth optional pam_krb5.so.1 try_first_pass #login auth optional pam_krb5.so.1 try_first_pass #other auth optional pam_krb5.so.1 try_first_pass #cron account optional pam_krb5.so.1 #other account optional pam_krb5.so.1 #other session optional pam_krb5.so.1 #other password optional pam_krb5.so.1 try_first_pass |
- © 2010, Oracle Corporation and/or its affiliates
