Creating a Cluster
This section, the second of three basic topics, explains how to create a cluster that contains two Application Server instances. For simplicity, the cluster runs completely within one machine. This topic includes the following tasks:
 To Start the Node Agent
A node agent is a lightweight process running on each machine that participates in an Application Server administrative domain. The node agent is responsible for starting and stopping server instances on the host. It also collaborates with the Domain Administration Server to create new Application Server instances.
One node agent is needed on a machine, for each Application Server administrative domain that the machine belongs to. If you chose the Node Agent Component during installation, a default node agent called hostname was created.
-
In a terminal window, type this command:
asadmin start-node-agent hostname
Replace the variable hostname with the name of the host where the Application Server is running.
-
When you are prompted, provide the master password.
The node agent starts and connects with the Domain Administration Server.
Note –If the Domain Administration Server is not running, the node agent might fail to start.
 To Create a Cluster
A cluster is a group of server instances (typically on multiple hosts) that share the same configurations, resources, and applications. A cluster facilitates load balancing across server instances and high availability through failover. You can create clusters spanning multiple machines and manage them with the help of the node agent process on each machine. In this guide, for simplicity, our sample cluster will be on one host, the same one where the Domain Administration Server is running.
Before You Begin
You must have already started the node agent process on each machine, as described in previous section. When you specify instances during cluster creation, you must associate the instance with a running node agent for the machine on which you want the instance to run. If the node agent is not running, the instance will not start. Node agent and instance names must be unique across clusters that are created in a domain.
-
Log in to the Administration Console at https:// localhost:4849 if you have not already done so.
Replace the localhost variable with the name of the system that the Domain Administration Server is running on.
4849 is the Admin Console’s default port number. If you changed the port number during the installation, use that number instead.
-
On the right pane, under Common Tasks, click Create New Cluster to display the Create Cluster input page.
-
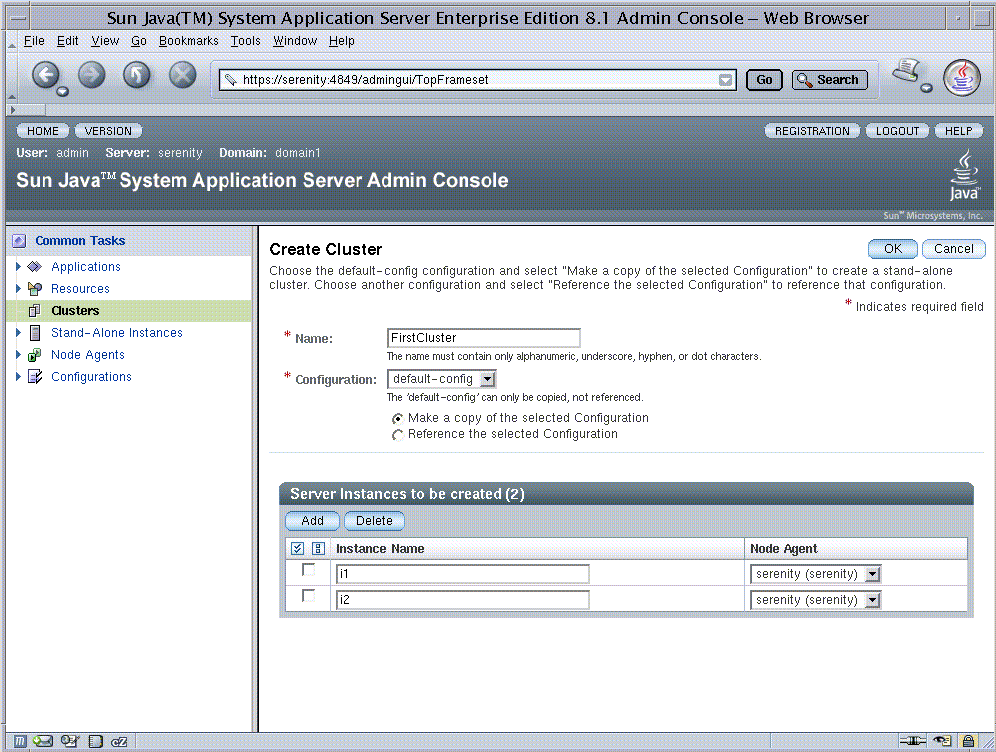
Type FirstCluster as the name of the new cluster.
-
From the drop-down list of available configuration templates, select the default-config configuration and choose Make a copy of the selected Configuration.
-
Click the Add button twice, to create two entries to specify two instances for the cluster.
-
Type i1 and i2 as instance names. The node agent name is automatically populated with the name of the local machine.
You see a screen like this:

-
Click OK. The create process can take a few minutes.
Note –This exercise requires automatically assigned port numbers for HTTP, HTTPS, IIOP and IIOPS. You can change them later, if desired.
When the create process is completed, the Cluster Created Successfully page appears, and FirstCluster appears in the tree in the left pane. A copy of the configuration template default-config was made for this cluster, and the name FirstCluster-config was assigned to it.
-
In the left pane, expand Clusters and click FirstCluster to display the General Information page for clusters.
-
Click the Instances tab to display i1 and i2, the instances that you created.
-
Click i1 to examine this instance.
-
From the tabs above the General Information heading of the right pane, click Properties and see the value for HTTP_LISTENER_PORT.
-
Repeat these steps for i2.
Note –By default, the HTTP ports are 38081 for i1 and 38080 for i2. If these ports were busy on your machine when you created these clusters, or if you had already assigned these ports to other instances and clusters, different port numbers were assigned.
-
Next Steps
In this section you have created a simple cluster on a single machine. You can also create clusters spanning multiple machines using the same basic steps (as long as you have the software installed and a node agent running on each machine).
You can stop the Quick Start trail here if you do not wish to continue, or you can go on to the next section.
- © 2010, Oracle Corporation and/or its affiliates
