|
| |
| Sun Java Enterprise System Installation Guide for Microsoft Windows | |
Chapter 5
Installing Sun Java Enterprise System Using the Installation WizardThis chapter provides instructions for using the interactive graphical interface, also called the installation wizard, to install the Sun Java™ Enterprise System software.
This chapter includes the following sections:
PrerequisitesBefore installing, you should have developed your installation plan. If it is not ready, refer to Chapter 2, "Developing Your Installation Sequence".
You should also survey your system for incompatibilities before running the installer. For more information, refer to What Components Are Installed?.
Running the Installation WizardThis section includes:
To Begin Installation
Verify that you have met the pre-installation requirements. Refer to Installation Prerequisites for a listing of the specific tasks that might apply to your installation. By default, the English language version of the wizard is always installed.
- Access the DVD drive where the Sun Java Enterprise System is mounted.
- Click the Setup launcher to start the wizard.
- The Welcome screen is displayed.
- Click Next to continue.
The Software License Agreement screen is displayed.
- Select I accept the terms of the license agreement, click Next to continue.
The Language Support screen displays.
To Install by Default Setup Type
- Select the Default setup type from the Setup Type Screen and Click Next.
All the components are installed and configured by Default and then the Administrator Settings Screen appears
- Follow the procedure from Step 4 of the To Initiate the Configure Automatically During Installation.
To Install by Custom Setup Type
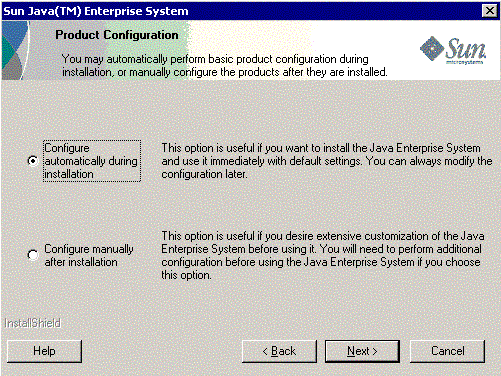
To Initiate the Configure Automatically During Installation
Configure automatically during installation installs the components you select and configures them according to the default configuration settings. If you are new to Sun Java Enterprise system and undecided about the configuration best suited for your need, this option is good to start with.
- Choose the components that you want to install and configure automatically, by selecting and deselecting the check boxes. You can select some or all components:
- Select All Components. By default all the products are selected in the Product Selection panel.
- Select Some Components. First deselect the check box next to Sun Java Enterprise System, and then select the check box next to the components you want to install. As you make each selection, the installer automatically selects any other component that the component you selected depends on.
Each selection causes additional files to be installed, adding to more disk space required for installation. The screen displays the disk space available on your machine and the disk space required by the components you selected.
- When a web application is selected (IM, UWC, AM, PS, DA) and if no web container is selected, the web container selection screen appears.
Select one of the Web containers
Click OK to get back to the product selection panel.
- Enter the Administrative user ID, Administrative user password, and re-type the Administrative user password in the respective fields. Click Next.
The Start Copying Files screen is displayed. This screen also confirms the component selections for this installation session.
- If the products selected lists all the components to be installed and configured, click Next. To make any changes to component selection, click Back and make the appropriate changes.
- The Setup Status screen and subsequently the Installation In Progress screen is displayed. It is followed by the Configuration In Progress screen. This might take some time depending on your server setup.
- The Information screen is displayed after the installation and configuration of the components are over. Click Next to continue.
- The Installation Complete screen is displayed. Click Finish to exit the setup.
To Initiate the Configure Manually After Installation
Configure manually after installation only installs the components you select, it does not configure them. You need to configure them later. See chapter on Configuring Components After Installation to proceed with the configuration of the components after successful installation.
- Select the Configure manually after installation radio button. Click Next.
The Customize Installation screen is displayed.
- You must choose the components that you want to install by selecting and deselecting the check boxes. You can select all or some of the components:
- Select All Components. Select the check box next to Sun Java Enterprise System.
- Select Some Components. Select the check box next to the components you want to install. As you make each selection, the installer automatically selects any other components that the component you selected depends on.
Each selection causes additional files to be installed, adding to the disk space required for installation. The screen displays the disk space available on your machine and the disk space required by the components you selected.
- Click Next to continue.
The Start Copying Files screen is displayed. This screen confirms the selections you made for installation.
- The Products Selected screen lists all the components to be install. Click Next. To make any changes to component selection, click Back and make appropriate changes.
- The Setup Status screen and subsequently the Installation In Progress screen is displayed. This might take some time depending on your server setup.
- The Information screen is displayed after the installation is over. Click Next to continue.
- The Installation Complete screen is displayed. Click Finish to exit the setup.
After an installation session, a summary file containing the list of products installed can viewed from the installation wizard by clicking the View Summary button, or from the installation directory [INSTALLDIR] where this file is saved.
To Cancel InstallationYou can cancel installation by clicking Cancel from the screens where it is enabled. This starts the uninstall process and removes any Java Enterprise System software that is already installed.
If you selected the Configure Automatically During Installation option, you should not cancel installation after copying files for installation is complete and configuration is in progress.
Next StepsAfter you have completed the installation and configuration of components through Configure Automatically During Installation option, proceed to Chapter 9, "Starting and Stopping Components", to learn how to start and stop these components.
If you have completed the installation through the Configure Manually After Installation option, proceed to the Configuring Components After Installation to learn how to configure the components.