Creating an Active Directory Source
You should add an Active Directory directory source for each Windows domain in your network that you want to synchronize.
Each Active Directory deployment has at least one global catalog that knows about all the global information across all Active Directory domains. To access the global catalog, the rights assigned to a normal user are sufficient unless you change the default permissions.
Note –
It is possible for each Active Directory server to be a global catalog and a deployment can have multiple global catalogs, but you only need to specify one global catalog.
 To Configure and Create Windows Active Directory Servers in a
Network
Perform these steps if there are Windows Active Directory servers in your network:
-
Select the Directory Sources node in the navigation tree, and then click the New Active Directory Source button on the Directory Sources panel.
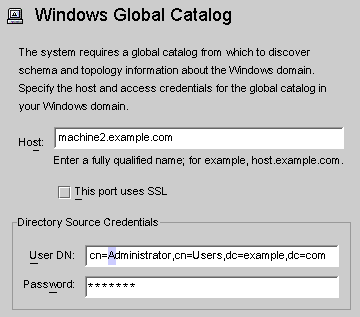
The Windows Global Catalog dialog box is displayed.
Figure 4–16 Windows Global Catalog
-
Enter the following information and then click OK:
-
Host: Enter the fully qualified host name of the machine that holds the global catalog for the Active Directory forest.
For example: machine2.example.com
-
This port uses SSL: Enable this option if Identity Synchronization for Windows is using an SSL port to communicate with the global catalog.
-
User DN: Enter your fully qualified Administrator’s (bind) distinguished name. (Any credentials that enable you to browse the schemas and determine which Active Directory domains are available on your system will suffice.)
-
Password: Enter a password for the specified user.
-
-
The Define Active Directory Source wizard is displayed, as follows.
Figure 4–17 Define an Active Directory Source Wizard
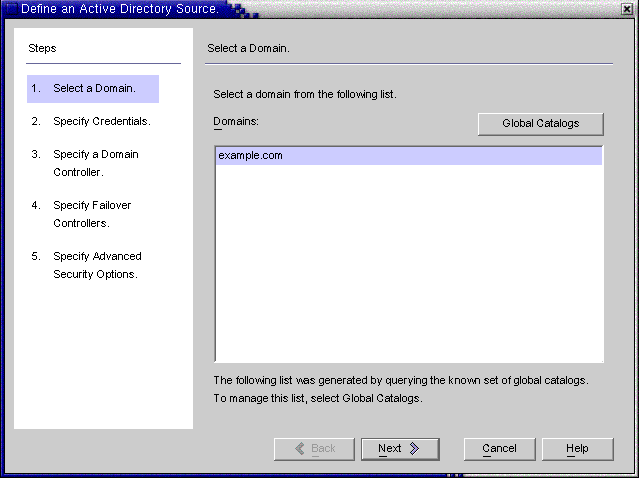
This wizard queries the Active Directory global catalog to determine what other domains exist, and displays those domains in the Domains list pane.
-
Select a name from the list pane to specify an Active Directory domain and click OK.
If the domain you want to use is not displayed in the list, you must add the global catalog that knows about that domain using the following steps:
-
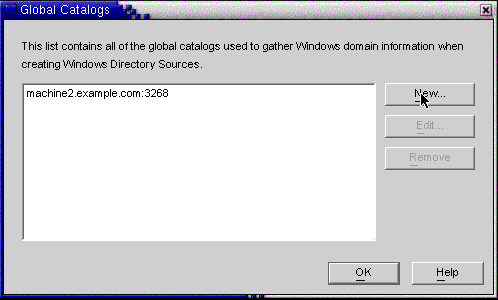
Click the Global Catalogs button and the Global Catalogs wizard is displayed.
Figure 4–18 Specifying a New Global Catalog
-
Click the New button.
-
When the Windows Global Catalog dialog box is displayed, provide the global catalog’s Host name and your Directory Source credentials (as described in Step 2), and then click OK
-
The new global catalog and port, are displayed in the Global Catalogs list panel. Select the catalog name, and then click OK.
-
Repeat these steps if you want to add more global catalogs (domains) to the system.
-
When you are done, click the Next button in the Select a Domain pane.
-
-
When the Specify Credentials panel is displayed, review the value in the User DN field.
Figure 4–19 Specifying Credentials for This Active Directory Source
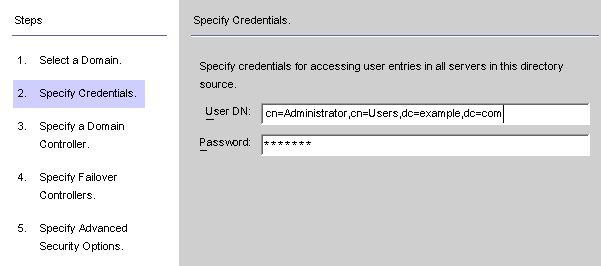
If the program did not automatically enter the Administrator’s distinguished name in the User DN field (or you do not want to use the Administrator’s credentials) enter a User DN and password manually.
When configuring an Active Directory source, you must provide a user name and password that the Active Directory Connector can use to connect to Active Directory.
Note –The Connector requires specific access rights. Minimum rights will depend on the direction of synchronization, as follows:
-
If you are configuring synchronization flow from Active Directory to Directory Server only, then the user provided for the Active Directory Connector does not require many special privileges. A normal user with the extra privilege to “Read All Properties” in the domain being synchronized will suffice.
-
If you are configuring synchronization flow from Directory Server to Active Directory, then the Connector user must have more privileges because, synchronization changes the user entries in Active Directory. In this setup, the Connector user must have either the “Full Control” privilege or be a member of the Administrators group.
-
-
Click Next to open the Specify a Domain Controller panel.
Figure 4–20 Specifying a Domain Controller
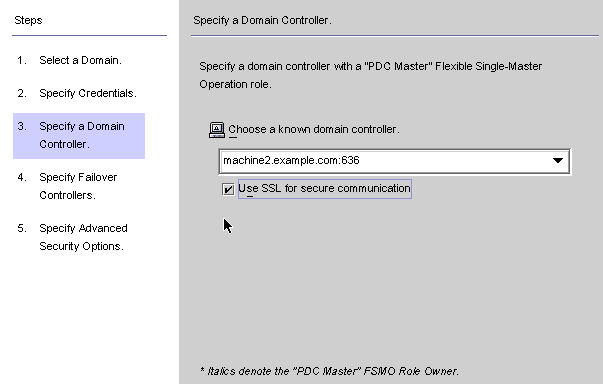
Use this panel to select a controller to synchronize within the specified domain. (The domain controller is similar in concept to a Directory Server’s preferred server.)
If the selected Active Directory domain has multiple domain controllers, select the domain controller with the Primary Domain Controller flexible single master operation (FSMO) role for synchronization.
By default, password changes made at all domain controllers will be replicated immediately to the Primary Domain Controller FSMO role owner, and if you select this domain controller, Identity Synchronization for Windows will synchronize these password changes immediately to the Directory Server.
In some deployments, the AvoidPdcOnWan attribute may be set in the Windows registry because there is a significant network “distance” to the PDC, which will delay synchronization significantly. (See Microsoft Knowledge Base Article 232690 for more information.)
-
Select a domain controller from the drop-down list.
-
If you want the Identity Synchronization for Windows Connector to communicate with the domain controller over a secure port, enable the Use a Secure Port box.
Note –The program automatically installs the CA certificate in the Active Directory Connector if you are using Microsoft certificate server. If you are not, then you must manually add the CA certificate in the Active Directory Connector (see Enabling SSL in the Active Directory Connector change your flow settings after initial configuration these procedures apply as well.
-
When you are done, click Next.
The Specify Failover Controllers panel is displayed (see Creating an Active Directory Source ). You can use this panel to specify any number of failover domain controllers.
Figure 4–21 Specifying Failover Controllers
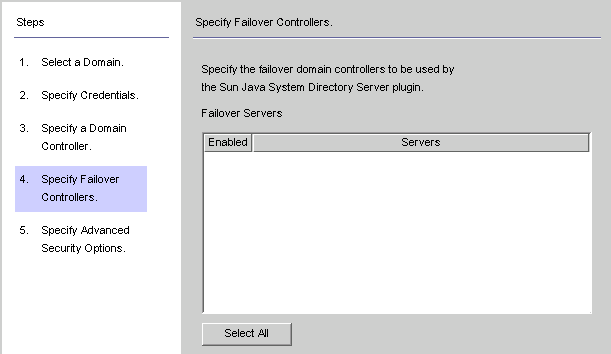
The Active Directory Connector communicates with only one Active Directory domain controller, and Identity Synchronization for Windows does not support failover changes applied by that Connector. However, the Directory Server Plug-in will communicate with any number of domain controllers when validating password changes to Directory Server.
If Directory Server tries connecting to an Active Directory domain controller and that domain controller is not available, Directory Server will iteratively try connecting to the failover domain controller(s) specified.
-
Select one or more of the server names listed in the Failover Servers list pane (or click the Select All button to specify all of the servers in the list), and then click Next.
-
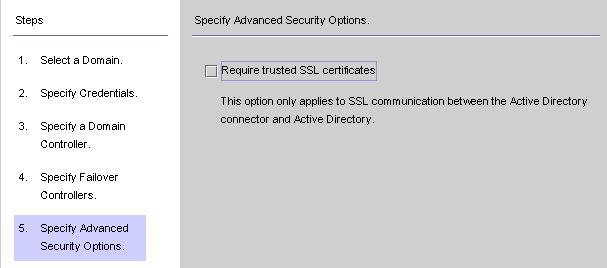
The Specify Advanced Security Options panel is displayed.
The Require trusted SSL certificates option is active (available for selection) only if you enabled the Use SSL for Secure Communication box on the Specify a Domain Controller panel.
Figure 4–22 Specifying Advanced Security Options
-
If the Require trusted SSL certificate box is disabled (Default setting ), the Active Directory Connector will connect to Active Directory over SSL and does not verify that it trusts the certificates passed by Active Directory.
Disabling this option simplifies the setup process because you do not have to put an Active Directory Certificate in the Active Directory certificate database.
-
If you enable the Require trusted SSL certificate box, the Active Directory Connector will connect to Active Directory over SSL and it must verify that it trusts the certificates passed by Active Directory.
Note –You must add Active Directory Certificates to the Active Directory Connector’s certificate database. For instructions, see Adding Active Directory Certificates to the Connector’s Certificate Database.
-
-
When you are finished with the Advanced Security Options panel, click the Finish button.
The program adds the newly specified Active Directory source to the navigation tree under Directory Sources.
-
Select the Active Directory source node to view the Active Directory Source panel.
Figure 4–23 Active Directory Source Panel
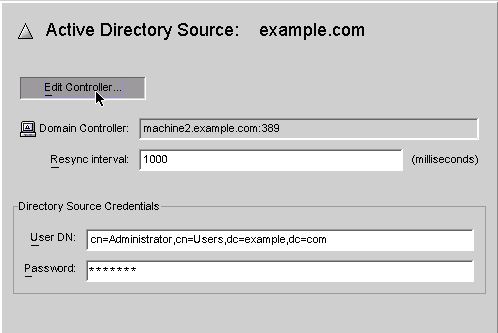
From this panel, you can perform the following tasks:
-
Edit Controllers: Click this button to reopen the Specify a Domain Controller panel where you can change any of the domain controller configuration parameters. If necessary, review the instructions provided for Creating an Active Directory Source.
-
Resync Interval: Specify how often you want the Active Directory Connector to check for changes. (Default is 1000 milliseconds)
-
Directory Source Credentials: Change the specified User DN and/or password.
-
- © 2010, Oracle Corporation and/or its affiliates
