Graphical Workspace Manager Tasks
There are a number of tasks that you can perform using Graphical Workspace Manager:
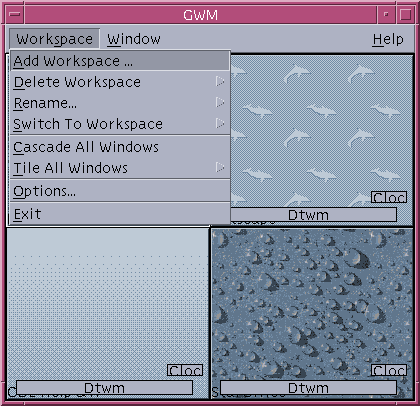
Figure 7–2 Graphical Workspace Manager – Workspace Menu

To Add a Workspace
-
Choose Add Workspace from the Workspace menu.
-
Enter a name in the Add Workspace dialog box.
-
Click OK.
To Delete a Workspace
-
Choose Delete Workspace from the Workspace menu.
-
Choose the workspace to be deleted from the submenu.
To Rename a Workspace
-
Choose Rename from the Workspace menu.
-
From the submenu, select the workspace to be renamed.
-
Enter the new name in the Rename Workspace dialog box.
-
Click OK.
To Switch to a Different Workspace
-
Choose Switch to Workspace from the Workspace menu.
-
From the submenu, select the workspace to which you want to switch.
To Cascade All Windows in a Workspace
This task executes in the current workspace.
Choose Cascade All Windows from the Workspace menu.
To Tile All Windows in a Workspace
This task executes in the current workspace.
To Open the Options Dialog
Choose Options from the Workspace menu.
For further information on the Options Dialog, see Graphical Workspace Manager Options Dialog.
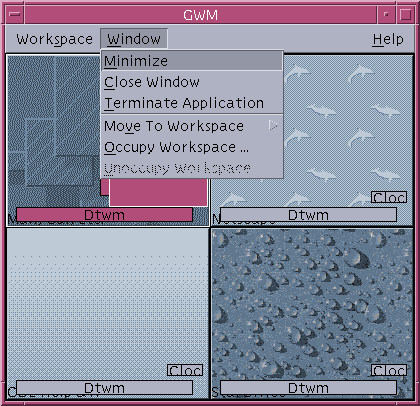
Figure 7–3 Graphical Workspace Manager — Window Menu

To Minimize a Window
To Close a Window
-
Select a window in Graphical Workspace Manager.
-
Choose Close Window from the Window menu.
-
(Optional) If the window you are closing is the only window that contains the application, a confirmation dialog will appear. Click OK, if you want to continue with closing the window.
To Terminate an Application
-
Select an application window in Graphical Workspace Manager.
-
Choose Terminate Application from the Window menu.
-
In the confirmation dialog box, click OK.
To Move a Window to a Different Workspace
-
Select a window in the Graphical Workspace Manager.
-
Choose Move to Workspace from the Window menu.
-
From the submenu, choose the workspace to which you want the window to move. You may also choose All Workspaces.
To Occupy Workspace(s)
-
Select a window in the Graphical Workspace Manager.
-
Choose Occupy Workspace from the Window menu.
-
Choose the workspace(s) from the submenu.
Multiple workspaces can be selected by pressing the Control key and selecting the additional workspaces.
-
Click OK.
To Unoccupy Workspace
Graphical Workspace Manager Options Dialog
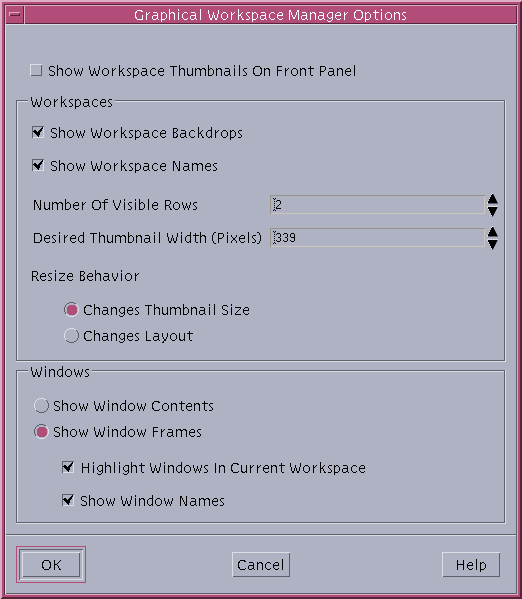
The Graphical Workspace Manager Options dialog box contains a number of options that can be set. They are:
Figure 7–4 Graphical Workspace Manager Options Dialog Box

-
Show Workspace Thumbnails On Front Panel – Determines if the Graphical Workspace Manager workspace images will appear on the Front Panel.
-
Show Workspace Backdrops – Determines if the actual workspace backdrops will be shown in the Graphical Workspace Manager.
-
Show Workspace Names – Displays the workspace names in the thumbnailed workspaces of the Graphical Workspace Manager.
-
Number of Visible Rows – Enables the setting of the number of rows used to display the open workspaces of the Graphical Workspace Manager.
-
Desired Thumbnail Width (Pixels) – Sets the width, in pixels, of the workspace display in the Graphical Workspace Manager.
-
Changes Thumbnail Size – Specifies that a resize of the Graphical Workspace Manager will actually increase/decrease the size of the Graphical Workspace Manager main window, thus changing the size of the workspace thumbnails.
-
Changes Layout – Specifies that a resize of the Graphical Workspace Manager will only change the layout of the workspace thumbnails within the Graphical Workspace Manager.
-
Show Window Contents – Causes window images to be grabbed and displayed.
-
Show Window Frames – Window images will not be grabbed. Blank boxes will be displayed.
-
Highlight Windows In Current Workspace – The windows in the current workspace will be displayed in the desktop highlight color. This option is only available if Show Window Frames is selected.
-
Show Window Names – The command name of the window will appear in the window. This option is only available if Show Window Frames is selected.
- © 2010, Oracle Corporation and/or its affiliates
