Introduction to Solaris Volume Manager
Solaris Volume Manager is a software product that lets you manage large numbers of disks and the data on those disks. Although there are many ways to use Solaris Volume Manager, most tasks include the following:
-
Increasing storage capacity
-
Increasing data availability
-
Easing administration of large storage devices
In some instances, Solaris Volume Manager can also improve I/O performance.
How Solaris Volume Manager Manages Storage
Solaris Volume Manager uses virtual disks to manage physical disks and their associated data. In Solaris Volume Manager, a virtual disk is called a volume. For historical reasons, some command-line utilities also refer to a volume as a “metadevice.”
A volume is functionally identical to a physical disk in the view of an application or a file system. Solaris Volume Manager converts I/O requests directed at a volume into I/O requests to the underlying member disks.
Solaris Volume Manager volumes are built from disk slices or from other Solaris Volume Manager volumes. An easy way to build volumes is to use the graphical user interface that is built into the Solaris Management Console. The Enhanced Storage tool within the Solaris Management Console presents you with a view of all the existing volumes. By following the steps in wizards, you can easily build any kind of Solaris Volume Manager volume or component. You can also build and modify volumes by using Solaris Volume Manager command-line utilities.
For example, if you need more storage capacity as a single volume, you could use Solaris Volume Manager to make the system treat a collection of slices as one larger volume. After you create a volume from these slices, you can immediately begin using the volume just as you would use any “real” slice or device.
For a more detailed discussion of volumes, see Volumes.
Solaris Volume Manager can increase the reliability and availability of data by using RAID 1 (mirror) volumes and RAID 5 volumes. Solaris Volume Manager hot spares can provide another level of data availability for mirrors and RAID 5 volumes.
Once you have set up your configuration, you can use the Enhanced Storage tool within the Solaris Management Console to report on its operation.
How to Administer Solaris Volume Manager
Use either of these methods to interact with Solaris Volume Manager:
-
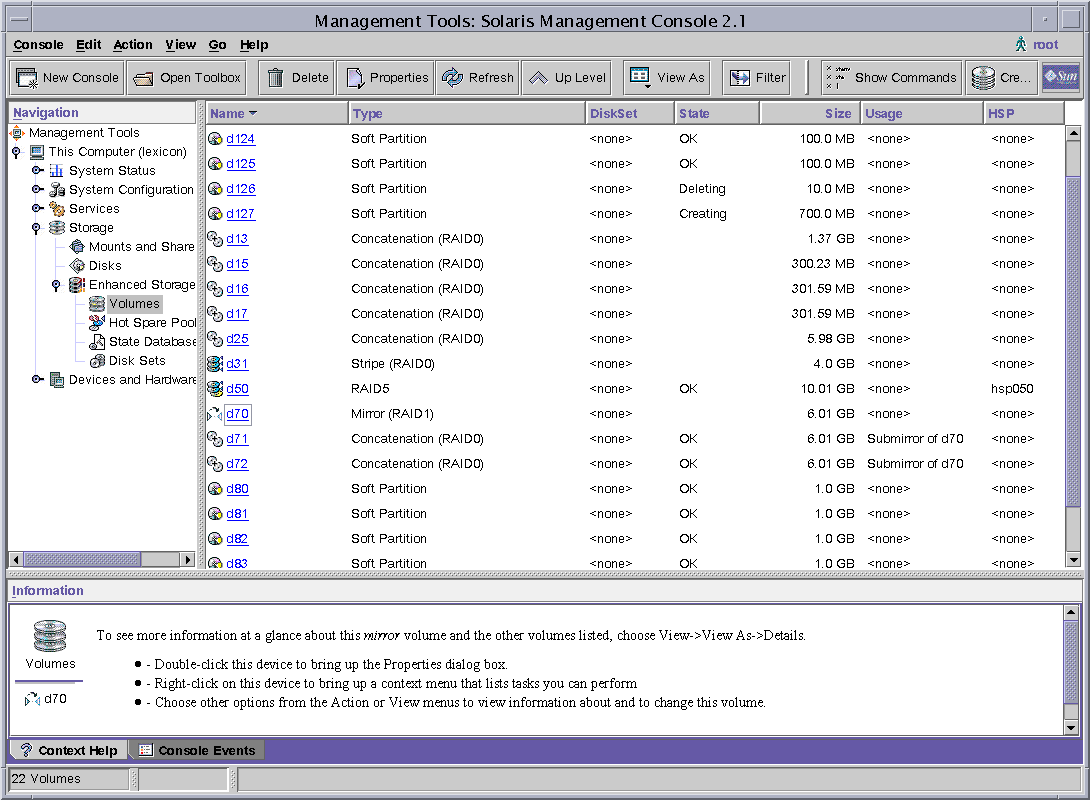
Solaris Management Console–This tool provides a graphical user interface to volume management functions. Use the Enhanced Storage tool within the Solaris Management Console as illustrated in Figure 3–1. This interface provides a graphical view of Solaris Volume Manager components, including volumes, hot spare pools, and state database replicas. This interface offers wizard-based manipulation of Solaris Volume Manager components, enabling you to quickly configure your disks or change an existing configuration.
-
The command line–You can use several commands to perform volume management functions. The Solaris Volume Manager core commands begin with meta for example the metainit and metastat commands. For a list of Solaris Volume Manager commands, see Appendix B, Solaris Volume Manager Quick Reference.
Note –
Do not attempt to administer Solaris Volume Manager with the command line and the graphical user interface at the same time. Conflicting changes could be made to the configuration, and the behavior would be unpredictable. You can use both tools to administer Solaris Volume Manager, but not concurrently.
Figure 3–1 View of the Enhanced Storage tool (Solaris Volume Manager) in the Solaris Management Console

 How to Access the Solaris Volume Manager Graphical
User Interface
The Solaris Volume Manager graphical user interface (Enhanced Storage) is part of the Solaris Management Console. To access the graphical user interface, use the following instructions:
Steps
-
Start Solaris Management Console on the host system by using the following command:
% /usr/sbin/smc
-
Double-click This Computer.
-
Double-click Storage.
-
Double-click Enhanced Storage to load the Solaris Volume Manager tools.
-
If prompted to log in, log in as root or as a user who has equivalent access.
-
Double-click the appropriate icon to manage volumes, hot spare pools, state database replicas, and disk sets.
Tip –All tools in the Solaris Management Console display information in the bottom section of the page or at the left side of a wizard panel. Choose Help at any time to find additional information about performing tasks in this interface.
- © 2010, Oracle Corporation and/or its affiliates
