JavaScript is required to for searching.
Skip Navigation Links
Exit Print View
Oracle VTS 7.0 Software

User's Guide for Patch Set 8 and Subsequent Compatible Releases

search filter icon
search icon

Document Information

Using This Documentation

Related Documentation

Feedback

Support and Accessibility

Understanding the Software

Software Overview

Software Architecture

Testable Components

Understanding Test Modes

Online Stress Test Mode

System Exerciser Test Mode

Component Stress Test Mode

User Interface Options

Installing or Updating the Software

Preparing for Installation

Installation Requirements

Determine Installed Software Version

Determine Installed Package Version for Oracle Solaris 11 Updates

Determine Installed Package Version for Oracle Solaris 10 Updates

Obtaining Packages for Installation

Software Packages

Install the Software for Oracle Solaris 11

Install the Software for Oracle Solaris 10 Updates

Set Up Man Page Access

Upgrade the Software for Oracle Solaris 11

Upgrade the Software for Oracle Solaris 10 Updates

Uninstall the Software for Oracle Solaris 11

Uninstall the Software for Oracle Solaris 10 Updates

Starting the Software

Preparing to Start the Software

System Requirements

Runtime Considerations

Device Preparations

Starting the Software (Interface)

Start the Software (GUI)

Start the Software (TTY UI)

Start the Software (CLI)

Starting the Software (No Interface)

Start Testing (No UI)

Start Long Testing

Start Short Testing

Start Memory Sub System Testing

Start Testing in all Stress Levels

Start Testing With Time Information

Starting the Software (CD/DVD)

Start the Software (Bootable CD/DVD)

Testing Using the GUI

GUI Overview

Configuring the Test Session (GUI)

View the Host Configuration (GUI)

Select a Test Mode (GUI)

Change Global Options (GUI)

Select Device to Test (GUI)

Change Individual Test Options (GUI)

Begin the Test Session (GUI)

Monitor the Test Session

Stop the Test Session (GUI)

Review the Log Files (GUI)

Delete the Log Files (GUI)

Reset the Test Session (GUI)

Use the Auto Mode Sequencer (GUI)

Saving a Test Session Configuration for Repeated Use (GUI)

Create and Save a Test Session (GUI)

List Test Sessions (GUI)

Load a Test Session (GUI)

To Create a Configuration File to Load Sessions From a User Defined Location

Delete a Test Session (GUI)

Reset a Test Session (GUI)

Quit the GUI

Testing Using the TTY UI

TTY UI Overview

Keyboard Commands for Navigation (TTY UI)

Display TTY UI HELP and Release Table

View the Host System Configuration (TTY UI)

Configuring the Test Session (TTY UI)

Select a Test Mode (TTY UI)

Change Global Options (TTY UI)

Select Devices to Test (TTY UI)

Change Individual Test Options (TTY UI)

Begin the Test Session (TTY UI)

Monitor the Test Session

Stop the Test Session (TTY UI)

Review the Log Files (TTY UI)

Reset the Test Session Results (TTY UI)

Saving a Test Configuration for Repeated Use

Session Files in Oracle VTS

Create and Save a Test Session (TTY UI)

List Test Sessions (TTY UI)

Load a Test Session (TTY UI)

Delete a Test Session (TTY UI)

Reset a Test Session (TTY UI)

Reprobe the Devices (TTY UI)

Use the Auto Mode Sequencer (TTY UI)

Quit VTS TTY UI

Testing Using the CLI

CLI Overview

View the Host Configuration

Configuring the Test Session (CLI)

Display and Set a Test Mode (CLI)

Display and Set Global Options (CLI)

Select Device to Test (CLI)

Change Individual Test Options (CLI)

Begin the Test Session (CLI)

Monitor the Test Session (CLI)

Stop the Test Session (CLI)

Review the Log Files (CLI)

Deleting the Log Files

Reset the Test Session (CLI)

Saving a Test Configuration for Repeated use (CLI)

Create and Save a Test Session (CLI)

List Test Sessions (CLI)

Load a Test Session (CLI)

Delete a Test Session (CLI)

Reset a Test Session (CLI)

Reprobe the Devices (CLI)

Use the Auto Mode Sequencer (CLI)

Stop the CLI

Bootable CD/DVD (x86)

Overview and Limitations

Using the Oracle VTS 7.0 PS16 Bootable Image Built on Oracle Solaris 11 Update Release

Using the Oracle VTS 7.0 PS13 or Older Bootable Image Built on Oracle Solaris 10 and Update Release

Use the Service Processor to Boot From the VTS Image

Interpreting VTS Messages

Log File Descriptions

Test Status Indicators

Log Files

VTS Messages

Using Additional VTS Features

Generate a Test Report

Use the vtsprobe Utility

Auto Mode Sequencer

Overview

Expected Behavior in Different Use Cases

Loop Option

Exiting the Auto Mode Sequencer

Automatic Setting of Levels

Safe and Unsafe Options

Create a Configuration File for the Unsafe Option

Understanding the Tests

Disk Test

Disk Subtests

Disk Test Setup

Disk Test Options

Disk Test Options (Configuration File)

Environment Test

Environment Test Requirements

Environment Test Modes

Graphics Test

Graphics Test Overview

Graphics Test Modes

Graphics Test Setup

Disable the Solaris Screen Saver

Change the Screen Resolution

Run hlgraphics Test

Check Presence of ast Driver on T4 System

Host Bus Adapter Test

Host Bus Adapter Test Modes

Host Bus Adapter Test Setup

Host Bus Adapter Test Options Through Configuration File

Io_Interconnect Test

Io_Interconnect Test Mode

Io_Interconnect Test Setup

Live-Network Port Testing Settings

Io_Interconnect Test Options Through Configuration File

IOports Test

IOports Test Overview

IOports Test Modes

IOports Test Setup

Media Test

Media Test Overview

Media Test Modes

Media Test Setup

Memory Test

Memory Test Overview

Memory Test Swap Space Requirements

Memory Test Modes

Memory Test Options Through Configuration File

Network Test

Network Test Overview

Network Test Modes

Network Test Setup

Live-Network Port Testing Settings

Network Test Options

Processor Test

Processor Test Overview

Processor Test Modes

Removable Disk Test

Removable Disk Test Overview

Media Subtest

File System Subtest

Removable Disk Test Modes

Removable Disk Test Options Through Configuration File

Supported Configuration Parameters

VTS Harness Configuration File Parameters

Disk Test Configuration File Parameters

Removable Disk Test Configuration File Parameters

Host Bus Adapter Test Configuration File Parameters

Io_Interconnect Test Configuration File Parameters

Memory Test Configuration File Parameters

Network Test Configuration File Parameters

VTS on Logical Domains

Running Oracle VTS on LDOMS

VTS Sessions on LDOMs

Building Test Connectors

Test Connector Overview

25-Pin Port A-to-Port B Plug

25-Pin Port A-to-A Port B-to-B Plug

9-Pin Male Single-Port Plug

9-Pin Female Single-Port Plug

9-Pin to 9-Pin Port-to-Port Cable

NT to TE Cable

TPE Cable for Fast Ethernet

TPE Cable for Gigabit and 10/100 Ethernet

9-Pin Male DB-9 External Connector

9-Pin Female DB-9 External Connector

Index

GUI Overview

The GUI is an Oracle Java technology-based standalone user interface. The GUI needs to be started on the same machine under test that has the VTS kernel running. The GUI does not allow remote connection.
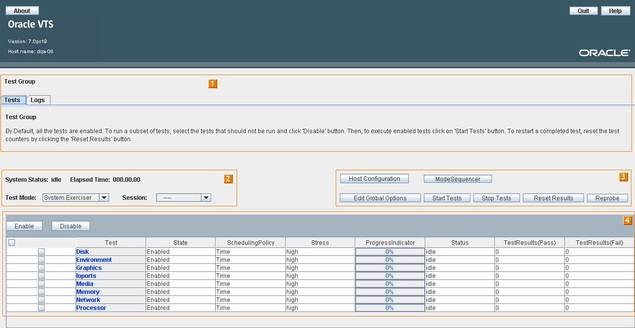
image:GUI Main Window
Icon
Name
Description
image:
Test Group Tab
Lists the tests that are registered with the host machine. The Tests tab is associated with the Test Group View, and the Logs tab is associated with the log view of the software. The host machine name can be viewed at the top of the page.
image:
Test Group Pane
Displays the tests registered with the host. You can set the testing modes, schedule the tests, and monitor the testing status of each of the tests.
image:
Test Group Buttons
You can perform various functions on the Test Group table using the following buttons:
  • Host Configuration: Displays the details of the machine under test.

  • Mode Sequencer: Displays the options to set the Auto Mode Sequencer to run the tests.

  • Edit Global Options: Sets options that you can apply to all the tests globally. These options can be used to schedule the total time of the testing session.

  • Start Tests: Starts all the tests that are enabled. By default, all the tests are enabled. To run only a particular test, disable other tests by clicking the corresponding checkbox and then clicking Disable. To start a particular test when other tests are already running, select the checkbox for the test and click Enable.

  • Stop Tests: Stops all the tests that are started. To stop a particular test that is running, select the checkbox for the test and click Disable.

  • Reset Results: Resets the status counters (pass, elapsed time, and error count of a test is reset to zero), and progress bar to an idle state. Before starting a new test session, click Reset.

  • Reprobe: Reprobes the system for devices currently available.

image:
Test Table
Describes the parameters available in setting up a test. The Test Group screen displays the name of the system being viewed. The following items describe the Test Table:
  • Enable: Enables all the selected tests. To verify which tests are enabled, look for the state of the tests under the State column corresponding to the test.

  • Disable: Disables all the selected tests. To verify if a particular test is disabled, look for the state of the test under the State column corresponding to the test.

  • Test: Tests can be any of the following: Memory, Disk, Removable Disk, Network, HBA, Graphics, Processor, IO ports, lnterconnect and Media. Click on the test link to set the test options, namely: stress level, scheduling policy (time-based or in terms of test passes) and error limit.

  • State: Displays the state of the test at a given time (enabled or disabled).

  • Scheduling Policy: Displays the scheduling policy selected for the test, whether Test Time or Test Pass based on the testing requirement.

  • Stress: Displays the stress level at which the test is running (low or high).

  • Progress Indicator: Indicates the percentage of test run completed. A tool tip over the progress bar shows the progress of the test in percentage and the current state of the test.

  • Status - Displays the status of the test being viewed.

  • Test Results: Displays the test results in two columns. The first column displays the number of test errors and the second displays the number of test successes.

Related Information