| Exit Print View | |
Sun Fire X4170 M2 and X4270 M2 Servers Installation Guide for Linux, Virtual Machine Software, and Oracle Solaris Operating Systems |

|
| Exit Print View | |
Sun Fire X4170 M2 and X4270 M2 Servers Installation Guide for Linux, Virtual Machine Software, and Oracle Solaris Operating Systems |

|
Part I Linux Software Installation
1. Assisted OS Installation With Oracle Hardware Installation Assistant
2. Getting Started With Linux Operating System Installations
4. Installing SUSE Linux Enterprise Server
Installing SLES 10, SLES 11, or SLES 11 SP1 Using Local or Remote Media
Install SLES10 SP3 Using Local or Remote Media
Installing SLES 11 or SLES 11 SP1 Using Local or Remote Media
Installing SLES 10 SP3, SLES 11, or SLES 11 SP1 Using a PXE Network Environment
Install SLES 10 SP3, SLES 11, or SLES 11 SP1 Using PXE Network Boot
Updating the SLES Operating System
5. Installing Red Hat Enterprise Linux
Part II Virtual Machine Software Installations
6. Getting Started With Virtual Machine Software Installations
8. Installing VMware ESX or ESXi
Part III Oracle Solaris Installation
9. Getting Started With Oracle Solaris Operating System Installations
10. Installing Oracle Solaris 10
Part IV System Administrator References
A. Supported Installation Methods
B. Supported Operating Systems
C. BIOS Defaults for New Installations
This chapter provides information about installing SUSE Linux Enterprise Server (SLES) 10 SP3, SLES 11, or SLES 11 SP1 (or subsequent release) for x86 (64-bit).
Note - It is highly recommended that you use the Oracle Hardware Installation Assistant to
install the Oracle Linux operating system on your server. The installation assistant provides
and installs the device driver(s), if required, for you. For more information about using
Oracle Hardware Installation Assistant to install an operating system, see ![]() Chapter 1, Assisted OS Installation With Oracle Hardware Installation Assistant.
Chapter 1, Assisted OS Installation With Oracle Hardware Installation Assistant.
This chapter includes the following topics:
![]() Installing SLES 10, SLES 11, or SLES 11 SP1 Using Local or Remote Media
Installing SLES 10, SLES 11, or SLES 11 SP1 Using Local or Remote Media
![]() Installing SLES 10 SP3, SLES 11, or SLES 11 SP1 Using a PXE Network Environment
Installing SLES 10 SP3, SLES 11, or SLES 11 SP1 Using a PXE Network Environment
The following procedure describes how to boot the SLES 10 SP3 or SLES 11 SP1 operating system from local or remote media. It assumes that you are booting the SLES 10 SP3, SLES 11, or SLES 11 SP1 installation media from one of the following sources:
SLES 10 SP3, SLES 11, or SLES 11 SP1 (or subsequent release) CD or DVD set (internal or external CD/DVD)
SLES 10 SP3, SLES 11, or SLES 11 SP1 (or subsequent release) ISO DVD image (network repository)
Note - If you are booting the installation media from a PXE environment, refer to ![]() Installing SLES 10 SP3, SLES 11, or SLES 11 SP1 Using a PXE Network Environment for boot instructions.
Installing SLES 10 SP3, SLES 11, or SLES 11 SP1 Using a PXE Network Environment for boot instructions.
To install SLES 10 SP3, SLES 11, or SLES 11 SP1 using local or remote media, refer to the following topics:
For further details about installing SLES 10 SP3, SLES 11, or SLES 11 SP1, see the SUSE Linux Enterprise Server documentation collection from Novell at:
http://www.novell.com/documentation/suse
Prior to performing the installation, the following requirements must be met:
All applicable installation prerequisites for installing this operating system should have been met. For further information about these prerequisites, see ![]() Chapter 2, Getting Started With Linux Operating System Installations.
Chapter 2, Getting Started With Linux Operating System Installations.
An installation method (for example: console, boot media, and install target) for booting the SLES installation media should have been chosen and established prior to performing the installation. For more information about these setup requirements, see ![]() Appendix A, Supported Installation Methods.
Appendix A, Supported Installation Methods.
After completing this procedure, you should review and perform the required post installation
tasks described later in this chapter. For more details, see ![]() Post SLES Installation Tasks.
Post SLES Installation Tasks.
For additional information about how to set up the install media, see ![]() Appendix A, Supported Installation Methods.
Appendix A, Supported Installation Methods.
For example:
The BIOS screen appears.
Note - The next events occur very quickly; therefore, focused attention is needed for the following steps. Watch carefully for the messages as they appear on the screen for a brief time. You might want to enlarge the size of your screen to eliminate scroll bars.
The Please Select Boot Device menu appears.
The device strings listed on the Boot Device menu are in the format of: device type, slot indicator, and product ID string.
After a few seconds the initial SUSE Linux boot screen appears.
This option continues the normal user interactive installation process.
The Language screen appears.
Note - The Language screen might take several minutes to appear.
The License Agreement screen appears.
The SUSE YaST installation program initializes. The YaST graphical installation screen appears.
Depending on the AutoYaST file configuration, the YaST Language Selection screen might appear.
Depending on the AutoYaST file configuration, the YaST Installation Mode screen might appear.
The system’s hardware is detected. The YaST Installation Settings screen appears.
Refer to the YaST Partitioning instructions for more information.
Note - If Oracle Solaris OS or Oracle VM is preinstalled on the disk, you can choose to partition the disk to remove the preinstalled OS; or, you can choose to keep the preinstalled OS and partition the disk to support dual-boot operating systems.
Alternatively, see ![]() Updating the SLES Operating System to manually update your SLES 10 SP3 OS.
Updating the SLES Operating System to manually update your SLES 10 SP3 OS.
Refer to ![]() Post SLES Installation Tasks.
Post SLES Installation Tasks.
For additional information about how to set up the install media, see ![]() Appendix A, Supported Installation Methods.
Appendix A, Supported Installation Methods.
For example:
The BIOS screen appears.
Note - The next events occur very quickly; therefore, focused attention is needed for the following steps. Watch carefully for the messages as they appear on the screen for a brief time. You might want to enlarge the size of your screen to eliminate scroll bars.
The Please Select Boot Device menu appears.
The device strings listed on the Boot Device menu are in the format of: device type, slot indicator, and product ID string.
After a few seconds the initial SUSE Linux boot screen appears.
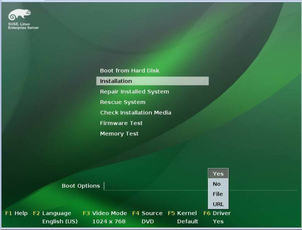
The Welcome screen appears. Proceed to Step 7.
- or -
The Welcome screen appears. Proceed to Step 7.
- or -
The Driver Update Medium dialog appears. Proceed to Step 6.
Note - The floppy storage media for loading LSI mass storage driver should have been
mounted prior to starting the SLES 11 installation. For details about mounting the
LSI floppy storage media prior to installation, see ![]() SAS PCIe HBAs Requiring Storage Drivers for SLES 11 Installations.
SAS PCIe HBAs Requiring Storage Drivers for SLES 11 Installations.
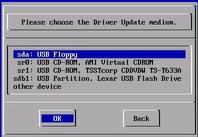
The driver is loaded then the Driver Update Medium dialog reappears.
A message appears stating that the installation is being loaded then the SUSE Welcome screen appears.
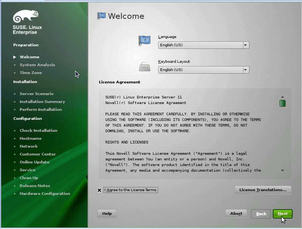
The Clock and Time Zone screen appears.
The Server Base Scenario screen appears.
The Installation Settings screen appears.
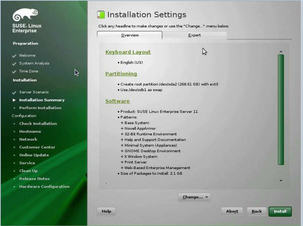
- or -
Note - For more information about how to create custom partitions or edit other installation settings, refer to the Novell SLES 11 documentation.
The Confirm Package License screen appears.
A Confirm Installation dialog appears.
The Perform Installation dialog appears.
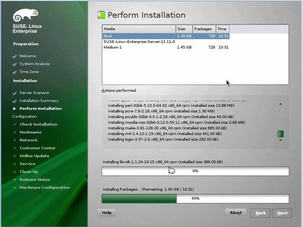
For details, see ![]() Post SLES Installation Tasks.
Post SLES Installation Tasks.
This section describes how to boot SLES 10 SP3, SLES 11, or SLES 11 SP1 from a PXE network environment. It assumes that you are booting the install media from one of the following sources:
SLES 10 SP3, SLES 11, or SLES 11 SP1 (or subsequent release) CD or DVD set (internal or external CD/DVD)
SLES 10 SP3, SLES 11, or SLES 11 SP1 (or subsequent release) ISO DVD image or AutoYaST image (network repository)
AutoYaST enables you to install the SLES operating system on multiple systems. For information about how to prepare an automated installation using AutoYaST, refer to the Novell SUSE documentation collection at:
http://www.novell.com/documentation/suse
The following requirements must be met prior to performing the SLES 10 SP3 or SLES 11 SP1 installation from a PXE network boot environment:
If you are using AutoYaST to perform the installation, you must:
Create the AutoYast profile.
Follow the AutoYaST installation instructions in the SUSE Linux Enterprise Server (10 or 11) documentation.
To use PXE to boot the installation media over the network, you must:
Configure the network (NFS, FTP, HTTP) server to export the installation tree.
Configure the files on the TFTP server necessary for PXE booting.
Configure the Sun Fire X4170 M2 and X4270 M2 Servers MAC network port address to boot from the PXE configuration.
Configure the Dynamic Host Configuration Protocol (DHCP).
Follow the setup instructions for booting SUSE media over the network in the SUSE Linux Enterprise documentation
After completing this procedure, you might need to perform the tasks for ![]() Post SLES Installation Tasks.
Post SLES Installation Tasks.
For example:
The BIOS screen appears.
Note - The next events occur very quickly; therefore, focused attention is needed for these steps. Watch carefully for the messages as they appear on the screen for a brief time. You might want to enlarge the size of your screen to eliminate scroll bars.
The Please Select Boot Device menu appears listing the available boot device.
The network bootloader loads and a boot prompt appears. Wait for the five second time-out and the installation kernel will begin to load.
The initial SUSE Linux boot screen appears.
After completing the SLES 10 SP3, SLES 11, or SLES 11 SP1 installation, review the following post installation tasks and, if necessary, perform the tasks that are applicable to your system.
The SLES OS installation media might not contain the most up-to-date versions of the operating system. The following procedure describes how to update the SLES OS on your server.
# you
Note that YaST can operate in both text and graphical modes. These directions apply to both.
Note - In order for the on-line update service to function correctly through a network HTTP or HTTPS proxy, the following additional configuration step must be performed.
rug set-prefs proxy-url proxy_URL
Where proxy_URL is the fully qualified URL of your proxy server (for example: http://proxy.yourdomain:3128/).
Note - You will need your Novell Customer Center user name and password, as well as an SLES product activation code.
If you intend to use the Trusted Platform Module (TPM) feature set that is provided in SLES, you must configure the server to support this feature. For instructions, see the service manual for your server model:
Sun Fire X4170 M2 Server Service Manual
Sun Fire X4270 M2 Server Service Manual
Note - TPM enables you to administer the TPM security hardware in your server. For additional information about implementing this feature, refer to the TPM documentation available for SUSE Linux Enterprise Server.