| Skip Navigation Links | |
| Exit Print View | |

|
Sun Fire X4170 M2 and X4270 M2 Servers Installation Guide |
1. Preparing to Install the Sun Fire X4170 M2 and X4270 M2 Servers
Server Installation Task Checklist
Sun Fire X4170 M2 Server Supported Components
Sun Fire X4270 M2 Server Supported Components
2. Installing the Server Into a Rack With Slide-Rails
Server Installation Process Overview
Disassemble Bolt-On Slide-Rails
Disassemble Tool-less Slide-Rails
Installing the Mounting Brackets Onto the Server
Attaching the Slide-Rail Assemblies to the Rack
Attach Bolt-On Slide-Rail Assemblies
Attach Tool-less Slide-Rail Assemblies
Installing the Server Into the Slide-Rail Assemblies
Install Server Into the Slide-Rail Assemblies
Installing the Cable Management Arm on the Sun Fire X4170 M2 Server
Installing the Cable Management Arm on the Sun Fire X4270 M2 Server
Verifying Operation of the Slide-Rails and CMA
Verify Operation of Slide-Rails and CMA
3. Attaching Cables and Power Cords
Attaching Cables to the Server
Connecting Power Cords to the Server
4. Connecting to Oracle ILOM and Applying Main Power to the Server
Log In to Oracle ILOM Using a Serial Connection
Log In to Oracle ILOM Using an Ethernet Connection
Test IPv4 or IPv6 Network Configuration
Applying Main Power to the Server
Apply Main Power to the Server
5. Installing or Configuring an Operating System
Installing an Operating System
Configuring a Preinstalled Operating System
6. Configuring the Preinstalled Solaris 10 Operating System
Configuring Server RAID Drives
Configuring the Preinstalled Oracle Solaris 10 Operating System
Configure Oracle Solaris 10 OS
Oracle Solaris 10 Operating System User Information
Oracle Solaris 10 User Documentation
Using the Oracle Solaris Installation Program
Reinstalling the Oracle Solaris Operating System
Download the Solaris Operating System
7. Configuring the Preinstalled Oracle VM Software
Oracle VM Server Configuration
Oracle VM Manager Configuration
After you have completed the configuration worksheets, use the following procedure to configure the preinstalled Oracle VM software.
See Log In to Oracle ILOM Using a Serial Connection or Log In to Oracle ILOM Using an Ethernet Connection.
-> start /SP/console
Are you sure you want to start /SP/console (y/n)? y
Serial console started.
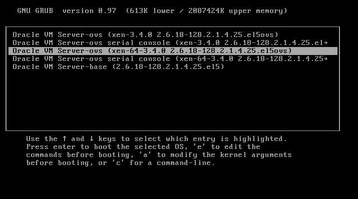
The GRUB menu (GRUB Menu Screen for Preinstalled Oracle VM) appears.
From the GRUB menu, you can choose whether you want to continue to direct the display to the serial port, or whether you want to direct the display to a device connected to the video port.
Note - If you do not press a key within five seconds, the GRUB menu disappears from the screen and the display is by default directed to the serial port. To pause at the GRUB menu, press any key other than Enter. Then select the option you want to use and Press Enter to continue.
Figure 7-1 GRUB Menu Screen for Preinstalled Oracle VM

Note - The first two options and the last option listed on the screen are not supported.
Oracle VM Server - ovs (xen-64-3.4.0 2.6.18-128.2.1.4.25.eI5ovs)
If you choose this option, you must connect a device to the video connector on the server.
Oracle VM Server - ovs serial console (xen-64-3.4.0 2.6.18-128.2.1.4.25 ->
This is the default option. If you do not select an option on the GRUB menu, after five seconds, the GRUB menu is no longer available and the system continues with the output directed to the serial port.
Use the information you entered in the Oracle VM Server worksheet in Worksheet for Oracle VM Server Configuration to respond to the prompts.
After you have configured the Oracle VM Server portion of the software, the following prompt is displayed:
Deploy Oracle VM Manager virtual machine?
You can register the new Oracle VM Server to the existing Oracle VM Manager.
Use the information you entered in the Oracle VM Manager worksheet in Worksheet for Oracle VM Manager Configuration to respond to the prompts.
Note - If you do not install the Oracle VM Manager and you do not already have an existing Oracle VM Manager as part of your configuration, you will be unable to use the Oracle VM Server software.
After you have responded to all the prompts for system information, the server completes the boot process and displays the Oracle VM login prompt.