| C H A P T E R 2 |
|
Installation and Configuration |
Use the instructions in this chapter to install the server module into the chassis.
Electronic equipment is susceptible to damage by static electricity. Use a grounded antistatic wriststrap, footstrap, or equivalent safety equipment to prevent electrostatic damage (ESD) when you install the server module.
|
1. Ensure that you have the MAC address and serial number.
This information is on the customer information sheet attached to the shipping container. The serial number is also on the front of the server module.
2. Ensure that the modular system chassis is powered on.
Refer to You can also use a pointed object or stylus to press and release the recessed Power button on the server front panel. and to the documentation that came with your Sun Blade modular system.
3. Locate the desired slot in the chassis.
4. Remove the filler panel from the target slot, if applicable.
5. (Optional) Attach a serial cable from the terminal server to the virtual console connector on the dongle cable.
If you plan to use a dongle cable to connect directly to the server module, you must connect the terminal server to the dongle cable before you insert the server module so that you can see the boot messages for the ILOM firmware. Refer to the sections Managing the Server Module With ILOM and Connecting and Configuring the Server Module for more information.
a. Attach the dongle cable to the server module.
Refer to Attaching a Serial Console to the Server Module.
b. Attach a serial cable from the terminal server to the virtual console connector on the dongle cable.
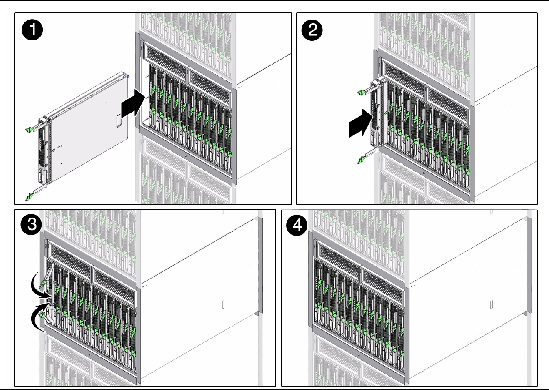
6. Position the server module vertically so that the ejectors are on the right.
Box 1 in FIGURE 2-1 shows the server module being inserted into the chassis.
FIGURE 2-1 Inserting the Server Module Into the Chassis

7. Push the server module into the slot until the module is about 1.5 cm (one-half inch) from the chassis front.
See box 2 in FIGURE 2-1.
8. Push the ejectors down until they snap into place.
The server module is now flush with the modular system and the ejectors are locked. See boxes 3 and 4 in FIGURE 2-1.
The server module goes into standby mode and the ILOM service processor initializes as soon as you insert the server module into the chassis.
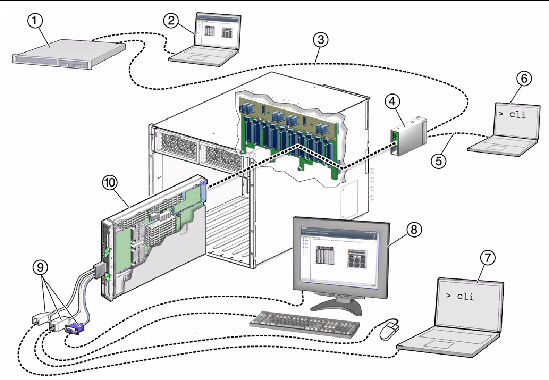
Before you continue installing the server module, you must ensure that you can connect to the SP. FIGURE 2-2 shows the connections to the server module SP and ILOM software.
FIGURE 2-2 CMM and Server Module Connection Options

This section describes how to connect to the server module SP using one of the methods listed below and described in the corresponding sections:
The Ethernet port on the modular system chassis provides the most robust method of connecting to the CMM and the server module SP. This connection supports both the CLI and the web interface.
You can connect to the CMM through the RJ-45 NET MGT 0 Ethernet port.
Before you can use the Ethernet connection, you must know the IP addresses for the CMM and server module SP to which you want to connect. To configure the IP address on the Sun Blade T6340 server module, refer to Configuring and Viewing the IP Address for a Server Module SP.
ILOM supports SSH access to the CLI over the Ethernet.
3. Type your password when prompted.
| Note - The default user name is root, and the default password is changeme. See Changing the ILOM Password for information about changing the default password. |
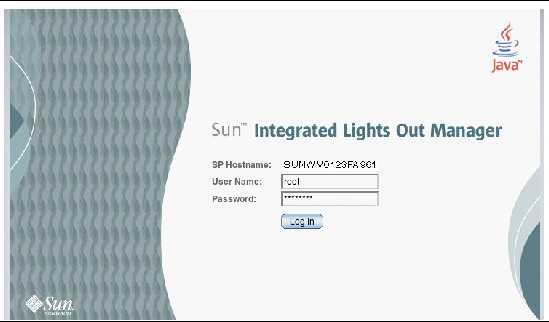
1. To log in to the web interface, type the IP address of the SP into your web browser.
The login screen is displayed:
FIGURE 2-3 Web Interface Login Screen

2. Type your user name and password.
When you first try to access the web interface, it prompts you to type the default user name and password. The default user name and password are:
The default user name and password are in lowercase characters. See Changing the ILOM Password for information about changing the default password.
The web interface is displayed.
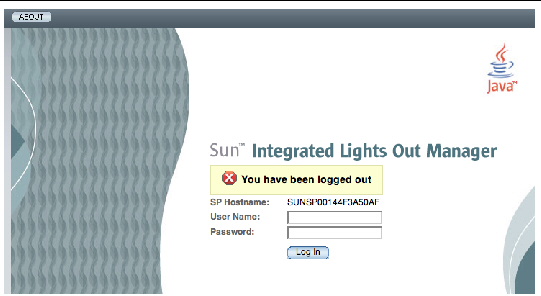
4. To log out of the web interface, click the Log Out button at the top right of the screen.
The log out screen is displayed.
FIGURE 2-4 Web Interface Log Out Confirmation Screen

You can access the CMM ILOM by connecting a terminal or a terminal emulator to the RJ-45 serial port on the chassis. Once the server module is installed in the modular system chassis, you can connect to the server module SP by using the CLI on the CMM ILOM software.
1. Verify that your terminal, laptop, or terminal server is operational.
2. Configure the terminal device or terminal emulation software to use the settings.
3. Connect a serial cable from the serial port (SER MGT) on the chassis to a terminal device.
Refer to the modular system chassis documentation for the location of the serial port.
| Note - The serial port requires the pin assignments described in TABLE 2-1. Note that these are the same as the serial cable connector for the Sun Advanced Lights Out Manager (ALOM) or Remote System Control (RSC). |
4. Press Enter on the terminal device.
The connection between the terminal device and the CMM is established.
| Note - If you connect a terminal or emulator to the serial port before it has been powered up or during its power-up sequence, you will see boot messages. |
When the system has booted, the CMM ILOM software displays its login prompt:
The first string in the prompt is the default host name. It consists of the prefix SUNCMM and the CMM ILOM MAC address. The MAC address for each service processor is unique.
5. Log in to the CMM ILOM software:
a. Type the default user name, root.
b. Type the default password, changeme.
Once you have successfully logged in, the CMM ILOM displays its default command prompt:
You are now connected to the CMM ILOM software CLI.
6. Navigate to the server module ILOM by typing:
Where n is an integer (0 - 11) that identifies the target server module by the chassis slot that the server module is installed in.
8. Type y to continue or n to cancel.
After you type y, the ILOM software running on the server module SP prompts for the password specific to that server module SP.
| Note - The CMM ILOM logs on to the server module ILOM using the user name in the user target under /CH/BLn/SP/cli (where n is the slot where the server module is installed). |
9. Type the password when prompted.
The default password is changeme.
The server module ILOM prompt is displayed.
See Changing the ILOM Password for information about changing the default password.
10. When you are done, type exit.
The server module ILOM exits and the CMM CLI prompt is displayed.
The following display shows an example of the login screen:
A dongle cable allows you to connect a terminal directly to the server module.
1. Connect a dongle cable to the UCP port on the front of the server module.
Refer to Attaching a Serial Console to the Server Module for information about attaching UCP dongle cables.
2. Connect a terminal or terminal emulator to the serial connector on the dongle cable.
The ILOM login prompt is displayed.
3. Type the user name and password when prompted.
The default user is root and the default password is changeme.
The server module ILOM prompt is displayed.
See Changing the ILOM Password for information about changing the default password.
4. When you are done, exit the ILOM software by typing:
|
Connect the storage device directly to the dongle cable USB connector.
You can configure and view the network IP address for the server module SP in two ways:
Refer to Configuring and Viewing the IP Address for a Server Module SP Through the CMM.
Refer to Configuring and Viewing the IP Address for a Server Module SP Through the UCP.
You can attach to the CMM on the modular system chassis through a serial port or an Ethernet port:
After attaching to the CMM by using one of these ports, you can log in to the CMM ILOM software to configure and view your server module IP address, whether the IP address is assigned by DHCP or a static IP address.
|
|
1. Verify that your DHCP server is configured to accept new media access control (MAC) addresses.
2. Attach to the CMM using the CMM serial or Ethernet port.
3. Find the IP address that DHCP has assigned to the server module SP.
A valid IP address may already have been assigned to the server module SP by your DHCP server. To view the IP address that has been assigned, type:
Where n is an integer representing the slot where the target server module is installed. The CMM ILOM software displays the IP address currently assigned to the server module SP.
If the assigned IP address is not valid, you should provide the MAC address for the server module SP to your DHCP system administrator. In that case, proceed to Step 4.
4. Obtain the MAC address for the server module SP.
The Customer Information document shipped with your server module lists the MAC address, or you can find it using this procedure:
a. Log in to the CMM ILOM software and type:
Where n is an integer representing the slot where the target server module is installed. The CMM ILOM software displays the current MAC address.
b. Write down the MAC address and use it to configure your DHCP server.
5. View the IP address that DHCP has assigned to the server module SP.
After a valid IP address has been assigned to the server module, view the IP address, as described in Step 3.
|
|
1. Attach to the CMM using the CMM serial or Ethernet port.
2. (Optional) View the IP address.
3. Navigate to /CH/BLn/SP/network by typing the following command:
4. Type one of the following commands:
Where xxx.xxx.xx.xx, yyy.yyy.yyy.y and zzz.zzz.zz.zzz are the IP address, netmask, and gateway for your ILOM and network configuration. To determine these addresses, contact your system administrator.
The following display shows a typical session where the user looks at static settings, configures them to be dynamic, then looks at the new settings.
You can connect to the server module SP by one of these methods:
|
|
1. Verify that your DHCP server is configured to accept new media access control (MAC) addresses.
2. Connect to the server module SP through the front-panel UCP using a dongle cable.
Refer to Connecting to the Server Module SP Using a Dongle Cable.
3. Find the IP address that DHCP has assigned to the server module SP.
A valid IP address may already have been assigned to the server module SP by your DHCP server. To view the IP address that has been assigned, type:
The ILOM software displays the IP address currently assigned to the server module SP.
If the assigned IP address is not valid, you should provide the MAC address for the server module SP to your DHCP system administrator. In that case, proceed to Step 4.
4. Obtain the MAC address for the server module SP.
The Customer Information document shipped with your server module lists the MAC address, or you can find it using this procedure:
The ILOM software displays the current MAC address.
b. Write down the MAC address and use it to configure your DHCP server.
5. View the IP address that DHCP has assigned to the server module SP.
After a valid IP address has been assigned to the server module, view the IP address. Refer to Step 3.
|
|
1. Connect to the server module SP through the front-panel UCP using the serial connector on the dongle cable.
Refer to Connecting to the Server Module SP Using a Dongle Cable.
2. (Optional) View the IP address.
3. Follow the instructions in To View or Configure the IP Address for the Server Module SP Using Static IP Addresses -- Through the CMM, starting with Step 3.
These procedures are described in the Sun Integrated Lights Out Manager 2.0 Supplement for Sun Blade T6340 Server Modules, 820-3904 and chapter 12 of the Sun Integrated Lights out Manager 2.0 User’s Guide, 820-1188.
The service processor has two management ports, serial and network (Ethernet). If the system console is directed to use the serial management and network management ports (the default configuration), these ports provide access to both the system console and the ILOM command-line interface (the ILOM service processor prompt), each on a separate channel (FIGURE 2-5).
FIGURE 2-5 Separate System Console and Service Processor Channels
You can switch between the ILOM service processor prompt and the system console at any time. However, you cannot access both at the same time from a single terminal window or shell tool.
The prompt displayed on the terminal or shell tool tells you which channel you are accessing:
| Note - If no text or prompt appears, it might be because no console messages were recently generated by the system. Pressing the terminal’s Enter or Return key should produce a prompt. |
|
1. Establish an ILOM service processor session.
2. To connect to the system console, at the ILOM command prompt, type:
The start /SP/console command switches you to the system console.
3. To switch back to the -> prompt, type the #. (Hash-Period) escape sequence.
After initial system installation, you can install a local graphics monitor and configure it to access the system console. You cannot use a local graphics monitor to perform initial system installation, nor can you use a local graphics monitor to view power-on self-test (POST) messages.
To install a local graphics monitor, you must have the following items:
To view a list of supported screen resolutions type:
For more information about graphics support, see Appendix B of the Sun Blade T6340 Server Module Service Manual, 820-3902.
|
1. Attach the monitor video cable to the HD-15 video connector on the cable dongle.
Tighten the thumbscrews to secure the connection.
2. Connect the monitor power cord to an AC outlet.
3. Connect the USB keyboard cable to one USB connector on the cable dongle.
4. Connect the USB mouse cable to the other USB connector.
For more information, see To Obtain the ok Prompt.
6. Set the OpenBoot configuration variables.
From the existing system console, type:
7. To cause the changes to take effect, type:
The system stores the parameter changes, and boots automatically when the OpenBoot configuration variable auto-boot? is set to true (the default value).
| Note - To cause the parameter changes to take effect, you can also power cycle the system using the front panel Power button. |
You can now issue system commands and view system messages using your local graphics monitor. Continue with your installation or diagnostic procedure, as needed.
For more information about graphics configurations, see Appendix B of the Sun Blade T6340 Server Module Service Manual, 820-3902.
1. At the initial login prompt on the server module SP, log in using the default administrator user name and password:
2. Use the ILOM password command to change the password.
After the root password has been set, on subsequent reboots, the ILOM CLI login prompt is displayed.
After the service processor boots, the ILOM CLI prompt (->) is displayed the first time the service processor is booted.
1. Type the start /SYS command.
You see an ILOM -> prompt on the system console. This indicates that the system has reset. Issue the start /SYS command:
2. Type the start /SP/console command.
-> start /SP/console Are you sure you want to start /SP/console (y/n)? y Serial console started. To stop, type #. 0:0:0>Scrub Memory....Done 0:0:0>SPU CWQ Tests...Done 0:0:0>MAU Tests...Done |
The system may take six to 15 minutes to run POST diagnostics and boot. After you type the start commands, the CPU and memory controllers initialize, and eventually the OpenBoot PROM (OBP) firmware initializes. If a boot device installed with the Solaris OS is accessible locally, that device will be booted. Otherwise, the system will use the boot net command to seek a boot device on the network.
|
 You can also use a pointed object or stylus to press and release the recessed Power button on the server front panel.
When main power is applied to the full server, the Power/OK LED above the Power button lights and remains lit.
|
To power off the server from main power mode, use one of the following two methods:
When main power is off, the Power/OK LED on the front panel will begin flashing, indicating that the server is in standby power mode.
| Note - To power off the server completely, you must either remove the server module from the chassis or disconnect the AC power cords from the back panel of the chassis. |
The basic configuration of the Sun Blade T6340 server module ships with or without hard drives. If you ordered an optional hard drive with preinstalled software, refer to Preinstalled Software.
If you ordered an optional hard drive without preinstalled software and want to install the Solaris OS on the hard drive in slot 0, you must install the operating system from your network.
For instructions on how to install the operating system from the network, refer to the Solaris Installation Guide: Network-Based Installations. You can obtain this guide at:
You can use a JumpStart server to install the OS. A JumpStart server consists of several components:
The boot image is architecture independent, providing basic operating system services to all hardware supported by that operating system release. The Boot Server provides RARP, TFTP and bootparam services.
Partition sizes, lists of software components to install, begin, and finish scripts are specified in a profile served by the configuration server.
| Note - The boot server, configuration server, and install server can be one server. |
Specific instructions on how to configure a JumpStart server are out of the scope of this document. However, configuring the JumpStart server consists of the following tasks:
2. Create the configuration server.
3. Create the configuration files.
4. Verify the configuration file syntax.
5. Share the installation directory.
7. Configure the client access.
The configuration and use of the JumpStart server depends on the configuration of your network. For a full explanation of these steps and instructions on how to configure the JumpStart server, refer to the following documents:
You can obtain these documents from the following site:
Copyright © 2010, Oracle and/or its affiliates. All rights reserved.