Software Installation
This section covers basic installation. After you install server software, see Server Instance Creation for instructions on creating server instances.
 To Install Directory Service Control Center From Native Packages
This procedure covers installation of Directory Service Control Center, also known as DSCC, and remote administration command-line tools.
You must be root to perform this procedure.
When you install DSCC, you automatically also install Directory Server from native packages. DSCC uses its own local instance of Directory Server to store information about your directory service configuration. The instance is referred to as the DSCC Registry.
You can use the Directory Server software that is installed alongside DSCC to create your own additional Directory Server instances on the system.
Before You Begin
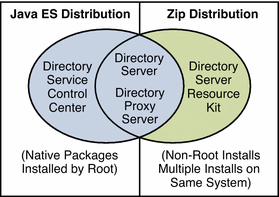
Obtain the Java Enterprise System distribution for this installation, as shown in the following figure.
Complete the worksheet that follows for your installation.
|
Requisite Information |
Hints |
Your Answers |
|---|---|---|
|
Hostname of the system where you install DSCC |
| |
|
root password for the system |
| |
|
Java Web Console URL |
Default: https://localhost:6789 | |
|
Directory Service Manager password |
|
-
Install prerequisite patches or service packs for your platform.
-
With the Java Enterprise System distribution, run the Java ES installer as root.
# ./installer
-
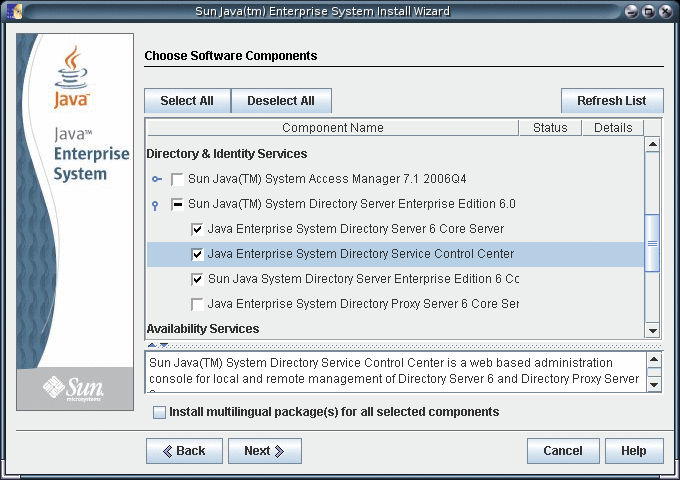
Select the Directory Service Control Center component for installation.
-
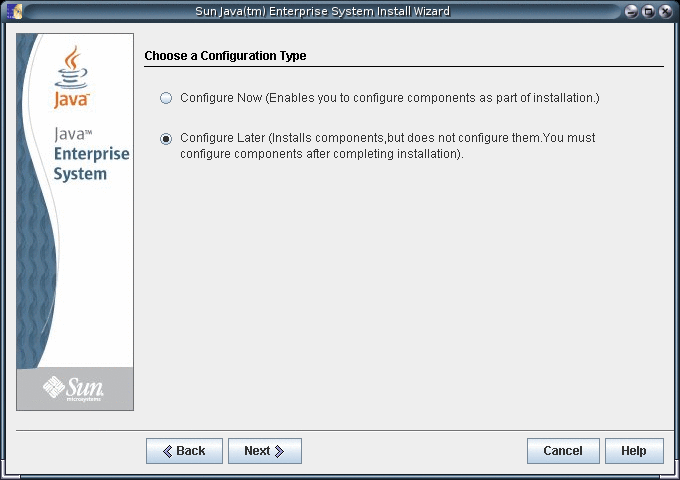
Choose to configure the software later, as you will register the software and create server instances after installation.
-
Complete installation with the Java ES installer.
After you complete installation, the native packages are installed on the system.
-
Initialize DSCC with the dsccsetup initialize command.
For example, on a Solaris system the following command performs initialization.
root# /opt/SUNWdsee/dscc6/bin/dsccsetup initialize
***
Registering DSCC Application in Sun Java(TM) Web Console
This operation is going to stop Sun Java(TM) Web Console.
Do you want to continue ? [y,n] y
Stopping Sun Java(TM) Web Console...
Registration is on-going. Please wait...
DSCC is registered in Sun Java(TM) Web Console
Restarting Sun Java(TM) Web Console
Please wait : this may take several seconds...
Sun Java(TM) Web Console restarted successfully
***
Registering DSCC Agent in Cacao...
Checking Cacao status...
Starting Cacao...
DSCC agent has been successfully registered in Cacao.
***
Choose password for Directory Service Manager:
Confirm password for Directory Service Manager:
Creating DSCC registry...
DSCC Registry has been created successfully
***
The dsccsetup command is located in install-path/dscc6/bin/dsccsetup. See Default Paths to determine the default install-path for your system.
-
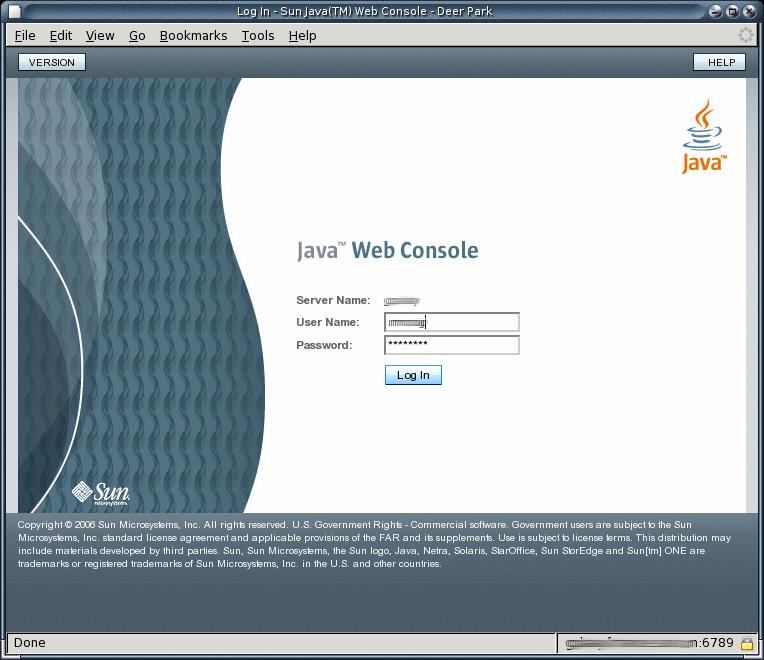
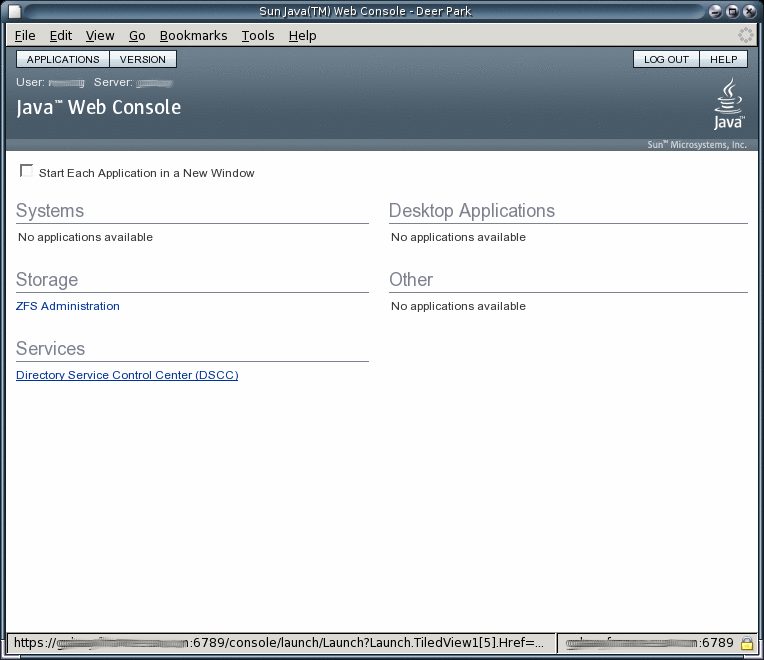
Access DSCC through Java Web Console in your browser.
-
Login to Java Web Console using your operating system login information or server's root login information.
If you do not login to Java Web Console using server's root login information, the system might required you to have the root privileges while performing certain tasks such as starting the server instances.
By default, the URL to access Java Web Console is of the following form.
https://hostname:6789
-
Click the Directory Service Control Center link.
-
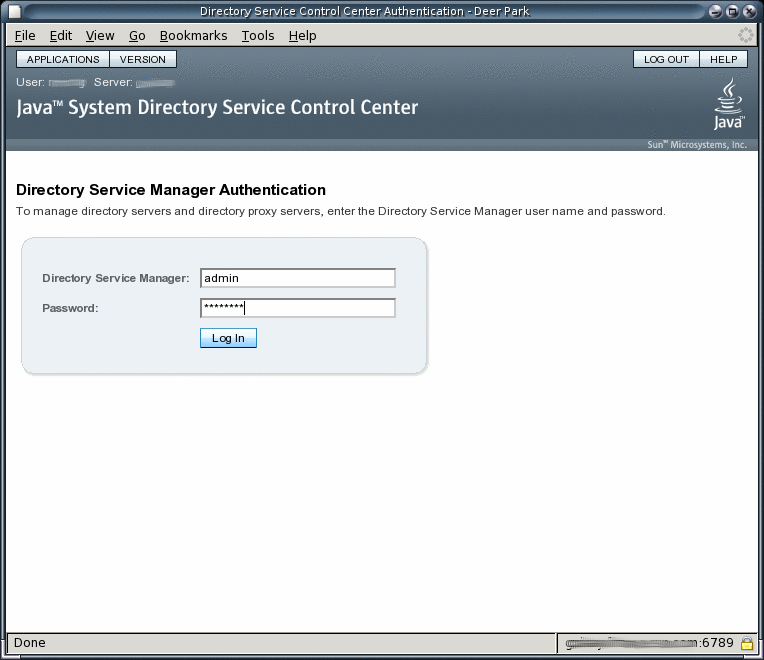
Login as Directory Service Manager.
Directory Service Manager's entry is stored in the Directory Service Control Center registry. Directory Service Manager has administrator access to Directory Service Control Center. Directory Service Manager also has administrator access to the server instances registered with Directory Service Control Center.
-
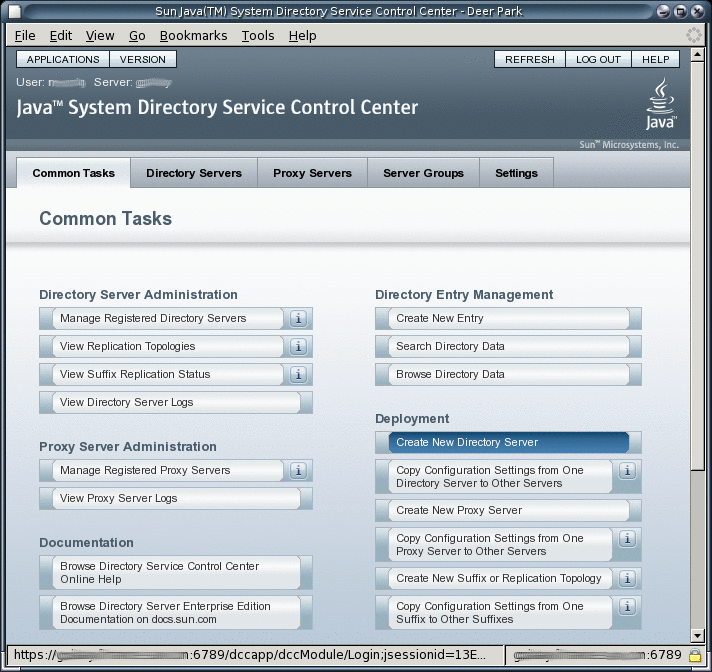
Begin managing your servers through Directory Service Control Center.
-
-
After Directory Service Control Center is working, enable Java Web Console to restart when the system reboots.
On a Solaris system, the following command enables restart upon reboot.
root# /usr/sbin/smcwebserver enable
For the exact location of this command on your system, see Command Locations.
-
(Optional) Enable the Common Agent Container, cacao, to restart when the operating system reboots.
root# cacaoadm enable
If you decide not to enable the common agent container, you would not be able to use DSCC to communicate with the servers handled by that instance of cacao.
Next Steps
After installing the software, see Environment Variables.
 To Troubleshoot Directory Service Control Center Access
Use this procedure on the host where you installed Directory Service Control Center.
You must be root to perform this procedure.
-
Verify that Directory Service Control Center has been initialized properly.
root# /opt/SUNWdsee/dscc6/bin/dsccsetup status
***
DSCC Application is registered in Sun Java (TM) Web Console
***
DSCC Agent is registered in Cacao
***
DSCC Registry has been created
Path of DSCC registry is /var/opt/SUNWdsee/dscc6/dcc/ads
Port of DSCC registry is 3998
***
The default installation path for native packages on Solaris operating systems is /opt/SUNWdsee. For the default installation path on your operating system, see Default Paths.
Fix Directory Service Control Center initialization problems with the dsccsetup(1M) command.
-
Start Java Web Console if necessary with the smcwebserver command.
root# /usr/sbin/smcwebserver status
Sun Java(TM) Web Console is stopped
root# /usr/sbin/smcwebserver start
Starting Sun Java(TM) Web Console Version 3.0.2 ...
The console is running.
-
Check the Common Agent Container if you see errors that pertain to the DSCC Agent.
The cacaoadm(1M) man page describes the error codes that the command returns. For the exact location of this command on your system, see Command Locations.
If you installed Directory Server from the zip distribution, you must run the cacaoadm command as the user who performed the installation. Otherwise, run the command as root.
After installing Directory Server, the Common Agent Container is started automatically. However, when you reboot, you might have to start the Common Agent Container manually.
root# /usr/sbin/cacaoadm status
default instance is DISABLED at system startup.
Smf monitoring process:
26129
Uptime: 0 day(s), 3:16
For more information about the Common Agent Container, see Sun Java Enterprise System 5 Monitoring Guide.
Note –In Directory Server Enterprise Edition 6.1, you can also install Directory Service Control Center with the Zip distribution by deploying the WAR file provided with the software packages. For more information, see Installing Directory Service Control Center Using the Zip Distribution.
 To Install Only Directory Server From
Native Packages
This procedure covers installation of Directory Server from native packages. You must be root to perform this procedure.
Note –
If you installed Directory Service Control Center, you automatically also installed Directory Server from native packages. You can use the Directory Server software that is installed alongside DSCC to create your own additional Directory Server instances on the system.
Before You Begin
Obtain the Java Enterprise System distribution for this installation, as shown in the following figure.

Complete the worksheet that follows for your installation.
|
Requisite Information |
Hints |
Your Answers |
|---|---|---|
|
Fully qualified hostname of the system where you install Directory Server |
Example: ds.example.com | |
|
(Optional) Cacao common agent container port number to access from Directory Service Control Center |
Default: 11162 | |
|
File system paths where you create Directory Server instances |
Example: /local/ds/ Create instances only on local file systems, never on network–mounted file systems such as NFS. Each path is henceforth referred to as an instance-path. | |
|
LDAP port number |
Default: 389 when installing as root; 1389 for non-root | |
|
LDAP/SSL port number |
Default: 636 when installing as root; 1636 for non-root | |
|
Directory Manager DN |
Default: cn=Directory Manager | |
|
Directory Manager password |
Must be at least 8 characters long | |
|
Base suffix DN |
Example: dc=example,dc=com | |
|
(UNIX systems) Server user (uid) |
Example: noaccess | |
|
(UNIX systems) Server group (gid) |
Example: noaccess |
-
Install prerequisite patches or service packs for your platform.
-
Using the Java Enterprise System distribution, run the Java ES installer as root.
root# ./installer
-
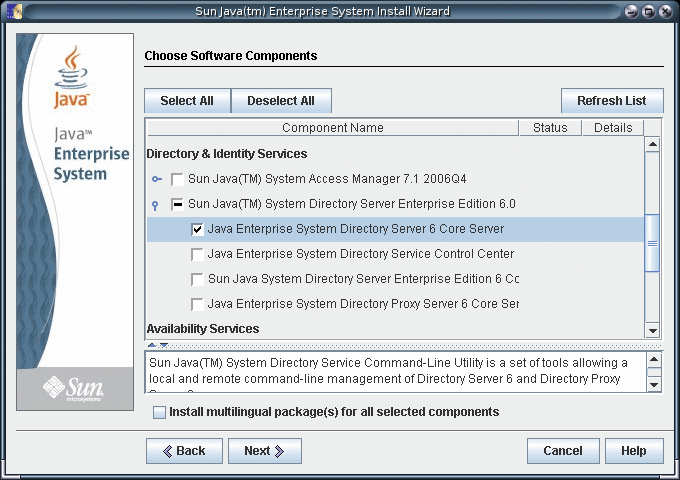
Select the Directory Server component for installation.
-
Choose to configure the software later, as you will register the software and create server instances after installation.

-
Complete installation with the Java ES installer.
At this point, you can now create server instances on the system. See Server Instance Creation for details.
-
(Optional) Enable the Common Agent Container, cacao, to restart when the operating system reboots.
root# cacaoadm enable
If you decide not to enable the common agent container, you would not be able to use DSCC to communicate with the servers handled by that instance of cacao.
Next Steps
After installing the software, see Environment Variables.
 To Install Only Directory Proxy Server From
Native Packages
This procedure covers installation of Directory Proxy Server from native packages. You must be root to perform this procedure.
Before You Begin
Obtain the Java Enterprise System distribution for this installation, as shown in the following figure.

Complete the worksheet that follows for your installation.
|
Requisite Information |
Hints |
Your Answers |
|---|---|---|
|
Fully qualified hostname of the system where you install Directory Proxy Server |
Example: dps.example.com | |
|
(Optional) Cacao common agent container port number to access from Directory Service Control Center |
Default: 11162 | |
|
File system paths where you create Directory Proxy Server instances |
Example: /local/dps/ Create instances only on local file systems, never on network–mounted file systems such as NFS. Each path is henceforth referred to as an instance-path. | |
|
LDAP port number |
Default: 389 when installing as root; 1389 for non-root | |
|
LDAP/SSL port number |
Default: 636 when installing as root; 1636 for root | |
|
Directory Proxy Manager DN |
Default: cn=Proxy Manager | |
|
Directory Proxy Manager password |
Must be at least 8 characters long | |
|
(UNIX platforms) Server user (uid) |
Example: noaccess | |
|
(UNIX platforms) Server group (gid) |
Example: noaccess | |
|
(Optional) Connection information for each server to access through the proxy |
Example: ds1.example.com:1389, ds2.example.com:1636 |
-
Install prerequisite patches or service packs for your platform.
-
Using the Java Enterprise System distribution, run the Java ES installer as root.
root# ./installer
-
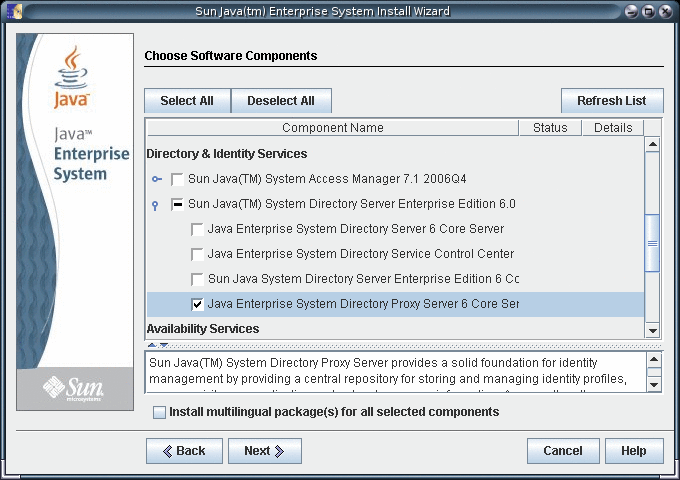
Select the Directory Proxy Server component for installation.
-
Choose to configure the software later, as you will register the software and create server instances after installation.

-
Complete installation with the Java ES installer.
At this point, you can now create server instances on the system. See Server Instance Creation for details.
-
(Optional) Enable the Common Agent Container, cacao, to restart when the operating system reboots.
root# cacaoadm enable
If you decide not to enable the common agent container, you would not be able to use DSCC to communicate with the servers handled by that instance of cacao.
Next Steps
After installing the software, see Environment Variables.
Environment Variables
This section lists environment variables that you can set to facilitate creating server instances and using Directory Server Resource Kit and software development kits.
|
Environment Variable |
Set to include… |
Applies to… |
|---|---|---|
|
Hostname of Directory Proxy Server for administration tools |
dpconf(1M) command |
|
|
Port number of Directory Proxy Server for administration tools |
dpconf(1M) command |
|
|
Hostname of Directory Server for administration tools |
dsconf(1M) command |
|
|
Port number of Directory Server or for administration tools |
dsconf(1M) command |
|
|
Path to the file that contains the directory administrator password To administer all servers registered with Directory Service Control Center, set this environment variable to a file containing Directory Service Manager password. |
dpconf(1M), dsconf(1M) commands |
|
|
Directory administrator DN To administer all servers registered with Directory Service Control Center, set this environment variable to cn=admin,cn=Administrators,cn=dscc. If you have not installed DSCC, use cn=admin,cn=Administrators,cn=config for Directory Server, cn=Proxy Manager for Directory Proxy Server. |
dpconf(1M), dsconf(1M) commands |
|
|
install-path/dsee6/man |
Online manual pages to browse with the man command |
|
|
Add any of the following sections not in your MANSECT environment variable. 1:1m:4:5dsconf:5dpconf:5dssd:5dsat:5dsoc Alternatively, specify the sections to search explicitly when using the man command. |
The man command can use the MANSECT environment variable to identify the sections to search by default. |
|
|
install-path/dps6/bin |
Directory Proxy Server commands |
|
|
install-path/ds6/bin |
Directory Server commands |
|
|
install-path/dscc6/bin |
Directory Service Control Center commands |
|
|
install-path/dsrk6/bin |
Directory Server Resource Kit and LDAP client commands |
- © 2010, Oracle Corporation and/or its affiliates
