Creating Java-based Resources
This section describes how you can use the Administration Interface to create J2SE-based resources:
Creating a New JDBC Connection Pool
You can create a new JDBC connection pools in the following ways:
-
Using the Administration Interface
-
Using the Command-Line Interface
Using the Administration Interface
To create a new JDBC connection pool using the Administration interface, do the following
 To create a new JDBC connection pool using the Administration
interface
-
Access the Server Manager and choose the Java tab.
-
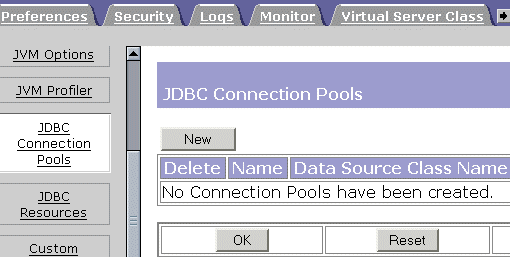
Click JDBC Connection Pools.
-
Click New.
Figure 12–3 The JDBC Connection Pool Interface

-
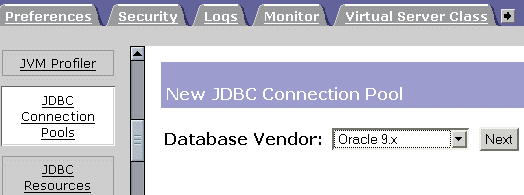
From the Database Vendor drop down, select the type of database that you want to connect to. If your DBMS is not listed, select Other.
Figure 12–4 The New JDBC Connection Pool Interface

-
Click Next.
The Add New JDBC Connection Pool page is displayed.
-
Specify the properties for your new connection pool and click OK.
Listed below are the connection pool properties that you must specify:
General
-
Pool Name: Enter a name for the new connection pool.
-
DataSource Classname: The vendor-specific classname that implements the data source. If you selected Other from the Database Vendor list in the New JDBC Connection Pool page, you must enter the vendor-specific classname of the data source you plan to use. Please note that this class must implement javax.sql.DataSource.
Properties
Specify standard and proprietary JDBC connection pool properties. Many of these properties are optional. By default the names of all of the standard properties are provided. You will need to consult your database vendor’s documentation to determine the standard and vendor specific properties that are required.
-
Steady Pool Size: Specify the minimum number of connections that the pool should maintain. When a connection is given to a requesting thread, it is removed from the pool, reducing the current pool size. The steady pool size also refers to the number of connections that will be added to the pool on server startup.
-
Max Pool Size: Specify the maximum number of connections that can be allowed in the pool at any given point in time.
-
Pool Resize Quantity: When the pool shrinks toward the steady pool size it is resized in batches. This value determines the size of the batch. Making this value too large will delay connection recycling, making it too small will be less efficient.
Note –The pool capacity is only ever increased one connection at a time so this field does not effect increases in pool capacity.
-
Idle Timeout (secs). The maximum time in seconds that a connection can remain idle in the pool. After this time, the pool implementation can close this connection.
-
Max Wait Time (milli secs): The amount of time the caller will wait before getting a connection timeout. The default wait time is long, which means that a caller can wait for a long time. If this value is set to 0, the caller will be blocked until a connection is available.
-
Connection Validation Required: If this field is checked connections are validated before they are passed to the application. This allows the web server to automatically re-establish database connections in the case of the database becoming unavailable due to network failure or database server crash. Validation of connections cause additional overhead and slightly reduce performance.
-
Validation Method: Specifies the methods the Web server can employ to validate database connections. Choose from the following values:
-
auto-commit: In this mode, query statements are executed and committed as individual transactions. When auto-commit is disabled, query statements are grouped into transactions that can be terminated by either commit or roll back mechanisms.
-
meta-data: In this mode, a connection’s database is able to provide meta-information describing its tables, its stored procedures, and so on. Each instance of the meta-data object will have a particular query associated with it. The meta-data object will execute that query and cache the results.
-
table: This method requires the Web server to perform a query on a user-specified table.
Table Name: If you select the validation option, table, from the Validation Method drop-down list, specify the table name here.
-
-
Fail All Connections: Specifies whether to fail all connections in the pool and re-establish them if a single connection is determined to have failed. If left unchecked, connections will be individually re-established only when they are used.
The isolation level that a transaction uses determines how sensitive the application is to changes that other users’ transactions make, and consequently, how long the transaction must hold locks to protect against these changes.
-
Transaction Isolation. Allows you to select the transaction isolation level for this connection. Choose from the following values:
-
read-uncommitted. Also known as dirty read, this isolation level lets a transaction read any data currently on a data page, whether or not that data has been committed.
-
read-committed. This places shared locks on data in such a way that data another transaction has changed but not yet committed will never be read. Because uncommitted data is not read, if a transaction running with read-committed isolation queries the data again, that data might have changed, or additional data might appear that meet the criteria of the original query.
-
repeatable-read. This ensures that locks will be placed on all data that is used in a query. No other user can modify the data that your transaction visits as long as you have not yet committed or rolled back your transaction.
-
serializable. This locks ranges of data so that if a query is reissued, no data will have changed and no additional rows of data will appear during the time interval between the first and second query.
Guarantee Isolation Level. This ensures that any connection taken from the pool will have the same isolation level. For example, if the isolation level for the connection was changed programatically (for example, con.setTransactionIsolation) when last used, this mechanism will change it back to the specified isolation level.
-
-
-
Using the Command-Line Interface
For information on how to use the command-line interface to create a new JDBC connection pool, see Create JDBC Connection Pool in Appendix A, Command Line Utilities.
Creating a JDBC Resource
A JDBC resource, also called a data source, lets you make connections to a database using getConnection(). Create a JDBC resource in one of these ways:
Using the Administration Interface
To create a JDBC resource using the Administration interface, perform these tasks
 To create a JDBC resource using the Administration
interface
-
Access the Server Manager and choose the Java tab.
-
Click JDBC Resources.
-
Click the New button.
-
Enter the following information:
-
JNDI Name (required). Enter the JNDI name that application components must use to access the JDBC resource.
-
Pool Name (required). Select from the list the name (or ID) of the connection pool used by this JDBC resource. For more information, see Creating a New JDBC Connection Pool.
-
-
To enable the JDBC resource, select On from the Data Source Enabled drop-down.
If a JDBC resource is disabled, no application component can connect to it, but its configuration remains in the server instance.
-
Click OK.
-
Click Apply Changes.
Using the Command Line Interface
For information on how to use the command-line interface to create a new JDBC resource, see Create JDBC Resource in Appendix A, Command Line Utilities.
Creating Custom Resources
You can create a custom resource in any of the following ways:
Using the Administration Interface
 To create custom resources using the administration
interface
-
Access the Server Manager and choose the Java tab.
-
Click Custom Resources.
-
Click the New button.
-
Enter the following information:
-
JNDI Name (required): Enter the JNDI name that application components must use to access the custom resource.
-
Resource Type (required): Enter the fully qualified type of the custom resource.
-
Factory Class (required). Enter the fully qualified name of the user-written factory class, which implements javax.naming.spi.ObjectFactory.
-
Custom Resource Enabled (optional): Select On to enable the custom resource at runtime.
-
-
-
Click OK.
-
Click Apply Changes.
Using the Command Line Interface
For information on how to use the command-line interface to create a new custom resource, see Create Custom Resource in Appendix A, Command Line Utilities.
Creating External JNDI Resources
You can create an external resource in the following ways:
Using the Administration Interface
 To create external JNDI resources using the administration
interface
-
Access the Server Manager and choose the Java tab.
-
Click External JNDI Resources.
-
Click the New button.
-
Enter the following information:
-
JNDI Name (required). Enter the JNDI name that application components must use to access the custom resource.
-
Resource Type (required). Enter the fully qualified type of the custom resource.
-
Factory Class (required). Enter the fully qualified name of the user-written factory class, which implements javax.naming.spi.ObjectFactory.
-
JNDI Lookup (required). Enter the JNDI value to look up in the external repository. For example, if you are creating an external resource to connect to an external repository, to test a mail class, your JNDI Lookup could read cn=testmail.
-
External Resource Enabled (optional). Select On to enable the external resource at runtime.
-
-
-
Click OK.
-
Click Apply Changes.
Using the Command Line Interface
For information on how to use the command-line interface to create a new custom resource, see Create External JNDI Resource in Appendix A, Command Line Utilities.
- © 2010, Oracle Corporation and/or its affiliates
