Chapter 4 Publishing Content
Sun Java System Web Server 6.1 introduces support for the Web-based Distributed Authoring and Versioning (WebDAV) protocol that enables users to perform remote web content authoring operations. What this means is that once you have created a WebDAV collection on your virtual server users can access remotely.
A complete WebDAV transaction involves a server that supports WebDAV, such as Sun Java System Web Server 6.1, to service requests for WebDAV resources, as well as a WebDAV-enabled client such as Microsoft Internet Explorer, Adobe® GoLive® or Macromedia® DreamWeaver® that supports WebDAV-type web publishing requests.
This chapter includes the following sections:
Set Up the Server to Handle WebDAV
Clients can author documents and publish them on your server. You can view, copy, move, and lock documents, and perform other WebDAV operations on collections of resources that are configured to support WebDAV on a virtual server. As server administrator, therefore, you need to create such collections.
For instance, you have a set of documents located in a folder called /info in the docroot of your virtual server, acme. You want the HR group in Acme Corp. to be able to work remotely with this folder.
 To enable WebDAV
First you need to enable WebDAV at two levels: globally, at the server instance level and at the virtual server class level. Note that WebDAV is disabled by default.
To enable WebDAV globally:
-
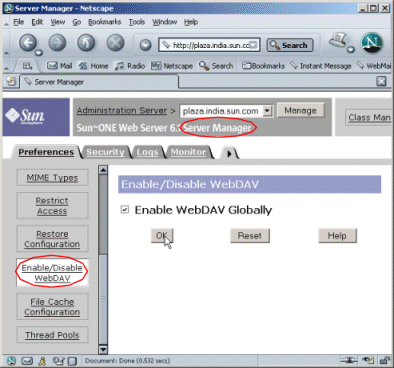
Go to the Server Manager and click the Enable/Disable WebDAV link on the Preferences tab.
Figure 4–1 Enable/Disable WebDAV at Global Level
-
Click the Enable WebDAV Globally checkbox.
-
Click OK and then click Apply for the changes to take effect.
 To enable WebDAV for the virtual server
Enable WebDAV for the virtual server acme , which belongs to the virtual server class, vsclass2:
-
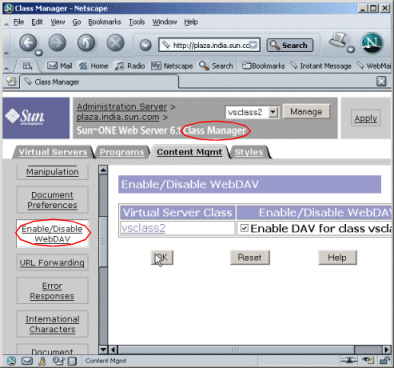
Go to the Class Manager interface of vsclass2.
-
Select the Content Management tab and click the Enable/Disable WebDAV link.
Figure 4–2 Enable/Disable WebDAV at Virtual Server Level
-
Check the Enable DAV checkbox corresponding to vsclass2.
-
Click OK.
You are now ready to create the WebDAV collection.
At a minimum, creating a collection involves specifying the path to a directory that you want to enable WebDAV on. Now, if this directory contains only static data (such as HTML pages or images), you need to specify only the URI path to the directory. However, if the directory also contains dynamic content (such as JSP, SHTML, or CGI programs), you must also specify a source URI.
For instance, you have a dynamic page, test.shtml in the collection. This page contains a script that displays today’s date on the browser. While creating the collection, you specify only a URI for the collection, and no source URI. In this case, when a client invokes the test.shtml page, how it appears on a browser is shown in the Figure 4-3: Page Displaying the Current Date for the Collection:
Figure 4–3 Page Displaying the Current Date for the Collection

You can also configure a source URI for the collection, say /info_source. Now if a client invokes the test.shtml page, the figure below shows how it appears on a browser window:
Figure 4–4 Page displaying the source URI for the collection

By specifying a source URI for a collection, you expose the source of a resource to clients. This is discussed in Chapter 3, Enabling Access Control .
 Caution –
 Exposing the source obviously has security implications and you are recommended to set access control on directories that you map source URIs against.
Create a collection and specify both URI and also a source URI so that the collection can expose the source of dynamic content.
 To create a WebDAV collection
-
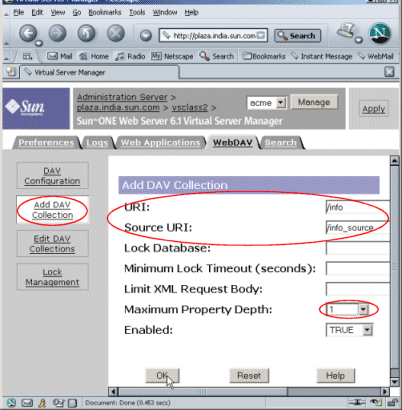
Go to the Virtual Server Manager interface page for your virtual server, acme and select the WebDAV tab
-
Click the Add DAV Collection link
-
Specify /info as the URI and /info_source as the source URI
Figure 4–5 Adding DAV Collection
-
Set the Maximum Property Depth value to either 1 or infinity.
-
Click OK and then Apply to save and apply your changes.
You can specify other parameters for the collection in order to fine-tune the level of WebDAV support. For instance, you can set an upper limit on how much data a person can copy onto the server or for what length of time a resource can be locked. You can do this either at the time of creating the collection or at any time after you have created the collection using the Edit DAV Collections page.
Once you are done with creating or editing the collection, you need to ensure that only the user named “manager” and no one else has the right to access the collection.
Note –-
You must ensure that filesystem permissions should be owned by the user the server is running as. For example, if /info is the URI for a WebDAV collection and if the server is running as a user named “Joe”, ensure that /info maps to a directory to which “Joe” has filesystem permissions.
-
Because WebDAV gives users the right to modify the content of collections on your server, you must ensure that these collections are protected against unrestricted and unauthorized access. For more information on enabling access control and security, see Chapter 3, Enabling Access Control.
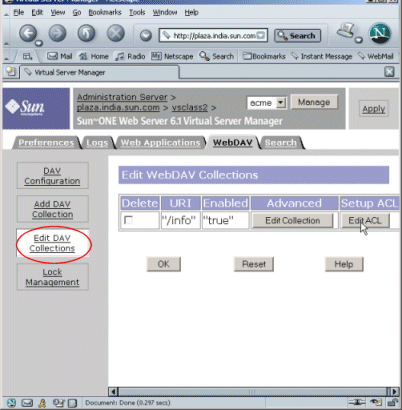
If you need to provide access control and security to the collection that you have just created for only the user named “manager”, use the Edit ACL button on the Edit WebDAV Collections page to set this up.
Figure 4–6 Editing WebDAV Collection
The server is now set up to handle WebDAV requests.
-
Set Up a Client to Use WebDAV
You can use any WebDAV-enabled client software to access and use resources on a WebDAV-enabled server, for example, Microsoft Internet Explorer, Adobe GoLive and Macromedia DreamWeaver.
You would first need to connect to Sun Java System Web Server server using a valid WebDAV URI. For example, if /info is the URI to a WebDAV-enabled collection on a server named acme running on port 2222, specify the URL for the client to make a connection with the server:
http://acme:2222/info
On the client-side, you receive a listing of the contents of the collection.
You can perform several operations on the listed resources. For example, creating a collection on the server, download files from the collection to your machine, upload files, lock, unlock, copy, move or delete resources. Typically, if you were making changes to a file, use the WebDAV client software to lock it to prevent others from simultaneously working on the same file and overwriting your changes.
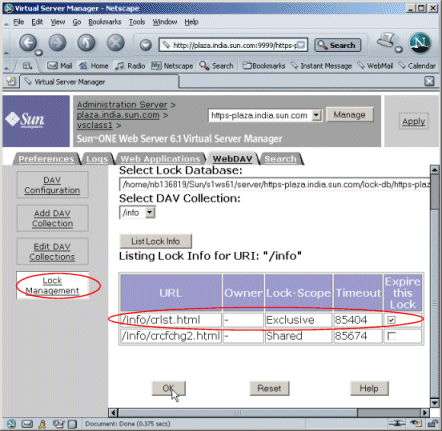
Sun Java System Web Server 6.1 keeps track of the outstanding locks in a locking database.
To view the outstanding locks or to free a locked resource, you use the Lock Management link on the Virtual Server Manager interface, as shown in the Figure 4-7: Lock Management Link :
Figure 4–7 Lock Management Link
For more information on WebDAV functionality, see the Sun Java System Web Server 6.1 SP12 Administrator’s Guide.
- © 2010, Oracle Corporation and/or its affiliates
