 To create a WebDAV collection
-
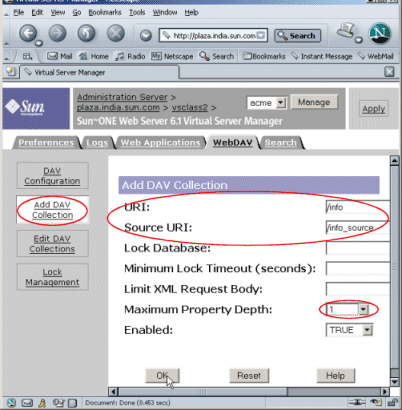
Go to the Virtual Server Manager interface page for your virtual server, acme and select the WebDAV tab
-
Click the Add DAV Collection link
-
Specify /info as the URI and /info_source as the source URI
Figure 4–5 Adding DAV Collection

-
Set the Maximum Property Depth value to either 1 or infinity.
-
Click OK and then Apply to save and apply your changes.
You can specify other parameters for the collection in order to fine-tune the level of WebDAV support. For instance, you can set an upper limit on how much data a person can copy onto the server or for what length of time a resource can be locked. You can do this either at the time of creating the collection or at any time after you have created the collection using the Edit DAV Collections page.
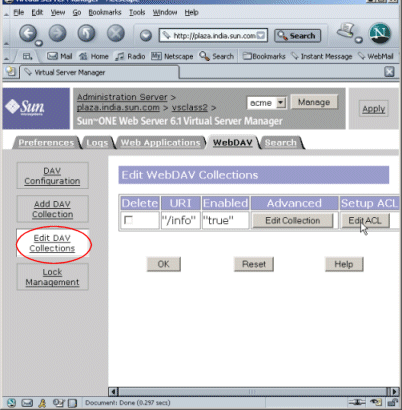
Once you are done with creating or editing the collection, you need to ensure that only the user named “manager” and no one else has the right to access the collection.
Note –-
You must ensure that filesystem permissions should be owned by the user the server is running as. For example, if /info is the URI for a WebDAV collection and if the server is running as a user named “Joe”, ensure that /info maps to a directory to which “Joe” has filesystem permissions.
-
Because WebDAV gives users the right to modify the content of collections on your server, you must ensure that these collections are protected against unrestricted and unauthorized access. For more information on enabling access control and security, see Chapter 3, Enabling Access Control.
If you need to provide access control and security to the collection that you have just created for only the user named “manager”, use the Edit ACL button on the Edit WebDAV Collections page to set this up.
Figure 4–6 Editing WebDAV Collection

The server is now set up to handle WebDAV requests.
-
- © 2010, Oracle Corporation and/or its affiliates
