Chapter 12 Using Atomic Transactions
This chapter explains how to configure and use WSIT WS-TX, which implements Web Services-AtomicTransactions (WS-AT) and Web Services-Coordination (WS-Coordination). WSIT WS-TX enables Java EE transactions to work across heterogeneous systems that support WS-AT and WS-Coordination.
About the basicWSTX Example
-
Developers use existing Java Transaction APIs (JTA). Invocations of transacted web service operations flow transactional context from client to web service. Persistent resources updated with client-created transactions are all committed or rolled back as a single atomic transaction.
-
After the client-side code commits or aborts the JTA transaction, the client confirms that all operations in the transaction succeeded or failed by using calls to verify methods on the transacted web service.
The basicWSTX example shows the following on the client-side:
-
SimpleService, a web service implemented as a Java servlet with transacted operations. The Edit Web Service Attributes feature in the NetBeans IDE WSIT plug-in is used to configure Transaction Attributes of each web service operation.
-
SimpleServiceASCMTEJB, a web service implemented as container-managed transaction enterprise bean (CMT EJB). No configuration is necessary for this case.
-
LibraryFacadeWebServiceBean, a web service that uses the Java Persistence API (JPA) with two JDBC resources
-
Managed Java EE resources participating in a distributed transaction having its transacted updates all committed or rolled back
The servlet and CMT EJB transacted web service operations manipulate two JMS resources:
-
jms/ConnectionFactory, an XATransaction connection factory
-
jms/Queue, a JMS queue
The LibraryFacadeWebServiceBean web service operations manipulate the JDBC resources:
-
connectionPool, an XATransaction JDBC connection pool
-
jdbc/javaProgrammingLibrary, a JDBC connection resource
-
SampleServiceClient, a WSIT servlet that initiates the transaction, and msclient, a client that performs the same operations but runs on the Microsoft side, both interact with the following components running on the service-side:
This example shows how to use XATransaction -enabled JMS and JDBC. The first version of this example, showing WSIT-to-WSIT operations, has the SampleServiceClient client configured to run on one GlassFish instance and the service running on the other GlassFish instance. Either the Java client or the Java web service could be replaced by a semantically equivalent Microsoft implementation. The Java client is, in fact, replaced by a Microsoft WCF client in the more advanced version of the example.
With the SampleServiceClient client, the WS-Coordination/WS-AtomicTransaction protocol messages flow back and forth between the two GlassFish instances just as they do in the Microsoft-to-Sun transaction interoperability scenario with the msclient client.
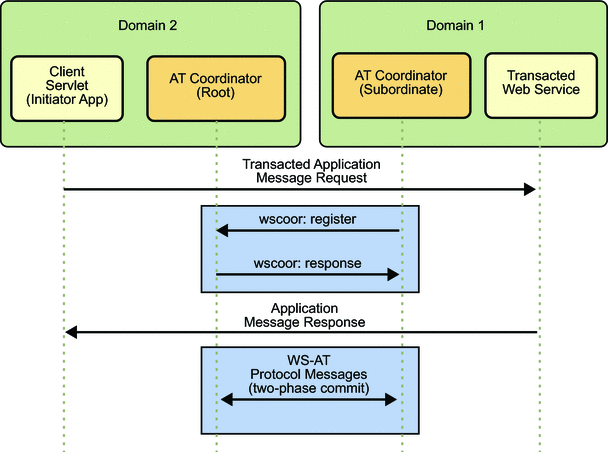
The basicWSTX example was initially designed so it could be run in either one or in two GlassFish domains. If you run the example in one domain, only one coordinator is used; no WS-Coordination protocol messages will be exchanged. This chapter explains how to run the example in two domains so both protocols, WS-Coordination and WS-AtomicTransaction (WS-AT), are used, as shown in Figure 12–1.
Figure 12–1 WS-Coordination and WS-AtomicTransaction Protocols in Two GlassFish Domains

The example also provides the msclient client, which is the equivalent of the client servlet shown in Domain 2.
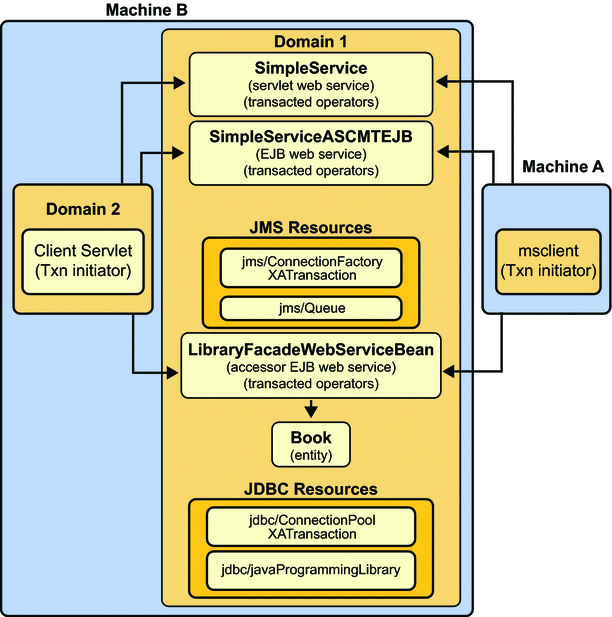
Figure 12–2 shows the components that make up the two domain example. Again, the msclient client would be equivalent to the client servlet in Domain 2 in this figure as well.
Figure 12–2 Components in the basicWSTX Example

The service, which runs in domain1, is comprised of two components:
-
SimpleService, a web service that is implemented as a servlet with transacted operations
-
SimpleServiceASCMTEJB, a container-managed transaction enterprise bean (CMT EJB) web service
The SimpleService web service uses two JMS resources that are created in domain1:
-
jms/ConnectionFactory, an XATransaction connection factory
-
jms/Queue, a JMS queue
The LibraryFacadeWebServiceBean web service uses the Java Persistence API (JPA) with two JDBC resources that are created in domain1:
-
connectionPool, an XATransaction JDBC connection pool
-
jdbc/javaProgrammingLibrary, a JDBC connection resource
The client servlet, which runs in domain2, initiates the transaction.
Building, Deploying and Running the basicWSTX Example
Complete the following steps to configure your environment then build, deploy, and run the basicWSTX example.
 To Build, Deploy, and Run the basicWSTX Example
-
Download the sample kit for this example from https://wsit-docs.dev.java.net/releases/1-0-FCS/wsittutorial.zip.
-
Ensure that properties that point to your local GlassFish and WSIT Tutorial installations have been set.
-
Copy file tut-install/wsittutorial/examples/bp-project/build.properties.sample to file tut-install/wsittutorial/examples/bp-project/build.properties.
-
Set the javaee.home and wsit.tutorial.home properties in the file tut-install/wsittutorial/examples/bp-project/build.properties.
-
Ensure that GlassFish and at least Ant 1.6.5 have been installed and are on the path.
GlassFish includes Ant 1.6.5, which can be found in theas-install/lib/ant/bin directory.
-
-
Set up your environment to run the basicWSTX example.
This step performs the following configuration tasks for you:
-
Starts domain1.
-
Creates the resources (jms/Queue and XATransaction jms/ConnectionFactory) used in the example.
-
Creates and sets up two GlassFish domains.
The domains can be created either on one machine or on two different machines. These steps show you how to do it on one machine. The first domain, domain1, is created as part of the GlassFish installation.
-
Establishes trust between the two domains by installing each domain’s s1as security certificate in the other domain’s truststore.
To configure your environment to run the example:
-
-
Register the GlassFish server instances (domain1 and domain2) in the NetBeans IDE.
-
If the Sun Java System Application Server (domain1) is already registered, go to Step 4g. If it is not, go to Step 4b.
-
In the Runtime tab, right-click Servers and select Add Server.
The Add Server Instance dialog appears.
-
Choose the server (Sun Java System Application Server) from the menu and give it a descriptive name, such as Sun Java System Application Server - domain1 (Server), and then press Next.
-
Press the Browse button, navigate to the location where the GlassFish server is installed, then press Choose.
-
Select domain1 from the menu, then press Next.
-
Type the admin account password (adminadmin) in the Admin Password field, then press Finish.
The server instance you just registered is the one in which you will run the web service (SampleService).
-
Right-click Servers and select Add Server.
The Add Server Instance dialog appears.
-
Choose the server (Sun Java System Application Server) from the menu and give it a descriptive name, such as Sun Java System Application Server - domain2 (Client), and then press Next.
-
Press the Browse button, navigate to the location where the GlassFish server is installed, then press Choose.
-
Select domain2 from the menu, then press Next.
-
Type the admin account password (adminadmin) in the Admin Password field, then press Finish. The server instance you just registered is the one in which you will run the web service client (SampleServiceClient).
-
-
Associate the SampleService web service with the appropriate instance (domain1) of the GlassFish server.
-
Select File, then Open Project.
-
Browse to the tut-install/wsittutorial/examples/wstx/basicWSTX/ directory, select the SampleService project, and select Open Project Folder.
-
In the Projects tab, right-click SampleService, select Properties, then select the Run category.
-
Use the Server menu to point to the Sun Java System Application Server, the default domain, or the Glassfish server instance (domain1) you registered in Step 4.
-
Click OK.
-
-
Set the proper transaction attributes for each mapping (wsdl:binding /wsdl:operation) in the SimpleService-war web service.
This operation creates file SampleService\SampleService-war\web\WEB-INF\wsit-wstx.sample.service.Simple.xml, in which the transaction attribute settings for the SampleService-war are stored.
To set the transaction attributes for the SampleService-war web service:
-
In the Projects tab, open the SampleService-war project.
-
Open the Web Services node.
-
Right-click Simple and select Edit Web Service Attributes.
-
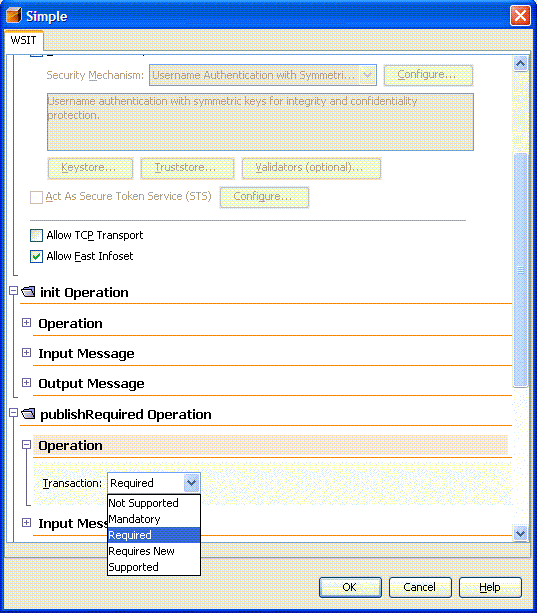
Select the WSIT tab and open the Operation node and then the method node in each section. Select the indicated setting for each of the following operations from the Transaction menu:
-
Set init to Required.
-
Set publishRequired to Required.
-
Set publishSupports to Supported.
-
Set verify to Required.
-
Set getMessage to Required.
Figure 12–3 shows how this is done for the publishRequired operation.
Figure 12–3 Setting the Transaction Attribute for the publishRequired Method

-
-
Click OK.
Transaction attributes for SampleServiceASCMTEJB do not need to be set; EJB 3.0 transaction attributes are used.
-
-
Deploy the SampleService web service.
Right-click SampleService and select Deploy Project. NetBeans IDE will start domain1 and deploy the web service to that domain.
-
Register the SampleServiceClient client with the appropriate instance (domain2) of the GlassFish server.
-
Select File, then Open Project.
-
Browse to the tut-install/wsittutorial/examples/wstx/basicWSTX/ directory, select the SampleServiceClient project, and select Open Project Folder.
-
In the Projects tab, right-click SampleServiceClient, select Properties, then select the Run category.
-
Use the Server menu to point to domain2.
-
Click OK.
-
-
Create web service references for the client (two web service clients, a simpleServlet and a CMT EJB client) and generate the WSDL for both.
-
In the Projects tab, right-click SampleServiceClient, select New, then select Web Service Client.
-
Click Browse next to the Project field. The Browse Web Services dialog is displayed.
-
Open SampleService-war, select Simple, then click OK.
-
In the Package field, type wstx.sample.client, then click Finish.
-
Right-click SampleServiceClient, select New, then select Web Service Client.
-
Click Browse next to the Project field. The Browse Web Services dialog is displayed.
-
Open SampleService-ejb, select SimpleASCMTEjb, then click OK.
-
In the Package field, type wstx.sample.ejbclient, then click Finish.
-
Right-click SampleServiceClient, select New, then select Web Service Client.
-
Click Browse next to the Project field. The Browse Web Services dialog is displayed.
-
Open SampleService-ejb, select LibraryFacadeWebServiceBean, then click OK.
-
In the Package field, type wstx.sample.library, then click Finish.
-
-
(Optional) If transaction attributes for the servlet (see Step 7) or CMT EJB web service have changed, those services must be deployed and client web service references refreshed to get new web service attributes.
To refresh the client web service references for this example:
-
In the Projects tab, open the SampleServiceClient, then open Web Service References.
-
Right-click SimpleService and select Refresh Client to refresh the client node and regenerate the WSDL for the simpleServlet.
-
Right-click SimpleAsCMTEjb to do the same for the CMT EJB client.
-
Right-click SimpleAsCMTEjb to do the same for the LibraryFacadeWebServiceBean client.
-
-
Deploy and run the client. Right-click SampleClient and select Run Project.
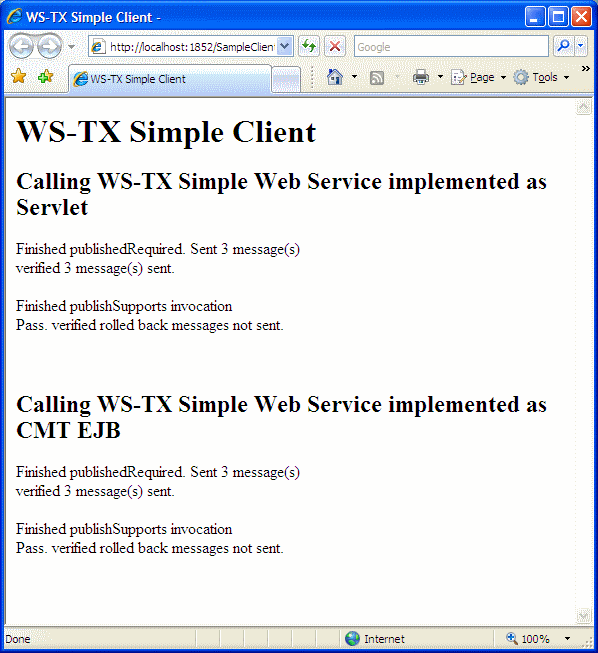
NetBeans IDE will start domain2, deploy the servlet and EJB CMT clients to that domain, then display the results for both in a pop-up browser window, as shown in Figure 12–4.
Figure 12–4 basicWSTX Results

- © 2010, Oracle Corporation and/or its affiliates
