 To Add a Destination to an Object Store
-
Make sure the object store is connected to the Administration Console (see Connecting to an Object Store).
-
Click on the Destinations item under the object store’s name in the Administration Console window’s navigation pane and choose Add Destination Object from the Actions menu.
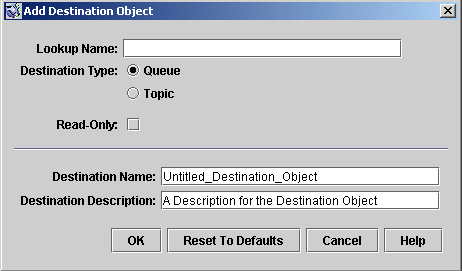
Alternatively, you can right-click on Destinations and choose Add Destination Object from the pop-up context menu. In either case, the Add Destination Object dialog box (Figure 2–14) will appear.
Figure 2–14 Add Destination Object Dialog Box

-
Enter a name for the destination administered object in the Lookup Name field.
This is the name that client applications will use when looking up the destination with JNDI.
For this exercise, type in the name MyQueue.
-
Select the Queue or Topic radio button to specify the type of destination object to create.
For this exercise, select Queue if it is not already selected.
-
Enter the name of the corresponding physical destination in the Destination Name field.
This is the name you specified when you added the physical destination to the broker (see Working With Physical Destinations).
For this exercise, type in the name MyQueueDest.
-
Optionally, enter a brief description of the destination in the Destination Description field.
The contents of this field are intended strictly for human consumption and have no effect on client operations.
For this exercise, you can either delete the contents of the Destination Description field or type in some descriptive text such as
Example destination for MQ Admin Guide tutorial
-
If appropriate, click the Read-Only checkbox.
This locks the destination object’s configuration attributes to the values they were given at creation time. A read-only administered object’s attributes cannot be overridden, whether programmatically from client code or administratively from the command line.
For this exercise, do not check Read-Only.
-
Click OK to create the destination object, add it to the object store, and dismiss the dialog box.
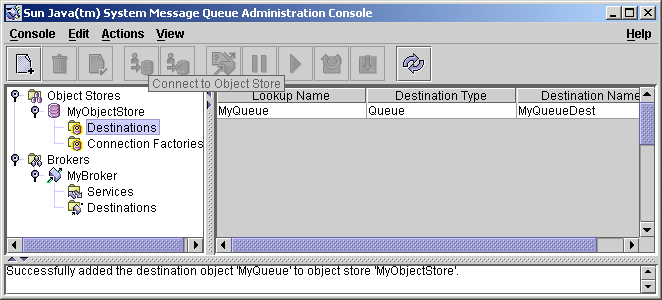
The new destination object will appear in the result pane, as shown in Figure 2–15.
Figure 2–15 Destination Object Displayed in Administration Console Window

- © 2010, Oracle Corporation and/or its affiliates
