Adding Authorized Systems
Any remote host with which you want to communicate (send or receive data) must be configured using the Add pop-up window.
An authorized host may or may not be using encryption. The Add pop-up window provides four options:
-
Off or not using encryption
-
Using SKIP encryption
-
Using SKIP Version 1 encryption
-
Using ESP/AH (manual keying)
You add hosts to the authorized systems list using the Add button, located at the bottom left of the main window of skiptool.
The valid types of remote hosts that you can add to your ACL are
-
Host
-
Network
-
Nomadic
When setting up SunScreen SKIP, be sure to include any NFS servers and NIS or DNS name servers on the authorized systems list, otherwise your system may hang.
Note -
To avoid problems such as this, a safe approach at the beginning is to add the clear "default" entry. Once you become more comfortable with SKIP configuration, you can remove it.
To determine the servers your system communicates with, use the following commands:
-
For NFS servers, type
mount
-
For NIS servers, type
ypwhich
-
For DNS servers, consult your system administrator
-
It might be useful to verify the current routing entries used by the local system. To verify the current routing entries, type netstat -rn and add specific network ACL entries.
If you do not specify a system that you currently have in use when you enable access control, a menu will come up and ask if you want to add the system. It also checks for multicast routers that are being used for others and adds them to the proposed list of systems to add.
Regardless of the type of system that you are adding to the ACL, you must implement the same policy on both your machine and the entity with which you wish to communicate securely over the intranetworks or internetworks. If you do not configure both systems properly, the packets are silently dropped and it appears as if that particular host does not exist. skiplog is useful in diagnosing this situation.
When you click on the Add button, the Add pop-up window appears. From the menu in this window, you select the type of connection: Host, Network, or Nomadic. Next, use the pull-right menu to set the security level. After you have selected the level of security, the appropriate Properties window becomes available. The Add System Properties window is used to set up the options for the type of encryption used by the host, network, or nomadic system being authorized. Table 3-1shows what type of encryption can be used with hosts, networks, or nomadic systems. The procedures in the sections following the table detail how to set up each encryption option.
Table 3-1 Type of Security Available, by Type of System|
Type of System |
Type of Security |
|||
|---|---|---|---|---|
|
Off (none) |
SKIP |
SKIP (Version 1) |
ESP/AH (manual keying) |
|
|
Host |
X |
X |
X |
X |
|
Network |
X |
X |
X |
X |
|
Nomadic |
-- |
X |
X |
-- |
Adding a Host or Network with No Encryption
This procedure is used to allow a host or network access to your system without using any encryption.
-
Click and hold on the Add button at the bottom of the authorized systems list on the skiptool main window.
-
Select the type of connection being authorized: Host or Network. (Nomadic does not offer this option.)
-
Pull right on the type of connection and select Off.
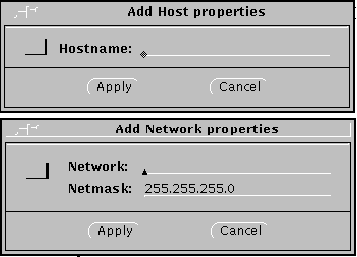
The Add Host properties or Add Network properties dialog box will appear (Figure 3-2).
Figure 3-2 Add Host/Properties--No Encryption
-
In the Add Host or Network properties window, enter the name or IP address of the host system to be added to your ACL.
In the case of a network, you must define the network with the IP address and the netmask.
Setting Up Security for a Host, Network, or Nomadic System
These procedures enable a host, network, or nomadic system access to your system according to the encryption rules set up using one of the procedures below. Remember, both your system and the other system need to use the same properties in order to communicate.
Explanations of the Dialog Box Parameters
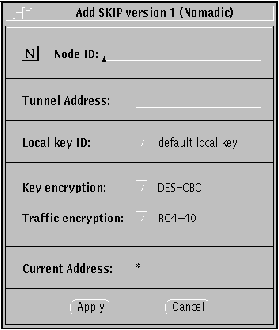
The three encryption dialog boxes (SKIP, SKIP Version 1, and ESP/AH) use common set-up parameters, as you can see in Figure 3-3 through Figure 3-10. Explanations of the parameters follow the figures. The procedure follows the explanations.
Figure 3-3 Host--Add SKIP Host Properties
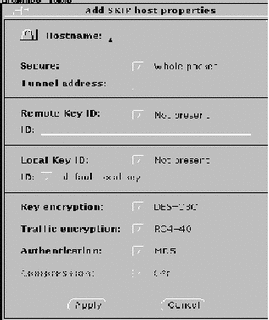
Figure 3-4 Host--Add SKIP Version 1 Properties
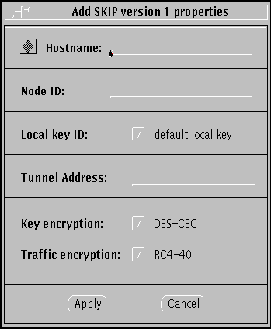
Figure 3-5 Host--Add ESP/AH Host Properties
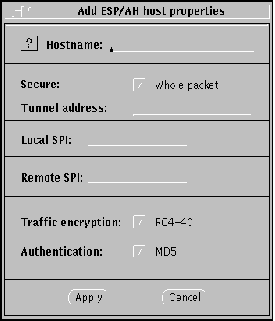
Figure 3-6 Network--Add SKIP Network Properties
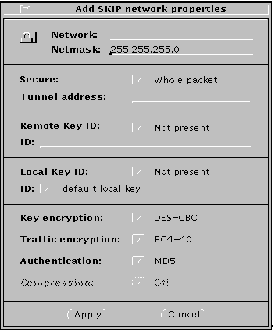
Figure 3-7 Network--Add SKIP Version 1 Properties
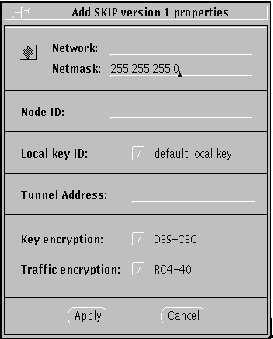
Figure 3-8 Network--Add ESP/AH (Manual Keying) Network Properties
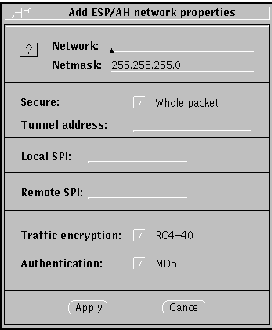
Figure 3-9 Nomadic--Add SKIP Properties (Nomadic)
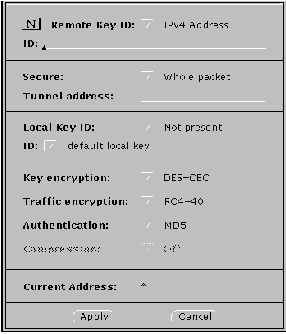
Figure 3-10 Nomadic--Add SKIP Version 1 (Nomadic)
-
Hostname/Network/Nomadic. Enter the name of the host or nomadic system, or the IP address of the host or network.
-
Netmask. (network only) Enter the netmask of the network. The default (255.255.255.0) is already entered.
-
Secure button. (SKIP and ESP/AH only) Set to either Whole packet ("tunnel mode") or Data only ("transport mode"). Whole packet is recommended because it offers a greater degree of security.
-
Node ID. (SKIP Version 1 only) This is the IPv4 key ID.
-
Tunnel Address. Use the tunnel address as the destination IP address. Tunnel address is generally used for clients of encrypted gateways where the IP address of the host entered here serves as the intermediary for any or all hosts on a network whose topography must remain unknown or hidden from the rest of the world. This is called topology hiding. This field is not available if you select Data only.
-
Local/Remote SPI. (ESP/AH only) You need to provide some sort of identifier for the local and remote systems when using manual keying. These are converted to hexadecimal numbers by SKIP. The Local security parameters index (SPI) is your machine, and the Remote SPI is the destination machine. Alternatively, you can enter the Local/Remote SPI values directly in hexadecimal by typing an eight-digit hexadecimal quantity with the prefix "0x."
-
Remote Key ID button. (SKIP only) Select whether you want the remote system's key ID included in SKIP packets and, if so, the namespace that key ID occupies. Selecting Not Present means that the receiver key ID will not be sent.
The following namespaces are listed in this menu:
-
Not Present
-
IPv4 Address
-
MD5 (DH Public Value)
Not Present is the default. It uses the IP address of the remote system to identify its certificate. If a remote system has a key ID other than that identified by its IP address, set the namespace and indicate the remote system's key ID in the ID field.
-
-
Remote Key ID field. (SKIP only) The namespace indicated in the Remote Key ID field is determined by the type of certificate (Table 3-2) that you are using or have obtained for this system:
Table 3-2 Remote Key ID FieldCertificate Type
Remote Key ID Field
CA (Sun or other)
IPv4
Self-generated unsigned key
MD5 (DH Public Value)
If the Remote Key ID field has been set to other than Not Present, enter the key ID in hexadecimal format in the ID field (such as 0x0a000000). It must contain the appropriate key ID for the system being authorized based upon the selection made with the Remote Key ID button. Depending on the type of certificate, this information may be obtained from the master key ID on the diskette or from the local key ID field of the other host.
-
Local Key ID and ID buttons. Use the Local Key ID button to indicate whether you want your local system to send its key ID in the SKIP packet and, if so, the namespace that key occupies. If you select Not Present, the sender's key ID is not sent in the packet and the remote system uses the local system's IP address to decide what key to use.
Note -If you have installed new local keys after you have started skiptool, skiptool will not list them. You must restart the key manager with the skipd_restart command to list them and rerun skiptool.
All the local-key times installed for this host are listed. Select the namespace for the local key that is to be used for communication with the above host. Once you have selected the namespace, click on the ID field to select the key to be used, in hexadecimal, for communication with this host.
-
Key Encryption button. Selecting this button lists the available key encryption algorithms. The algorithms available are determined by the system type and the selected encryption method selected.
-
Traffic Encryption button. Select the algorithm for encrypting the traffic between your system and the remote system. The algorithms available are determined by the system type, the version of SunScreen SKIP, and the method of encryption selected.
-
Authentication button. Use the authentication button to select the type of authentication for the packets. Currently, SunScreen SKIP supports only one type of authentication--MD5. You can also select None for no authentication.
-
Compression button. Compression is not available at this time.
- © 2010, Oracle Corporation and/or its affiliates
