Chapter 3 Requesting and Installing Your License
This chapter describes how to obtain and install a FLEXlm license for your i-Planet software.
-
If you will be using RTU licensing, refer to the instructions in "Right-To-Use Licenses".
-
If you will be using site (domain) licensing, refer to the instructions in "Domain-Based Licenses".
Right-To-Use Licenses
This section describes how to request and install your RTU license.
Requesting Your RTU License
Refer to the "Proof of License Certificate" card shipped in your i-Planet 2.0 product package. Follow the instructions on the card for contacting the Sun License Center by email message, fax, or telephone. The most current License Center information is also available on the World Wide Web at this URL: http://www.sun.com/licensing.
Be ready to provide this information when you contact the License Center:
-
Your organization-specific information, such as company name and address
-
Your i-Planet server hostid (run the command hostid to obtain your hostid)
-
The number of users (RTUs) desired for the license: 100, 1,000, 5,000, or 25,000
-
The serial number on your Proof of License Certificate (this indicates the feature version of i-Planet desired: full features or mail-only features)
The License Request Form, located on the product CD-ROM labeled "i-Planet 2.0", can also be used to collect this information for the Sun License Center. To use the License Request Form, copy it from the CD-ROM to a directory:
% cp /docs/usenglish/misc/LicenseRequestForm.txt filename |
change the file permissions so you can write to the file, and edit the file in your preferred editor.
After you provide the License Center with the required information, you will receive an email message or a fax with your license information; usually the License Center responds to your license request within one business day after receiving your request.
Installing Your RTU License
If you received an email message from the License Center, you can install your license from the email message or enter the license by hand; installing from the email message is easier. If you received a fax from the License Center, you must enter your license by hand.
Have the license information from the License Center ready when you install your license.
To install a license received in an email message
-
Save to a file the license information that you received from the License Center.
The email message that you received from the License Center has the license information either in an email attachment or embedded in the body of the email message.
-
If you received an email attachment, save only the email attachment to a directory and file name of your choice on your system.
-
If you received an email with the license information embedded in the body of the email message, delete the mail headers and the body of the email message, and save only the license information to a directory and file name of your choice on your system.
-
-
As root, run the script /opt/SUNWste/bin/lit on the i-Planet server.
The License Installation Tool is displayed.
-
In the License Installation Tool, click Loaded from an Email Message Saved to a File if it is not already marked.
-
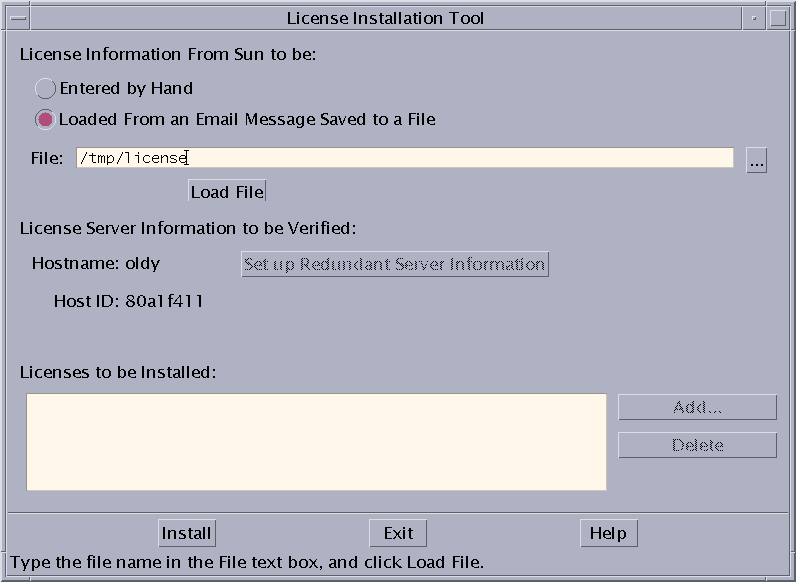
Enter the complete path to the file you specified in Step 1 in the File text field or click the browse button (labeled ".." to the right of the File text field) to use a file chooser to find the saved file.
The License Installation Tool with this information entered is shown in Figure 3-1.
Figure 3-1 License Installation Tool (license information received by email)

-
Click Load File.
Your license listed in the email you received from the License Center appears in the Licenses to be Installed pane.
-
Click Install to install the license.
-
When installation is complete, click OK in the pop-up window.
-
Click Exit to exit the License Installation Tool.
The license server should start.
If the license server does not start, an error message is displayed. Verify that you installed a valid license by running the script /opt/SUNWste/license_tools/testlic. The output of this script tells you whether or not a license is installed and what type it is. If a valid license is installed, run the script /etc/opt/licenses/lic_srvr_start to start the license server.
-
Restart the i-Planet server.
# /opt/SUNWjeev/bin/iplanet_serv stop
# /opt/SUNWjeev/bin/iplanet_serv start
To install a license received on a fax machine
-
As root, run the script /opt/SUNWste/bin/lit on the i-Planet server.
The License Installation Tool is displayed.
-
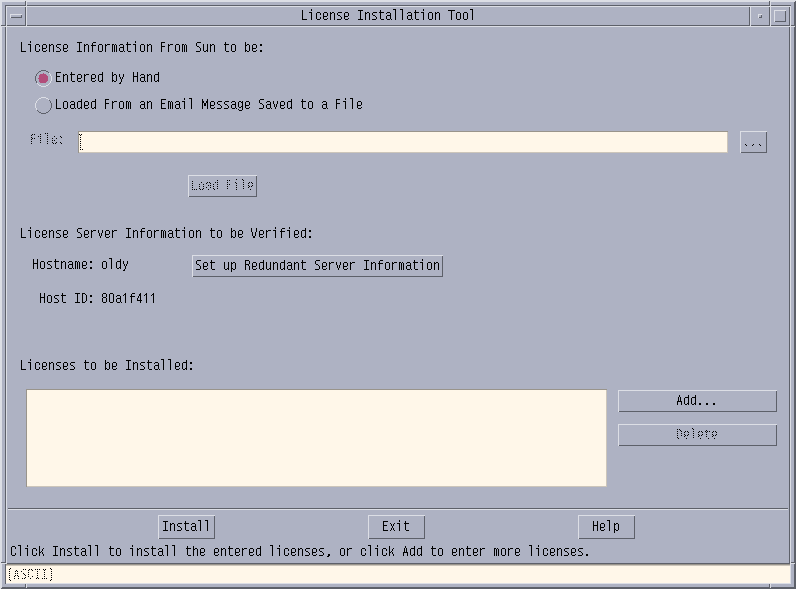
In the License Installation Tool, click Entered by Hand.
The License Installation Tool with this information entered is shown in Figure 3-2.
Figure 3-2 License Installation Tool (license information received by fax)

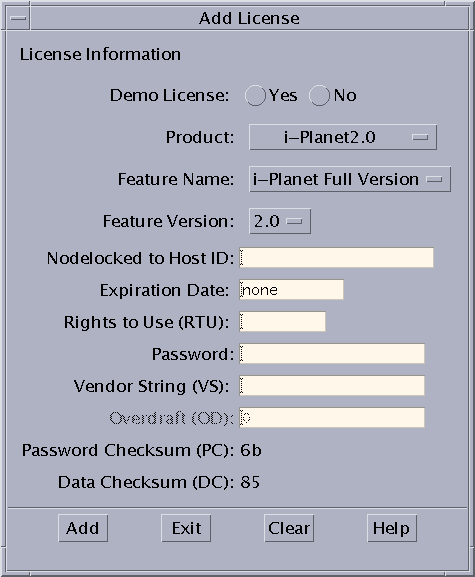
The Add License window opens, as shown in Figure 3-3. Leave the License Installation Tool up while you enter information in the Add License window.
Figure 3-3 Add License Window

-
In the Add License window, enter the following information, referring to your license information:
-
Click Yes or No for Demo License, as appropriate.
-
On the Product pull-down menu, select i-Planet, if it is not already selected.
-
On the Feature Name pull-down menu, select full version or mail only, as appropriate.
-
On the Feature Version pull-down menu, verify that 2.0 is selected.
-
Enter the host ID.
The host ID must match the host ID on your license.
-
For the license expiration date, leave the field defined as none; for a demo license, leave the field defined with the expiration date.
-
Enter the Rights to Use (RTU).
-
Enter the password provided by the License Center.
-
Enter the vendor string (VS).
-
Verify that the data displayed in the Password Checksum (PC) and the Data Checksum (DC) fields matches the data in your license information.
Make sure that you have typed in all the information correctly. If there is a discrepancy, contact the License Center (see your Proof of License Certificate card for access information).
-
-
Click Add.
Your license listed in the fax you received from the License Center appears in the Licenses to be Installed pane in the License Installation Tool.
-
Click Exit in the Add License window.
-
Click Install in the License Installation Tool to install the license.
-
When installation is complete, click OK in the pop-up window.
-
Click Exit to exit the License Installation Tool.
The license server should start.
If the license server does not start, an error message is displayed. Verify that you installed a valid license by running the script /opt/SUNWste/license_tools/testlic. The output of this script tells you whether or not a license is installed and what type it is. If a valid license is installed, run the script /etc/opt/licenses/lic_srvr_start to start the license server.
-
Restart the i-Planet server.
# /opt/SUNWjeev/bin/iplanet_serv stop
# /opt/SUNWjeev/bin/iplanet_serv start
You can now use your licensed software.
Refer to the section "Where To Go Next "at the end of this chapter.
Domain-Based Licenses
This section describes how to request and install your site, or domain-based, license.
Domain-based licenses tie licensed products to a network domain. Domain-based licenses support products licensed through the GoldPass (commercial) and ScholarPASS (educational) programs and link software to network domains rather than specific license servers. Domain-based licenses function without using a centralized license manager and without enforcing hard limits on the number of users.
The license agreement signed by your organization includes information about the network domains where licensed software is installed and any limitation on the number of users. Licenses are issued only for the domains associated with your site as described in your agreement.
Depending on how your network domains are set up, you can acquire a license for a single product (or product feature) that makes it available on all of the network domains at your site. You can also receive individual licenses for each domain and subdomain. This allows you reasonable control of user access to the software. For example, the license agreement may simply identify my_org.org as the domain on which licensed software may operate. However, you can acquire a license for a particular subdomain (for example, eng.my_org.org) and limit access to that subdomain as well as its subdomains.
Requesting Your Domain-Based License
Domain-based licenses are available one or two weeks after your GoldPass or ScholarPASS license agreement has been approved. Check the date of the agreement before requesting your license.
Follow these steps to request your domain-based licenses:
-
Collect the following information:
-
Site number. This number identifies your organization for all ScholarPASS or GoldPass licensed software. Upon approval of your agreement, a site number is assigned to each site in your organization. If you do not have this number, ask for it from the individual in your organization who signed the licensing agreement.
-
Your product name, version number, and serial number. The serial number is printed on the label attached to the Proof of License Certificate, which is part of your ScholarPASS or GoldPass product package.
-
Network domain names. The domain names that you supply are verified against the information that was provided in the license agreement. A license will be issued only if your requested domains are associated with your site number.
-
-
Follow the steps in "Requesting Your RTU License" to request and receive your license information from the Sun License Center.
If you use the License Request Form, add your site number and network domain name to the form.
Installing Your Domain-Based License
The current implementation of domain-based licenses does not require a separate license server, so it is not necessary to run a license server to use the GoldPass and ScholarPASS configured licenses.
To install your domain-based license
-
Create a text file containing the license information you received from the Sun License Center.
-
If you received an email attachment, copy only the email attachment into the text file.
-
If you received an email with the license information embedded in the email message, copy only the license information into the text file (do not include the mail headers and the body of the email message).
-
If you received your license information by fax, input the license information into the text file.
-
-
Save the text file in the following location with the following file name:
-
For GoldPass: /etc/opt/licenses/i-Planet.lic,gp
-
For ScholarPASS: /etc/opt/licenses/i-Planet.lic,sp
Note -Make sure your file name contains both a period (.) and a comma (,).
For the i-Planet.lic text file you just saved, root should be the owner and have read and write permission; all others should have read-only access.
-
The number of licenses available is zero (unlimited) for a domain-based license.
You can now use your licensed software.
Using Domain-Based Licenses
-
If a domain is specified in /etc/resolv.conf, it will be used.
-
If hostname is set to be a value that contains at least one period (.), the value to the right of the first period will be used as the domain value.
-
The domain listed in /etc/resolv.conf has precedence over the hostname value if both a domain and hostname are available.
-
If both NIS and DNS results are non-null, a case-insensitive comparison is performed with the domain listed on the license. If the domain value from the license is a subset of either the NIS or DNS values, the license will be granted.
The licensed software operates as long as the requesting user of the licensed software is on a valid network domain.
Where To Go Next
After you have obtained and installed your license, to set up and manage i-Planet 2.0, start the Administration Console on the i-Planet server by opening a browser and going to the URL:
-
http://i-Planet_server:8080/console and log in as root (if you are not using SSL communication between the gateway and server)
-
https://i-Planet_server/console and log in as root (if you are using SSL communication between the gateway and server)
Refer to the i-Planet Administration Guide, located in /opt/SUNWjeev/public_html/docs/usenglish/manuals/ps/admin.ps for information on administration; use a PostScript viewer started by imagetool or stdimage, for example, to display the PostScript. If your browser has the capability to display PostScript files, you can use the URL http://i-Planet_server:8080/docs/usenglish/manuals/ps/admin.ps, or, if you are using SSL between the gateway and the i-Planet server, https://i-Planet_server/docs/usenglish/manuals/ps/admin.ps. If you changed the default port numbers during installation, substitute the new port numbers in the path.)
- © 2010, Oracle Corporation and/or its affiliates
