Creating an iPlanet Web Application and a session EJB
![]() Before You Begin
Before You Begin
![]() Part 1: Creating a Hello World Web Application
Part 1: Creating a Hello World Web Application
![]() Part 2: Debugging
Part 2: Debugging
![]() Part 3: Creating a Sales Tax Calculation EJB
Part 3: Creating a Sales Tax Calculation EJB
![]() Part 4: Creating a Sales Tax Web Application that Uses the Sales Tax Calculation EJB
Part 4: Creating a Sales Tax Web Application that Uses the Sales Tax Calculation EJB
![]() Part 5: JSP Integration
Part 5: JSP Integration
![]() Part 6: Setting Up the Deployment Target
Part 6: Setting Up the Deployment Target
![]() Part 7: Debugging on a Remote Application Server
Part 7: Debugging on a Remote Application Server
Before You Begin
- Follow the directions in the Installation Instructions to install the integration tool.
- If you plan on performing remote debugging, follow the directions in the Installation Instructions to install the remote debugging services on the target system.
- To complete the tutorial, you must know:
- Administrator user name and password.
- Administrator Port Number for the iPlanet Application Server installed on your machine (the default admin port number is 10817).
This tutorial assumes some familiarity with the iPlanet Application Server and VisualCafť.
Part 1: Creating a Hello World Web Application
- Launch VisualCafť Enterprise Edition.
- From the File menu, select New Project.
The New Project window appears.
- Select the iPlanet Web Application icon and select OK.

- Enter HelloWorld as the VEP (project) name and select Save.
The project name appears as untitled. This is a known bug.
- Update the project name by closing the project and reopening it, or
by selecting Save from the File menu.
You are now ready to create a servlet in the project.
- From the Insert menu, select Servlet.
The Servlet wizard launches.
- Read the description of what the Servlet wizard does and select Next.
- In the Servlet window, enter the following data in each field:
Field Data to Enter Name: Hello Package: helloworld 
- Select Finish.
You have now added a servlet to your web application.
- Edit the Hello.java file.
- After the out.println("<BODY>"); line add the following:
out.println("<p>Hello everyone!</p>");
- Save the Hello.java file.
- From the Project menu, select Configure iPlanet Web Application to display the dialog.
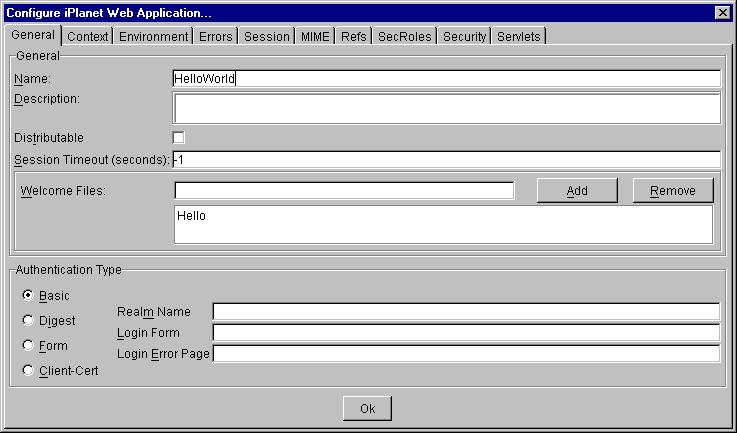
The first file listed is the Welcome file. This is the file that will be opened in a browser when you test your project. By default, it is the name of the servlet. This dialog can be used to change any of the Web App descriptor settings. However, for this project there's no need to change any of the settings.
- select OK to exit the dialog.
- From the Project menu, select Configure Servlets to display the dialog.
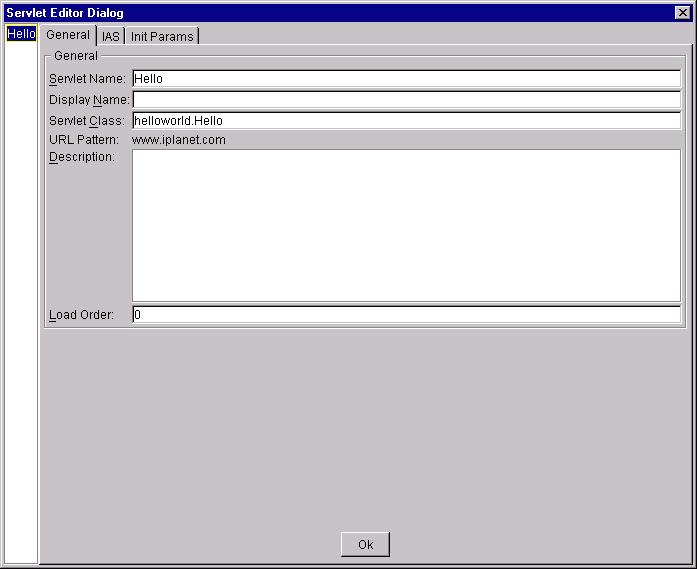
Use the Configure Servlets dialog to change the Servlet descriptor settings. For this project there is only one servlet "Hello". You don't need to change any of the settings.
- Select OK to exit the dialog.
- Make sure the iPlanet Application Server is running by selecting
Start Application Server from the Project menu.
The menu is disabled if the server is already running.
The server takes a few seconds to start up. To view the report information you must select Services from the Control Panel. Set the Allow Service to Interact with Desktop flag in the Startup panel of the iPlanet Application Server 6.0 service. You should now be able to see the kjs.exe DOS window report information identifying ENGINE-ready: ready: <port number>.
- From the Project menu, select Execute.
If this is the first time you are executing a web application from VisualCafť, the following window appears.
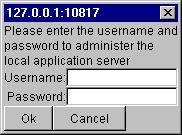
- Enter the administrator username and password, and select Ok.
There is a short pause while the KJS or Java server process in the application server is shut down and a new DOS window opens to start up the java.exe. This new window becomes the KJS or Java server process of the application server. The WAR file is built and then deployed on the application server.
Next, the browser window opens to the URL of the servlet, in this case http://localhost:80/NASApp/HelloWorld/Hello.
You can also look in the file system and see the HelloWorld.war file in the same directory as your project VEP file. In the <iasInstallationDirectory>/ias/Apps/modules/HelloWorld you can see the deployed Hello.class file that the server is using.
Congratulations, you have finished your first application.
- Close the DOS window running java.exe, and select the end task button
on the warning panel that displays.
This returns VisualCafť to the normal state so you can continue with the tutorial.
 After you use the Execute menu,
if you want to execute again using the Execute
menu or the Debug menu, you must kill the java.exe window. Otherwise,
you will have two KJS processes running.
When you close the last Web
Application project, or exit VisualCafť, the application
server starts a new KJS, if none are running, so your server will be in its normal state.
See Part 6
for a description of the Execute in iPlanet Server
command. In most cases, the Execute in iPlanet Server command gives you a faster
test turnaround than the Execute command.
After you use the Execute menu,
if you want to execute again using the Execute
menu or the Debug menu, you must kill the java.exe window. Otherwise,
you will have two KJS processes running.
When you close the last Web
Application project, or exit VisualCafť, the application
server starts a new KJS, if none are running, so your server will be in its normal state.
See Part 6
for a description of the Execute in iPlanet Server
command. In most cases, the Execute in iPlanet Server command gives you a faster
test turnaround than the Execute command.
Part 2: Debugging
These instructions apply for any Web Application.- Make sure the iPlanet Application Server is running by selecting
Start Application Server from the Project menu.
If the menu is disabled, this indicates the server is already running.
- From the Project menu, select Run in Debugger. Or, press the F5 key to launch the Java engine.
- From the View menu, select Messages to view the messages window.
Look for a ready: <port number> message indicating that the server is ready to take requests.
- Set at least one breakpoint, or specify other debug
options, within VisualCafť.
From
a source file you can set a breakpoint by selecting a line, then right
click to select the Set Breakpoint menu item.
You
can set a breakpoint in any project. If you want to debug an EJB you must
start the debugger from a Web Application, but you can set a breakpoint in the
EJB project.
- Open your browser to the start page of your application
and exercise the servlets you want to debug.
For web applications the URL is of the form http://hostname/NASApp/projectname/servletname.
- The debugger stops at your breakpoint. Use any of the debugging features of VisualCafť you would like such as Step Over, Continue to Cursor, or Continue.
- Once you are satisfied with your debugging, select Stop from the Debug menu to end your debugging session.
Part 3: Creating a Sales Tax Calculation EJB
- From the File menu, select New Project.
The New Project window appears.
- Select the Enterprise Bean icon and select OK.
The Create Enterprise Bean wizard appears to help you create the EJB component.
- Review the EJB Wizard Introduction window and select Next.
- In the Select Name window, enter the following data in each field:
Field Data to enter Basename: Sales Package: salestax Description: Whatever comment you wish to enter Location: Accept the default setting Enterprise Bean project name: Accept the default setting client project name: Accept the default setting 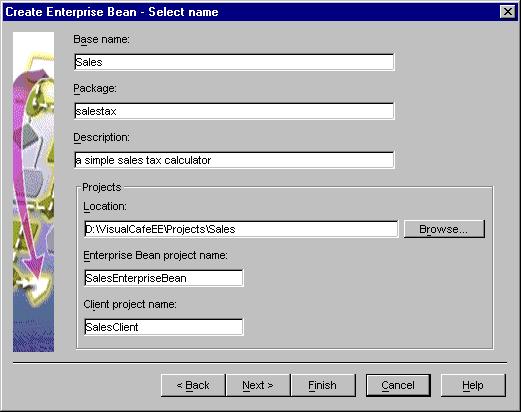
- Select Next.
- In the Choose Enterprise Bean type window, make sure Session - Stateless is selected and select Next.
- In the Add Business Methods window, select New to add a new business method.
- Enter the following data for each field.
Field Data to enter Return Type Double Method Name calculateTax Argument List (Double amount) - Select Next.
- In the Add environment properties window, select Next since you don't need any environment properties for this example.
- Review the selections you have made and select Finish.
A SalesEnterpriseBean.VEP and a SalesClient.VEP file is created in your project.
- Select the Files tab in the SalesEnterpriseBean.VEP Project window.
Locate the Sales.java, SalesEJB.java, and SalesHome.java files that were created.
- Open the SalesEJB.java file.
- In the Business Method calculateTax replace return null; with return new Double(0.0825* amount.doubleValue());
- From the File menu, select Save All.
- From the Project menu, choose the Options submenu and select the EJB tab.
- Make sure the Deploy Target field is set to the iPlanet Application Server 6.0.
This occured because in Part 1, when you selected Execute, the iPlanet Application server was set as the default local server for all your projects.
- Select the Manage Deployment Target button.
If you went through Part 1 of the tutorial, then the local server is in the list of servers.
- Make sure Local Server is selected and click OK.
If you didn't go through Part 1, go to Part 5 and define your local server. Part 5 describes how to reset the default setting for new projects as well as change the target for existing projects.
If you register
multiple servers, the one that is selected when you select OK is the target
of the project. You can register new servers in this dialog and they will
be available for all projects.
- Select OK to close the Project Options window.
- Select the SalesEnterpriseBean.VEP Project window.
- From the Project menu, select Configure Enterprise Bean.
- Verify that the Class tab and the Method tab are populated with the methods of the EJB
you just created.
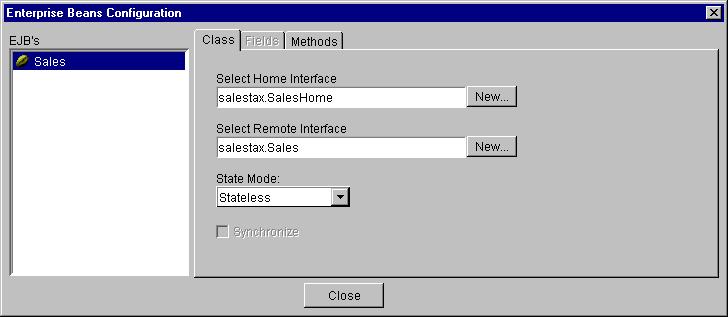
- Select Close to exit.
- From the Project menu, select Configure Deployment Descriptor and examine
the Configuration settings.

- Select OK to exit.
- From the Project menu, select Build Application.
In the messages window, the message "Build Successful" appears.
- Make sure the iPlanet Application Server is running by selecting Start EJB Server from the Project menu.
- From the Project menu, select Deploy.
The Deliver Enterprise Bean to EJB Server progress panel displays. When it is complete, the following two messages appear in the Messages window:
Deploying JAR.... Delivery complete.
Cleaning up...Completed.There is a short pause while the KJS or Java server process in the application server is shut down and a new DOS window opens to start up the java.exe. This new window becomes the KJS or Java server process of the application server. The EJB JAR file is built and then deployed on the application server.
Congratulations you have created an Enterprise Java Bean and delivered it to the server. You can look in the file system and see the exploded JAR in <iasInstallationDirectory>/ias/APPS/modules/SalesEnterpriseBean. If you look in your project directory you will see SalesEnterpriseBean.jar. In Part 4 you will construct a Web Application that communicates with this EJB.
Part 4: Creating a Sales Tax Web Application that uses the Sales Tax Calculation EJB
- From the File menu, select New Project.
- Select the iPlanet Web Application icon and select OK.
- Enter TaxWebApp as the VEP (project) name and select Save.
The project name still appears as untitled. This is a known bug.
- Update the project name by closing the project and reopenint it, or by selecting
Save from the File menu.
- From the Insert menu, select Servlet to create a servlet in the project.
- Read the screen that describes what the Servlet wizard does and select Next.
- Enter Calculator as the name.
- Enter taxapp as the package.
- Select Next.
- Confirm that HTTP-specific:similar to CGI script is selected and click Next.
- Confirm that Yes: implementation should be thread-safe is selected and click Next.
- Select doPost() and confirm that doGet() is selected.
- Select Finish.
You have now added a servlet to your Web Application.
In order to avoid compile time errors, you must configure the servlet to know about the EJB.
- From the Project menu, select Options.
- Select the Directories tab.
- In the Show directories for: pull-down, make
sure Input class files is selected.
- Add the directory of your EJB
project. In this case "<VisualCafťInstallDir>\Projects\Sales".

- Select OK to dismiss the dialog.
- Edit the Calculator.java file.
- Add the following to the imports:
import javax.ejb.*;
import javax.naming.*; - After the // to do: your HTML goes here. line in
the doGet() method add the following:
out.println("<form method=post action=\"/NASApp/TaxWebApp/Calculator\">"); out.println("<h1>Sales tax calculator</h1>"); out.println("Amount of sale is <input type=input name=newVal>"); out.println("<input type=submit value=Submit name=submitButton>"); - After the // to do: code goes here. line in the doPost()
method add the following:
String newVal = "0"; String vals[] = req.getParameterValues("newVal"); if (vals != null && vals.length >0) { newVal = vals[0]; } Double salesAmount = new Double(newVal); - After the // to do: your HTML goes here. line in
the doPost() method add the following:
try { java.util.Properties p = new java.util.Properties(); Context ctx = new InitialContext(p); Object beanObject = null; beanObject = ctx.lookup("java:comp/env/Sales"); salestax.SalesHome home = (salestax.SalesHome) beanObject; salestax.Sales remote = (salestax.Sales)home.create(); Double result = remote.calculateTax(salesAmount); out.println("<h1>The sales tax on "+salesAmount+ " is "+result+"</h1>"); } catch (Exception ex) { out.println("<pre>"); out.println("<h1>Error</h1>"); ex.printStackTrace(out); out.println("</pre>"); } - Save Calculator.java.
- From the Project menu, select Configure iPlanet Web Application.
- Select the Refs tab.
- In the section labeled References to EJBs defined elsewhere select the Add button.
- Enter the following data for each field.
Field Data to Enter Reference Sales Bean Type Session Linked to Bean Sales Bean Home Interface SalesHome Bean Remote Interface Sales JNDI Name ejb/<projectname>/<beanname>
in this example the JNDI name is ejb/SalesEnterpriseBean/Sales - Select OK to exit the dialog.
- Make sure the iPlanet Application Server is running. From the Project menu, select Start Application Server. If the menu is disabled it means the server is already running.
- Make sure you have closed any java.exe DOS windows
from previous Execute commands.
- From the Project menu, select Execute.
- If this is the first time you are executing a web application from VisualCafť,
you will be prompted to enter the administrator username and password.
After a short pause, the kjs or java server process in the application server shuts down and a new DOS window opens and starts the java.exe. This new window becomes the kjs or java server process of the app server. The WAR file is built and then deployed on the app server. Next a browser window opens to the URL of the servlet, in this case http://localhost:80/NASApp/TaxWebApp/Calculator.
- Enter an amount, and select Submit in the browser.
The servlet gets the amount, calls the EJB to calculate the tax, then display the resulting tax.
- Close the DOS window running java.exe.
- Select the End Task button on the warning panel that appears.
This returns VisualCafť to the normal state so you can continue with the tutorial.
- Return to Part 2 and try setting breakpoints in the EJB.
Part 5: JSP Integration
This section of the tutorial uses a simple JSP file as an example. These instructions assume you are adding the JSP to one of the previous two web applications you created in Part 4 (Calculator.java) of this tutorial.- From the File menu, select the New File.
- Enter the following text into the file:
<HTML>
<BODY>
<% out.println("According to this JSP, it is now " + new java.util.Date());%>
</BODY>
</HTML>
- Save the project with the name simplest.jsp.
- Verify that the Add to Project checkbox is selected and press the Save
button.
If you want to add
existing JSP files to your project, you can select Insert
Files into Project from the Insert menu.
- From the Project menu, select Configure Servlets.
A new entry appears at the left side of the window. This represents the new servlet descriptor with the name simplest_jsp.
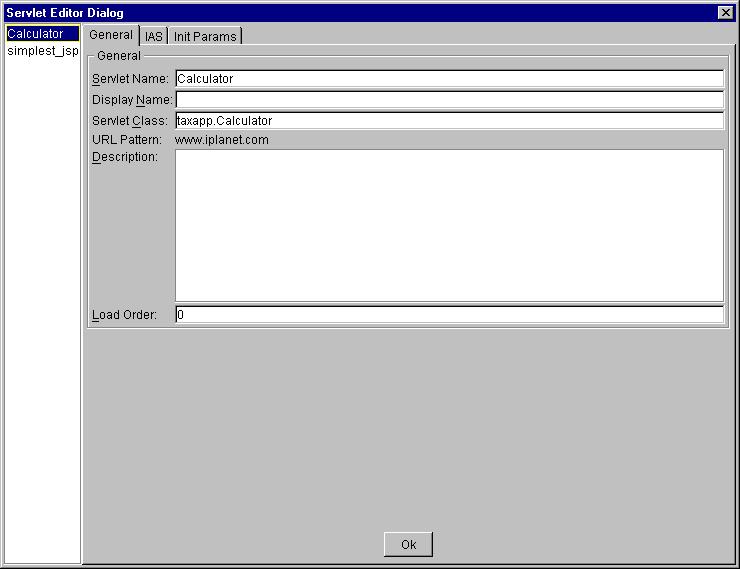
- Select simplest_jsp and look at the descriptor.
- Select Ok to dismiss the editor dialog.
- Open Calculator.java file.
- In the doGet method, add the following code directly
above the out.println("</BODY>"); statement that ends
the body of the servlet's response:
out.println("<A href=\"simplest_jsp\">Check the time</A>");
In this
example, simplest_jsp is used to refer to the registered servlet. You can
also use simplest.jsp to refer to the servlet by its file name. If you use
.jsp, then the JSP is reloaded each time it is accessed in the server. See
Part 6 for more information on the side effects.
- Select Save to save the file.
Make sure any java.exe DOS windows left over from previous Execute calls are closed.
- Select the Execute item from the Project menu.
- Select the HRef "check the time" in the browser's content area.
A new page appears indicating the current time.
There is a short pause while the WAR file is created, deployed, and the browser opens.
Part 6: Setting up the Deployment Target
- From the Tools menu, select Environment Options.
- Select the UML/EJB tab.
- From the Deployment Target pull down menu, select
iPlanet Application Server.

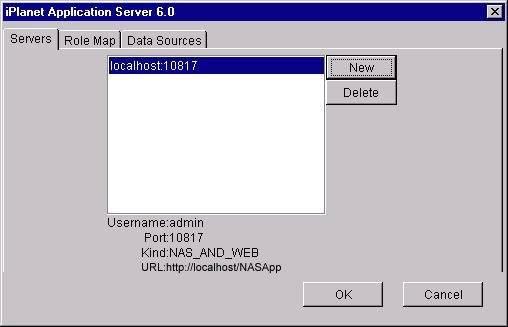
- Select Manage Deployment Target.
- Select New.
You can define servers by their name or IP address. If completed Parts 1-5 of this tutorial, your local server is defined by its IP address. If you don't have a remote server you would like to work with, use localhost for this part of the tutorial.
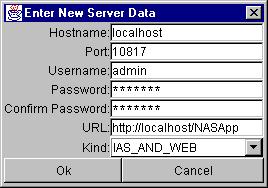
- In the Enter New Server window, enter the following data in each field:
- Select OK to enter the new server.
- Make sure your new server is selected and select OK to commit your changes
to the iPlanet Application Server deployment target window.
- Select OK to commit your changes to the Environment Options.
A warning message similar to the following appears:

- Select OK once more to commit your changes.
The new server is now registered with VisualCafť and can be used by all projects. The same server can be used for both Web Applications and EJBs. The selected server is the default server used in new projects.
The Execute, Run In Debugger, and Step Into commands will still use the local server, but the Deliver Enterprise Bean to EJB Server and Execute in iPlanet Server commands will use the server specified by the project.
Now lets configure the application you wrote in Part 3 and 4 to run on the remote server. Since these projects were created before you identified the default server you need to change the deployment target in both projects.
- Open the SalesEnterpriseBean project from Part 3.
- From the Project menu, select Options.
- Select the EJB tab.
- Select the server you just defined.
If you want
to add a new deployment target using this window it will be registered
in VisualCafť's defaults and available for all projects.
- Select OK to exit.
- From the Project menu, select Start EJB Server.
- From the Project menu, select Deploy.
The Deliver Enterprise Bean to EJB Server progress panel displays and the following messages appear in the Messages window:
Deploying JAR.... Delivery complete.
Cleaning up...Completed. - Restart the server.
- Open the TaxWebApp project from Part 4.
- From the Project menu, select Configure Target iPlanet Server.
- Select the server you just defined.
If you want
to add a new deployment target using this window it will be registered
in VisualCafť's defaults and available for all projects.
- Select Ok to exit.
- From the Project menu, select Execute in iPlanet Server.
The browser on your local machine displays with a URL that points to the servlet on the remote machine.
Since the Execute
in iPlanet Server relies on a running KJS it can be faster to use than
the Execute command on a local machine. However, the Execute in iPlanet
Server command does not reload cached data such as changed descriptors
or EJBs. The KJS started from the Execute
command loads information each time since it is started as a new process.
It is more convenient to use if you are doing EJB development. You do not need
to restart KJS if you are only making changes to your Java code or JSPs.
By default, servlets registered with the server (including JSPs referenced by
their .jsp name) are cached, but this can be changed. See
the iPlanet
Application Server Java Programmer's Guide for further detail on how to change
servlet registration.
| Field | Data to enter |
|---|---|
| Hostname: | The name of the server you want to use |
| Port: | The admin port of your application server |
| Username: | The iPlanet Application Server administrator username |
| Password: | The administrator password |
| Confirm Password: | Reenter the administrator password |
| URL: | The base URL for your server. The default is http://hostname/NASApp |
| Kind: | IAS_AND_WEB |
Part 7: Remote Debugging
 On the remote machine:
- Start the debugging services (this is already started if VisualCafť is
running on the machine).
ddservices
- Start the iPlanet Application Server on the remote machine (via Services, or in a new command window type kas -debug).
- Add the code you want to run into the CLASSPATH. If you are using the
iPlanet Application Server Version 6.0 Service Pack 2, your code should be
similar to:
d:\iplanet\ias6\APPS\modules\helloworld\Web-inf\classes;
- Start the Java2 debug Virtual Machine.
- On Windows NT type debugvm.
- On Solaris type kjsdebug.
This starts a Virtual Machine that will wait to get input for VisualCafť.
On the local machine:
-
Follow the steps in Part 6 to define the target server and deliver the
code to the target server for each project in your application. The executable
code must be on the target system and the source code on the local system
for remote debugging.
- From the system Start menu, start the iPlanet Application Server Administration Tool.
- From the Filemenu, select New Server.
- Enter the following information to define the remote server:
Field Data to enter Name: The name of the target server (or however you want to see it in the Administration Tool) Host: The name of the target server Port: The admin port of the target application server Username: The iPlanet Application Server administrator username of the target server Password: The administrator password of the target server - Select OK.
- Double click on the server you just defined in the tree view to expand it.
- Select the KJS process under the server in the tree view.
- Select the Stop Process button to stop the KJS process on the remote system.
The remote system is now ready for you to start debugging.
- In VisualCafť, select the web application you want to start from.
- From the Project menu, select Debug in Waiting Virtual Machine.
- In the treeview, select and expand the target server.
If the target server does not display, check that ddservices is running on the remote machine.
- Select the Virtual Machine that is waiting.
If there are multiple Virtual Machines listed, match the password with that displayed in the command window of the waiting Virtual Machine.
- Select Goto Breakpoint.
Once the ENGINE-ready: ready: <port number> message is displayed in the remote machine's command window you can access the server via your browser and start debugging.
When you have completed debugging, reset the target server to its normal state.
- From the iPlanet Application Server Administration Tool, select the Start Process button to restart the KJS engine.
![]()
Copyright
© 2000, Sun Microsystems Inc. All rights reserved.
Copyright © 2000, Netscape Communications Corporation.
All rights reserved.
Sun, Sun Microsystems, the Sun logo, Java, iPlanet, and the Sun, Java, and iPlanet-based trademarks and logos are trademarks or registered trademarks of Sun Microsystems, Inc. in the U.S. and other countries.
Netscape and the Netscape N logo are registered trademarks of Netscape Communications Corporation in the U.S. and other countries. Other Netscape logos, product names, and service names are also trademarks of Netscape Communications Corporation, which may be registered to other countries.