Creating an iPlanet Web Application and a CMP Entity Bean
![]() Before You Begin
Before You Begin
![]() Part 1: Creating a Container Managed Persistence Entity Bean
Part 1: Creating a Container Managed Persistence Entity Bean
![]() Part 2: Creating a Web Application that Calls the CMP EJB
Part 2: Creating a Web Application that Calls the CMP EJB
![]() Part 3: Creating a Web Application with Database Access
Part 3: Creating a Web Application with Database Access
Before You Begin
- Follow the directions in the Installation Instructions to install the integration tool.
- If you plan on performing remote debugging, follow the directions in the Installation Instructions to install the remote debugging services on the target system.
- Install a database client (Oracle 8.1.6)
- Create a table named PRODUCT using the following script:
	create table PRODUCT
	(
	description varchar(255);
	price double precision not null,
	productid varchar(255) constraint
	pk_product Primary Key
	);
- To complete the tutorial, you must know:
- The iPlanet Application Server Administrator user name and password.
- The iPlanet Application Server Administrator Port Number for the iPlanet Application Server installed on your machine (the default admin port number is 10817).
- The Oracle user name and password.
- Make sure <OracleHome>\jdbc\lib\classes111.zip is in the CLASSPATH in your <VisualCaféEE>\bin\sc.ini file.
This tutorial assumes some familiarity with the iPlanet Application Server and VisualCafé.
Part 1: Creating a Container Managed Persistence Entity Bean
- Launch VisualCafé Enterprise Edition.
- From the File menu, select New Project.
The New Project window appears.
- Select the Enterprise Bean icon and select OK.

The Create Enterprise Bean wizard appears to help you create the EJB component.
- Review the EJB Wizard Introduction window and select Next.
- In the Select Name window, enter the following data in each field:
Field Data to enter Basename: Cmp Package: CmpPack Description: Whatever comment you wish to enter Location: Accept the default setting Enterprise Bean project name: Accept the default setting client project name: Accept the default setting 
- Select Next.
- In the Choose Enterprise Bean type window, make sure Entity - container managed
persistence is selected and select Next.

- Select Next to proceed through the Add create methods, Add finder methods, Add business methods, and Add environment properties windows.
- In the Map database fileds window, select Persistence Builder.

- In the Persistence Builder window Source field, select JDBC.
- In the Database field, enter jdbc:oracle:thin:@<hostname>:<portnumber>:<SID>.
- In the Driver field enter oracle.jdbc.driver.OracleDriver.
- Enter the username and password.
- Select Connect to connect to your database.

Once you are connected, you should see a "connect" message in the Status window and the Tables should display a list of the available tables in your database.

- In the Filter field, enter the letter P to display the tables starting with the letter P.
- Select the Product table you created earlier.
- Select Load to load the table into the Persistence Builder Select Table dialog.

- Select each item in the Product table Select field.
Notice that when the PRODUCTID is select the Key button is checked indicating that this field is set as the key.
- Select Close to exit the Persistence Builder window.
- From the Map database fields window, select the Add All button to add all the table fields.
- Click to highlight the description Name field.
Notice that the Get, Set, and In Key checkboxes become active.
- Select Get and Set.

- Click to highlight the price Name field.
- Doubleclick on the object Type field to display a scroll list of types.
- Select double Type.

- Select the Get and Set checkboxes once more.
- Click to highlight the productid field.
Notice that the In Key checkbox becomes active and is checked.

- Select the Get and Set checkboxes.
- Select Next.

- Review the selections you have made and select Finish.
After a few moments, the Create Enterprise Bean wizard creates the following files:
Interface Filename Bean Home Interface CmpHome Bean Remote Interface Cmp Entity Bean CmpEJB - Open the CmpHome.java file.
- After the import java.rmi.RemoteException; method, add the following:
import javax.ejb.CreateException;
- After the throws FinderException, RemoteException; method, add the following:
public Cmp create(String description, double price, String productid)
	throws RemoteException, CreateException;

- Save the CmpHome.java file.
- Open the CmpEJB.java file.
- After the import javax.ejb.EntityContext; method, add the following:
import javax.ejb.FinderException;
- Scroll down to the ejbCreate method and replace return null; with return productid;:
public String ejbCreate(String description, double price, String productid) { this.description = description; this.price = price; this.productid = productid; return productid; - Add the following method after the ejbRemove() method at the end of the file.
public string ejbFindByPrimaryKey (String key) throws FinderException { return key; } - Save the CmpEJB.java file.
- Make sure the iPlanet Application server is set as the deployment target by selecting Options from the Projects menu.
- Select the EJB tab.
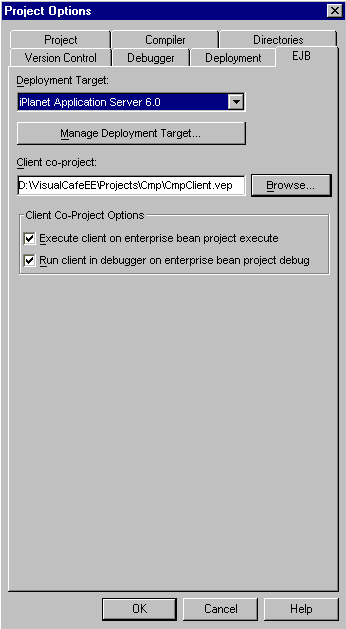
- Select the iPlanet Application Server 6.0 from the Deployment Target field.
- Select the Manage Deployment Target.
- Select New.
You can define servers by their name or IP address. Your local server is defined by its IP address. If you don't have a remote server you would like to work with, use localhost.
- In the Enter New Server window, enter the following data in each field:
Field Data to enter Hostname: The name of the server you want to use Port: The admin port of your application server Username: The iPlanet Application Server administrator username Password: The administrator password Confirm Password: Reenter the administrator password URL: The base URL for your server. The default is http://hostname/NASApp Kind: IAS_AND_WEB 
- Select OK.
- Make sure your new server is selected and select OK to commit your changes
to the iPlanet Application Server deployment target window.

- Select the Data Sources tab.
- Select New to define a new datasource, or select a predefined datasource.

- Select OK to define the datasource.
- Make sure the datasource you just defined is selected in the Data Sources field by selecting the
> button.
The defined datasource should now appear in the Referenced Datasources panel.

- Enter your username and password and Select OK.
- Select OK to commit your changes to the Environment Options.
The new server is now registered with VisualCafé and can be used by all projects. The same server can be used for both Web Applications and EJBs. The selected server is the default server used in new projects.
- Select the CmpEnterpriseBean to activate the window.
- From the Project menu, select Configure Deployment Descriptors.

- Select the Environment tab, then select the Resource tab.

- Select New and change the datasource name to cdx (your datasource).
- Select OK.
- From the Project menu, select Start EJB server.
In the Messages window, Build tab, a message displays indicating the application server is running.
- Select the CmpEnterpriseBean to activate the window.
- From the Project menu, select Deploy.
The Deliver Enterprise Bean to EJB Server progress panel displays, and the following messages appear in the Messages window:
Deploying JAR.... Delivery complete.
Cleaning up...Completed.
Part 2: Creating a Web Application that Calls the CMP EJB
- From the File menu, select New Project.
The New Project window appears.
- Select the iPlanet Web Application icon and select OK.

- Enter Caller as the VEP (project) name and select Save.
The project name appears as untitled. This is a known bug.
- Update the project name by closing the project and reopening it, or
by selecting Save from the File menu.
You are now ready to create a servlet in the project.
- From the Insert menu, select Servlet.
The Servlet wizard launches.
- Read the description of what the Servlet wizard does and select Next.
- In the Servlet window, enter the following data in each field:
Field Data to Enter Name: CallerServlet Package: Caller 
- Select simple HTTP servlets with the default methods.
- Select Next.
- Select HTTP-specific, then select Next.
- Select Yes: Implementation should be thread-safe.
- Select Next.
- Select doPost() method
- Select Finish.
- Modify your CallerServlet.java code as follows:
package Caller;
import java.io.*;
import javax.servlet.*;
import javax.servlet.http.*;
import javax.naming.*;
import javax.ejb.*;
public class CallerServlet extends HttpServlet
{
	public void doGet(HttpServletRequest req, HttpServletResponse resp)
	throws ServletException, IOException
	{
		resp.setContentType("text/html");
		PrintWriter out = new PrintWriter(resp.getOutputStream());
		try
		{
			// to do: code goes here.
			out.println("<HTML>");
			out.println("<HEAD><TITLE>callerservlet Output</TITLE></HEAD>");
			out.println("<BODY>");
            doPost(req, resp);
			// to do: your HTML goes here.
			out.println("</BODY>");
			out.println("</HTML>");
		}
		finally
		{
			out.flush();
		}
	}
	public void doPost(HttpServletRequest req, HttpServletResponse resp)
	throws ServletException, IOException
	{
		resp.setContentType("text/html");
		PrintWriter out = new PrintWriter(resp.getOutputStream());
		try
		{
			// to do: code goes here.
			out.println("<HTML>");
			out.println("<HEAD><TITLE>callerservlet Output</TITLE></HEAD>");
			out.println("<BODY>");
            String JNDI_NAME = "java:comp/env/Cmp";
            Object beanObject = null;
            try
            {
                Context initContext = new InitialContext();
                beanObject = initContext.lookup(JNDI_NAME);
                CmpPack.CmpHome home = (CmpPack.CmpHome)beanObject;
		CmpPack.Cmp duke = (CmpPack.Cmp)home.create( "Ceramics",11.11, "123");
		out.println("<B><P> The Output : </B></P>");
                out.println("<BR><B>" + duke.getDescription() + ": " + duke.getPrice()+"</B></BR>");
                out.println("<B>" + "Setting the price to 55.55" + "</B>");
                duke.setPrice(55.55);
                out.println("<BR><B>" + duke.getDescription() + ":" + duke.getPrice());
                duke = (CmpPack.Cmp)home.create( "Wooden Duck", 13.00,"11");
                duke = (CmpPack.Cmp)home.create( "Ivory Cat", 19.00,"22");
                duke = (CmpPack.Cmp)home.create( "Ivory Cat", 33.00,"33");
                duke = (CmpPack.Cmp)home.create( "Chrome Fish", 22.00,"44");
                CmpPack.Cmp earl = home.findByPrimaryKey("11");
                System.out.println("EARL: "+ earl.toString()+"\n");
                out.println("<BR><B>" + earl.getDescription() + ":"+ earl.getPrice() + "</B></BR>" );
            }catch(Exception e)
            {
                e.printStackTrace();
            }
	// to do: your HTML goes here.
	    out.println("</BODY>");
	    out.println("</HTML>");
	    }
	   finally
	   {
	       out.flush();
	   }
    }
}
You are now ready to build your servlet.
- From the Project menu, select Options.
- Select the Directories tab.
- Select the New button, then select the File button.
- Add the directory which has the EJB classes and add as the first entry.
For example: d:\VisualCafeEE\Projects\Cmp
- From the Project menu, select Configure iPlanet Web Application.
- Select the Refs tab.
- Select Add in the References to EJBs defined elsewhere section of the window to add the CMP.
Field Data to Enter Reference Cmp Bean Type Entity Linked to Bean Cmp Bean Home Interface CmpHome Bean Remote Interface Cmp JNDI Name ejb/CmpEnterpriseBean/Cmp 
- Select OK.
- From the Project menu, select Execute in iPlanet Server.
- Save the file.
Part 3: Creating a Web Application with Database Access
To create a web application with a data source connection, you must register the datasource with the application.- Open a project that includes a servlet (such as the project you created in Part 2).
- From the Tools menu, select Environment Options.
- Select the UML/EJB tab.
- Select iPlanet Application Server 6.0 as the Deployment Target.
- Select the Manage Deployment Target.
The Manage Deployment Target window appears.
- Select the Data Sources tab.
- Select New.
- Define the data source as follows:
Field Data to Enter Database Name: The name of your database Datasource: Identifier you want to use to refer to the data source. Database URL: The JDBC URL for the third party driver. This field is not required for the iPlanet Application Server database access engine. Username: The username for the database. Password: The password for the database username specified. Confirm Password: Repeat the password previously specified. Driver: The name of the third party driver specified above in the Database URL. In this example ORACLE_OCI is used.  The iPlanet Application Server provides built-in JDBC drivers,
as well as providing support for third party JDBC drivers.
The iPlanet Application Server provides built-in JDBC drivers,
as well as providing support for third party JDBC drivers.
- Select OK.
Congratulations, you have successfully globally defined the data source.
To verify your global data source settings, select the Deployment Target Data Source panel. The data source should appear in the Referenced Datasources list.
When you add a data source to a project and deploy that project, the associated data source is globally registered in the iPlanet Application Server. All applications subsequently deployed to that instance of the application server can also access that data source.
You are now ready to configure the servlet for database access.
- Select the desired datasource from the Referenced Datasources list.
- Select the Servers tab.
- Select the Server you wish to deploy to.
- Select OK.
- Replace your servlet code with the following code that performs the JNDI lookup of your
datasource:
import javax.servlet.*;
import javax.servlet.http.*;
import java.sql.*;
import javax.naming.NamingException;
import javax.sql.*;
import javax.servlet.*;
import javax.servlet.jsp.JspException;
import javax.servlet.http.*;
public class webservlet extends HttpServlet
{
	static private Connection con;
	static private String dbName = "java:comp/env/cdx";
	public void doGet(HttpServletRequest req, HttpServletResponse resp)
		throws ServletException, IOException
        {
		resp.setContentType("text/html");
		PrintWriter out = new PrintWriter(resp.getOutputStream());
// to do: code goes here.
	    try {
		makeConnection();
		insertRow("Test Product", 10.0, "B");
		}
		catch(Exception e){
		e.printStackTrace();
		}
		out.println("");
out.println("<HEAD><TITLE>webservletOutput</TITLE></HEAD>");
		out.println("<BODY>");
// to do: your HTML goes here.
		out.println("</BODY>");
		out.println("</HTML>");
		out.close();
        }
private void makeConnection()
		throws NamingException, SQLException
		{InitialContext ic = new InitialContext();
			DataSource ds = (DataSource) ic.lookup(dbName);
				con =  ds.getConnection();
		}
private void insertRow (String desc, double price, String id )
		throws SQLException
        	{
String insertStatement ="insert into product values ( ? , ? , ?)";
			PreparedStatement prepStmt =
				con.prepareStatement(insertStatement);
			prepStmt.setString(1, desc);
			prepStmt.setDouble(2, price);
			prepStmt.setString(3, id);
			prepStmt.executeUpdate();
			prepStmt.close();
			}
private void deleteRow(String id) throws SQLException {
		String deleteStatement ="delete from product where id = ? ";
			PreparedStatement prepStmt =
			con.prepareStatement(deleteStatement);
			prepStmt.setString(1, id);
			prepStmt.executeUpdate();
			prepStmt.close();
      } }
If you are calling an EJB to another EJB you must
register both EJBs so each can call the other. With the iPlanet Application Server
Integration tool this is performed by entering the name of the EJB you wish to
register into the references list of the bean you want to communicate with.
 To register an EJB:
- Select the Objects tab from the Project window, and select the CallerEJB.
- From the Project menu, select Configure Deployment Descriptor.
- Select the Environment tab, then select the EJB Rerefences tab.
- Select New to register the EJB.

- Replace the Name with the name of the EJB you want to register.
In this example, the name of the EJB to register is TestBase.
- Replace the Type with Session.
- In the Home Interface field, select testpkg.TestBase from the drop-down menu.
- In the Remote Interface field, select testpkg.TestBase from the drop-down menu.
- Select the Tart Options tab, then the EJB Reference tab.
- In the EJB Reference Name field, enter TestBase.
- In the JNDI Name field, enter ejb/TestBaseEnterpriseBean/TestBase
- Select OK.
Congratulations, you have just registered your EJB.
![]()
Copyright
© 2000, Sun Microsystems Inc. All rights reserved.
Copyright © 2000, Netscape Communications Corporation.
All rights reserved.
Sun, Sun Microsystems, the Sun logo, Java, iPlanet, and the Sun, Java, and iPlanet-based trademarks and logos are trademarks or registered trademarks of Sun Microsystems, Inc. in the U.S. and other countries.
Netscape and the Netscape N logo are registered trademarks of Netscape Communications Corporation in the U.S. and other countries. Other Netscape logos, product names, and service names are also trademarks of Netscape Communications Corporation, which may be registered to other countries.