Previous Next Contents


Chapter 1 Installing Netscape Application Server on Windows NT

This chapter explains how to install Netscape Application Server (NAS) on the NT platform. It includes the following topics:

Read this chapter carefully before installing Netscape Application Server on Windows NT.


Checking Hardware and Software Requirements
The following table lists the hardware and software requirements for installing and running a single instance of Netscape Application Server.

Device
Requirement
Computer/
Operating system
Intel Pentium microprocessor running Microsoft Windows NT version 4.0 with Service Pack 3

Memory
Per CPU: 64 MB minimum; 128MB recommended

Available disk space
Total disk space: 200 MB

CD-ROM drive

Network software

TCP/IP

Other software


Planning Your Installation
Before you install Netscape Application Server (NAS), think about the following issues and carefully plan how you want to configure your NAS system. Knowing this information in advance helps you to properly complete the installation.

Installation planning worksheets are provided at the end of this chapter to help you track the information you need to install Netscape Application Server. It is recommended that you make a copy of these worksheets and jot down information on them as you read through this section.

Note: Keep in mind that after you have installed NAS, you can change many of the configuration settings initially specified during the installation. For information about how to perform post-installation configuration tasks, see the Administration Guide.

Basic Installation Issues
Directory Server Issues
Basic Netscape Application Server Configuration Issues
Upgrading Issues
You cannot upgrade from an earlier release or version of Netscape Application Server. If you are installing on a machine that has an earlier release already on it, even an earlier release of NAS 4.0, you must uninstall the earlier release prior to installing the current NAS 4.0 release. Follow carefully the uninstallation instructions of the earlier release.

Web Server Configuration Issues
Database Configuration Issues
Transaction Manager Issues
Transaction manager is a feature that coordinates global transactions within a Java Server (KJS process). A global transaction can:

Transaction manager runs within a KJS process and creates two files: a restart file and a restart.bak file. In addition, you need to provide a log file for each KJS process.

During installation, be prepared to provide the following transaction manager information:

Resource Manager Issues
Resource manager lets you connect to a database back end for global transactions. Configure one resource manager for each database back end that you want to connect to. If you decide that you want to configure Netscape Application Server with resource manager, you must define the following information for each resource manager: the database type, whether or not the resource manager is enabled, and an open string.

If you enable a resource manager, when the KJS process starts up the transaction manager within that KJS process attempts a connection using the resource manager information you provide.

Resource Manager Database Type Information

The following list contains the database types you can specify for a resource manager:

Resource Manager Open String Information

The following table provides the open string formats for the different types of database back ends:

Database
Format
Example
Oracle
Oracle_XA +

Acc=P/user/password (or Acc=P//) +

SesTm=session_time_limit +

(optional_fields)
DB=db_name +

GPwd=P/group_password +

LogDir=log_dir +

MaxCur=maximum_#_of_open_cursors
+ SqlNet=connect_string


Oracle_XA+SqlNet=
ksample1+DB=ksample1+Ac
c=P/kdemo/kdemo+SesTm=

90+LogDir=/export/TxnLog/
tmp+Threads=True

Sybase
U username -P password -N lrm_name
[ -V version] [ -C connections] -L logfile
[ -T trace_flag]
-Usa -P -Nksample_rm -Txa
-L/tmp/syb_xa_log

DB2
database name, user name, password
ksample, inst1, inst1
Microsoft SQL
TM=ENCINA, RmRecoveryGuid=
resource manager ID

Note: The resource manager ID is available in the following location of the Microsoft SQL Server registry:

[HKEY_LOCAL_MACHINE\SOFTWARE
\Microsoft\MSSQLServer\MSSQLServer]

"ResourceMgrID"="{resource manager
ID}"

TM=ENCINA, RmRecoveryGuid=
12345698247024507520450
2450420579

Prior to running the installation program, you should also configure your database back ends for XA transactions. Consult your database documentation for details.

Note that if you do not elect to configure resource manager at installation time, you can always configure it at a later time using Netscape Application Server Administrator.

Clustering and Data Synchronization Issues

Installing Netscape Application Server
Before you install Netscape Application Server, see "Planning Your Installation" on page 15. The section explains important concepts and information required to properly install and configure Netscape Application Server. Also, refer to the "Installation Planning Worksheets" on page 56 at the end of this chapter to record information you'll need for the steps outlined here.

The Netscape Application Server installation program performs the following tasks:

Note: You must be logged on to Windows NT as a user with administrator privileges to install Netscape Application Server.

To install Netscape Application Server

  1. Insert the Netscape Application Server Install CD-ROM into the CD-ROM drive.
  2. Click Start on the Windows NT taskbar and click Run, or choose File - Run from the Windows NT Program Manager and click Run.
  3. Click Browse and go to the CD-ROM drive (for example, d:\).
  4. Open the NT folder and run the file setup.exe.
  5. Follow the instructions of the installation program.
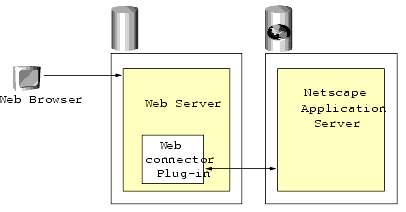
  6. When prompted for the installation, click Netscape Servers. This gives you the choice to install Netscape Application Server, Netscape Directory Server, Netscape Console, Netscape Application Server Administrator, and the Web connector plug-in.
  7. When prompted for the installation type, click Typical.
  8. Select the installation directory. The default directory is c:\Netscape\Server4. Note that if you use the default, Netscape Application Server is installed in c:\Netscape\Server4\NAS.
  9. Do one of the following:
  10. Click Change to select subcomponents and then choose the Netscape Application Server component(s) you wish to install:
  11. If you specified in Step 9 that you want to install Directory Server, continue to the next step.
    1. Enter the following information for the configuration Directory Server that you want this NAS installation to be configured with:
      Host name and port number of the machine where the existing installation of Directory Server resides
      Login ID to the machine where Directory Server is installed in "Bind As" (the default value is cn=Directory Manager)
      Password to the machine where Directory Server is installed
    2. Click "Store data in an existing directory server" and then enter the following information for the storage Directory Server that you want this NAS installation to be configured with:
      Host name and port number of the machine where Directory Server is installed
      Login ID to the machine where Directory Server is installed in "Bind As"
      Password to the machine where Directory Server is installed
      Top level domain name in Suffix
    3. Go to Step 15 to enter the Administration Domain where Netscape software is stored on Directory Server.
    4. Then go to Step 18 to proceed to the NAS portion of the installation process.

  12. If you are installing Directory Server with this installation of NAS, you must click the following options:
  13. Enter the settings to be used by the Directory Server you are installing:
  14. Enter the Administrator ID and password to the configuration directory.
  15. Enter the name of the Administration Domain where Netscape software information is stored on Directory Server.
  16. Enter the Directory Manager distinguished name (DN) and password. The default value for the distinguished name is cn=Directory Manager.
  17. Enter the port number for the Directory Server Administration Server. This is required for using the Console to administer the Directory Server.
  18. Enter the unique global configuration name of the configuration settings for this installation of NAS. The name you assign is stored on the configuration Directory Server, under the o=NetscapeRoot tree along with the global configuration names of other NAS installations
  19. Enter the product key of Netscape Application Server. See the Welcome letter you received with the product for the correct key.
  20. When prompted for the type of web server to be used with this installation of Netscape Application Server, click one of the supported web server types and, if you clicked Netscape Enterprise Server, enter the web server instance name.
  21. Enter the number of Java Servers (KJS) and C++ Servers (KCS) used to process applications. The default value is 1; increase this to handle high processing loads.
  22. Enter the port numbers for the Administrative Server (KAS), the Executive Server (KXS), the Java Servers (KJS), and C++ Servers (KCS). All port numbers you specify are for listener ports, must be within the acceptable range (1 to 65535), and must be unique (not used by any other applications on your system).
  23. When prompted for the Administration Server user ID and password, enter the user ID and password that will be required to log on to the Administration Server through the Administrator tool (Netscape Application Server Administrator).
  24. Rank the installed databases in priority order.
  25. Enter the mirror directory path where the transaction manager restart.bak file for each KJS engine process gets stored.
  26. Enter the log volume disk name where the transaction manager log file gets stored for each Java Server.
  27. Indicate if the specified disk name is a raw partition. If you indicate that it is, make sure that the name you specify in Step 26 is that of a raw device.
  28. If the log volume is a raw partition, indicate the number of pages (Size) in the raw partition and the starting page number (the Offset value). Make sure that the size allocated for the log file is greater than 4MB; in other words, the file should be greater than or equal to 1000 pages, at a size of roughly 4KB per page.
  29. Indicate whether or not you want to configure Netscape Application Server with resource manager.
  30. If you indicate Yes in Step 29, specify the number of resource managers you want to use.
  31. If you indicate Yes in Step 29, specify the following information for each resource manager:
  32. When prompted whether the server will synchronize data across servers, click Yes if you intend to synchronize session and state information across multiple servers for failover and fault tolerance.
  33. If you answered Yes in Step 32, enter the name of the cluster that this Netscape Application Server will participate in.
  34. Indicate if you are currently installing a Sync Server or a Sync Local. If you are installing a Sync Local, then this server will use data synchronization services, but is not eligible to become a Sync Primary or the Sync Backup.
  35. Enter the total number of Sync Servers that you plan to have in the cluster.
  36. For each Sync Server in the cluster, specify the following information:
  37. Review the summary provided by the installation program of the configuration you have selected. If necessary, go back and make changes.
  38. When the installation is complete, reboot the computer so that the new settings take effect.
Verifying the Installation Version Number After you install Netscape Application Server, you can verify the version number of the installation at any time.

Run the following command from the installation bin directory (nas install directory\bin\):

The version number of the NAS installation stored in that directory displays.


Using the Sample Applications
Netscape Application Server offers sample applications written in both C++ and Java. Once you have installed Netscape Application Server and your database servers and clients, you can use the sample applications to ensure that the server is working properly.

Two sample applications in particular, Online Bookstore and the Java-based version of Online Bank, both discussed in this section, demonstrate the NAS 4.0 programming model and its implementation of the following technologies: EJBs, servlets, JSP, JDBC, and transaction manager.

To use the Java-based sample applications, configure transaction manager and enable and configure resource manager. For information about these features, see page 23 and page 25.

The following table lists the sample applications provided with Netscape Application Server.

Sample Application
Description
Development Language
Online Bookstore
Online shopping cart application for purchasing books
Java
Online Bank (2.1)
Online customer banking application demonstrating security and session management. For information about migrating to the NAS 4.0 version of this application, see the Migration Guide.
Java
Online Bank (4.0)
Online customer banking application demonstrating security and session management
Java
Online Bank
Online customer banking application demonstrating security and session management
C++
Fortune

Simple application used to verify that NAS has been installed properly
Java
Fortune & Lottery

Simple applications used to verify that NAS has been installed properly
C++

It is recommended that you first run the Fortune and Lottery applications to test that NAS has been installed properly. Then, after verifying that the server is installed properly, run the Online Bookstore and Online Bank applications to understand the NAS 4.0 programming model and its implementation of servlets, JSPs, EJBs, JDBC, and transaction manager.

In the instructions that follow, nas install directory refers to the directory where you have installed NAS. The default is c:\Netscape\Server4\nas.

Online Bookstore Sample Application This section explains how to configure the Online Bookstore sample application.

Configuring the Databases
The setup files for configuring the databases to work with the sample application are:

These files configure the databases, update registry settings, set up the resource managers, and populate the database tables.

To configure databases for the sample application, run the appropriate database setup batch file using the following syntax (all parameters listed here are required) from the nas install directory\APPS\ nsOnlineBookstore\database directory:

[Database setup file name] [DataSource] [Database] [DB User] [DB 
Password] [Resource manager name]
It is strongly recommended that you specify the same user-defined resource manager you specified during installation (Step 31 on page 34). Make sure you use the resource manager name that maps to the database type you are configuring here.

DB2 Database

Note that if you configure the sample application to run with DB2, you can browse the catalog and search for books but you cannot check out items into your shopping cart. If you want to use the checkout feature, configure the sample application with one of the other database types.

Microsoft SQL Server Database

For Microsoft SQL Server:

Oracle Database

For Oracle, use SQL*PLUS to troubleshoot any errors that may be generated when you run setup_ora.bat.

Sybase Database

For Sybase, make sure you enable row level locking before using the sample application. This avoids application deadlocking. Refer to your Sybase documentation for details about how to enable row level locking.

Sybase clients require a threaded TLI driver. Edit the DRIVERS section of the Sybase configuration file $SYBASE/config/libtcl.cfg with the following information:

[DRIVERS] 

;libtli.so=tcp unused ; This is the non-threaded tli driver.
libtli_r.so=tcp unused ; This is the threaded tli driver.
Make sure you restart Sybase after you make these edits to the configuration file.

Updating the Sample Application
If you change any of the source files of the Online Bookstore application after installing and configuring it, you must edit the bsdefaults.mak file by resetting the path for javac.exe and ejbc.exe in the PATH environment variable. The bsdefaults.mak file is located in nas install directory\APPS\GXApp\nsOnlineBookstore\src.

To invoke the nmake command, which includes bsdefaults.mak, type the following at the prompt:

If you want to update source files in a particular directory, invoke the .mak file located in that directory.

For example, to rebuild files in the custom directory, do the following:

  1. From the DOS prompt, run the following command to go to the custom directory:
  2. From the DOS prompt to run the following command to invoke the .mak file in the custom directory:
Creating a Group and a User
The sample application has two primary features: the ability to purchase books from the bookstore and the ability to manage the bookstore from the manager's office. To manage the bookstore, you must create a user with special privileges. Because the sample application takes advantage of LDAP integration, such a user is verified by the Directory Server configured with Netscape Application Server. Therefore you must create this user on Directory Server.

  1. Click Start on the Windows NT taskbar and click Programs - Netscape Server Family - Netscape Console.
  2. Enter the Console Administrator user ID and password.
  3. Click the "Users and Groups" tab.
  4. Choose New User in the drop-down list on the lower right portion of the panel and click Create.
  5. In the "Select Organizational Unit" dialog, select People and click OK.
  6. Enter the name, user ID, and password for the user you want to create and click OK.
  7. Click the "Users and Groups" tab.
  8. Choose New Group in the drop-down list on the lower right portion of the panel and click Create.
  9. In the "Select Organizational Unit" dialog, select Groups and click OK.
  10. Under Create Group, enter the name of the Group you want to create, for example: BookAdmin. If the group already exists, go to Step 11.
  11. Click the Members tab and then click Add.
  12. Click Users and then click Search.
  13. Choose the name of the user you created in Step 6 and click OK.
  14. If you created a new group in Step 10, do the following:
    1. Open the file nas install directory/APPS/GXApp/ldap/ldapInfo.properties
    2. Add the following line in the file: ADMIN_GROUP_DN = cn=name of group created in Step 10, ou=Group, o=mcom.com
    3. Save the file.
The user you created is stored on the Directory Server with which this NAS installation is configured. Whenever you administer the application, this user is verified by the Directory Server.

Online Bank Sample Application This section explains how to configure the NAS 4.0 Java-based version of the Online Bank sample application. For information about migrating from the NAS 2.1 Java-based version of this same application, see the Migration Guide.

Configuring the Databases
The setup files for configuring the databases to work with the sample application are:

These files configure the databases, update the registry, and populate the database tables.

To configure databases for the sample application, run the appropriate database setup batch file using the following syntax (all parameters listed here are required) from the nas install directory\APPS\nsOnlineBank \database directory:

[Database batch file name] [DataSource] [Database] [DB User] [DB 
Password]
You must also run the following scripts for each database type:

Microsoft SQL Server Database

For Microsoft SQL Server use the following syntax when you run setup_mssql.bat:

Oracle Database

For Oracle, use SQL*PLUS to troubleshoot any errors that may be generated when you run setup_ora.bat.

Sybase Database

For Sybase, make sure you enable row level locking before using the sample application. This avoids application deadlocking. Refer to your Sybase documentation for details about how to enable row level locking.

Sybase clients require a threaded TLI driver. Edit the DRIVERS section of the Sybase configuration file $SYBASE/config/libtcl.cfg with the following information:

[DRIVERS] 

;libtli.so=tcp unused ; This is the non-threaded tli driver.
libtli_r.so=tcp unused ; This is the threaded tli driver.
Make sure you restart Sybase after you make these edits to the configuration file.

Updating the Sample Application
If you change any of the source files of the Online Bookstore application after installing and configuring it, you must edit the bsdefaults.mak file by resetting the path for javac.exe and ejbc.exe in the PATH environment variable. The bsdefaults.mak file is located in nas install directory\APPS\GXApp\nsOnlineBank\src.

To invoke the nmake command, which includes bsdefaults.mak, type the following at the prompt:

If you want to update source files in a particular directory, invoke the .mak file located in that directory.

For example, to rebuild files in the customer directory, do the following:

  1. From the DOS prompt, run the following command to go to the custom directory:
  2. From the DOS prompt to run the following command to invoke the .mak file in the custom directory:
Running a Sample Application

  1. Start running NAS.
  2. Open Netscape Navigator, enter the following URL, and press Enter:
  3. Click the link for one of the following sample applications:
  4. If you are running the Online Bookstore application:

Post-Installation Notes
This section includes post-installation information about Netscape Application Server.

Environment Size Variables After installation, if you notice any NAS processes consuming 100% of your system resources, increase the size of the environment space on your NT machine. Edit the file Config.nt, found in the System32 directory of your system root (normally c:\Winnt or c:\Winnt4) by adding the following line, and then restart your machine:

SHELL=%systemroot%\system32\command.com /e:2048
If you still experience the problem after restarting your machine, try increasing the environment size further by specifying /e:4096, instead of /e:2048, in the line above.

Class Loader Issues When running applications, if the NAS Class Loader is unable to find the AppLogic class file through the SYSTEM_JAVA parameter (the registry parameter that contains both the CLASSPATH and GX_CLASSPATH settings), NAS hands the request over to the JAVA Class Loader, which in turn reads the CLASSPATH environment variable to find the class file. This allows AppLogics and servlets to execute even if the user classpath is not specified.

Database System Environment Variables After installation, verify that system environment variables for databases are properly set.

To verify the variables, click Control Panel - System - Environment. If any variable is not set according to the guidelines provided here, change it under "System Variables" to the proper setting:

For Sybase:

For Oracle:

For DB2:

For INFORMIX:

Sybase Client Configuration Sybase clients require a threaded TLI driver. Edit the DRIVERS section of the Sybase configuration file $SYBASE/config/libtcl.cfg with the following information:

[DRIVERS] 

;libtli.so=tcp unused ; This is the non-threaded tli driver.
libtli_r.so=tcp unused ; This is the threaded tli driver.
Make sure you restart Sybase after you make these edits to the configuration file.

Establishing Database Connections After Installation If you did not specify a home and library for a particular database client during installation, and want your applications to establish connections with that database, you must set environment variables in the script of the engine (KJS, KCS, KXS) that will connect to the database.

If you wish to establish connections to a database from your Java-based applications that use DAE2 or DAE, you must set environment variables in the KJS engine script. This script is located in nas install directory\bin \kjs. When you open the file, you'll see the environment variables for all the databases listed together. Set the home and library variables to the full directory path of the home and library directories for the database client. For example, if you wish to make a connection to an Oracle database, set the ORACLE_HOME and ORCLLIB variables to the full directory path of the home and library directories of your Oracle database.

For DAE connections from the KCS and KXS engines, set the environment variables for the desired database or databases in these scripts:

nas install directory\bin\kcs

nas install directory\bin\kxs

Installing the Web Connector Plug-in
The Web Connector plug-in passes requests from your web server to applications on Netscape Application Server (NAS).

Netscape provides Web Connector plug-ins for the following web servers:

See "Checking Hardware and Software Requirements" on page 14 for information about supported web server versions.

If you install NAS on a different machine than where the web server resides, you are configuring what is referred to as a "webless installation" of NAS. If this is the case, you must install the NAS Web Connector plug-in on the web server machine.

Before you install the Web Connector plug-in, do the following:

Use the following procedure to install the Netscape Application Server Web Connector plug-in on a machine running the Windows NT operating system. This procedure assumes that you have already installed NAS and Directory Server.

Note: If your web server resides on a Unix machine, see Chapter 2, "Installing Netscape Application Server on Unix," for information on how to install the Netscape Application Server Web Connector plug-in.

You must be logged on to Windows NT as an administrator before installing the Netscape Application Server Web Connector plug-in on a Windows NT machine.

To install the Web Connector plug-in

  1. Insert the Netscape Application Server Install CD-ROM into the CD-ROM drive.
  2. Click Start on the Windows NT taskbar and click Run, or choose File - Run from the Windows NT Program Manager and click Run.
  3. Click Browse and go to the CD-ROM drive (for example, d:\).
  4. Open the NT folder and run the file setup.exe.
  5. Follow the instructions of the installation program.
  6. When prompted for the installation, click Netscape Servers.
  7. When prompted for the installation type, click Typical.
  8. Select the installation directory. The default directory is c:\Netscape\Server4. Note that if you use the default, Netscape Application Server is installed in c:\Netscape\Server4\NAS.
  9. Choose Netscape Application Server 4.0 and click Change to select subcomponents.
  10. Choose Web Connector Component (Web Connector).
  11. Enter the host name and non-SSL port number for the configuration Directory Server that you want this Web Connector plug-in and the corresponding NAS installation to be configured with.
  12. When prompted for the type of web server to be used with this installation of Netscape Application Server, click one of the supported web server types.
  13. If you click Netscape Enterprise Server, enter the web server instance name.
  14. Enter the domain name of the current machine.
  15. Enter the IP address of the machine where Netscape Application Server is installed. This is a separate machine from the one where you are currently installing the Web Connector plug-in.
  16. Enter the Executive Server (KXS) port number of the Netscape Application Server that the Web Connector plug-in will work with.
  17. Review the Web Connector plug-in configuration list.
  18. When the installation program finishes running, reboot the web server machine.
Manually Configuring a Web Server When you install Netscape Application Server, your web server is automatically configured for the Web Connector plug-in, meaning that all the necessary directories and settings on the web server are updated. However, there may be occasions, when, after you've installed the Web Connector plug-in, you must manually reconfigure the web server. This procedure is recommended only if you are having problems with the connection between Netscape Application Server and your web server.

The following steps explain how to manually configure a web server to use the Web Connector plug-in, whether your web server resides on the same or a different machine than where the Netscape Application Server is installed.

If you perform only Step 1 (enabling CGI) of this procedure, the Web Connector will run as a CGI script. If you perform the entire procedure, the Web Connector will run as a plug-in, which is more efficient since the plug-in is faster than a CGI script.

Note that all CGI environment variables are automatically sent to Netscape Application Server AppLogics, servlets, and EJBs, so you do not have to modify the registry on the web server machine. However, if any special HTTP/CGI variables need to be retrieved by the Web Connector plug-in and sent to the AppLogic, then you must add them to the registry.

You must be logged on as the same administrator user who installed the web server.

Note: If your web server is installed on a Unix machine, see the Chapter 2, "Installing Netscape Application Server on Unix," for information about how to manually configure a web server.

To reconfigure the Netscape web server

  1. Enable CGI, if it is not already enabled:
    1. Go to the Netscape program group and click Administer Netscape Servers.
    2. Enter the administrator ID and password, and click OK.
    3. On the Netscape Server Selector screen, click on the web server instance you want to configure.
    4. On the main menu bar across the top of the page, click Programs.
    5. On the CGI directory screen under URL prefix, type cgi-bin.
    6. Under the CGI directory, enter the cgi-bin path.

  2. Make a copy of the obj.conf file before modifying it and place the copy in the following directory:
  3. Open the obj.conf file in the web server configuration directory to begin editing.
  4. At the end of the Init section of the obj.conf file, add the following as two separate lines:
  5. In the Object name=default section, just before the line NameTrans fn=document-root root="drive_letter:/netscape home directory/SuiteSpot/docs", add the following as two separate lines:
  6. In the Object name=default section, just after the line ObjectType fn=force-type type=text/plain, also add the following line:
  7. In the Objectname=cgi section(s), insert the following line immediately before the line Service fn="send-cgi":
  8. After the Objectname=cgi section(s), add the following sections:
  9. Make a copy of the current version of the file obj.conf and copy it to the back up version (so that the backup is consistent with the current version) in the following directory:
  10. Restart the web server.
Reconfiguring the Microsoft Internet Information Server
Keep in mind the following information when reconfiguring Microsoft IIS:


Installing Netscape Application Server Administrator
You may choose to install the Netscape Application Server Administrator as a standalone installation on another machine. You can then administer all or some of your Netscape Application Servers from this other machine, using the Administrator tool.

This section explains how to install Netscape Application Server Administrator.

To install Netscape Application Server Administrator

  1. Insert the Netscape Application Server Install CD-ROM into the CD-ROM drive.
  2. Click Start on the Windows NT taskbar and click Run, or choose File - Run from the Windows NT Program Manager and click Run.
  3. Click Browse and go to the CD-ROM drive (for example, d:\).
  4. Open the NT folder and run the file setup.exe.
  5. Follow the instructions of the installation program.
  6. When prompted for the installation, click Netscape Servers.
  7. When prompted for the installation type, click Typical.
  8. Select the installation directory. The default directory is c:\Netscape\Server4. Note that if you use the default, Netscape Application Server is installed in c:\Netscape\Server4\nas.
  9. Choose Netscape Application Server 4.0 and click Change to select subcomponents.
  10. Choose Administrator Component (Netscape Application Server Administrator) as the component you wish to install.
  11. Review the Netscape Application Server Administrator configuration list.
  12. When prompted for the Server Administrator user name and password, enter the user name and password to log on to the NAS Administrator tool.
  13. After the installation program finishes running, reboot your machine.

Uninstalling Netscape Application Server
Note the following before uninstalling Netscape Application Server (NAS) or its related components:

To uninstall Netscape Application Server

  1. Click the Uninstall icon in the Netscape Application Server 4.0 program group.
  2. Follow the uninstall instructions.
  3. Choose the components you wish to uninstall.
  4. When prompted, enter a user name and password with administrator access to the configuration Directory Server. If you do not want to use the user name and password you entered at the beginning of the installation process (Step 14 on page 32), enter another user name and password, as long as it has administrator privileges on the configuration Directory Server.
  5. Re-enter the configuration Directory Server information you entered in Step 4.
  6. Reboot your system after you uninstall Netscape Application Server.
  7. Remove the Netscape Application Server root directory.
  8. Remove the Netscape Application Server item from the Start menu. To do so:
    1. Click Start - Settings - Taskbar.
    2. Click the Start Menu Programs tab.
    3. Click Advanced.
    4. Click Winnt - Profiles - All Users - Start Menu - Programs.
    5. Remove the following items:
To verify that Netscape Application Server has been uninstalled

  1. Click Start - Settings - Control Panel.
  2. Click the Services icon.
  3. Verify whether or not Netscape Application Server 4.0 is still listed as a service in the Services dialog box.
  4. If Netscape Application Server 4.0 is still listed as a service, remove the Netscape key from the registry by running regedit. Search the following locations for the key:

Installation Planning Worksheets
The following worksheets will help you plan your Netscape Application Server installation. For each instance of Netscape Application Server that you intend to install, make a copy of the set of worksheets and fill them out with the pertinent data. The worksheets are divided into the following categories of information that the installation program requires:

Refer to these worksheets during installation.

Table 1.1 Basic installation information

No.
Data
Enter your value
Description
1
Machine IP address


The IP address of the machine on which you are installing Netscape Application Server (NAS)

2
Target installation /server root directory


The name of the directory where you want this installation to store files.

The default is:
c:\Netscape\Server4

See "Basic Installation Issues" on page 15 for details.

3
Netscape Server components
Netscape Server Family Core Components

Netscape Directory Suite

Administration Services

Netscape Application Server

The Netscape server software you are installing.

The first three items—Netscape Server Family Core Components, Netscape Directory Suite, and Administration Services—install Directory Server. The last item installs Netscape Application Server.

See Step 9 on page 30 for details.

4
Netscape Application Server components
Web Connector plug-in component

Netscape Application Server, without the Web Connector plug-in and without Netscape Application Server Administrator

Netscape Application Server Administrator component

Deployment Manager component

The Netscape Application Server component(s) you are installing.

See "Basic Netscape Application Server Configuration Issues" on page 19 for details.

Table 1.2 Directory Server installation information

No.
Data
Enter your value
Description
1
Is Directory Server already installed at your site?
Yes

No

Even if you decide to install Directory Server with this installation of NAS, another Directory Server may already be installed at your site.

See "Directory Server Issues" on page 16 for details.

2
Do you want to install Directory Server as part of this installation?
Yes

No

You can elect to install or not install Directory Server with this installation.

See "Directory Server Issues" on page 16 for details.

3
Configuration Directory Server information
Host
Name: ______________


Non-SSL Port:________________

Login ID
(Bind As): ____________


Password: ____________________

The Host Name and Non-SSL Port Number of the configuration Directory Server. If you are installing Directory Server along with this installation of NAS, you must designate this Directory Server as the configuration Directory Server.

See "Directory Server Issues" on page 16 for details.

4
Configuration Directory Server Administrator ID and Password

Administrator ID: ______________________

Password: ______________________
This is the Administrator ID and password to uninstall NAS and Directory Server.

See "Directory Server Issues" on page 16 for details.

5
Storage Directory Server information
Host Name: ____________________

Login ID (Bind As): ____________________

Password: ____________________

Top-level domain
name (Suffix): ____________________

If you are installing Directory Server as part of this installation, indicate that you want this Directory Server to be the storage directory.

See "Directory Server Issues" on page 16 for details.

6
Settings for your existing Directory Server
Host Name
(Server Identifier): ____________________


Port number: ____________________

Top-level domain
name (Suffix): ____________________

If you are not installing Directory Server as part of this NAS installation, gather the information of the Directory Server that is already installed at your site.

See "Directory Server Issues" on page 16 for details.

7
Administration Domain

The name of the Administration Domain where Netscape software information is stored on Directory Server.

See "Directory Server Issues" on page 16 for details.

8
Directory Manager Distinguished Name and Password
Distinguished
Name (DN): _____________________

Password: _____________________

Default value for the distinguished name is cn=Directory Manager.

See "Directory Server Issues" on page 16 for details.

9
Directory Server Administration Server Port Number

Required for using the Console to administer Directory Server.

See "Basic Installation Issues" on page 15 and "Directory Server Issues" on page 16 for details.

10
Global Configuration Name

The unique global configuration name of the configuration settings for this installation of NAS.

See "Directory Server Issues" on page 16 for details.

Table 1.3 Netscape Application Server installation information

No.
Data
Enter your value
Description
1
Product key


The product key for this installation of NAS.

See "Basic Netscape Application Server Configuration Issues" on page 19 for details.
2
Webless installation

Yes

No

Decide if you are installing NAS on a machine where the web server is also installed or if NAS is on a separate machine (webless).

3
Web server type

NES 3.6

Microsoft IIS 4.0

The kind of web server this installation of NAS will use.

See "Web Server Configuration Issues" on page 20 for details.

4
NES 3.6 web server instance name

If you are using NAS with NES 3.6, specify the web server instance name.

See "Web Server Configuration Issues" on page 20 for details.

5
Number of Java Servers (KJS)


The number of Java Servers to be used to process applications.

See "Basic Netscape Application Server Configuration Issues" on page 19 for details.

6
Number of C++ Servers (KCS)


The number of C++ Servers to be used to process applications.

See "Basic Netscape Application Server Configuration Issues" on page 19 for details.

7
Administrative Server (KAS) port number


The port number on this machine for your Administrative Server.

See "Basic Netscape Application Server Configuration Issues" on page 19 for details.

8
Executive Server (KXS) port number


The port number on this machine for your Executive Server.

See "Basic Netscape Application Server Configuration Issues" on page 19 for details.

9
Java Server (KJS) port number(s)

The port number(s) on this machine for your Java Server(s).

See "Basic Netscape Application Server Configuration Issues" on page 19 for details.

10
C++ Server (KCS) port number(s)


The port number(s) on this machine for your C++ Server(s)

See "Basic Netscape Application Server Configuration Issues" on page 19 for details.

11
Administration Server user ID and password
User ID: _____________

Password: ____________

User ID and password to log on to the Administration Server via the Netscape Application Server Administrator tool. Account must already exist on Directory Server.

See Step 23 on page 33 for details.

12

Database client priority

Database client: ________
Priority:___

Database client: ________
Priority:___

Database client: ________
Priority:___

Database client: ________
Priority:___

Database client: ________
Priority:___

The priority rating for the database clients installed on this machine.

See "Database Configuration Issues" on page 22 and Step 24 on page 33 for details.

13
Mirror directory path

The location of the transaction manager restart.bak file for each Java Server (KJS).

See "Transaction Manager Issues" on page 23 for details.

14
Log volume disk name
KJS1:________________

KJS2:________________

KJS3:________________

KJS4:________________


The name of the disk where the transaction manager log file is stored for each Java Server (KJS).

See "Transaction Manager Issues" on page 23 for details.

15
Is the log volume disk a raw partition?

Yes

No

It is strongly recommended that you create a raw partition prior to running the installation program, for dedicated storage of the transaction manager log file of each Java Server (KJS).

See "Transaction Manager Issues" on page 23 for details.

16
If the log volume disk is a raw partition, how many pages is it and what is the starting page number?
Size (No. of pages): _____

Offset value (Starting page number): _________

During installation, you must specify the number of pages (total must be greater than 4 MB) and a starting page number for the log volume disk.

See "Transaction Manager Issues" on page 23 for details.

17
Do you want to configure this installation of NAS with resource manager?

Yes

No


Resource manager lets you connect to a database back end for global transactions.

See "Resource Manager Issues" on page 25 for details.

18
Number of resource managers


You can configure multiple resource managers, one for each database back end you want to connect to with a global transaction.

See "Resource Manager Issues" on page 25 for details.

19
For the first resource manager, provide the following details:

User-defined name:_______________

Database type:

Oracle

Sybase

MSSQL

Open string: ___________
_____________________
_____________________
_____________________
_____________________
____

Enabled:

Yes

No

For each resource manager you configure, provide this set of information. Configure one resource manager per database back end that you want to connect to. This worksheet lets you write down information for up to four resource managers, but you are not limited to this number.

See "Resource Manager Issues" on page 25 for details.

20
If you want to use a second resource manager, provide the following details:

User-defined name:________________

Database type:

Oracle

Sybase

MSSQL

Open string: ___________
_____________________
_____________________
_____________________
_____________________

Enabled:

Yes

No

For each resource manager you configure, provide this set of information. Configure one resource manager per database back end that you want to connect to. This worksheet lets you write down information for up to four resource managers, but you are not limited to this number.

See "Resource Manager Issues" on page 25 for details.

21
If you want to use a third resource manager, provide the following details:

User-defined name:________________

Database type:

Oracle

Sybase

MSSQL

Open string: ___________
_____________________
_____________________
_____________________
_____________________

Enabled:
Yes
No

For each resource manager you configure, provide this set of information. Configure one resource manager per database back end that you want to connect to. This worksheet lets you write down information for up to four resource managers, but you are not limited to this number.

See "Resource Manager Issues" on page 25 for details.

22
If you want to use a fourth resource manager, provide the following details:

User-defined name:________________

Database type:

Oracle

Sybase

MSSQL

Open string: ___________
_____________________
_____________________
_____________________
_____________________

Enabled:

Yes
No

For each resource manager you configure, provide this set of information. Configure one resource manager per database back end that you want to connect to. This worksheet lets you write down information for up to four resource managers, but you are not limited to this number.

See "Resource Manager Issues" on page 25 for details.

23
Will this installation of NAS participate in data synchronization?

Yes

No

Distributed data synchronization also referred to as clustering, maintains the integrity of multiple Netscape Application Servers.

See "Clustering and Data Synchronization Issues" on page 27 for details.

24
Cluster name
(Applies only to data synchronization)


The name of the cluster that this server will belong to.

See "Clustering and Data Synchronization Issues" on page 27 for details.

25
Sync Server Status
(Applies only to data synchronization)

Sync Server

Sync Local

Is this installation a Sync Server (eligible to become a Sync Primary) or a Sync Local (not eligible to become a Sync Primary, Sync Backup, or Sync Alternate)?

See "Clustering and Data Synchronization Issues" on page 27 for details.

26
Number of Sync Servers
(Applies only to data synchronization)


The number of additional Sync Servers in the cluster that this installation belongs to.

See "Clustering and Data Synchronization Issues" on page 27 for details.

27
Sync Server machine addresses, port numbers, and priority
(Applies only to data synchronization)
Address:______________
Port number:__________
Priority:_____


Address:______________
Port number:__________
Priority:_____


Address:______________
Port number:__________
Priority:_____


Address:______________
Port number:__________
Priority:_____

The IP addresses of each Sync Server in the cluster, their corresponding port numbers, and their priority rating.

See "Clustering and Data Synchronization Issues" on page 27 for details.


© Copyright 1999 Netscape Communications Corp.