Chapter 4 Managing User Access
This chapter contains information about managing user accounts and other related accounts. Topics in this chapter include the following:
-
User access
-
Projects and project access
-
Path-aliasing
-
Default requests
In addition to the background information, this chapter includes detailed instructions on how to accomplish the following tasks:
Setting Up a User
You need to perform the following tasks to set up a user for the grid engine system:
-
Assign required logins.
To submit jobs from host A for execution on host B, users must have identical accounts on both hosts. The accounts must have identical user names. No login is required on the machine where sge_qmaster runs.
-
Set access permissions.
The grid engine software enables you to restrict user access to the entire cluster, to queues, and to parallel environments. See Configuring Users for a detailed description.
In addition, you can grant users permission to suspend or enable certain queues. See Configuring Owners Parameters for more information.
-
Declare a Grid Engine System user.
In order to add users to the share tree or to define functional or override policies for users, you must declare those users to the grid engine system. For more information, see Configuring Policy-Based Resource Management With QMON and Configuring User Objects With QMON.
-
Set up project access.
If projects are used for the definition of share-based, functional, or override policies, you should give the user access to one or more projects. Otherwise the user's jobs might end up in the lowest possible priority class, which would result in the jobs having access to very few resources. See Configuring Policy-Based Resource Management With QMON for more information.
-
Set file access restrictions.
Users of the grid engine system must have read access to the directory sge-root/cell/common.
Before a job starts, the execution daemon creates a temporary working directory for the job and changes ownership of the directory to the job owner. The execution daemon runs as root. The temporary directory is removed as soon as the job finishes. The temporary working directory is created under the path defined by the queue configuration parameter tmpdir. See the queue_conf(5) man page for more information.
Make sure that temporary directories can be created under the tmpdir location. The directories should be set to grid engine system user ownership. Users should be able to write to the temporary directories.
-
Set up site dependencies.
By definition, batch jobs do not have a terminal connection. Therefore UNIX commands like stty in the command interpreter's startup resource file (for example, .cshrc for csh) can lead to errors. Check for the occurrence of stty in startup files. Avoid the commands that are described in Chapter 6, Verifying the Installation, in Sun N1 Grid Engine 6.1 Installation Guide.
Because batch jobs are usually run off line, only two ways exist to notify a job owner about error events and the like. One way is to log the error messages to a file, the other way is to send email.
Under some rare circumstances, for example, if the error log file can't be opened, email is the only way to directly notify the user. Error messages are logged to the grid engine system log file anyway, but usually the user would not look at the system log file. Therefore the email system should be properly installed for grid engine users.
-
Set up grid engine system definition files.
You can set up the following definition files for grid engine users:
-
qmon – Resource file for the grid engine system GUI. See Customizing QMON in Sun N1 Grid Engine 6.1 User’s Guide.
-
sge_aliases – Aliases for the path to the current working directory. See Using Path Aliasing.
-
sge_request – Default request definition file. See Configuring Default Requests.
-
Configuring User Access
The grid engine system has the following four categories of users:
-
Managers. Managers have full capabilities to manipulate the grid engine system. By default, the superusers of the master host and of any machine that hosts a queue instance have manager privileges.
-
Operators. Operators can perform many of the same commands as managers, except that operators cannot add, delete, or modify queues.
-
Owners. Queue owners are restricted to suspending and resuming, or disabling and enabling, the queues that they own. These privileges are necessary for successful use of qidle. Users are commonly declared to be owners of the queue instances that reside on their desktop workstations.
-
Users. Users have certain access permissions, as described in Configuring Users, but users have no cluster or queue management capabilities.
The following sections describe each category in more detail.
Configuring Manager Accounts
You can configure Manager accounts with QMON or from the command line.
Configuring Manager Accounts With QMON
On the QMON Main Control window, click the User Configuration button. The Manager tab appears, which enables you to declare which accounts are allowed to run any administrative command.
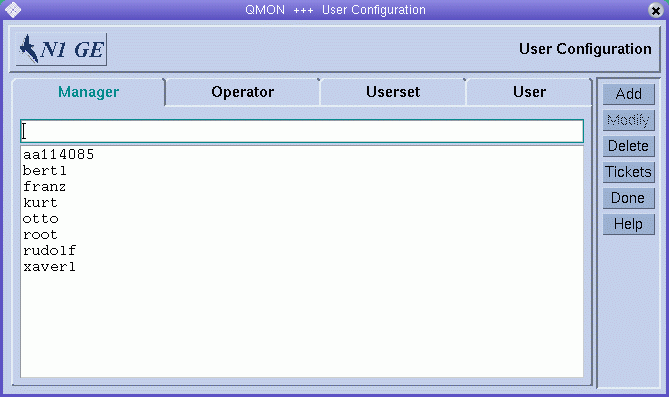
This tab lists all accounts that are already declared to have administrative permission.
To add a new manager account, type its name in the field above the manager account list, and then click Add or press the Return key.
To delete a manager account, select it, and then click Delete.
Configuring Manager Accounts From the Command Line
To configure a manager account from the command line, type the following command with appropriate options:
# qconf options |
The following options are available:
-
The -am option (add manager) adds one or more users to the list of grid engine system managers. By default, the root accounts of all trusted hosts are grid engine system managers. See About Hosts and Daemons for more information.
-
The -dm option (delete manager) deletes the specified users from the list of grid engine system managers.
-
The -sm option (show managers) displays a list of all grid engine system managers.
Configuring Operator Accounts
You can configure operator accounts with QMON or from the command line.
Configuring Operator Accounts With QMON
On the QMON Main Control window, click the User Configuration button, and then click the Operator tab.
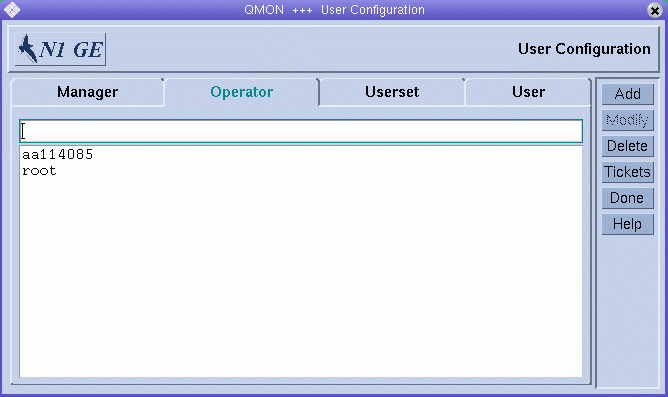
The Operator tab enables you to declare which accounts are allowed to have restricted administrative permission, unless the accounts are also declared to be manager accounts. See Configuring Manager Accounts With QMON.
This tab lists all accounts that are already declared to have operator permission.
To add a new operator account, type its name in the field above the operator account list, and then click Add or press the Return key.
To delete an operator account, select it, and then click Delete.
Configuring Operator Accounts From the Command Line
To configure an operator account from the command line, type the following command with appropriate options:
# qconf options |
The following options are available:
-
The -ao option (add operator) adds one or more users to the list of grid engine system operators.
-
The -do option (delete operator) deletes the specified users from the list of grid engine system operators.
-
The -so option (show operators) displays a list of all grid engine system operators.
Configuring User Access Lists
Any user with a valid login ID on at least one submit host and one execution host can use the grid engine system. However, grid engine system managers can prohibit access for certain users to certain queues or to all queues. Furthermore, managers can restrict the use of facilities such as specific parallel environments. See Configuring Parallel Environments for more information.
In order to define access permissions, you must define user access lists, which are made up of named sets of users. You use user names and UNIX group names to define user access lists. The user access lists are then used either to deny or to allow access to a specific resource in any of the following configurations:
-
Cluster configuration – see Basic Cluster Configuration
-
Queue configuration – see Configuring Subordinate Queues
-
Configuring of parallel environment interfaces – see Configuring Parallel Environments With QMON.
Configuring User Access Lists With QMON
On the QMON Main Control window, click the User Configuration button, and then click the Userset tab. The Userset tab appears.
Figure 4–1 Userset Tab
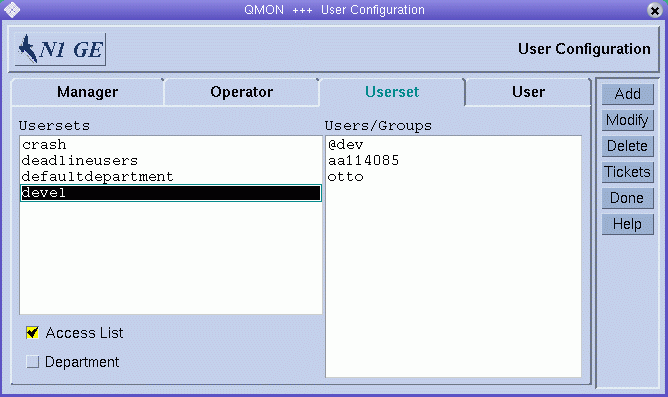
In the grid engine system, a userset can be either an Access List or a Department, or both. The two check boxes below the Usersets list indicate the type of the selected userset. This section describes access lists. Departments are explained in Defining Usersets As Projects and Departments.
The Usersets lists displays all available access lists. To display the contents of an access list, select it. The contents are displayed in the Users/Groups list.
Note –
The names of groups are prefixed with an @ sign.
To add a new userset, click Add.
To modify an existing userset, select it, and then click Modify.
To delete a userset, select it, and then click Delete.
When you click Add or Modify, an Access List Definition dialog box appears.
Figure 4–2 Access List Definition Dialog Box
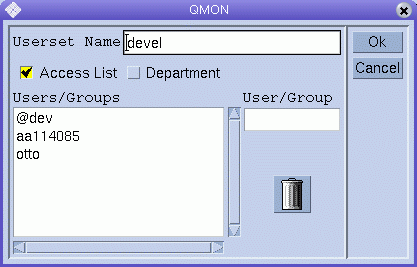
To add a new access list definition, type the name of the access list in the Userset Name field. If you are modifying an existing access list, its name is displayed in the Userset Name field.
To add a new user or group to the access list, type a user or group name in the User/Group field. Be sure to prefix group names with an @ sign.
The Users/Groups list displays all currently defined users and groups.
To delete a user or group from the Users/Groups list, select it, and then click the trash icon.
To save your changes and close the dialog box, click OK. Click Cancel to close the dialog box without saving changes.
Configuring User Access Lists From the Command Line
To configure user access lists from the command line, type the following command with appropriate options.
# qconf options |
The following options are available:
-
qconf -au user-name[,...]access-list-name[,...]
The -au option (add user) adds one or more users to the specified access lists.
-
The -Au option (add user access list from file) uses a configuration file, filename, to add an access list.
-
qconf -du user-name[,...] access-list-name [,...]
The -du option (delete user) deletes one or more users from the specified access lists.
-
qconf -dul access-list-name[,...]
The -dul option (delete user list) completely removes userset lists.
-
The -mu option (modify user access list) modifies the specified access lists.
-
The -Mu option (modify user access list from file) uses a configuration file, filename, to modify the specified access lists.
-
qconf -su access-list-name[,...]
The -su option (show user access list) displays the specified access lists.
-
The -sul option (show user access lists) displays all access lists currently defined.
Defining Usersets As Projects and Departments
Usersets are also used to define grid engine system projects and departments. For details about projects, see Defining Projects.
Departments are used for the configuration of the functional policy and the override policy. Departments differ from access lists in that a user can be a member of only one department, whereas one user can be included in multiple access lists. For more details, see Configuring the Functional Policy and Configuring the Override Policy.
A Userset is identified as a department by the Department flag, which is shown in Figure 4–1 and Figure 4–2. A Userset can be defined as both a department and an access list at the same time. However, the restriction of only a single appearance by any user in any department applies.
Configuring Users
You must declare user names before you define the share-based, functional, or override policies for users. See Configuring Policy-Based Resource Management With QMON.
If you do not want to explicitly declare user names before you define policies, the grid engine system can automatically create users for you, based on predefined default values. The automatic creation of users can significantly reduce the administrative burden for sites with many users.
To have the system create users automatically, set the Enforce User parameter on the Cluster Settings dialog box to Auto. To set default values for automatically created users, specify values for the following Automatic User Defaults on the Cluster Settings dialog box:
-
Override Tickets
-
Functional Shares
-
Default Project
-
Delete Time
For more information about the cluster configuration, see Basic Cluster Configuration.
Configuring User Objects With QMON
On the QMON Main Control window, click the User Configuration button, and then click the User tab. The User tab looks like the following figure:
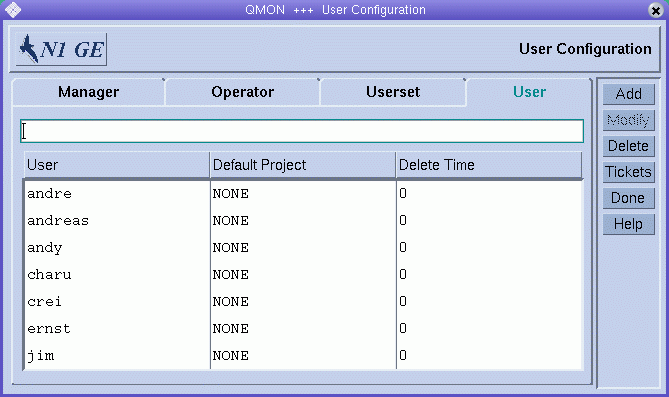
To add a new user, type a user name in the field above the User list, and then click Add or press the Return key.
To delete a user, select the user name in the User list, and then click Delete.
The Delete Time column is read-only. The column indicates the time at which automatically created users are to be deleted from the grid engine system. Zero indicates that the user will never be deleted.
You can assign a default project to each user. The default project is attached to each job that users submit, unless those users request another project to which they have access. For details about projects, see Defining Projects.
To assign a default project, select a user, and then click the Default Project column heading. A Project Selection dialog box appears.
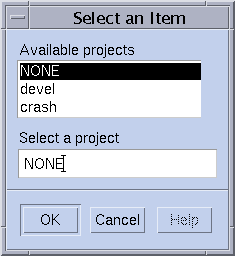
Select a project for the highlighted user entry.
Click OK to assign the default project and close the dialog box. Click Cancel to close the dialog box without assigning the default project.
Configuring User Objects From the Command Line
To configure user objects from the command line, type the following command with appropriate options:
# qconf options |
The following options are available:
-
The -auser option (add user) opens a template user configuration in an editor. See the user(5) man page. The editor is either the default vi editor or the editor specified by the EDITOR environment variable. After you save your changes and exit the editor, the changes are registered with sge_qmaster.
-
The -Auser option (add user from file) parses the specified file and adds the user configuration.
The file must have the format of the user configuration template.
-
The -duser option (delete user) deletes one or more user objects.
-
The -muser option (modify user) enables you to modify an existing user entry. The option loads the user configuration in an editor. The editor is either the default vi editor or the editor specified by the EDITOR environment variable. After you save your changes and exit the editor, the changes are registered with sge_qmaster.
-
The -Muser option (modify user from file) parses the specified file and modifies the user configuration.
The file must have the format of the user configuration template.
-
The -suser option (show user) displays the configuration of the specified user.
-
The -suserl option (show user list) displays a list of all currently defined users.
Defining Projects
Projects provide a means to organize joint computational tasks from multiple users. A project also defines resource usage policies for all jobs that belong to such a project.
Projects are used in three scheduling policy areas:
-
Share-based, when shares are assigned to projects – see Configuring the Share-Based Policy
-
Functional, when projects receive a percentage of the functional tickets – see Configuring the Functional Policy
-
Override, when an administrator grants override tickets to a project – see Configuring the Override Policy
Projects must be declared before they can be used in any of the three policies.
Grid engine system managers define projects by giving them a name and some attributes. Grid engine users can attach a job to a project when they submit the job. Attachment of a job to a project influences the job's dispatching, depending on the project's share of share-based, functional, or override tickets.
Defining Projects With QMON
Grid engine system managers can define and update definitions of projects by using the Project Configuration dialog box.
To define a project, on the QMON Main Control window, click the Project Configuration button. The Project Configuration dialog box appears.
Figure 4–3 Project Configuration Dialog Box
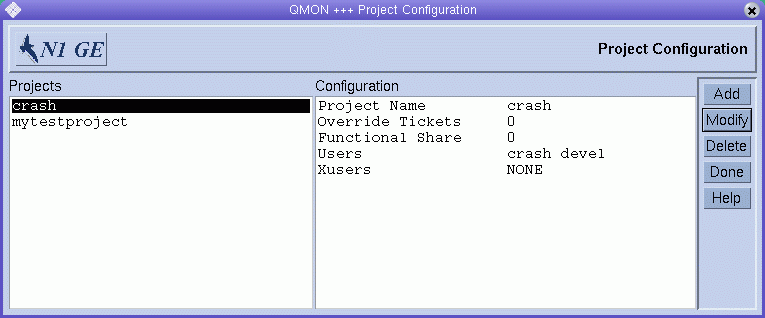
The currently defined projects are displayed in the Projects list.
The project definition of a selected project is displayed under Configuration.
To delete a project immediately, select it, and then click Delete.
To add a new project, click Add. To modify a project, select it, and then click Modify. Clicking Add or Modify opens the Add/Modify Project dialog box.

The name of the selected project is displayed in the Name field. The project defines the access lists of users who are permitted access or who are denied access to the project.
Users who are included in any of the access lists under User Lists have permission to access the project. Users who are included in any of the access lists under Xuser Lists are denied access to the project. See Configuring Users for more information.
If both lists are empty, all users can access the project. Users who are included in different access lists that are attached to both the User Lists and the Xuser Lists are denied access to the project.
You can add access lists to User Lists or Xuser Lists, and you can remove access lists from either list. To do so, click the button at the right of the User Lists or the Xuser Lists.
The Select Access Lists dialog box appears.
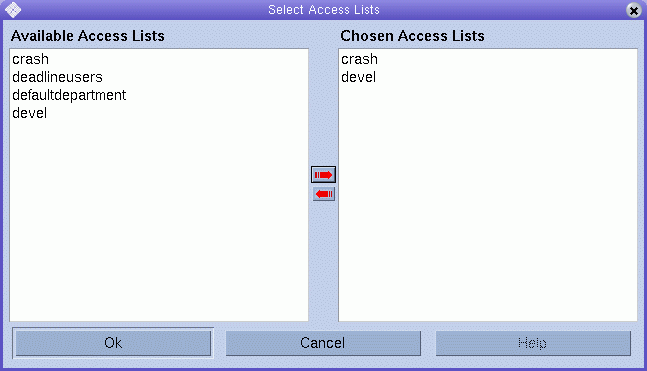
The Select Access Lists dialog box displays all currently defined access lists under Available Access Lists. The dialog box displays the attached lists under Chosen Access Lists. You can select access lists in either list. You can move access lists from one list to the other by using the red arrows.
Click OK to save your changes and close the dialog box. Click Cancel to close the dialog box without saving your changes.
Defining Projects From the Command Line
To define projects from the command line, type the following command with appropriate options:
# qconf options |
The following options are available:
-
The -aprj option (add project) opens a template project configuration in an editor. See the project(5) man page. The editor is either the default vi editor or the editor specified by the EDITOR environment variable. After you save your changes and exit the editor, the changes are registered with sge_qmaster.
-
The -Aprj option (add project from file) parses the specified file and adds the new project configuration. The file must have the format of the project configuration template.
-
qconf -dprj project-name[,...]
The -dprj option (delete project) deletes one or more projects.
-
The -mprj option (modify project) enables you to modify an existing user entry. The option loads the project configuration in an editor. The editor is either the default vi editor or the editor specified by the EDITOR environment variable. After you save your changes and exit the editor, the changes are registered with sge_qmaster.
-
The -Mprj option (modify project from file) parses the specified file and modifies the existing project configuration. The file must have the format of the project configuration template.
-
The -sprj option (show project) displays the configuration of a particular project.
-
The -sprjl option (show project list) displays a list of all currently defined projects.
Using Path Aliasing
In Solaris and in other networked UNIX environments, users often have the same home directory, or part of it, on different machines. For example, the directory might be made accessible across NFS. However, sometimes the home directory path is not exactly the same on all machines.
For example, consider user home directories that are available across NFS and automounter. A user might have a home directory /home/foo on the NFS server. This home directory is accessible under this path on all properly installed NFS clients that are running automounter. However, /home/foo on a client is just a symbolic link to /tmp_mnt/home/foo. /tmp_mnt/home/foo is the actual location on the NFS server from where automounter physically mounts the directory.
A user on a client host might use the qsub -cwd command to submit a job from somewhere within the home directory tree. The -cwd flag requires the job to be run in the current working directory. However, if the execution host is the NFS server, the grid engine system might not be able to locate the current working directory on that host. The reason is that the current working directory on the submit host is /tmp_mnt/home/foo, which is the physical location on the submit host. This path is passed to the execution host. However, if the execution host is the NFS server, the path cannot be resolved, because its physical home directory path is /home/foo, not /tmp_mnt/home/foo.
Other occasions that can cause similar problems are the following:
-
Fixed NFS mounts with different mount point paths on different machines. An example is the mounting of home directories under /usr/people on one host and under /usr/users on another host.
-
Symbolic links from outside into a network-available file system
To prevent such problems, grid engine software enables both the administrator and the user to configure a path aliasing file. The locations of two such files are as follows:
-
sge-root/cell/common/sge_aliases — A global cluster path-aliasing file for the cluster
-
$HOME/.sge_aliases — A user-specific path-aliasing file
Note –Only an administrator should modify the global file.
Format of Path-Aliasing Files
Both path-aliasing files share the same format:
-
Blank lines and lines that begin with a # sign are skipped.
-
Each line, other than a blank line or a line preceded by #, must contain four strings separated by any number of blanks or tabs.
The first string specifies a source path, the second a submit host, the third an execution host, and the fourth the source path replacement.
-
Both the submit host and the execution host strings can be an * (asterisk), which matches any host.
How Path-Aliasing Files Are Interpreted
-
After qsub retrieves the physical current working directory path, the global path-aliasing file is read, if present. The user path-aliasing file is read afterwards, as if the user path-aliasing file were appended to the global file.
-
Lines not to be skipped are read from the top of the file, one by one. The translations specified by those lines are stored, if necessary.
A translation is stored only if both of the following conditions are true:
-
The submit host string matches the host on which the qsub command is run.
-
The source path forms the initial part either of the current working directory or of the source path replacements already stored.
-
-
After both files are read, the stored path-aliasing information is passed to the execution host along with the submitted job.
-
On the execution host, the path-aliasing information is evaluated. The source path replacement replaces the leading part of the current working directory if the execution host string matches the execution host. In this case, the current working directory string is changed. To be applied, subsequent path aliases must match the replaced working directory path.
The files are interpreted as follows:
Example 4–1 is an example how the NFS automounter problem described earlier can be resolved with an aliases file entry.
Example 4–1 Example of Path-Aliasing File
# cluster global path aliases file # src-path subm-host exec-host dest-path /tmp_mnt/ * * / |
Configuring Default Requests
Batch jobs are normally assigned to queues with respect to a request profile. The user defines a request profile for a particular job. The user assembles a set of requests that must be met to successfully run the job. The scheduler considers only those queues that satisfy the set of requests for this job.
If the user does not specify any requests for a job, the scheduler considers any queue to which the user has access without further restrictions. However, grid engine software enables you to configure default requests that define resource requirements for jobs even when the user does not specify resource requirements explicitly.
You can configure default requests globally for all users of a cluster, as well as privately for any user. The default request configuration is stored in default request files. The global request file is located under sge-root/cell/common/sge_request. The user-specific request file can be located either in the user's home directory or in the current working directory. The working directory is where the qsub command is run. The user-specific request file is called .sge_request.
-
The global default request file
-
The user default request file in the user's home directory
-
The user default request file in the current working directory
If these files are present, they are evaluated for every job. The order of evaluation is as follows:
Note –
The requests specified in the job script or supplied with the qsub command take precedence over the requests in the default request files. See Chapter 3, Submitting Jobs, in Sun N1 Grid Engine 6.1 User’s Guide for details about how to request resources for jobs explicitly.
You can prevent the grid engine system from using the default request files by using the qsub -clear command, which discards any previous requirement specifications.
Format of Default Request Files
The format of both the local and the global default request files is as follows:
-
Default request files can contain any number of lines. Blank lines and lines that begin with a # sign are skipped.
-
Each line not to be skipped can contain any qsub option, as described in the qsub(1) man page. More than one option per line is allowed. The batch script file and the argument options to the batch script are not considered to be qsub options. Therefore these items are not allowed in a default request file.
-
The qsub -clear command discards any previous requirement specifications in the currently evaluated request file or in request files processed earlier.
Suppose a user's local default request file is configured the same as test.sh, the script in Example 4–2.
Example 4–2 Example of Default Request File
# Local Default Request File # exec job on a sun4 queue offering 5h cpu -l arch=solaris64,s_cpu=5:0:0 # exec job in current working dir -cwd |
To run the script, the user types the following command:
% qsub test.sh |
The effect of running the test.sh script is the same as if the user specified all qsub options directly in the command line, as follows:
% qsub -l arch=solaris64,s_cpu=5:0:0 -cwd test.sh |
Note –
Like batch jobs submitted using qsub, interactive jobs submitted using qsh consider default request files also. Interactive or batch jobs submitted using QMON also take these request files into account.
- © 2010, Oracle Corporation and/or its affiliates
